11 Fixes to Windows Modules Installer Worker High CPU
You can learn 11 different solutions and one easiest approach to fix the Windows Modules Installer Worker High CPU problem. Please read on.
By Rosie Updated on August 28, 2025
How to fix Windows Modules Installer Worker High CPU Usage?
“I have a desktop computer with Windows 10 and it always performed well. But recently it has suddenly become laggy and I see Windows Module Installer Worker in Task Manager constantly running at 50% CPU usage, which keeps almost all day whenever I start the computer.
Even if I click on End Task, it still reappears after 5 seconds. I make sure that there is nothing installed on the computer that could be causing this problem! This problem brings a lot of trouble, so how do I fix Windows Modules Installer Worker high disk usage in Windows 10? I need your help very much.”
– Anonymous user

Windows Modules Installer Worker (TiWorker.exe) is a core Windows component that checks and installs updates for Windows and other Microsoft products. It plays an important role in keeping your system running stably. In general, Windows Modules Installer Worker is fine, but sometimes it may cause abnormally high CPU usage and make your computer lag.
So how do we solve the problem of persistent high CPU usage? This article provides the reasons and 11 corresponding solutions to ensure your computer's CPU usage is back to normal.
Easiest Way: Restore Windows 10 to An Earlier Version
If you have backed up your system before, you can solve the problem easily by restoring your system to the previous version. And AOMEI Backupper Standard will be a good choice to help you achieve the goal.

-
Free and Easy to Use: It is completely free to download and use, and the software is user-friendly with an intuitive interface, making it easy for both beginners and advanced users.
-
Universal Restore (Professional Version): The Universal Restore feature in the Professional or higher versions allows you to restore a system backup onto different hardware. If you need to transfer your system backup to a new computer with different components (e.g., CPU, motherboard, or hard drive), ensure a smooth and quick restoration process.
-
Restores in Just a Few Clicks: With AOMEI Backupper, restoring your system or files is straightforward. Whether you're restoring to the same machine or a new one, the process is smooth and efficient, allowing you to get back to work quickly.
Next, we'll introduce how to restore your system with AOMEI Backupper Standard, but you need to complete a system backup before you start. In other words, you have backed up your system before the Windows Modules Installer Worker High CPU issue. Then you can follow the graphic tutorial below to restore the system.
Step 1. Download AOMEI Backupper Standard, install, and open it. Go to the Home tab and click Restore to select a task or image file.

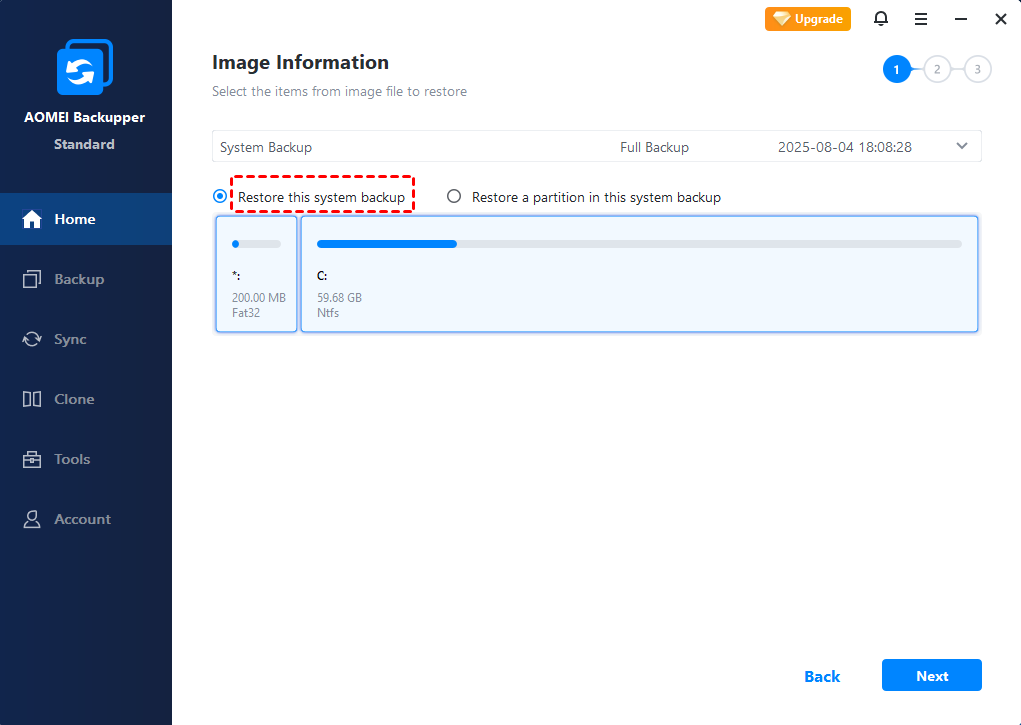
Step 2. Select Restore this system backup and click Next.
Step 3. By default, it will restore to original location. You can also consider using "Restore to a new location" if it's not detected.
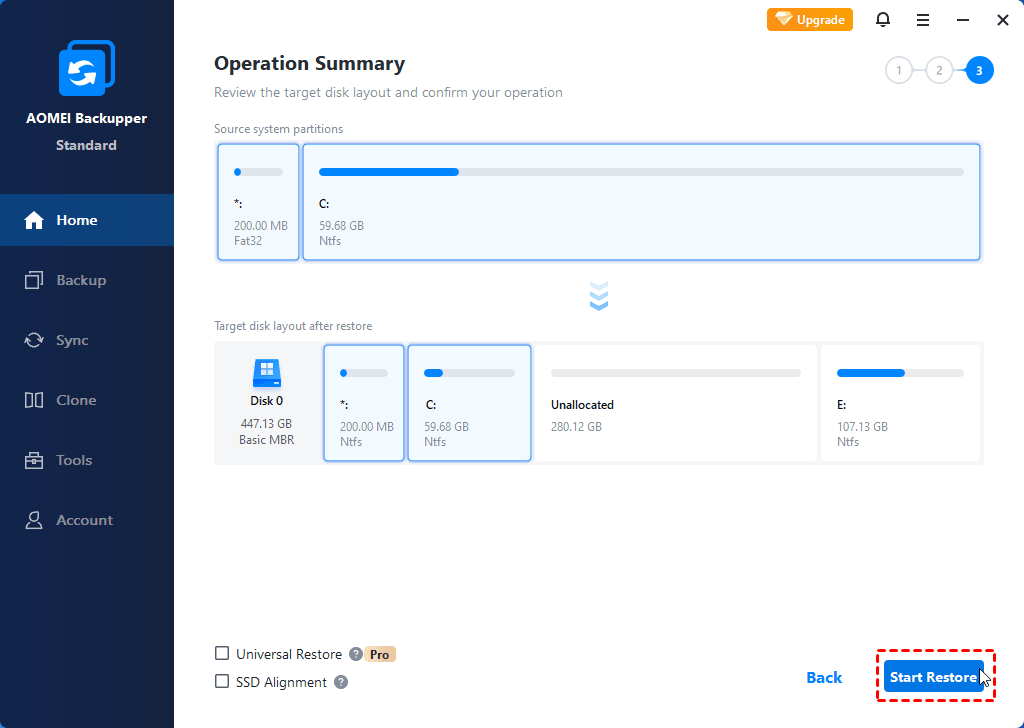
Step 4. Confirm your operations and click Start Restore.
- Notes:✎...
- The Standard version supports restoring the system image on the same computer. If you want to restore the system image to another computer, please upgrade to the Pro version and use the Universal Restore feature.
- When your computer fails to boot with an unexpected error, you can use AOMEI Backupper to create bootable media. Then boot the failed computer to WinPE and perform a normal system restore.
How to Fix Windows Modules Installer Worker High CPU
If you don't have a system backup, and you need a Windows Modules Installer Worker High CPU solution, you may receive some suggestions to disable it. Although you can do that, it will result in Windows systems can't keep up to date and may directly affect your user experience.
Windows Modules Installer Worker is just one of the core Windows tools, not a virus. And Windows itself has various defenses to prevent viruses from pretending to be existing Windows services. So you don't have to disable it.
Although it is not recommended that you disable Windows Modules Installer Worker, there are still other useful ways to solve Windows Installer CPU Usage too high. Next, we'll introduce 11 different options to fix the problem in detail.
- Change Internet Settings
- Delete the SoftwareDistribution folder
- Run Windows Troubleshoot
- Disable Windows 10 automatic updates
- Restart the Windows Update service
- Change Windows Module Installer and Windows Update to manual
- Scan and repair corrupted system files using the System File Checker tool
- Use the DISM tool to find and repair Windows corruption
- Perform a clean boot
- Lower the TiWorker process priority
- Stop trusted installers
Method 1. Change Internet Settings
You can prevent Windows from automatically updating by changing Internet settings. You can choose any of the ways based on the network you are currently using.
Wi-Fi
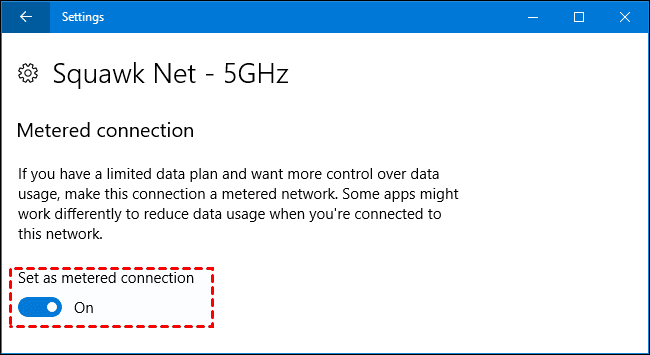
Click the Start menu button, and navigate to Settings > Network & Internet > Wi-Fi > Advanced Options, then click the On button below Set as metered connection.
Ethernet
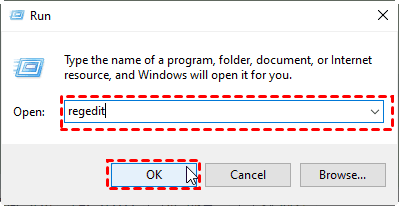
Step 1. Press Win+R together to open the Run window, then type regedit and press Enter.
Step 2. Navigate to the path below, then right-click DefaultMediaCost and select Permissions in the drop-down menu.
HKEY_LOCAL_MACHINE > SOFTWARE > Microsoft > Windows NT > CurrentVersion > NetworkList > DefaultMediaCost
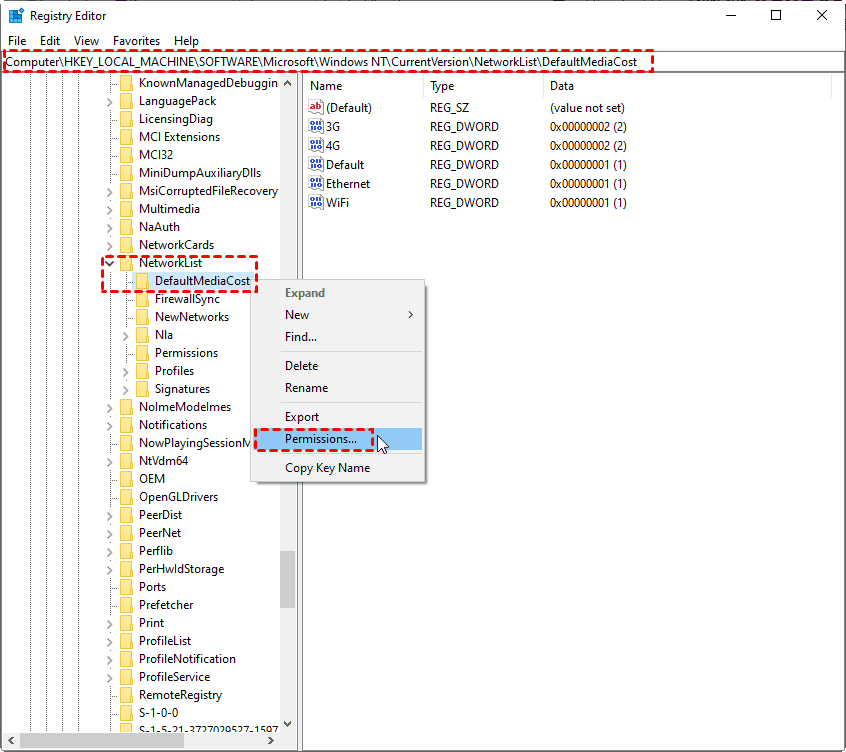
Step 3. Click the Add button, enter the User Name in the pop-up window, then click the Check Names button and click OK.

Step 4. Select the user you just added, tick Allow Full Control box and click OK.

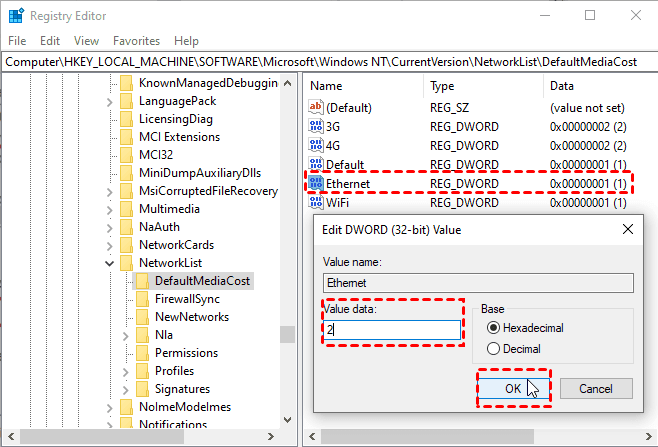
Step 5. Return to the main interface of Registry Editor, find and double-click Ethernet. Then change Value data to 2 and click OK.
Method 2. Delete the SoftwareDistribution Folder
The SoftwareDistribution folder is mainly used to store new Windows updates. If there are corrupted files stored in this folder, it may cause high CPU usage problems in Windows Modules Installer Worker.
In addition, Windows 10 will automatically generate a new folder with the same name when a new Windows update appears. So, there is no risk in deleting the SoftwareDistribution folder. You need to perform this operation with an administrator account.
First, we need to temporarily disable the Windows Update service to avoid errors when deleting the SoftwareDistribution folder. Then follow the corresponding graphic tutorial to delete the SoftwareDistribution folder.
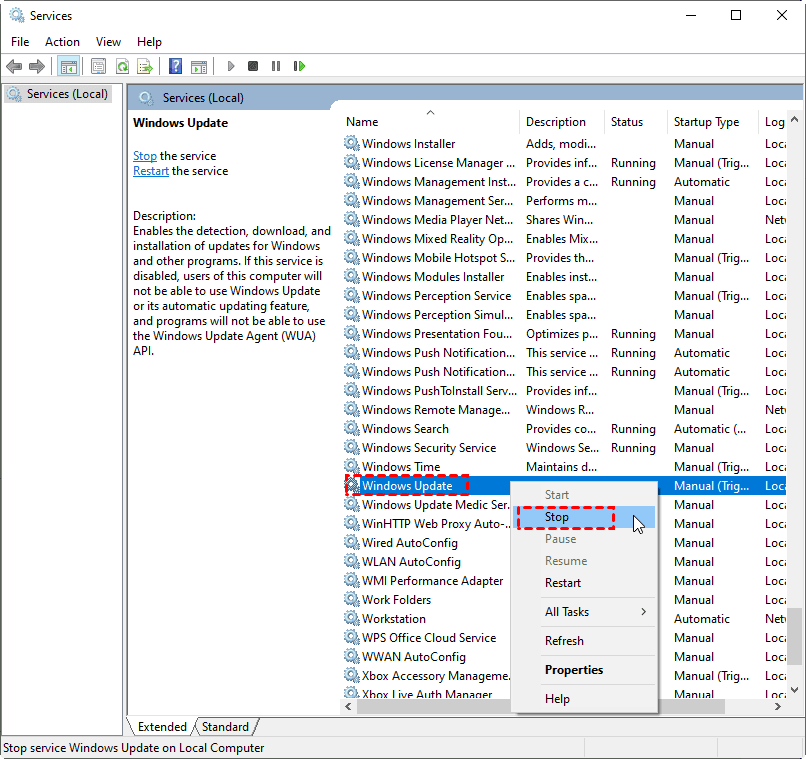
Temporarily Disable the Windows Update Service
Type services.msc in the Run window and press Enter to open the Services window. Find and right-click the Windows Update service then select Pause/Stop in the drop-down menu. You can refer to the above method to turn on the Windows Update service after the problem is solved.
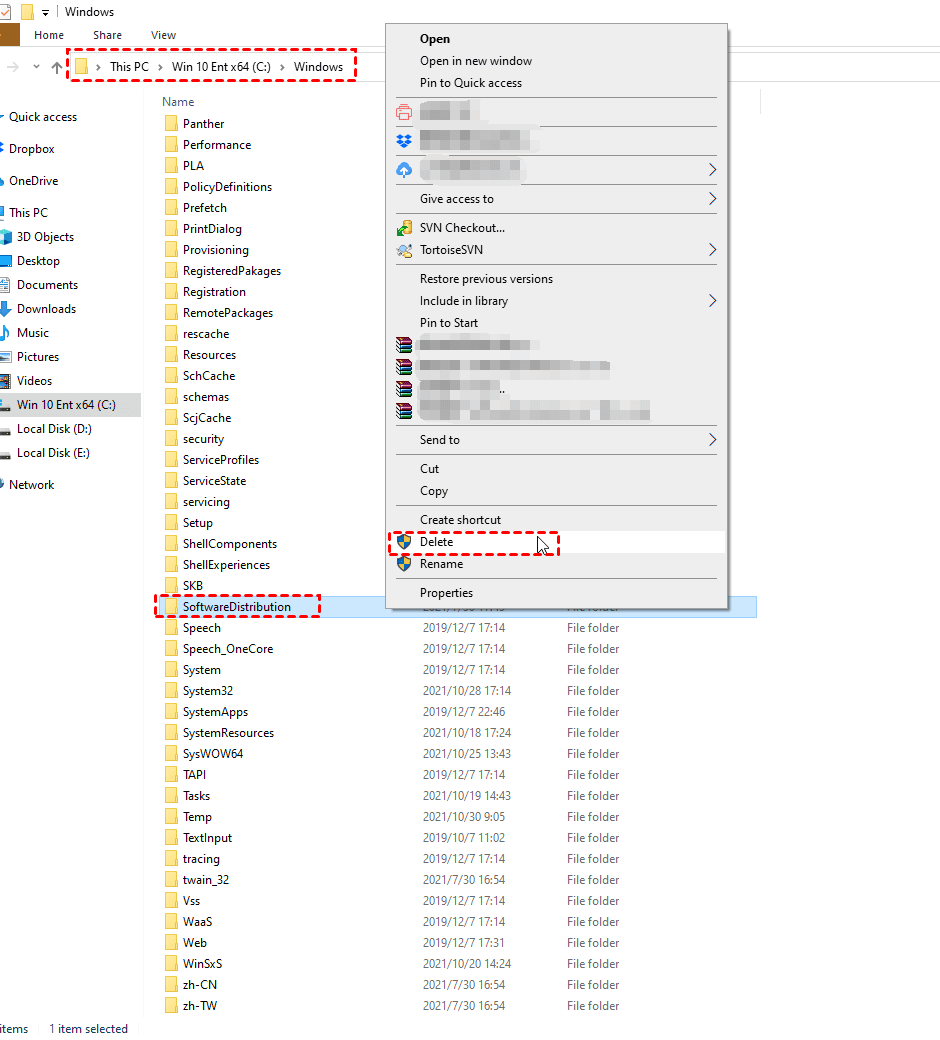
Delete the SoftwareDistribution Folder
Open File Explorer on the desktop, then go to the Windows folder. Locate and right-click the SoftwareDistribution folder, then select Delete in the drop-down menu.
After restarting your computer, then navigate to the following path to refresh Windows Update.
Settings > Update and Security > Windows Update > Check for update
Method 3. Run Windows Troubleshooter
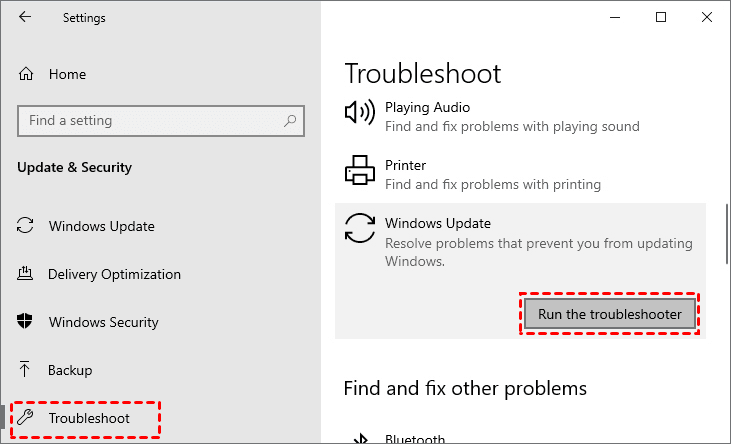
Microsoft has released a specified tool called Troubleshoot to help you fix Windows Update issues. This tool is free and works even if you don't have a Microsoft account. So, you can run the tool and see if it can help you fix the problem.
First, click the Start button and select Settings > Update and Security > Troubleshoot, find and click Windows Update, then click the Run the troubleshooter button. Finally, follow the prompts to execute the repair process.
Method 4. Disable Windows 10 Automatic Updates
Since Windows Modules Installer Worker is a core component of Windows Update, the Windows Modules Installer Worker High CPU issue can be solved by disabling Windows 10 automatic updates.
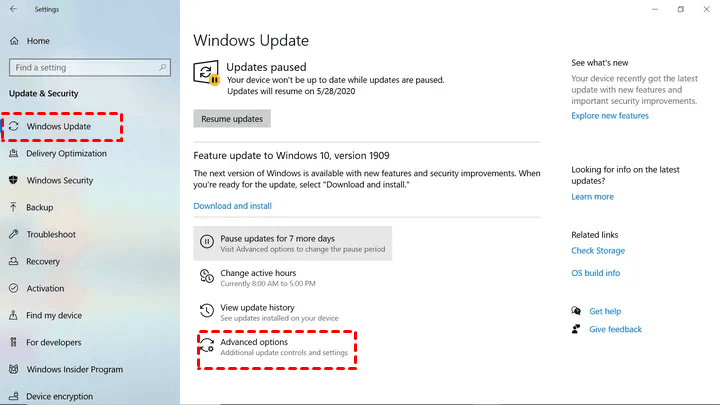
Step 1. Press Win+I to open the Windows Settings, find and click the Update & Security option, switch the tab to Windows Update in the left sidebar, and click Advanced Options in the right window.
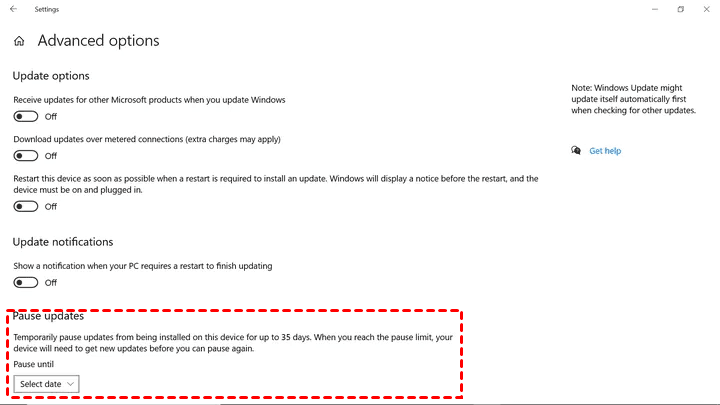
Step 2. In the Advanced options window, scroll down to Pause updates and click the option box to select date you want to pause the update.
Method 5. Restart Windows Update Service
Sometimes, you just need to simply restart Windows Update Service to help you fix Windows Modules Installer Worker High CPU problems.
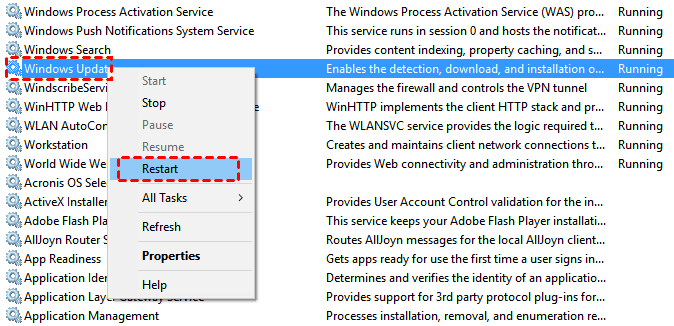
Step 1. Type services.msc in the Run window and press Enter.
Step 2. Scroll down to find Windows Update, right-click on it and select the Restart option in the drop-down menu.
Method 6. Change Windows Module Installer and Windows Update to Manual
Feedback from some users shows that changing Windows Module Installer and Windows Update to manual helps fix the Windows Modules Installer Worker High CPU issue.
Step 1. Open the Services window, find and double-click Windows module installer in the right list.
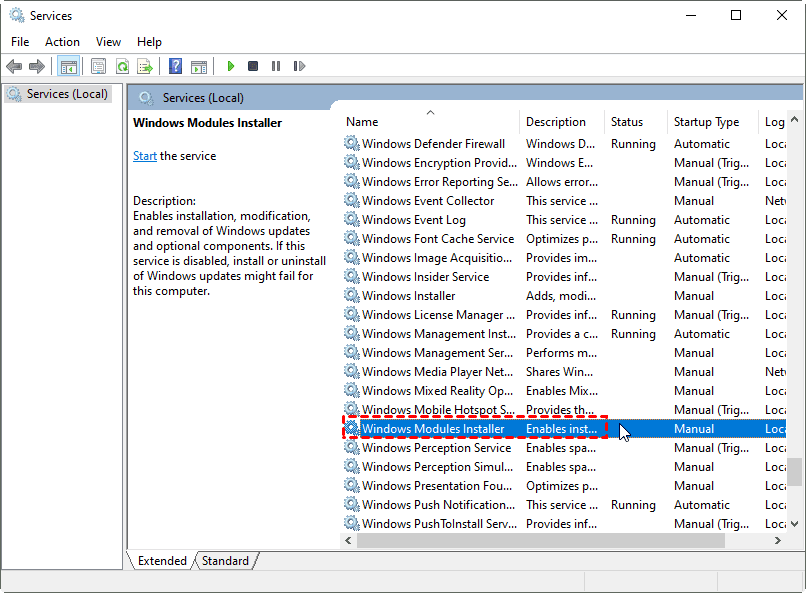
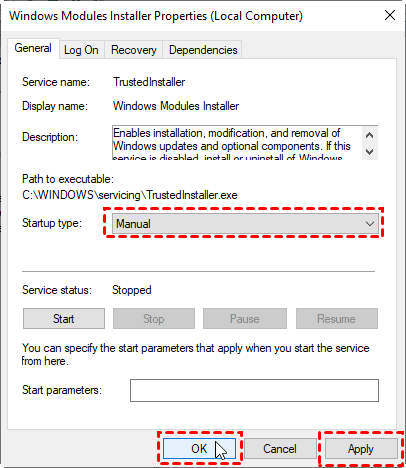
Step 2. In the Windows module installer properties window, set it to the Manual option, then click Apply > OK to save this change.
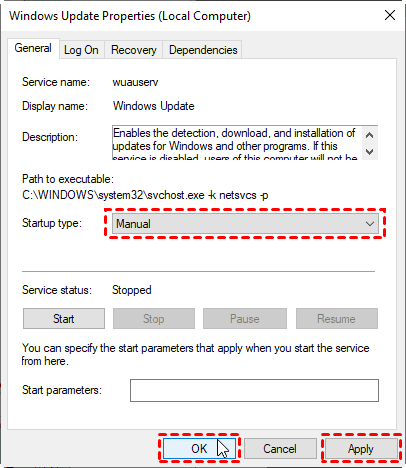
Step 3. Find and double-click Windows update in the right list, set it to Manual option, then click Apply > OK to save this change.
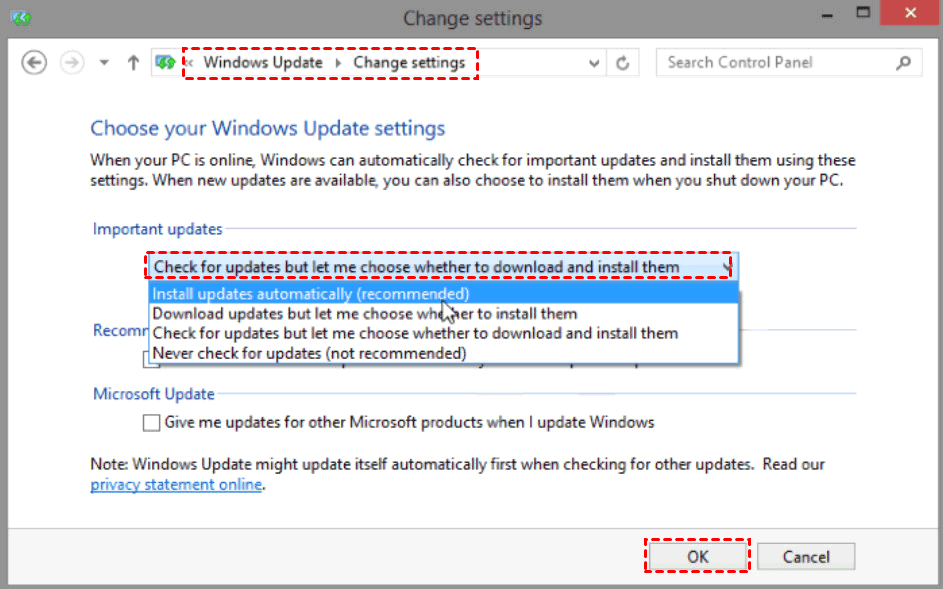
Step 4. Type control in the Run window and press Enter to open the Control Panel. Find and click on the Windows update option then click on the Change settings button on the left.
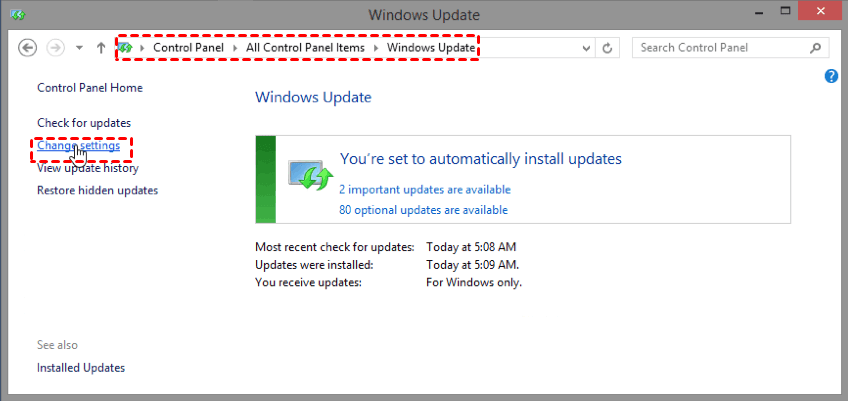
Step 5. Change the settings to Check for updates but let me choose whether to download and install them, then click OK to save this change. Finally, restart it.
Note:
Since you set Windows Update to manual, you must check Windows Update regularly (weekly or monthly) by yourself, which will help improve your Windows system stability.
Method 7. Scan and Repair Corrupted System Files using System File Checker Tool
Your computer may face problems with Windows Modules Installer Worker High CPU when one or more system files related to Windows updates become corrupted. To fix it, use the System File Checker tool to automatically scan and repair these files.
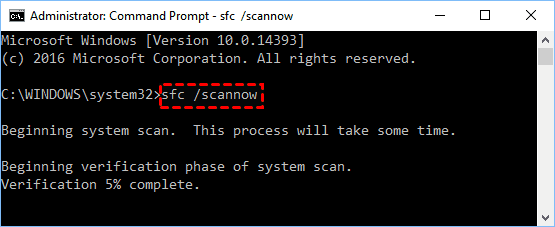
Step 1. Press Win+X to open the Windows menu and select the Command Prompt (Admin) option.
Step 2. Type sfc /scannow in Command Prompt and press Enter to execute this command. The System File Checker tool will run automatically. You just need to wait for the process to complete and then restart your computer.
Note:
Do not interrupt the System File Checker tool while it is running, such as shut down or restart, because it may have serious consequences.
Method 8. Use the DISM Tool to Find and Repair Windows Corruptions
The DISM tool has an alternative name called System Update Preparation Tool (Deployment Image Servicing and Management). It helps Windows users by scanning the entire Windows system to identify corrupted files and repair them automatically. If the System File Checker tool has failed, you can use this tool to try to fix the problem.
Type Dism.exe /Online /Cleanup-Image /Restorehealth in Command Prompt (Admin) and press Enter to execute this command. Next, you just need to wait for the DISM tool to automatically scan and repair your computer's corrupted files.

Method 9. Perform a Clean Boot
You can perform a clean boot with the Windows Configuration Tool to fix the Windows Modules Installer Worker High CPU problem.
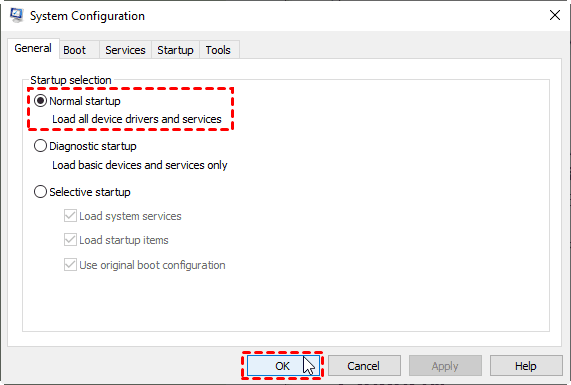
Step 1. Type msconfig.exe in the Run window and press OK.
Step 2. In the System Configuration window, under the Startup selection section, select Normal startup and click OK. Then restart the computer to make the changes take effect.
Method 10. Lower the TiWorker Process Priority
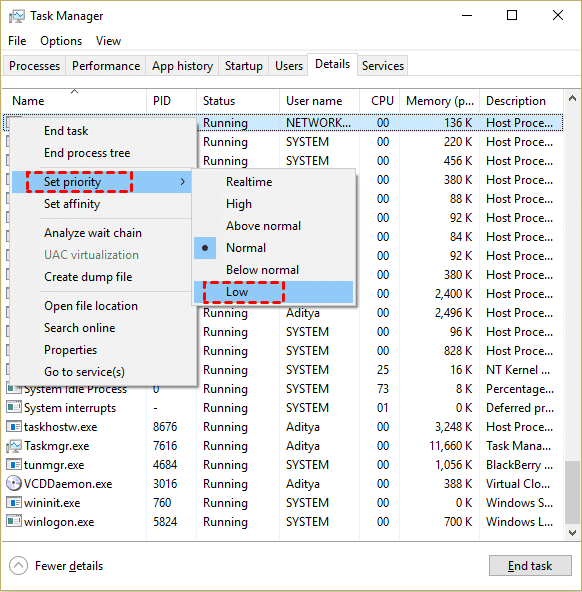
When open Task Manager, you can find TiWorker process, which is Windows Modules Installer Worker. You can reduce CPU usage by changing the priority of this process.
Press Ctrl+Shift+Esc to open Task Manager, find and right-click TiWorker.exe process, then set Set priority to Low.
Method 11. Stop Trusted Installers
Feedback from some users indicates that stopping the Trusted Installer Service helps fix the Windows Modules Installer Worker High CPU problem.
Step 1. Type regedit in the Run window and press Enter to open the Registry Editor. Then navigate to the following path.
Computer\HKEY_LOCAL_MACHINE\SYSTEM\CurrentControlSet\Services\TrustedInstaller
Step 2. Find and double-click the Start file in the right window. Then set Value data to 3, and click OK to save the changes.

Bonus: Reasons for Windows Modules Installer Worker High CPU Usage
There are some possible reasons that the Windows Modules Installer Worker (TiWorker.exe) is using a lot of CPU power on your computer, especially during or after a Windows update. Make clear of the reasons to keep you away from the trouble again in the future.
Windows Update Process:
The Windows Modules Installer Worker is responsible for updating system files and backing up old data during updates. This process is resource-intensive and can cause high CPU usage temporarily.
Update Completion Pending:
The process may still be working in the background to complete the update, even though the update appears to be done. CPU usage should drop once the update is fully completed.
Long-Running Update:
If the high CPU usage lasts for more than 2 hours, the update may have encountered an issue and is not completing properly.
Faulty or Incomplete Update:
Sometimes updates fail or are applied incorrectly, leading to high CPU usage as the system repeatedly tries to finish the process.
Background Processes or Other Software Conflicts:
Other programs or processes running in the background may conflict with Windows updates, causing the installer worker to consume more resources.
In any of these cases, it’s essential to try the above solutions to resolve the issue to restore normal system performance.
Summary
If you are struggling with Windows Modules Installer Worker High CPU problem, you can try the 11 solutions listed in the article. If none of them help you fix the problem, or you consider changing the registry is too dangerous, it is recommended to use AOMEI Backupper Standard to restore your Windows 10 system to an earlier version.
AOMEI Backupper Standard can help you automatically backup your system and restore it to any previous version if needed. Besides, its disk cloning feature can help you to transfer Windows 10 from SSD to another hard drive as well as upgrade to Windows 11.