Top 2 Ways to Sync Local Folders to Synology NAS on Windows
It is a good idea to backup/share files to Synology NAS. Learn how to sync your PC folders to Synology NAS easily from this page.
By Lily Updated on March 24, 2026
What is Synology NAS used for?
Synology NAS enjoys great popularity among computer users. For home users, Synology NAS makes it easy for them to access various files by multiple users. It also helps to safeguard their data from Windows, macOS, Linux, and mobile devices.
For enterprise users, Synology NAS provides strong business data protection and seamless file sharing and syncing across various platforms. Users can create, edit, and sync documents, spreadsheets and slides with real-time communication.
If you want to backup your PC folders to Synology NAS or share local folders with family or colleagues through Synology NAS, read on to get the how-to guide.
How to have Synology synchronize folders to NAS step by step
Here I’m going to show you how to have Synology sync folders with PC in two efficient ways. Method 1 applies to different NAS including Synology, QNAP, and WD My Cloud, etc while method 2 applies to Synology NAS only.
Method 1. Synology sync local folders to NAS using a handy freeware
If you want an easy way to sync multiple PC folders with Synology NAS, the best free file sync software - AOMEI Backupper Standard can help you.

-
It enables you to sync files between various sources and destinations, such as sync two external hard drives, sync PC to PC and sync local folders to NAS or cloud drives, etc.
-
It allows you to perform file sync on a schedule. For frequently changed data, you can choose the “Daily” mode. For less frequently changed data, there are the “Weekly” and “Monthly” modes.
-
It supports all Windows PC operating systems (Windows 11/10/8.1/8/7, 32 bit and 64 bit).
Click the download button above to download and install AOMEI Backupper on your computer. Then, follow the instructions below to sync local folders to Synology NAS via AOMEI Backupper:
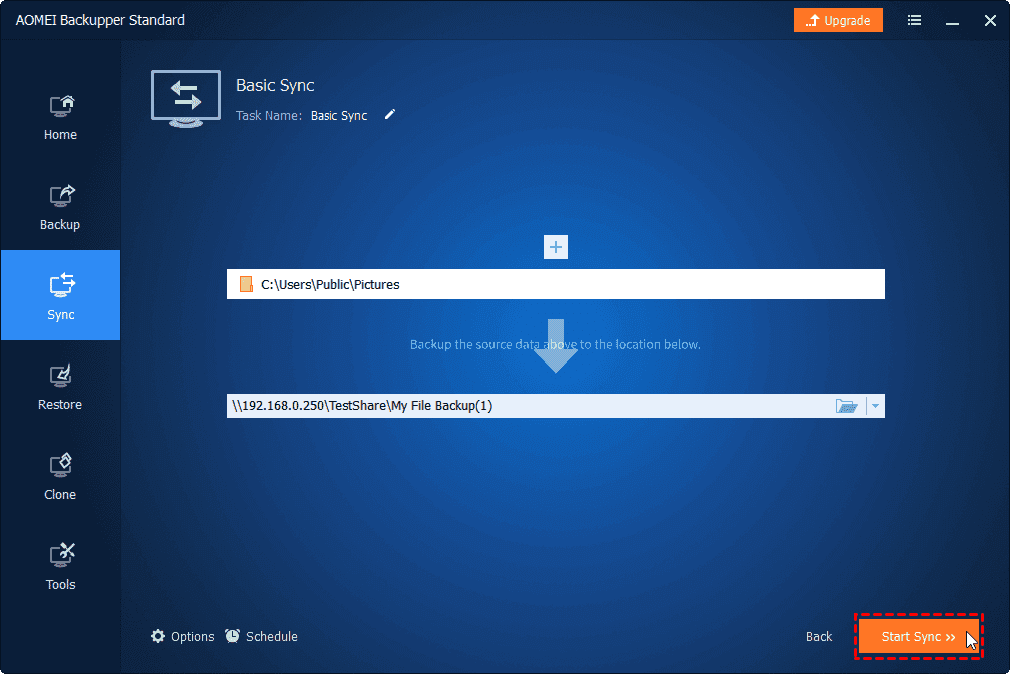
Step 1. Run AOMEI Backupper, click Sync and select Basic Sync.

Tip: To enjoy more advanced sync modes – Mirror Sync, Real-Time Sync and Two-Way Sync, you may upgrade to higher editions.
Step 2. Edit the task name based on your needs. Click Select Source to select the folder(s) you want to sync to Synology NAS. After adding the first folder, you can click Add Source to add the second or more folders.

Step 3. Click the destination box > NAS > Add NAS. In the pop-up window, type the IP address of the Synology NAS and click the right arrow. Type username and password if it is needed.
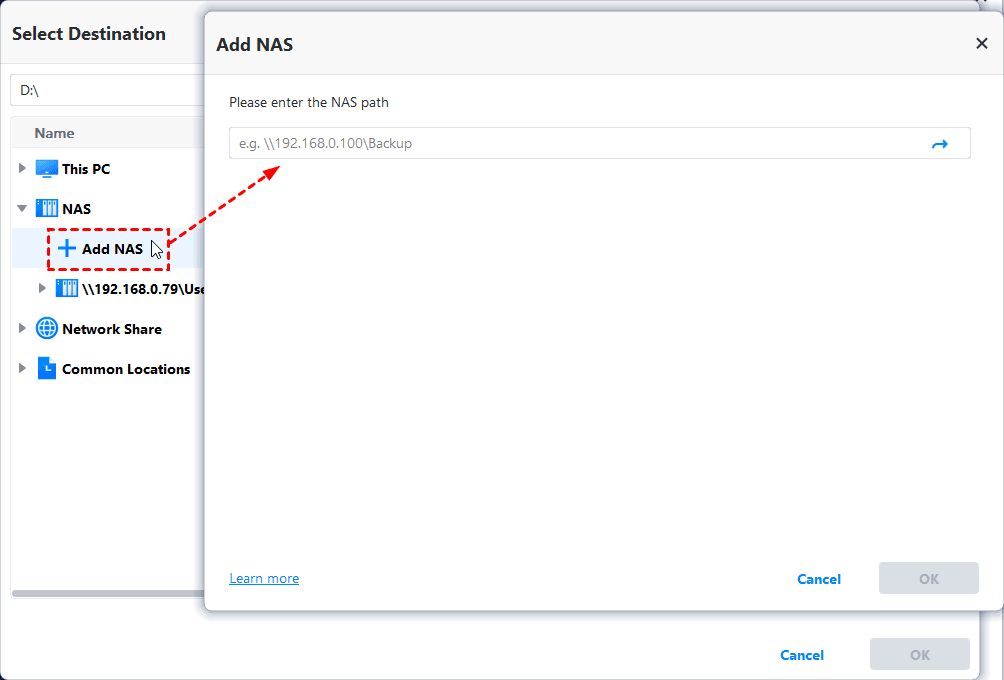
Step 4. Choose one folder on your Synology NAS to store the synced data and click OK.
Step 5. Confirm the operation and click Start Sync to begin.
✍ Notes:
-
You can configure more sync settings from Options and set up automatic sync from Schedule Sync.
-
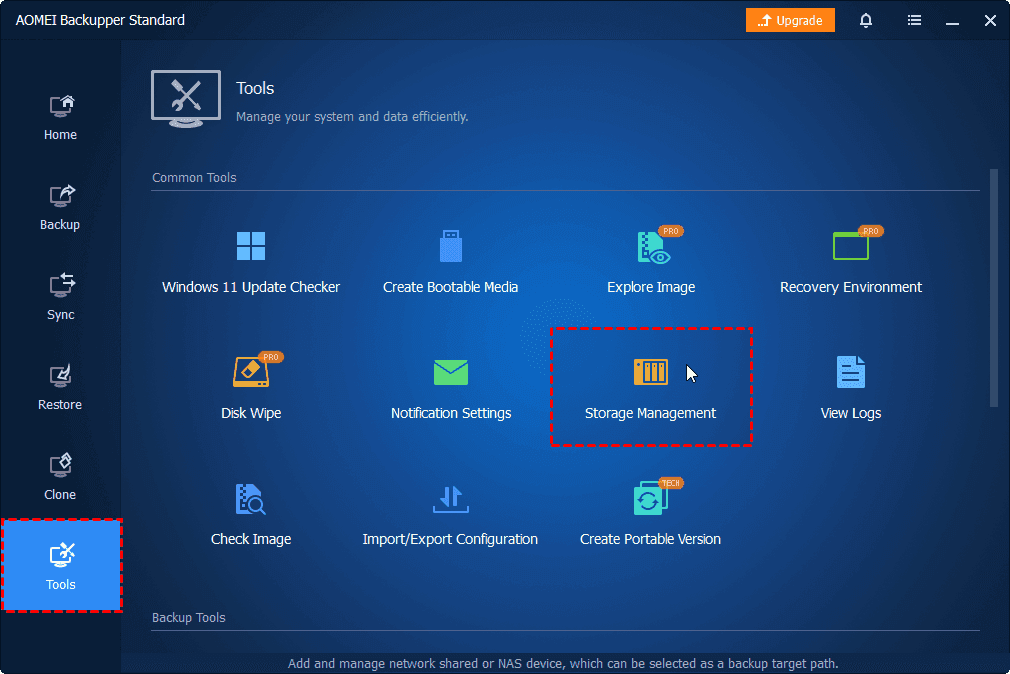
If you have created sync tasks with different NAS devices, you can go to Tools > Storage Management to manage your NAS storage.
- If you create an AOMEI account, you are able to backup files to AOMEI Cloud. It offers you 1TB of free storage for 15 days after you sign up for an AOMEI account.
Method 2. Sync folders to Synology NAS via Synology Drive
Synology used to provide an application called Cloud Station Drive to help users sync files between Synology NAS and computer over the Internet. But now Cloud Station Server will be succeeded by a new application, Synology Drive Server, which covers all of the original key functionalities. It enables you to sync files, view history versions, and get share links.
This article will show you how to use Synology Drive Server for file synchronization. If you still want to use Cloud Station to have Synology sync Windows folders to NAS, however, there is a very detailed official tutorial for your reference.
▶ To use Synology Drive, you need to do some preparations:
- Install the Synology Drive Server package on the NAS from the Package Center app.

- For each NAS user who wants to store files and access their home directories on Synology Drive, you must enable the user home service on the Synology NAS. To enable the user home service, navigate to Control Panel -> User & Group.

▶ To perform Synology sync local folders:
- Once Synology Drive Server is installed on the NAS and user home service is enabled, you can access Synology Drive from your favorite web browser. Click on the Synology Drive app from the DSM web interface. Synology Drive web app should be opened in a new browser tab.

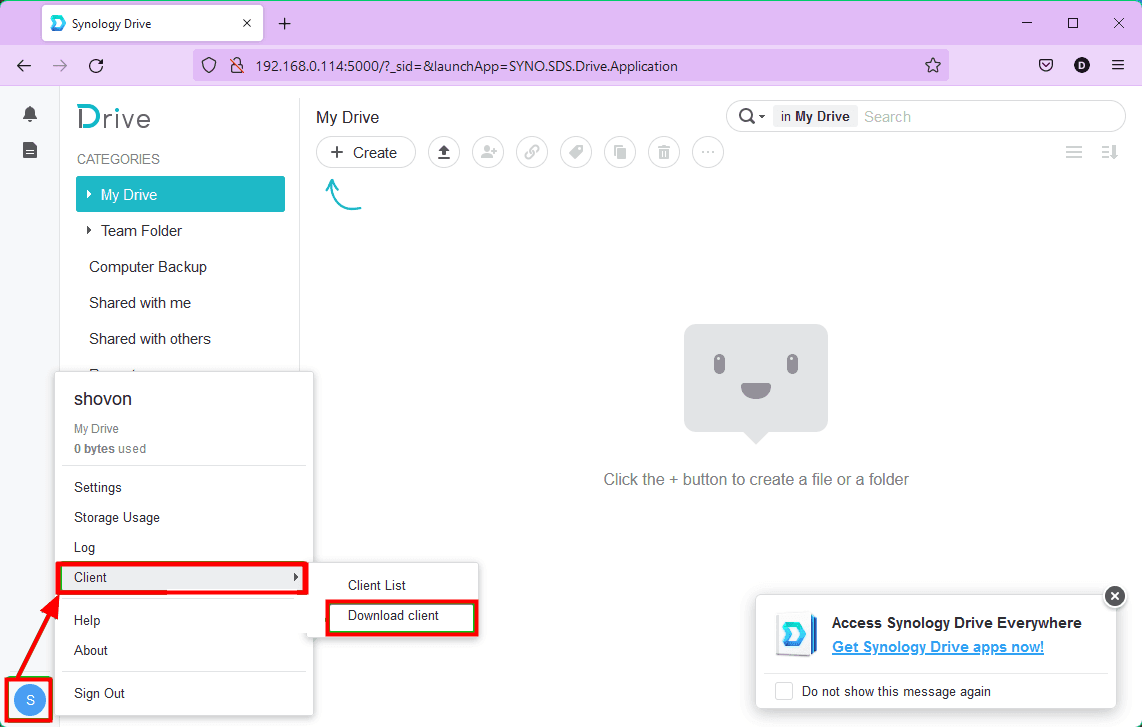
- Then log in to your Synology Drive web application and click on Client -> Download client from the user menu. Then download the Synology Drive Client installer according to the prompt.
- After the installation is complete, open Synology Drive Client and click Start Now.

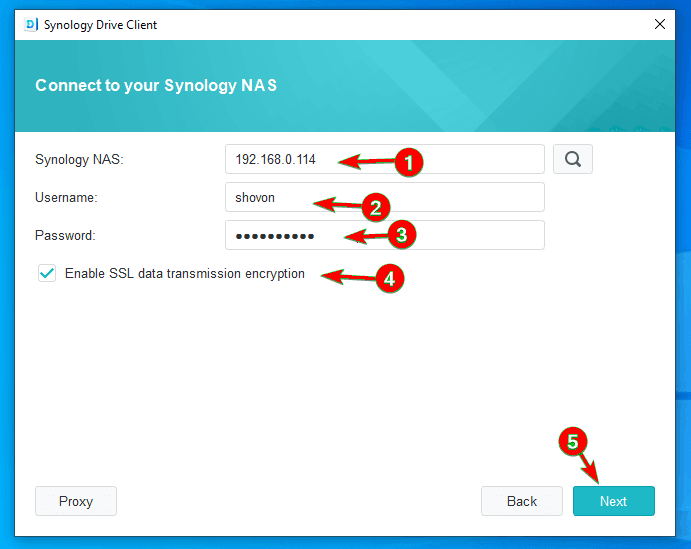
- Type in Synology NAS, Username and Password. To use SSL encryption, make sure to check the Enable SSL data transmission encryption. Once you’re done, click on Next.
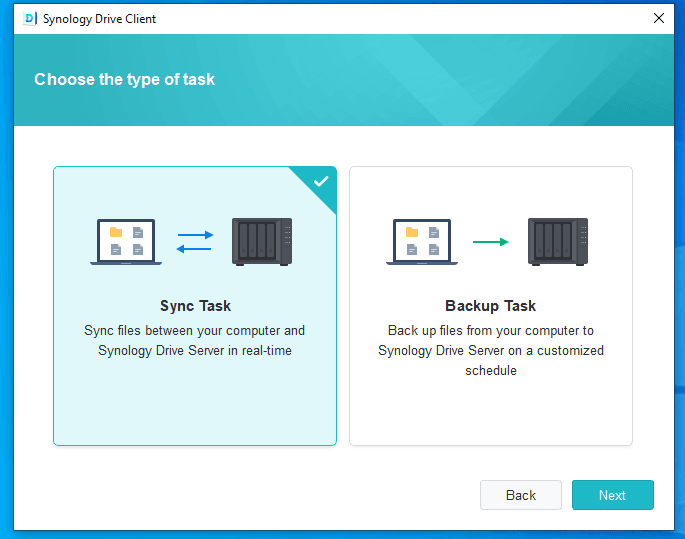
- Then, Synology Drive Client will ask you whether you want to set up a Sync Task or a Backup Task. We choose Sync Task to sync local folder with Synology NAS.
- Then you can set up your sync folders. By default, the /home/Drive folder of your Synology Drive will be synced with the folder C:\Users\Username\SynologyDrive of your computer. To change the sync folder of the Synology Drive, click on the Change button. You can also change the folder on your computer that will be synced with your Synology Drive folder.
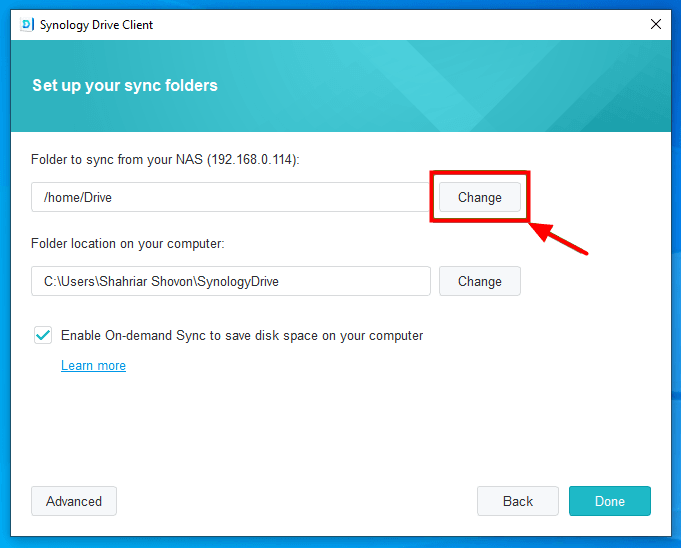
- After selecting the folder to be synchronized, you can check or uncheck the Enable On-demand Sync to save disk space on your computer checkbox to enable or disable on-demand sync. Next, you can click on Advanced in the lower left corner of this program to configure advanced sync settings.
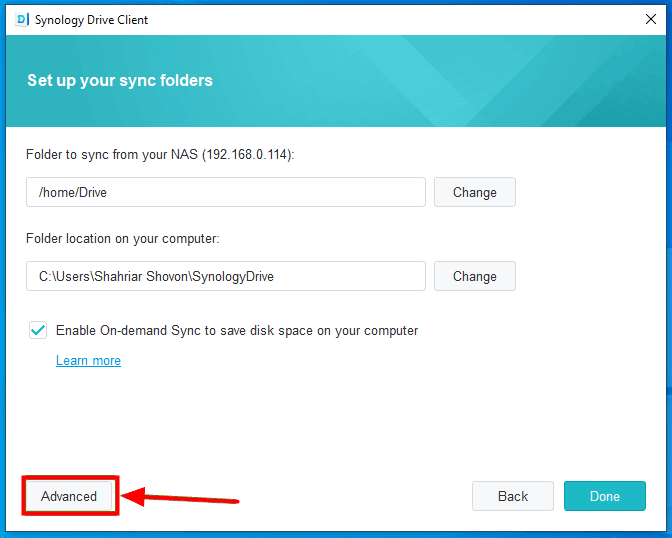
Tip: There are 3 tabs provided: Folder, File Filter, Sync Mode. You can customize the sync settings according to your needs.
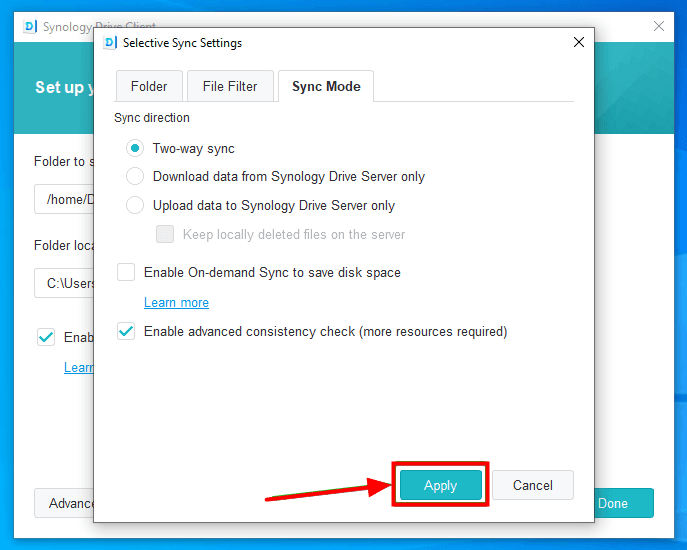
- Once you’ve done configuring the Sync Task, click on Done.
- Navigate to the Synology Drive folder in Windows File Explorer. Drag and drop PC folders into the Synology Drive folder, and they will be synced to the Synology NAS automatically.
As you can see, you need to drag and drop PC folders into the Synology Drive folder manually. It would be a heavy workload to drop and drop multiple folders from different locations. To sync multiple folders with Synology NAS more easily, please turn to method 1.
FAQs about Synology Drive Client
1. What platforms are supported by Synology Drive Client?
Answer: Synology Drive Client is compatible with various platforms:
- Windows 7 and above (excluding Windows 10 on ARM and Windows Server editions)
- macOS 10.14 and above (64-bit)
- Ubuntu 18.04 and above (officially supported versions)
2. What is the sync limit for Synology Drive?
Answer: There are some known limits with Synology Drive Client:
- The maximum number of files each Synology Drive Client can sync is 500,000.
- Certain file and drive types are not supported on Synology Drive sync or backup task, including hidden files or folders, the tmp/temp/swp/lnk files.
- Only one backup task can be established for one account.
3. What is the difference between Sync Task and Backup Task in Synology Drive?
Answer: “Sync Task” allows you to sync files from your computer to Synology Drive Server and vice versa in real time. “Backup Task” only allows you to backup files from your computer to Synology Drive Server on a customized schedule.
Verdict
Both Synology Drive Client and free AOMEI Backupper can help to sync local folders with Synology NAS. However, AOMEI Backupper is superior to Synology Drive in syncing multiple PC folders with Synology NAS. What’s more, AOMEI Backupper supports all kinds of NAS brands.
If you want to copy data from one hard drive to another, AOMEI Backupper also offers the Disk Clone feature. Try it now to discover more!

