How to Backup Pictures to iCloud from iPhone/PC [Updated]
This post will show you how to backup pictures to iCloud and how to manage your iPhone photos on iCloud. Read on to learn several useful methods!
By May / Updated on May 14, 2026
How to backup pictures to iCloud storage
I have more than 1000 photos on my iPhone 14, and I want to save them to my iCloud storage. How can I do it? Thanks
- Question from discussion.apple.com
Your iPhone pictures deserve to be protected. Given the durability of the iPhone, you can use it for years, accumulating tons of photos and beautiful images from apps. It would be a shame to lose them due to damage, theft, or even an iOS update. To protect your memories, it is quite vital to back up all your photos to iCloud. Follow this guide to learn how to backup pictures to iCloud.
Part 1. How to Backup Pictures to iCloud from iPhone
How to back up photos to iCloud from an iPhone? You can back up photos on your iPhone in 2 easy methods. Your photos can be saved to the iCloud Photos folder, and you can use iCloud to back up your entire iPhone to save your photos.
Method 1. Backup Pictures to iCloud
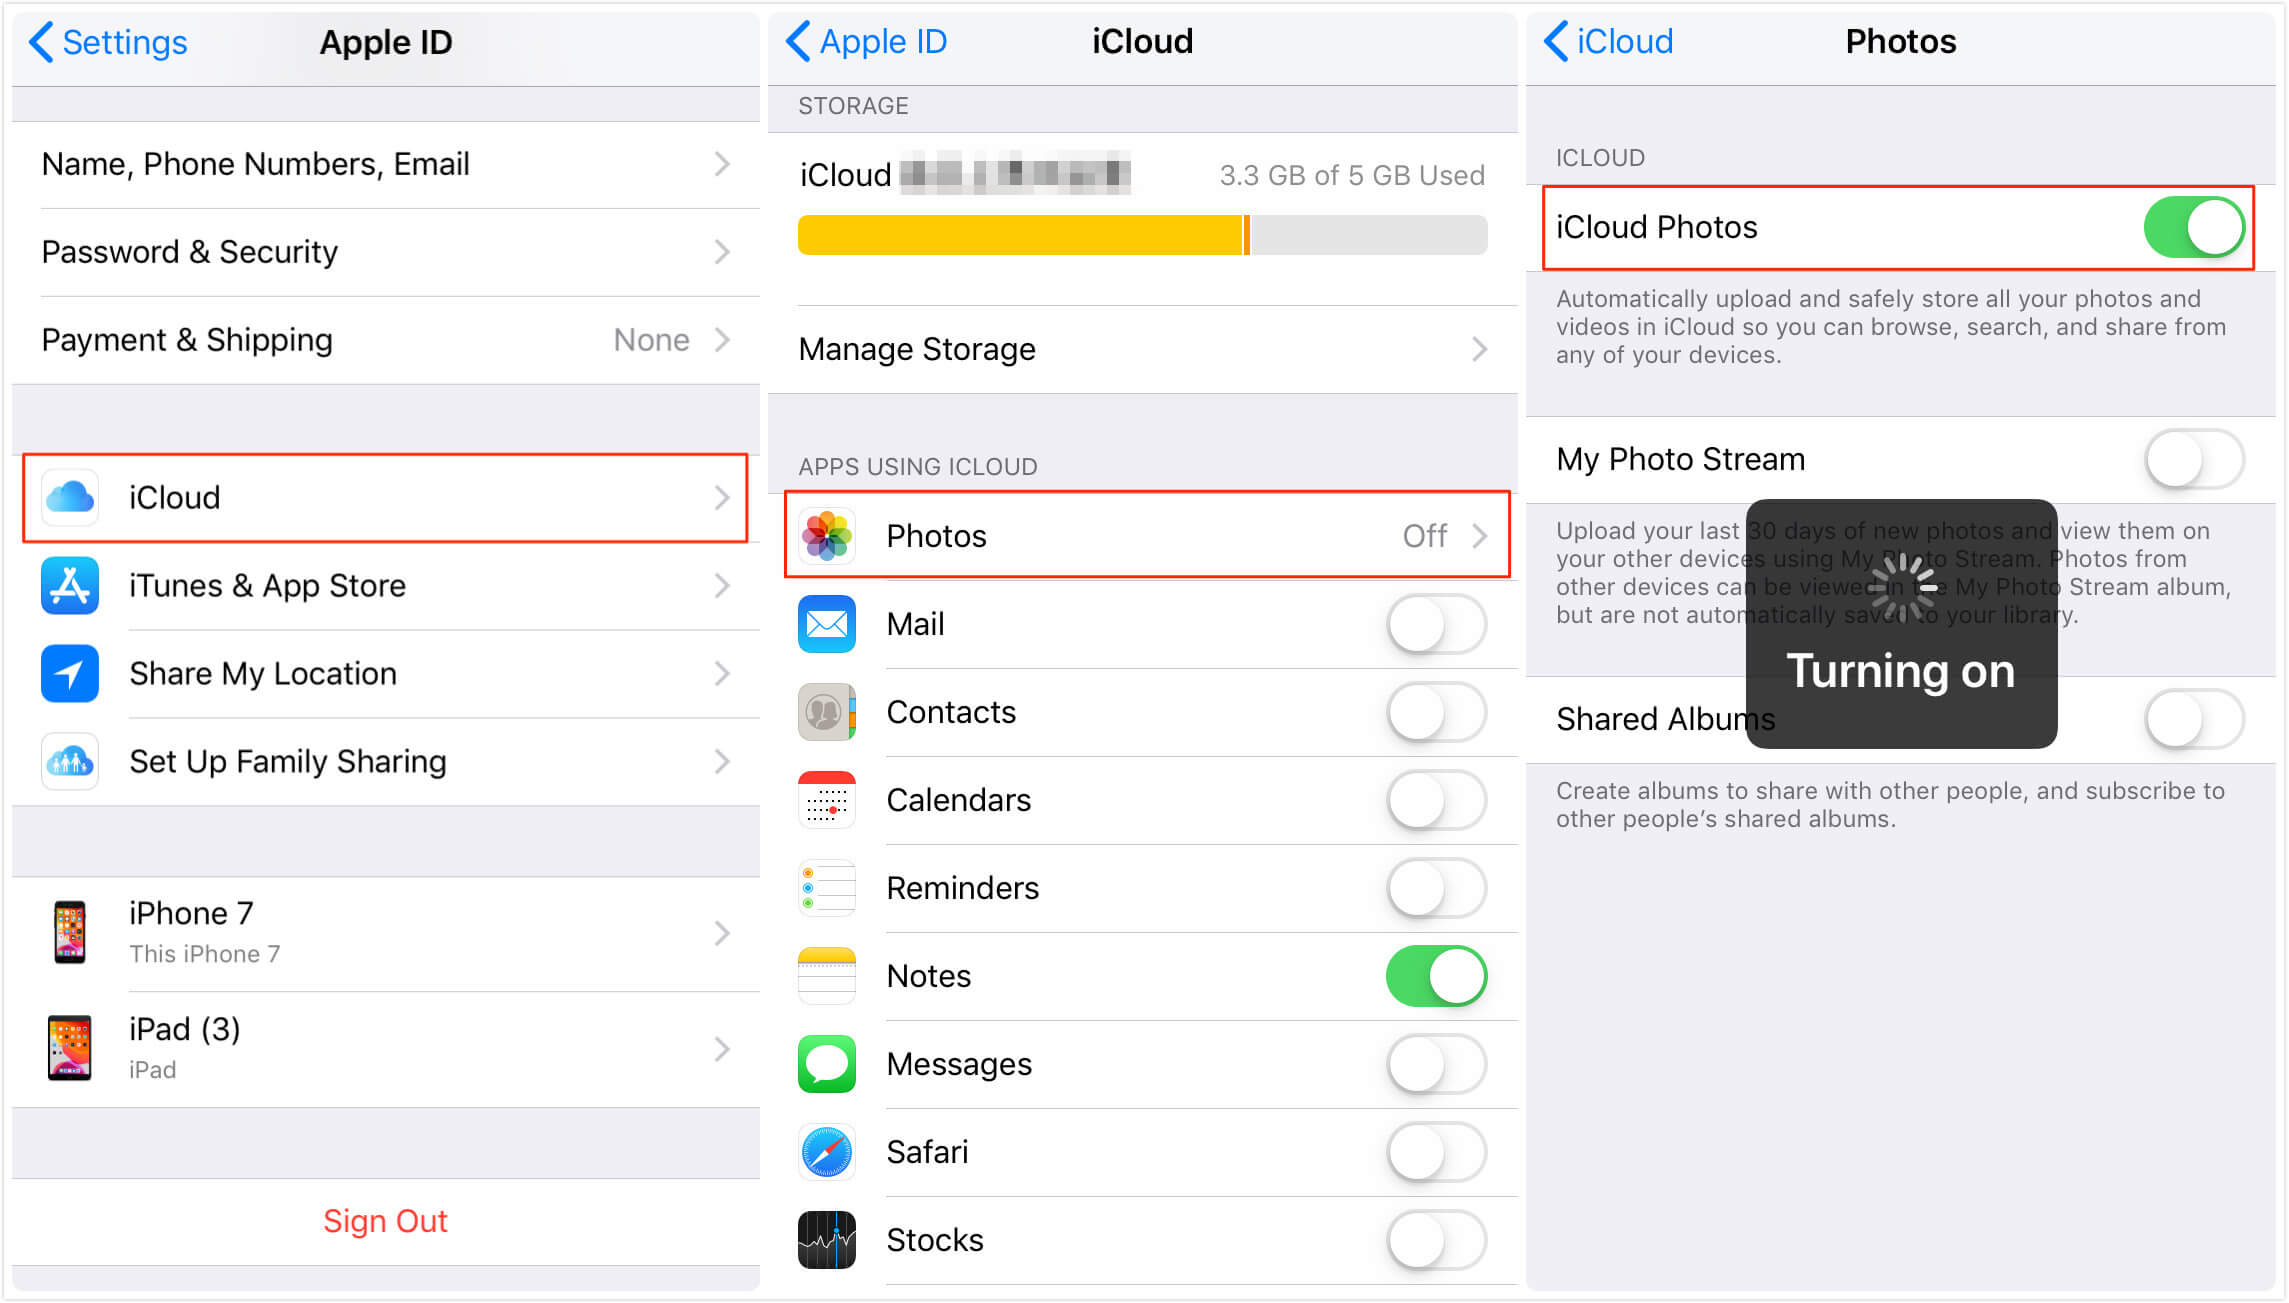
Go to iPhone Settings > [your name] > iCloud > Photos and toggle on iCloud Photos. After you upload photos from your iPhone to iCloud, you can select Optimize iPhone Storage to save iPhone space. You could preview your photos as usual, but they would be blurred if you zoomed in on them. Wait for several minutes and the full picture will be downloaded. You could sign in to another iPhone with the same ID, toggle on iCloud Photos on it and your photos would be downloaded from iCloud to that iPhone.
Method 2. Backup the Whole iPhone to iCloud
To backup iPhone photos to iCloud, go to iCloud > iCloud Backup and toggle on iCloud Backup, but you have only 5GB of free storage to back up your iPhone. If your iCloud storage is full, you could clear iCloud storage or reduce iCloud backup content. This backup can be only used when you set up an iPhone. If you want to view what’s in it, download iCloud backup to your PC.
Part 2. How to Backup Pictures to iCloud from a Windows PC
Backing up photos to iCloud on an iPhone is quite simple and easy. So, how to backup photos to iCloud from a Windows PC? Scroll down for 2 effective methods!
Method 1. Backup Pictures to iCloud Online
Go to the site of iCloud > sign in Apple ID > click the icon of photos > click the cloud icon or plus icon to upload photos or folders. You can view or download all your iCloud photos on this page. If you delete photos from iCloud, you can recover them in Recently Deleted in 30 days.

Method 2. Backup Pictures to iCloud via Client
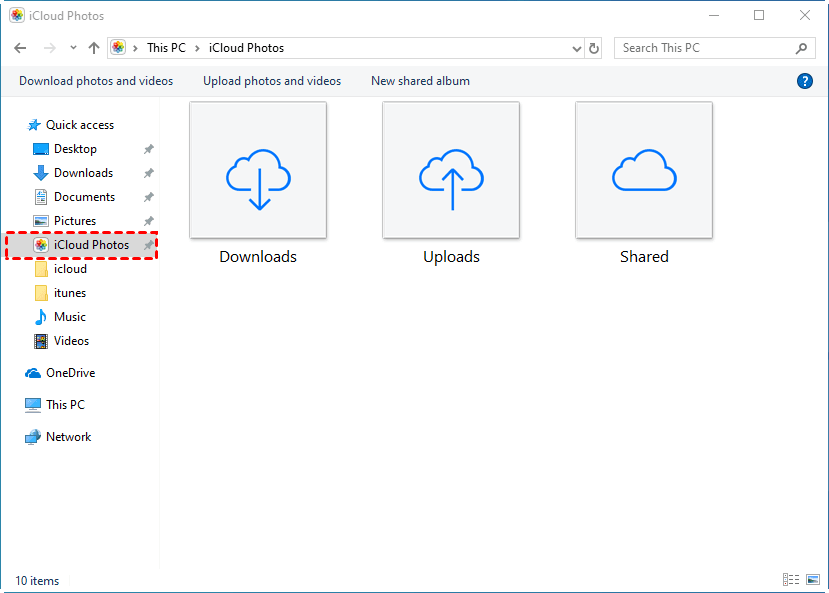
Download iCloud client for Windows > check Photos and enable Download photos, Upload photos, or Create new folders in Options > go to Windows Explorer > Select iCloud Photos. You could copy your photos to the folder Upload. You can check whether your photos have been uploaded by clicking Download Photos and Videos in the upper-left corner or going to the site of iCloud again.
Bonus Tip: How to Manage iCloud Pictures Without iCloud
A strong and stable Internet is necessary to back up photos to iCloud. It decides how long it takes to upload or download all your photos and you might come across problems with connecting to a server like iCloud backup stuck. It is not a good idea to store some personal files in iCloud considering data security.
You could use FoneBackup to back up iPhone photos on a computer without the Internet. It’s a free tool to save not only photos, but also videos, music, contacts, and messages from iPhone to computer. You could decide on your backup and view them on your computer.
Highlights of FoneBackup to Manage iPhone Photos:
Free iCloud Photo Manager: FoneBackup’s iCloud Manager makes it easy to manage your iCloud photos, providing an efficient solution for organizing, backing up, and transferring photos.
Backup iPhone Photos to PC: It enables seamless backup of your iPhone photos directly to your computer, providing secure local storage options while helping you free up iCloud space.
Selective Photo Backup: You can choose specific photos or entire albums to back up, giving you complete control over what gets transferred from your iPhone to your PC.
No Storage Limitations: By managing your photos on your computer, you can avoid iCloud storage limits, making it easier to work with large photo libraries.
If you have transferred your iPhone pictures to your PC before, here is how to back up your pictures in 3 steps:
Step 1. Download and install FoneBackup on your Windows 10 or any other versions
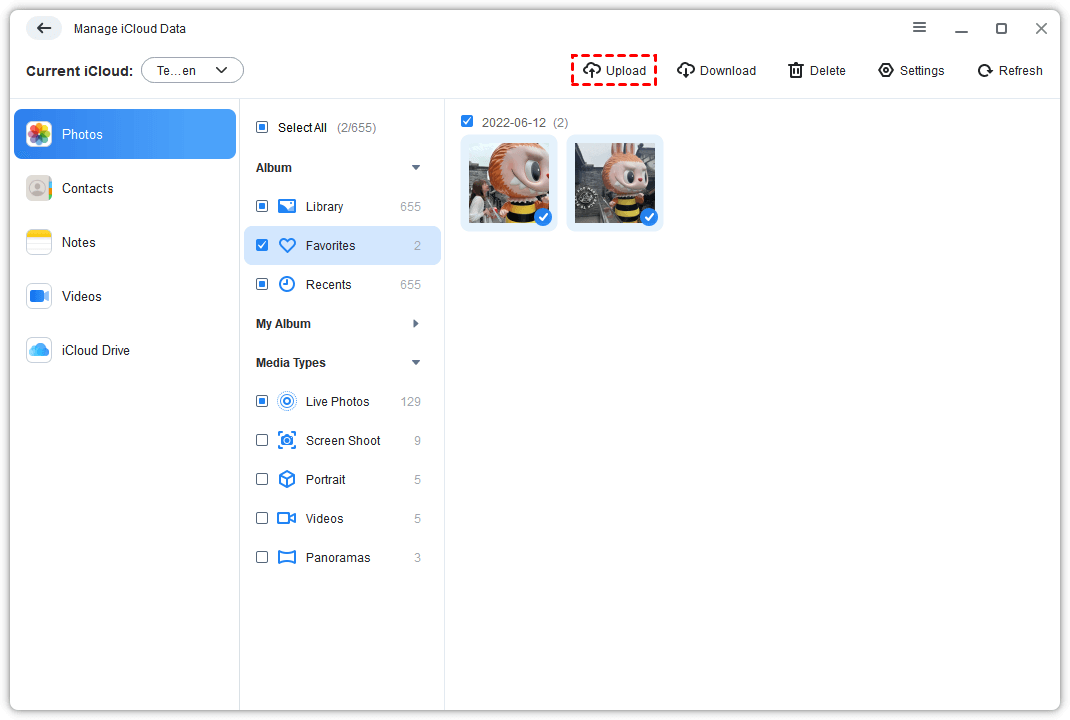
Step 2. After installation, launch FoneBackup and navigate to My iCloud > Sign in using your Apple ID and then proceed to click Manage iCloud.
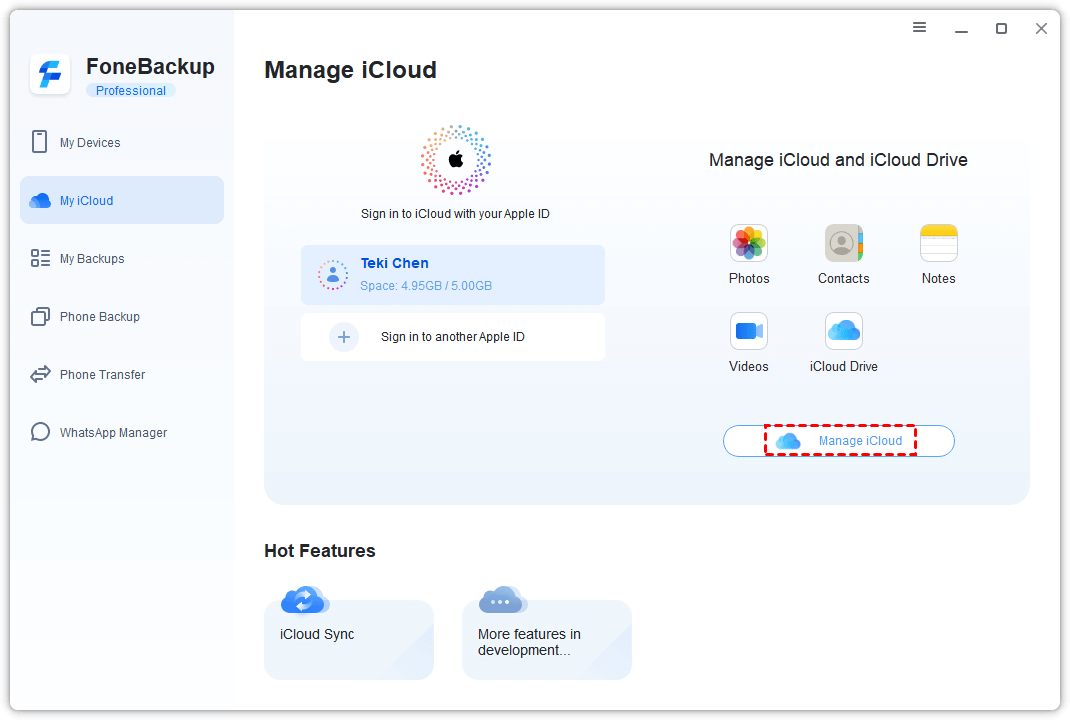
Step 3. Within the user-friendly interface, find and select the Photos icon > Click the Upload button to back up your iPhone pictures to your iCloud.
In addition, consider taking advantage of the features of the FoneBackup app - a convenient and free iOS data transfer tool. The tool helps seamlessly transfer photos from one iPhone to another. What makes it unique is that it works without an Internet connection and does not require WiFi or cellular data consumption.

Conclusion
That’s all about how to backup pictures to iCloud on iPhone or computer. To access your iCloud photos, you could check them online or using the iCloud client. You could also use FoneBackup to quickly and safely save all your photos to a computer without iCloud. Now download FoneBackup and enjoy it!