5 Ways to Easily Fix All the Acer eRecovery Management Problems
You will learn the potential causes of Acer eRecovery Management problems and 5 solutions to fix them easily. And you can learn an overall solution to fix them once and for all.
by Clytze Updated on October 26, 2022
Overview of Acer eRecovery Management
Acer eRecovery Management is a built in tool of Acer brand computers for Windows operating system backup and restoration. In default, there is already a hidden recovery partition on your system hard disk prepared for future usage when current OS fails due to some reason when you first get your machine. Thus, when an accident happens, you can immediately recover system back using Acer eRecovery Manager.

However, sometimes, there may be some problems when you make use of Acer eRecovery Management to create recovery media or reset factory settings. Then, how to fix them and go on the restore process? Let’s see them one by one.
How to Fix Acer eRecovery Management Problems
Here you will learn the potential causes for Acer eRecovery Management Problems as well as corresponding solutions. In addition, you can learn an overall solution to fix them once and for all.
Fix Acer eRecovery Management Cannot Install Bootable File
Some users may not have Acer eRecovery application on their computers either by default or by accidental deletion. Thus, they have to install one before backup or restoration work. However, when they are trying to install it, they may failed with “eRecovery Can Not Be Installed 1. Bootable Files”.
To solve this problem, you can follow the graphic tutorial below.
When Acer Recovery Manager cannot install bootable file, if you want to make a system recovery image, just make use of Windows System Recovery under the Control Panel.
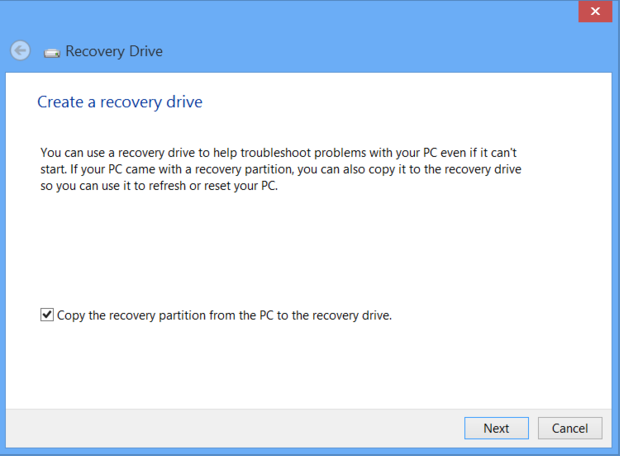
Step 1. Enter “recovery drive” in the search box, and then choose “Create a recovery drive”.
Step 2. In the next screen, ensure that the “Copy the recovery partition from the PC to the recovery drive” box is checked.
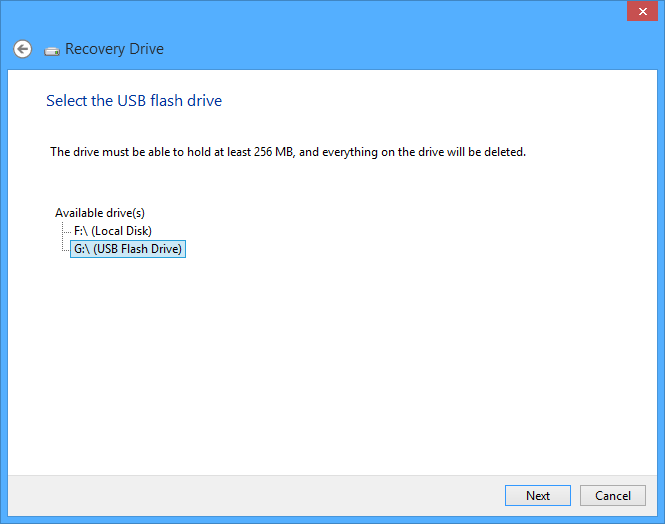
Step 3. Plug in a USB flash drive which is large enough to contain the image file and select your USB Flash Drive as your recovery drive. Then click Next to continue.
Step 4. Click “Create”. The recovery image and necessary recovery tools will be copied to your USB flash drive, which will take a while, depending on your PC and the size of the recovery image.
Step 5. When it finishes, remove the USB flash drive. Keep it in a safe place and don't use it to store other files or data.
Fix Acer eRecovery Management Not Working
Sometimes, eRecovery Management Acer may not working when you are in dire need of it to do factory recovery. This is an unpleasant thing. You cannot open it and it does not loading; even “Alt + F10” does not work.
When such thing happens, you can check if the “D2D Recovery” option is enabled or not in BIOS. If not, enable it and try again. You can follow the steps below.
Step 1. Boot your Acer computer and press F2 while it is booting to get into BIOS.
Step 2. Navigate to the Main tab by using the arrow keys “→” or “←”.
Step 3. Find the D2D Recovery (Disc-to-Disc Recovery), press Enter and then select “Enabled”.
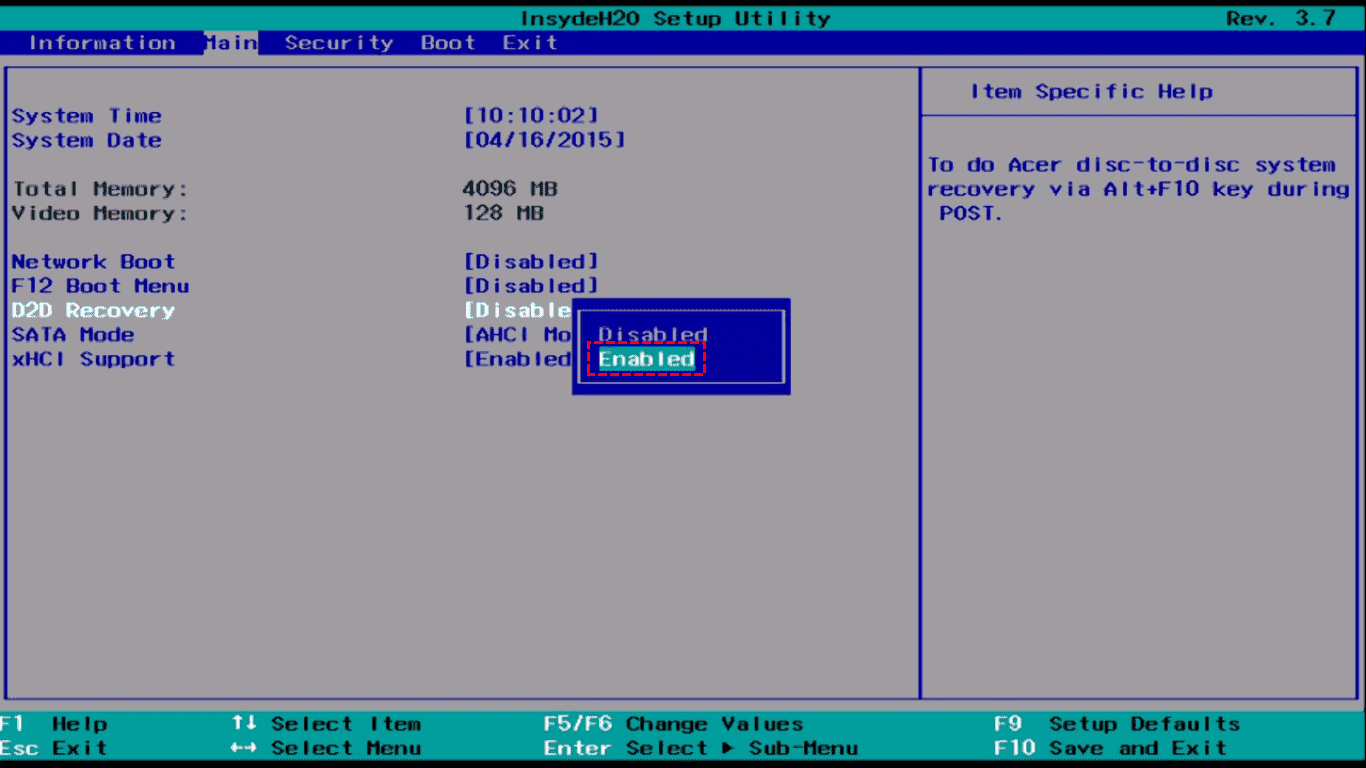
Step 4. Press F10 to save and exit. When you see the Acer logo, hold Alt and tap F10. The problem that Acer eRecovery Management not woring should now be solved.
Fix Acer eRecovery Management Cannot Select Restore Type
Sometimes, even if you are able to open Acer eRecovery software, you may not get to operate it smoothly. During restoring steps, it may stuck with a message saying that “acer erecovery management cannot select restore type”. Then, how to do?
There have several possibilities:
-
The recovery discs may be damaged;
-
The original drive needs to be formatted or needs to be free partition;
-
AHCI in BIOS should be disabled;
-
RAM problem.
Just find out the exact cause(s) and get rid of it or them.
Fix Acer eRecovery Hard Drive Configuration Is Not Set
In some situations, restore aborted due to acer erecovery hard drive configuration is not set. This may be caused also by several reasons:
-
There is no recovery discs or recovery partition;
-
The mode of SATA controller setting to AHCI is not correct;
-
Jumper numbers is not correct;
-
System disk partitions layout has been changed.
Get a recovery disk from Acer directly
If there is no recovery discs or recovery partition, you can purchase a set of recovery disks from Acer directly. Check in Accessories or the main web site.
If you want to solve these situation mentioned above one by one and retry your attention. Learn more about Acer eRecovery hard drive configuration is not set in this article.
Fix Acer eRecovery Management Gets Stuck
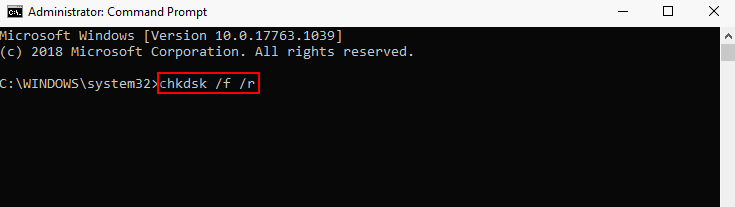
Another common error is that Acer eRecovery Management gets stuck in the process of creating Acer recovery disk and restoring computer settings. Many users have reported that this software is often stuck at 0% or 99% while loading files. This situation may be caused by a corrupted drive or file. You can check hard drive integrity by running the CHKDSK command to fix the problem. Please follow the steps below.
Step 1. Run Command Prompt as administrator on your computer.
Step 2. Type chkdsk /f /r or chkdsk x /f /r (x stands for the drive letter). Then press Enter and wait for the process to accomplish.
Step 3. Restart your computer and try using Acer eRecovery Management again. Check if the problem has been solved.
Almighty Solution to Fix Acer eRecovery Management Problems (Alternative)
In addition to these methods mentioned above, you can also choose an almighty solution to help you. As the best Acer eRecovery Management alternative - AOMEI OneKey Recovery allows you to create a system backup to a recovery partition. It can If something bad happens to your Acer computer, you can restore the system in time from the recovery partition to avoid data loss. It also has the advantages below.
- Multiple computer brands: It applies to all brands computers instead of for one specific brand computer. Therefore, it supports not only Acer computers. You can also use it to run Samsung laptop recovery from boot, if you need.
- Many paths: It allows you to backup the system to the recovery partition and other external devices, such as external hard drive, USB flash drive, CD/DVD, etc.
- Protect the backup: It is able to compress or encrypt the backup image.
- Schedule backup: You can backup the system regularly with fixed intervals such as daily, weekly or monthly.
- Emergency key: Once you backed up system with this software, it will generate an emergency key to help you restore. It supports both F11 or A as the recovery key and boot menu at the system startup.
You can follow the graphic tutorial below to create a system backup for Acer computer. If your computer has any problem you can use this backup to perform one key recovery.
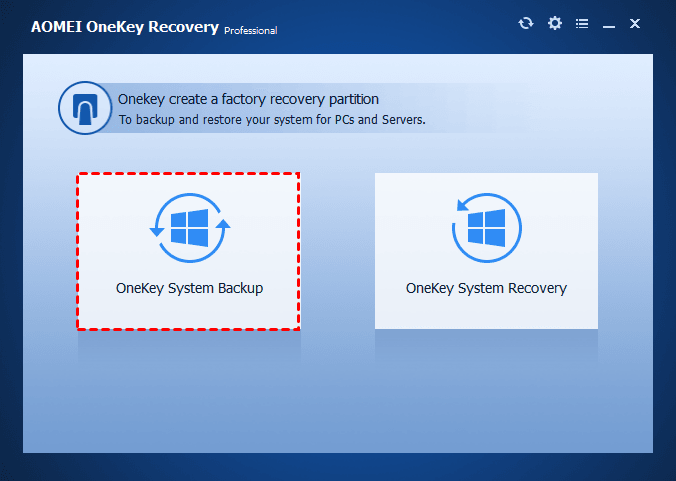
Step 1. Download this software install and launch it, click OneKey System Backup.
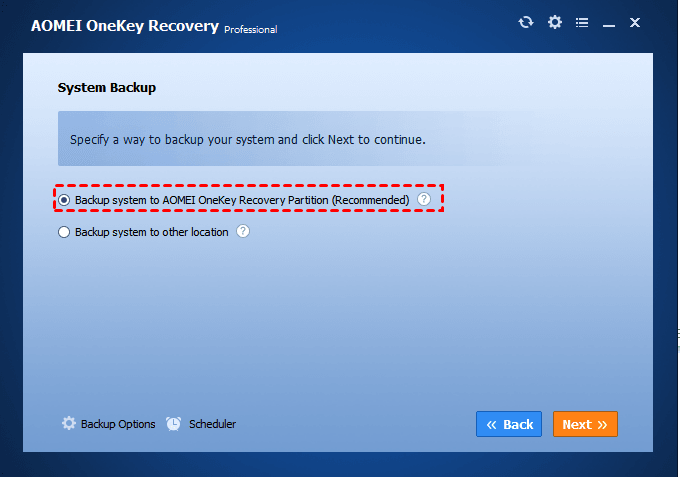
Step 2. Choose Backup system to AOMEI OneKey Recovery Partition and click Next. If you are worried about it will occupy a lot of disk space, you can choose the second method.
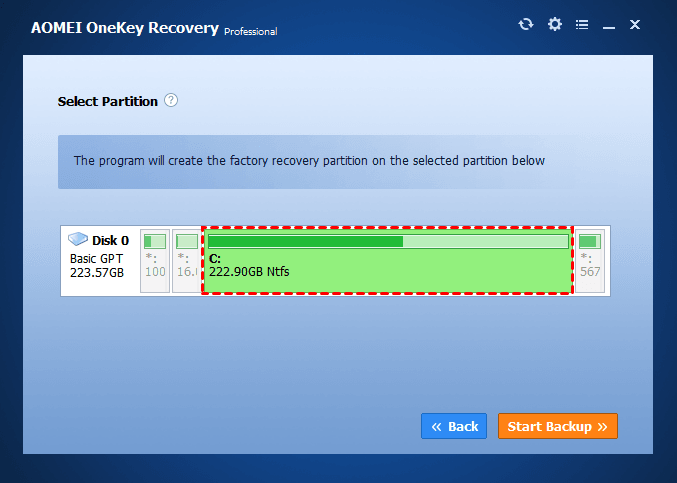
Step 3. Select a partition on the hard drive to create a recovery partition and store the backup image. Then, click Start Backup.
Summary
This article introduces you 5 ways to solve Acer eRecovery Management problems. You can choose the corresponding solution according to the specific cause. Or you can choose a one-and-done method to solve all the problems. That is to use AOMEI OneKey Recovery to help you create a system backup. No matter what problems your computer has, you can use this system backup to restore. Even if your computer can't boot up, you can still use the emergency key to do so. It can protect your data to the maximum extent.