


VMware Data Recovery Plug-in | EOA and Alternatives
You may have heard of VMware Data Recovery plugin, but do you know it is deprecated by VMware since vSphere 5.1? If you are looking for a replacement to backup your VMware ESXi VMs, maybe this article can help you.
By Crystal / Updated on March 8, 2023
Note: VMware Data Recovery (VDR) has been replaced by VMware Data Protection (VDP)
If you are looking for a suitable backup solution for your VMware ESXi virtual machines, then you may have noticed VMware Data Recovery. However, it has been replaced by VMware Data Protection since vSphere 5.1.
VMware Data Recovery (VDR) is an official virtual machine backup tool that uses a virtual machine appliance and a client plug-in to centralize the scheduling of backup jobs. The VMware Data Recovery plug-in supports VM backup and restore via the Microsoft Volume Shadow Copy Service (VSS). In addition, it provides the following features:
- Agentless Backup: creating independent image-level VM backups without installing a backup agent on VMs, simplifying the backup management and saving the costs.
- Changed Block Tracking (CBT): it’s one of VMware’s native technologies that only track and backup all changes made to a VM’s hard drive blocks since a specific point in time.
- Data Deduplication: deleting duplicate data and keeping only the newest data for each backup, which will effectively save storage space and the time on backup and restore.
Unfortunately, starting from vSphere 5.1, VMware Data Recovery plug-in has been replaced by another official backup software VMware Data Protection (VDP). Furthermore, VMware Data Protection was also announced the End of Availability (EOA) on April 5, 2017.
According to VMware, vSphere 6.5 is the last release that includes vSphere Data Protection, and they decided to exit the data protection market and focus its investments on VMware vSphere Storage APIs.

Therefore, if you still have vSphere 5.1 or previous versions, then you can still download and install VMware Data Recovery plugin to backup your VMs. I will introduce the steps in this article. But if you are using vSphere 6.5 and later versions, you may need to migrate your backup schedules to a third-party software that based on VMware vSphere APIs – Data Protection.
What is VMware vStorage APIs – Data Protection
VMware vStorage APIs - Data Protection is a data protection framework that enables backup products to do centralized, efficient, off-host LAN free backup of vSphere virtual machines. It is not a backup software, but many backup vendors provide solutions based on it.
To replace the deprecated VMware Data Recovery plug-in and VMware Data Protection, VMware will continue to enrich vStorage APIs’ feature set, so that the third-party software based on it can better protect the VMware VM data.
An effective alternative to VMware Data Recovery plugin (Free)
As VMware is focusing on the development of VMware vSphere Storage APIs - Data Protection, so far there is no official replacement to backup and restore entire VM. Users need to migrate their backup tasks to other third-party alternatives.
Therefore, here I introduce you to a free VMware backup software that is based on VMware vSphere Storage APIs -- AOMEI Cyber Backup. Here are its main benefits:
✦ Agentless Backup: create complete and independent image-level backup for VMware ESXi VMs.
✦ Multiple Storage Destinations: backup to local or network share destinations.
✦ Automated Execution: create backup schedules to automate virtual machine protection.
✦ Perpetual Free: you can use AOMEI Cyber Backup Free Edition with no time limit.
✦ Support free ESXi: AOMEI Cyber Backup supports both paid and free versions of VMware ESXi.
AOMEI Cyber Backup supports VMware ESXi 6.0 and later versions. Next, I will demonstrate how to create an automatic backup task that covers multiple ESXi VMs. You can click the following button to download the freeware.
*You can choose to install this VM backup software on either Windows or Linux system.
3 steps to backup and restore multiple VMware ESXi VMs
1. Bind Devices: Access AOMEI Cyber Backup web client, navigate to Source Device > VMware > + Add VMware Device to add vCenter or Standalone ESXi host as the source device, and then click … > Bind Device.
Note: Once bound the host you do not need to repeat this step later.

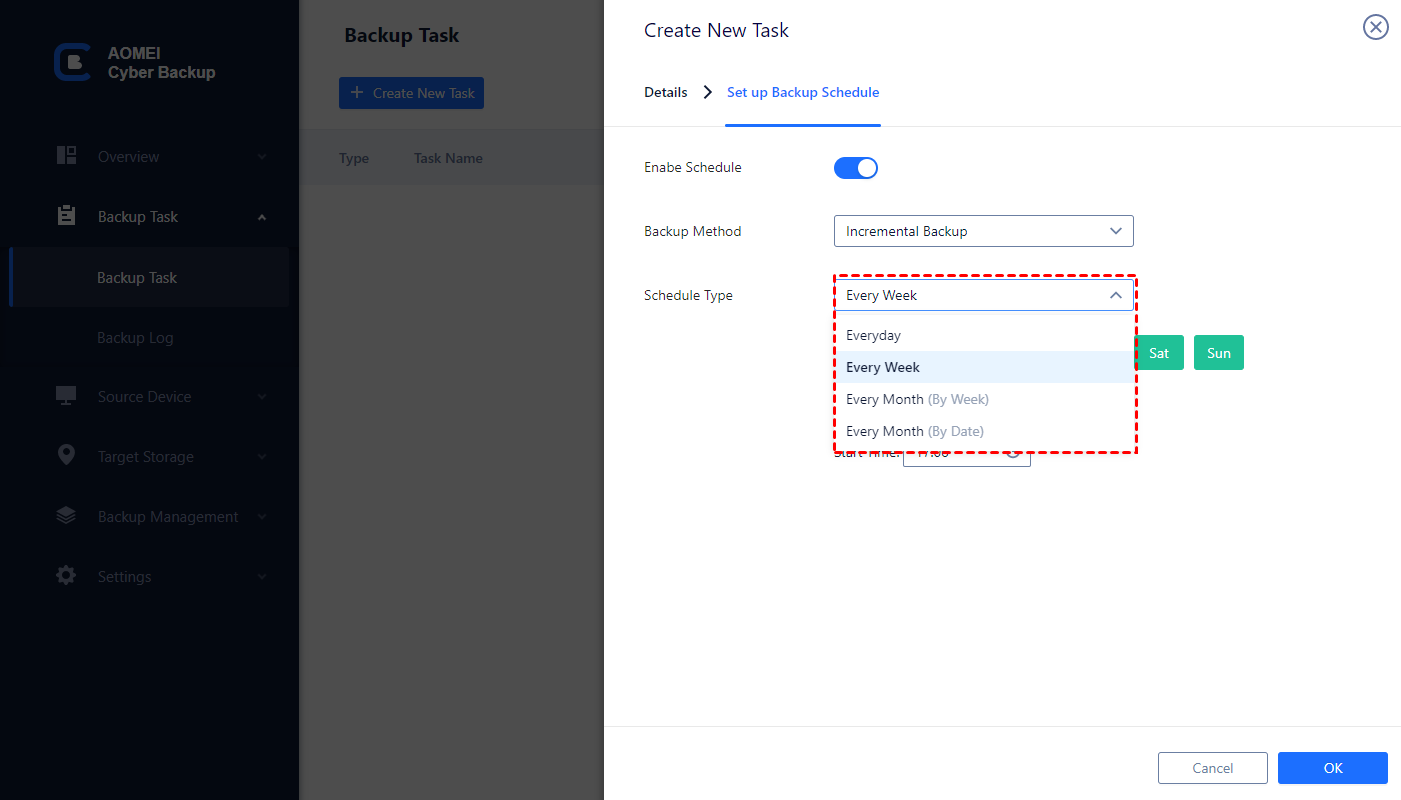
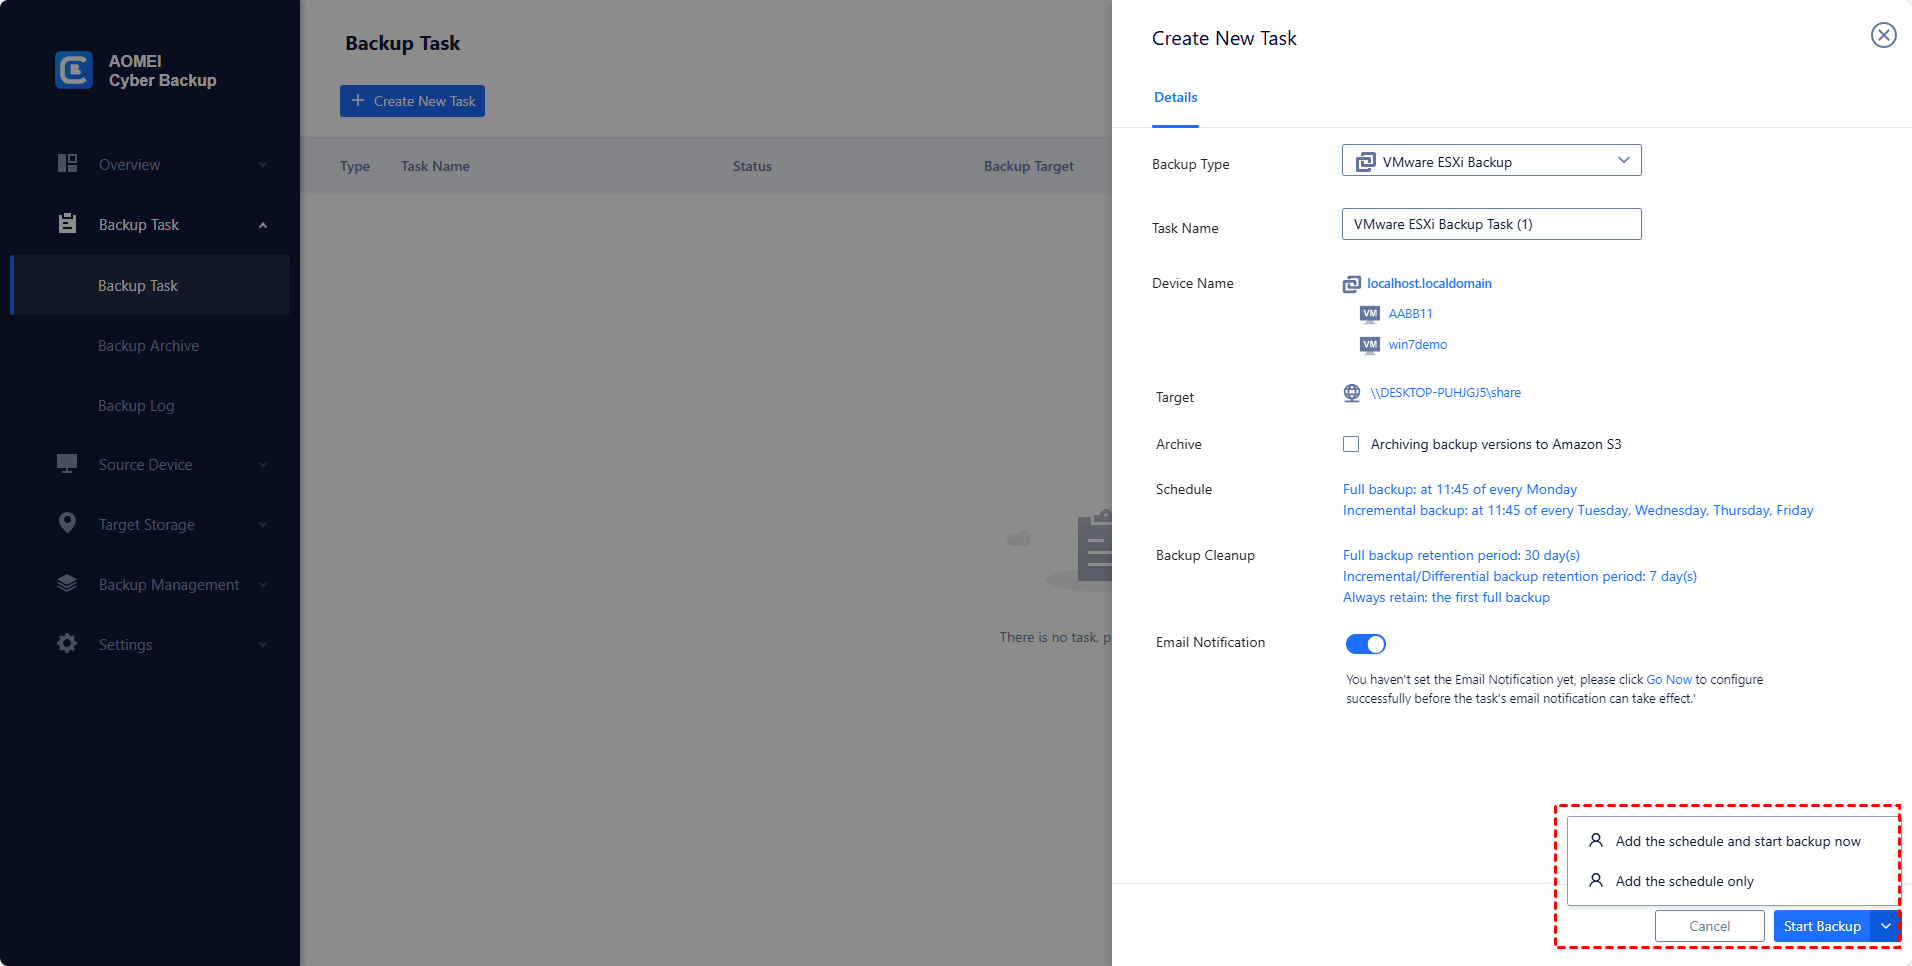
2. Create Backup Task: Navigate to Backup Task > + Create New Task, and then set the Task Name, Backup Type, Device, Target, and Schedule.
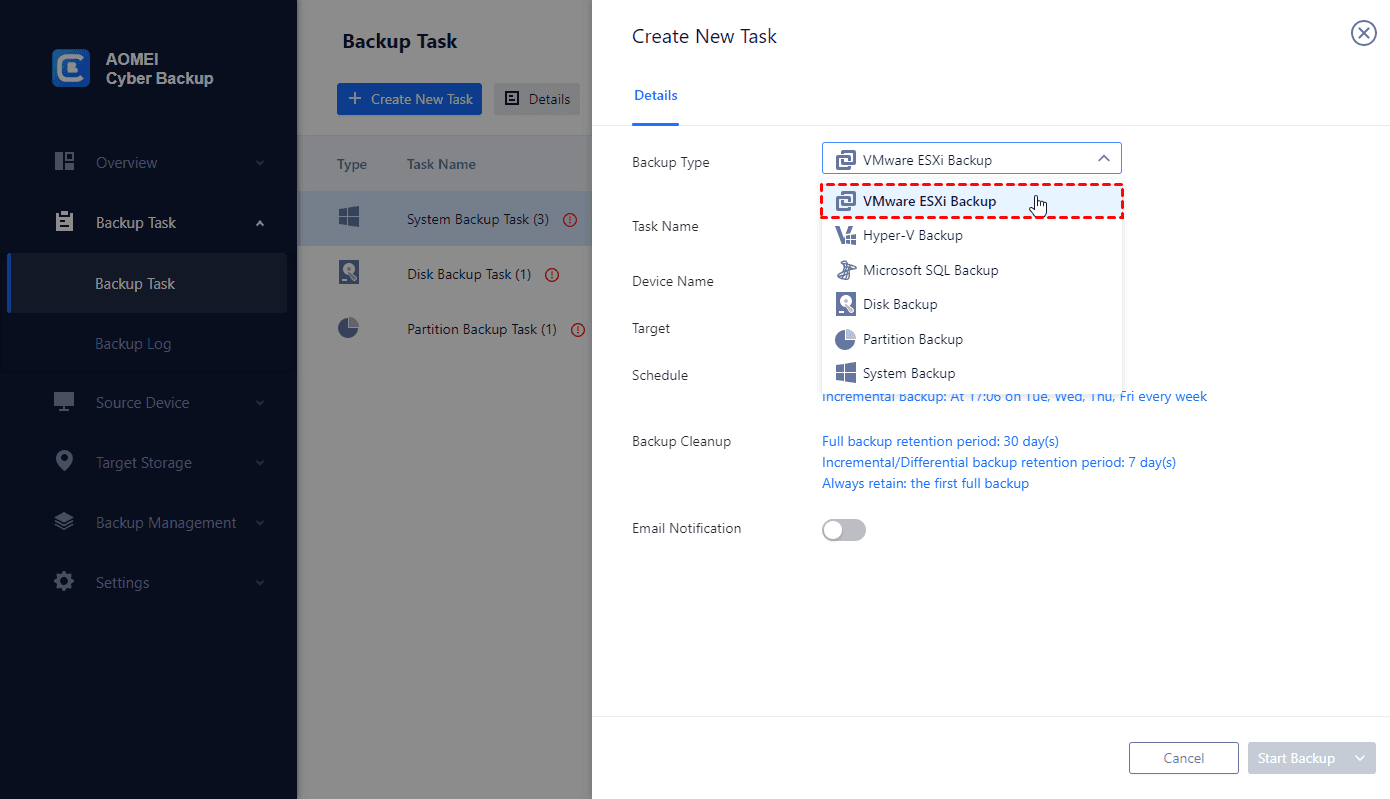
- Device: cover multiple VMs on the host in one backup task.
- Target: selecting to back up to a local path, or to a network path.

- Schedule: performing full, differential or incremental backup, and automate execution according to the frequency you specified.
Now you can click Start Backup and select to Add the schedule and start backup now, or Add the schedule only.
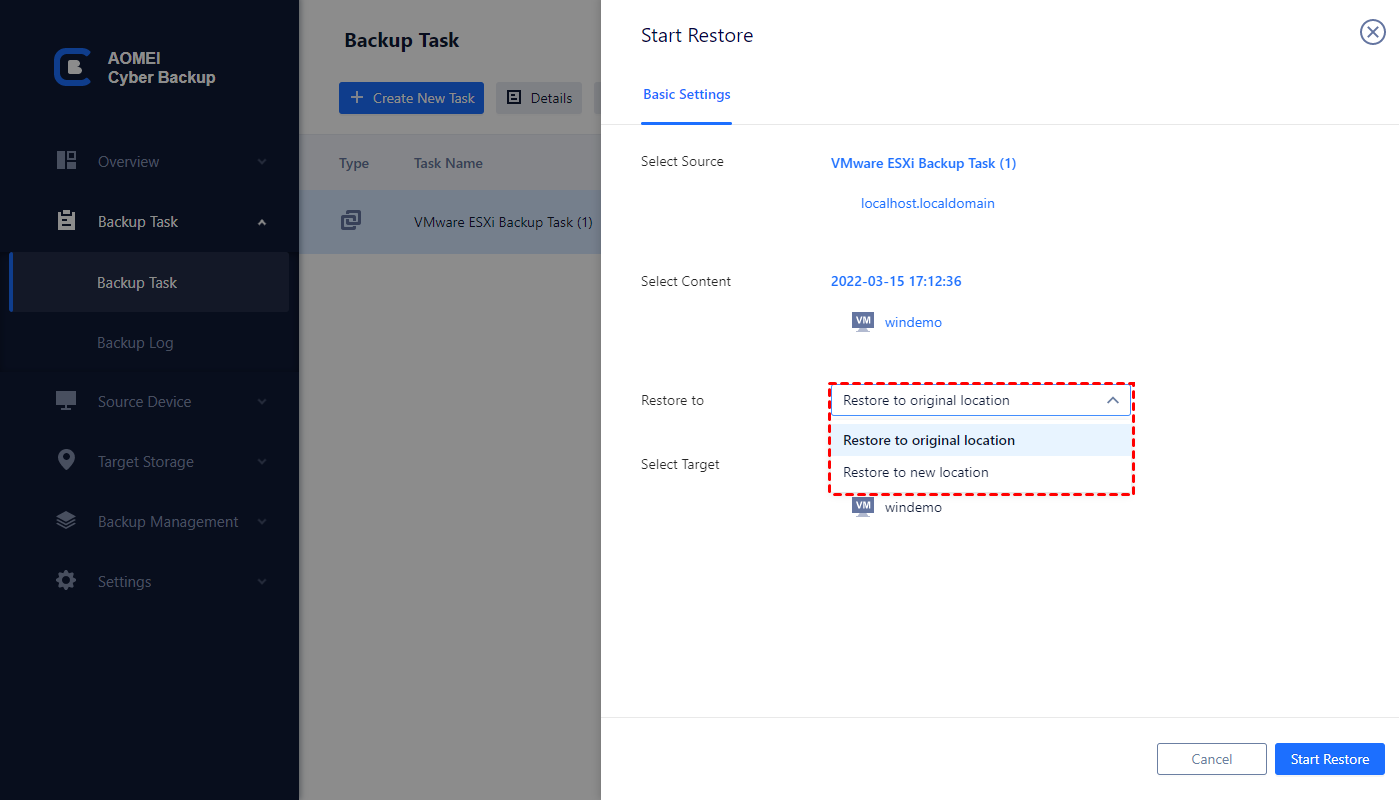
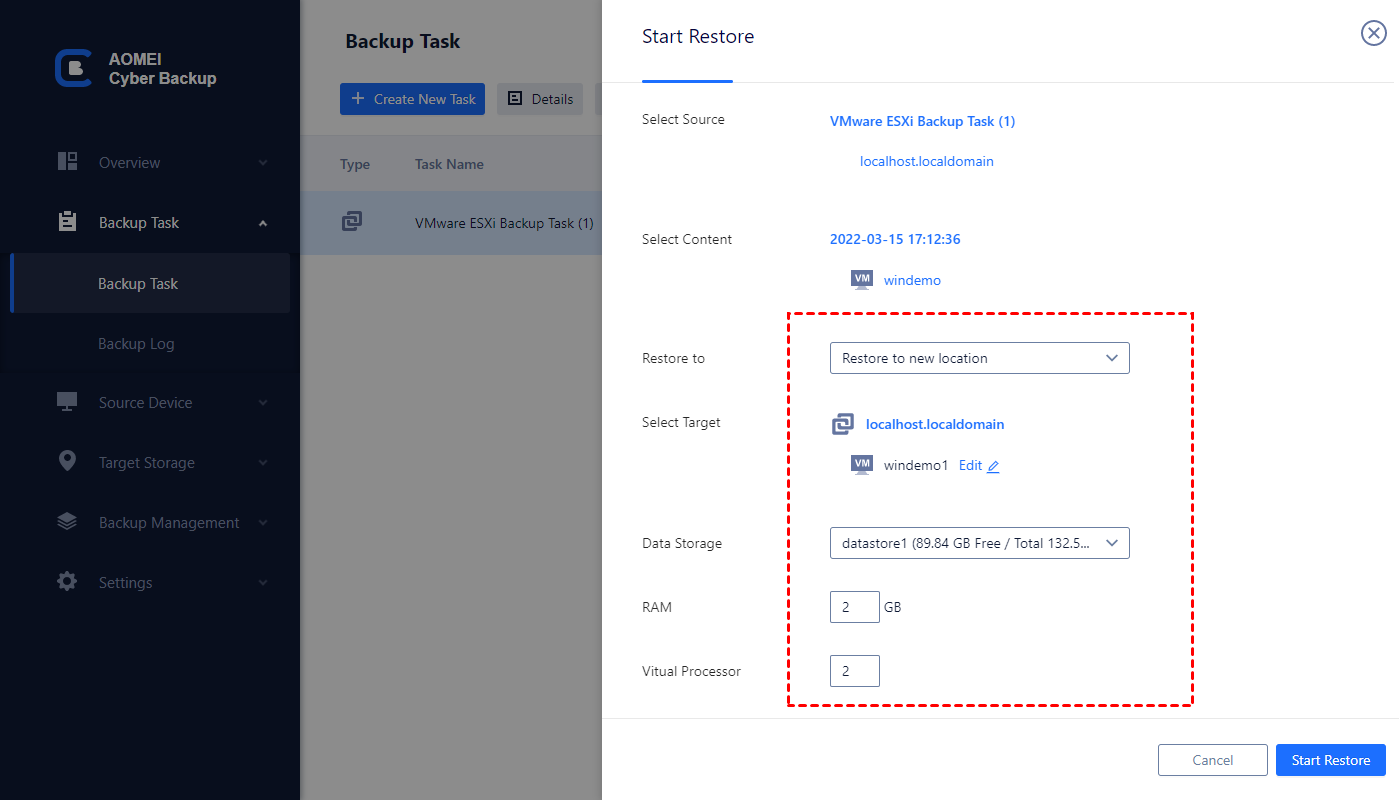
3. Restore VM: Click … > Restore on the backup task to open a wizard, and click Select Content to specify a restore point. Select to Restore to original location, and click Start Restore.
While the Free Edition covers most of VM backup needs, you can also upgrade to Premium Edition to enjoy:
▶ Batch VM Backup: batch backup large numbers of VMs managed by vCenter Server or standalone ESXi hosts.
▶ Backup cleanup: Configure a retention policy to auto delete old backup files and save storage space.
▶ Restore to new location: Create a new VM in the same or another datastore/host directly from the backup, saves the trouble of re-configuring the new VM.
How to install and deploy VMware Data Recovery
If you are using vSphere 5.1 or previous versions, you can still use VMware Data Recovery plugin to protect your VM data.
You need to install the VMware Data Recovery plugin and appliance first, and then connect to the appliance on port 22024. If there is a firewall, make sure the port 22024 is opened to allow the vSphere Client to manage VMware Data Recovery. I will show it in this part.
Before you start, please note that you must have an Essentials Plus license to use VMware Data Recovery plugin.
How to install VMware Data Recovery plugin and appliance
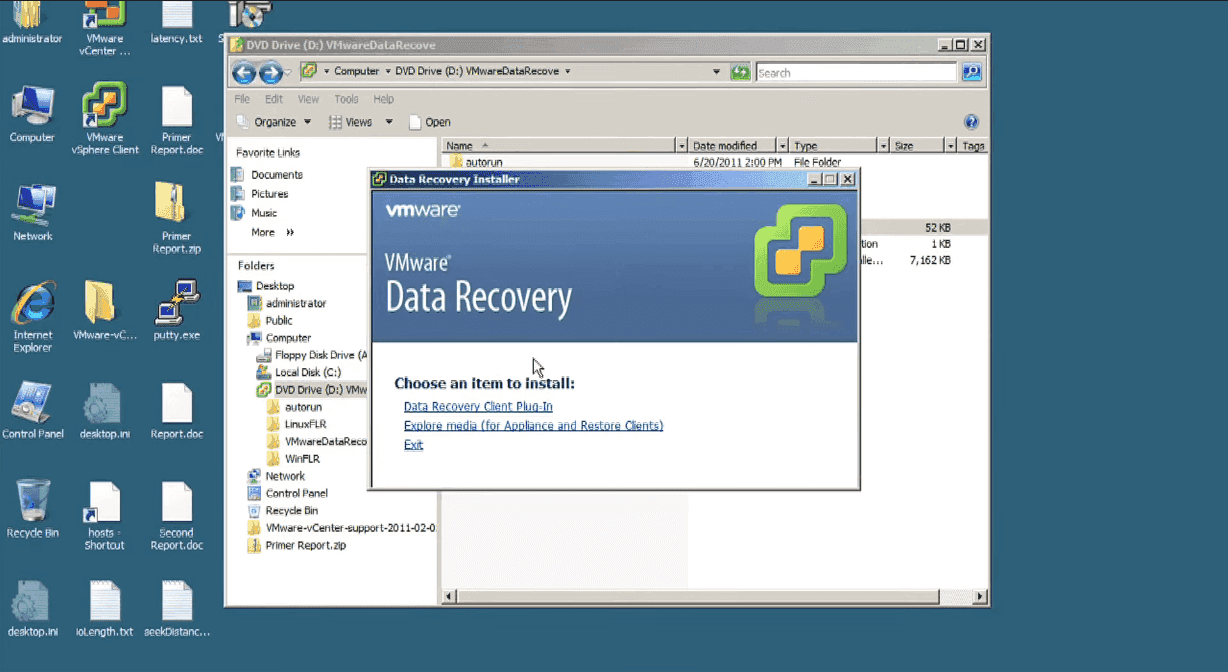
1. Download and run the plug-in installer VMwareDataRecoveryPlugin.msi, and follow the installation wizard.
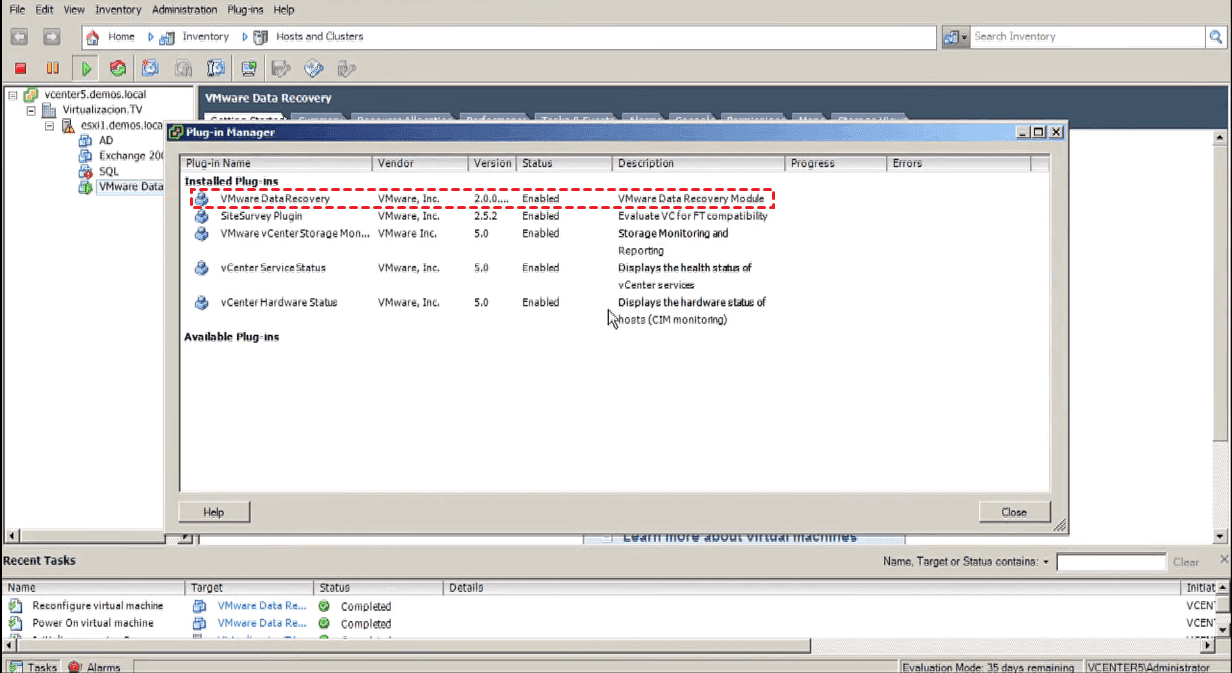
2. Access the vSphere Client, and log in to the vCenter server. Click Plug-In > Manage Plug-In to make sure the VMware Data Recovery plugin is enabled.
Note: If you do not see the VMware Data Recovery plugin in vSphere client, please restart the client.
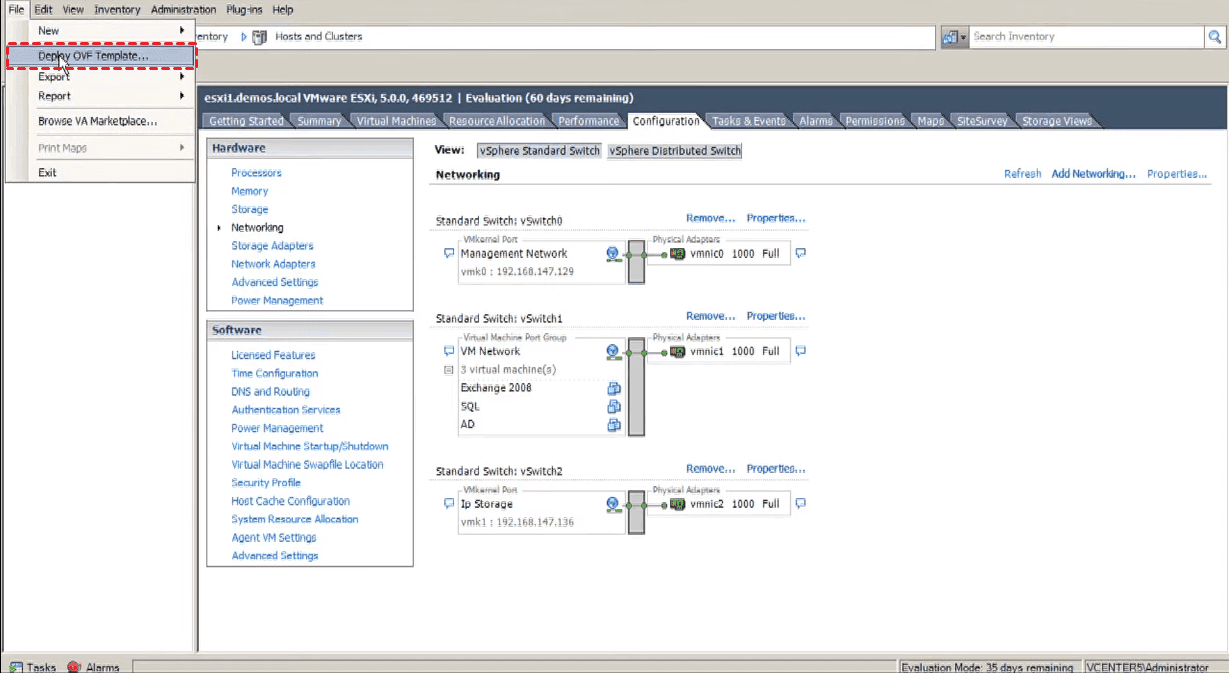
3. Click File button on the toolbar and select Deploy OVF Template…
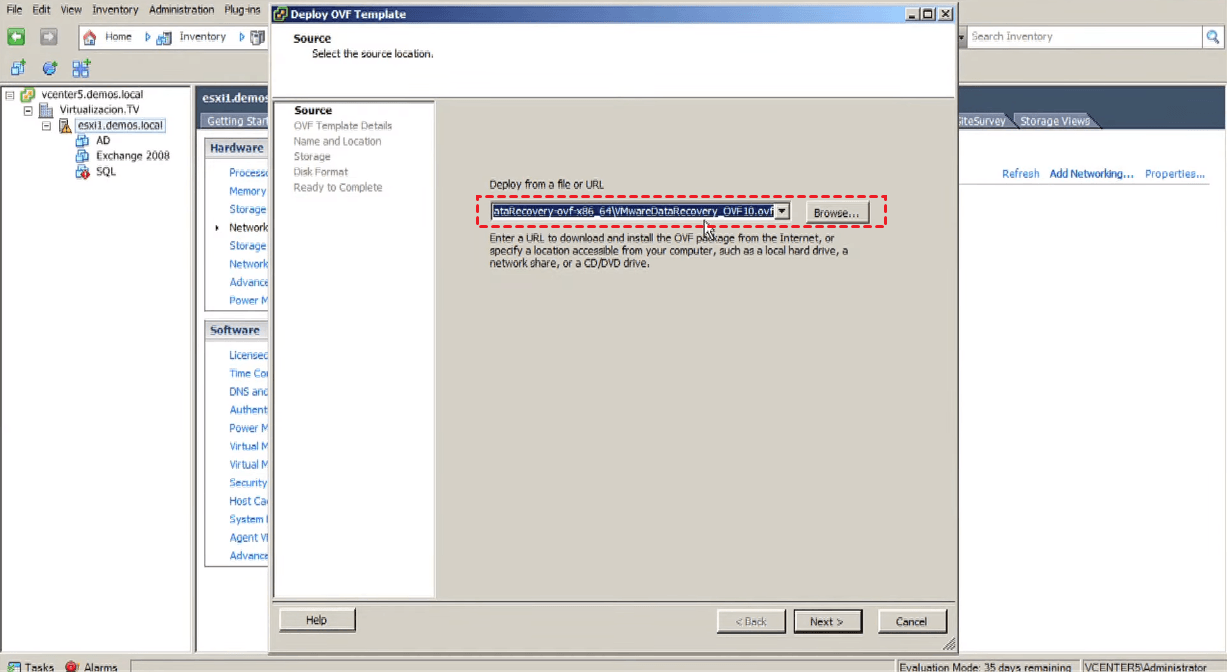
4. Click Browse… to select the VMwareDataRecovery_OVF10.ovf file, and click Next.
5. In Name and Location tab, provide the VM name, and in Datastore tab select the datastore where you want to keep this VM. In Disk Format tab, select a format in which to store the virtual disks of the VM.
How to deploy VMware Data Recovery appliance
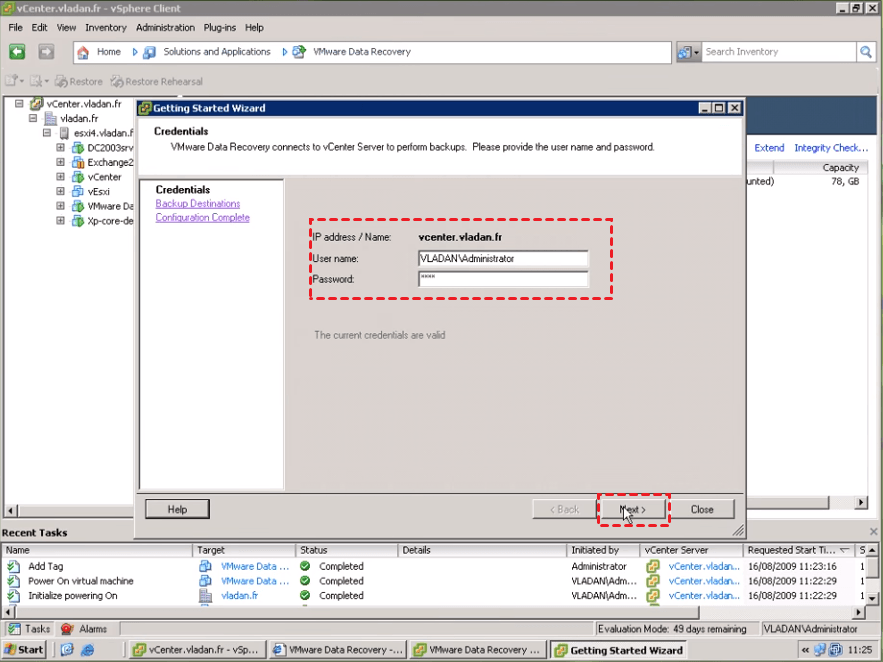
1. Access VI Client and click Home > Solutions and Applications > VMware Data Recovery. Provide the username and password in the pop-up window, and then click Next.
Note: VMware Data Recovery need the user account with administrative privileges to connect to vCenter.
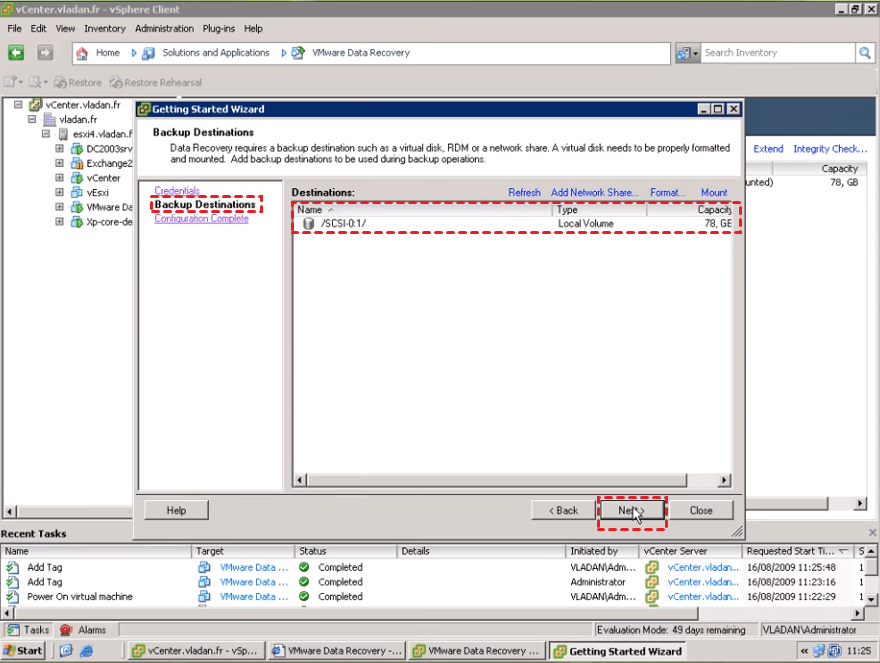
2. In Backup Destination tab, select a destination where you want to store the VM data. Click Next to complete.
You can configure the appliance from Configuration tab.
- To rescan the SCSI bus for new SCSI devices, click Refresh.
- To format a virtual disk that has been added to the appliance, click Format. After formatting completes, the disk appears as scsi:x:y. For disks that already contain data, use Mount rather than format.
- To mount a disk containing an existing deduplication store, click Mount.
- To mount the CIFS share, click Add Network Share and provide credentials. These credentials are stored in the appliance, so remounting is completed automatically if the appliance is rebooted.
For more details, you can refer to the official document: VMware Data Recovery Administrator’s Guide
Summary
If you are using VMware vSphere 5.1 or previous versions, you can choose VMware Data Recovery plugin to backup and restore your VMs. If you are using vSphere 6.5 or previous versions, then you can use VMware Data Protection to do that. However, if you are using later version, you may need a third-party software to backup VMware ESXi VMs. AOMEI Cyber Backup can be a very handy free tool.

