
Free & Valid Way to Recover Disabled iPhone without Losing Data
In this tutorial, it offers the free and valid method to recover disabled iPhone without losing data if you have iTunes or iCloud backups before.
By Lora / Updated on March 9, 2026
“iPhone is disabled, connect to iTunes”
The Apple iPad, iPhone, and iPod all are designed to be locked with a passcode. The passcode serves as a privacy safeguard if you misplace your phone or it is stolen.
The ‘iPhone disabled' warning is most commonly caused by pass-code errors. It usually implies that you forgot your iPhone's passcode and typed the erroneous passcode too many times, causing the iPhone to lock itself out to protect itself from possible hacking attempts.
Best way to recover disabled iPhone without losing data
If you receive the warning "iPhone is disabled, try again in [number] minutes," the device is not disabled and you can enter the right code after the time period provided. However, if you get the warning "iPhone is disabled, connect to iTunes," the iPhone is disabled.
You could try to put your iPhone into Recovery mode to fix the disabled issue and then recover the data from iTunes or iCloud backups. Only with backups, you could find all your data back, otherwise, you will erase all your data in the iPhone to fix iPhone disabling and reuse it as a new device.
Part 1. Fix disabled iPhone with Recovery Mode
If you get the "Disabled Connect to iTunes" notification on your iOS device, you could use iTunes to recover access and reset your passcode. With iTunes, a reset means you will lose some data not stored in an iTunes backup. But it is the best method to keep your data as much as possible.
You could fix a disabled iPhone by putting it into Recovery Mode manually and then connecting to iTunes. Please make sure your iTunes is the latest version.
Step 1. Turn off your iPhone. Press and hold the Side button to turn off your iPhone for the iPhone model with a Home button until the power off slider appears. Without it, press and hold the Side button and the Volume down until the power off slider appears.
Tips: Before you turn off your disabled iPhone, please disconnect your device from the computer.
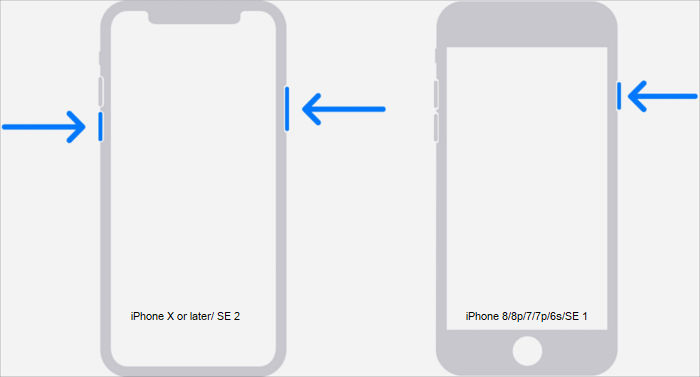
Step 2. Please put your iPhone into Recovery Mode manually according to different iPhone models.
For iPhone 8 or later. Press and quickly release the Volume Up button. Then press and quickly release the Volume Down button. At the last, press and hold the Side button until you see the Recovery Mode screen.
For iPhone 7/7 plus. Press and hold the Side and Volume Down buttons simultaneously. Keep holding the two buttons until you see the Recovery Mode screen.
For iPhone 6s or earlier. Press and hold the Home and the Side buttons simultaneously. Keep holding the two buttons until you see the Recovery Mode screen.

Step 3. Press and hold the iPhone buttons above and then connect your iPhone to the computer immediately. After you see the Recovery Mode screen, you could release them.
If you see the passcode screen, you need to repeat the steps to get your iPhone to Recovery Mode.
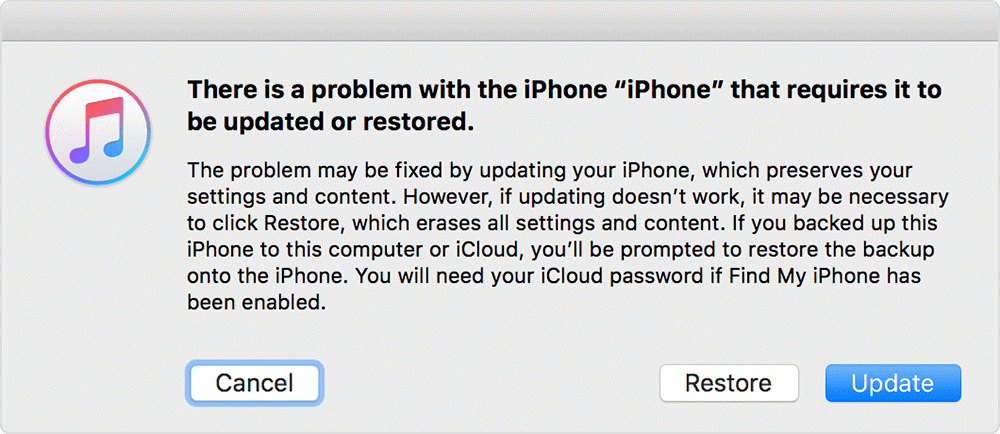
Step 4. Open iTunes. There will be a popup to choose Restore or Update your iPhone. Select “Restore” and then wait for the restore process to complete.
Part 2. Recover disabled iPhone data via backups
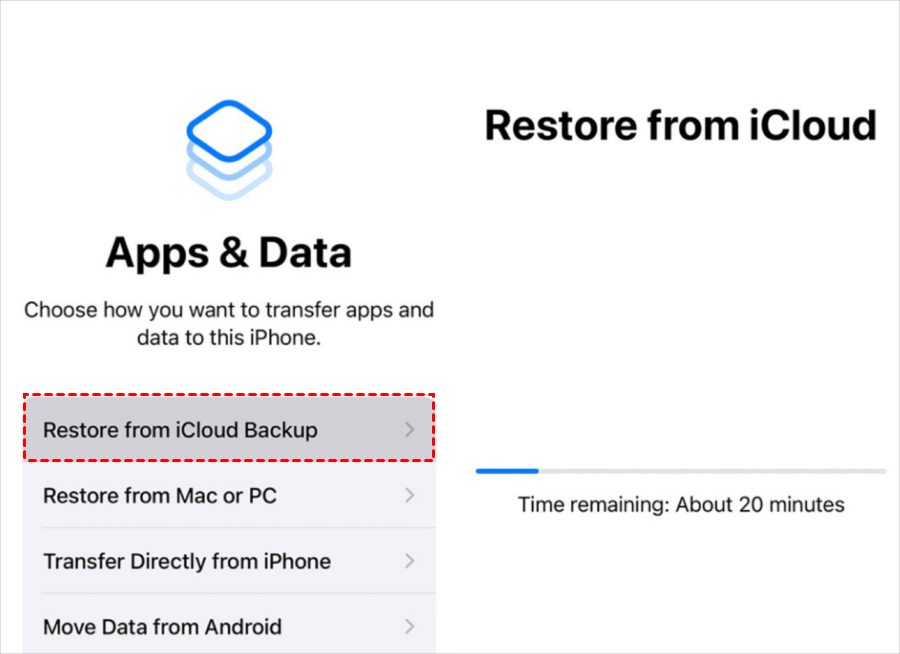
After the restore process finishes, you need to set up your iPhone for the first use. Press and hold the device’s Power button until the Apple logo appears.
Step 1. When comes to the “Apps & Data” screen, you could choose “Restore from iCloud Backup” or “Restore from iTunes Backup”.
Step 2. If you select “Restore from iCloud Backup”, you need to sign in to iCloud with Apple ID and then choose a backup from the list. And then wait for the restore process to complete.
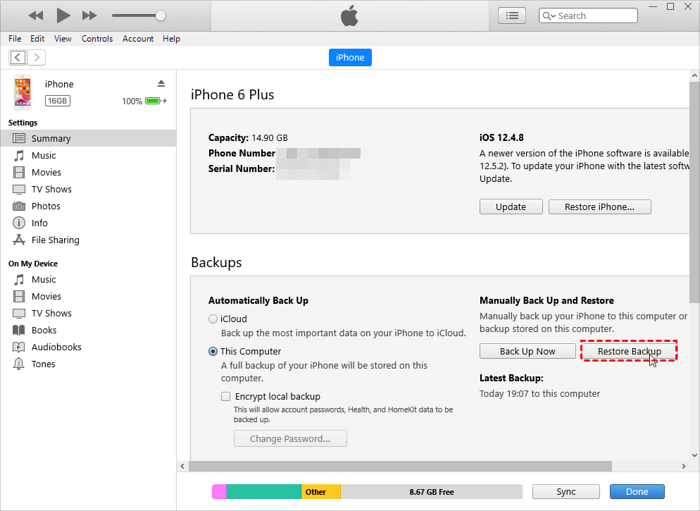
Step 3. If you choose “Restore from iTunes Backup”, you need to connect your iPhone to the computer and then launch iTunes. Click the device icon, and then you need to click “Restore Backup” under the Backups menu. You could choose a backup to restore from the list.
Bonus tip: Using freeware for iPhone backup
By using the methods above to recover a disabled iPhone without losing data, you must know that having iTunes or iCloud backup is a prerequisite to avoid data loss from disabled iPhone. Sometimes, it may be a little difficult to back up iPhone data to iTunes, because some iPhone users report that disconnection between iPhone and computer for no reason during backup.
As we all know, free iCloud backup space is limited to put all data on iCloud drive. It needs an extra charge for more space.
Here we recommend a backup freeware - FoneBackup. It helps users quickly back up iPhone/iPad/iPod photos, videos, music, contacts, and messages. Besides, you could transfer data between an iOS device and a computer.
Conclusion
To sum up, you could use the steps mentioned above to recover disabled iPhone without losing data if you have iTunes or iCloud backups. These approaches are also applicable to the iPad. So, don't be afraid to give it a shot right now. The sooner you act, the better your chances of success.
As a result, backing up your iPhone will usually ensure that the data that is important to you are always on your back.