5 Ways: How to Recover Permanently Deleted Photos FREE
Learn how to recover permanently deleted photos free via 5 feasible ways on this page. You can easily recover permanently deleted photos on Windows, iPhone, and Android.
By Lori / Updated on March 9, 2026
Where do permanently deleted photos go?
If you’ve executed the deleted performance on your Windows or iPhone, the Windows OS or iOS will send your deleted files to the Recycle Bin or the Recently Deleted folder automatically. That’s where do deleted files go on your computers or iOS devices.
Wondering where do permanently deleted photos go on Windows/iPhone/Android? Undeniably, before data coverage, your permanently deleted image files are still on the hard drives because your permanently deleted performance only can erase the information pointing to the location of the image file on the hard drive.

How to recover permanently deleted photos free? There’re corresponding solutions on Windows/iPhone/Android. Moreover, there’s a point that deserves your attention.
After data loss, you’d better avoid taking or storing new pictures on devices. Can you imagine? If you write newly taken photos to the same storage place that saves the deleted or lost photos, your permanently deleted photos will be overwritten.
How to recover permanently deleted photos on Windows
Wondering how to recover permanently deleted photos from hard drives? Why not give the following photo recovery software a shot?
1. Recover permanently deleted photos via photo recovery software
FastRecovery is a professional Windows data recovery software that is easy to use and has a high success rate in recovering data. It can not only recover permanently deleted pictures in the computer's Recycle Bin, but also handle lost photos on external storage devices, such as recovering SD cards, USB flash drives, cameras, and formatted hard drives. It preserves the original format of deleted/lost data.
- ★Functionalities & compatibility below:
- Recover 1000+ file types: Recover permanently deleted photos, Word, Excel, PPT, PDF, Videos, Audio, folders, compressed files, etc.
- During scanning, you can search your needed photos by tying their filenames in the search bar or wait to find all the deleted and other lost files on your computers after Quick Scan and Deep Scan.
- Apply to multiple data loss scenarios: support accidental deletion recovery, Recycle Bin recovery, formatted hard drive recovery,computer crashed recovery, and virus attack recovery.
- Support NTFS, exFAT, FAT32, and ReFS file systems on Windows 11, 10, 8, 7, or Windows Server.
🔥 This software offers 500MB of free recovery space. Download FastRecovery on your Windows computers to recover permanently deleted photos free.
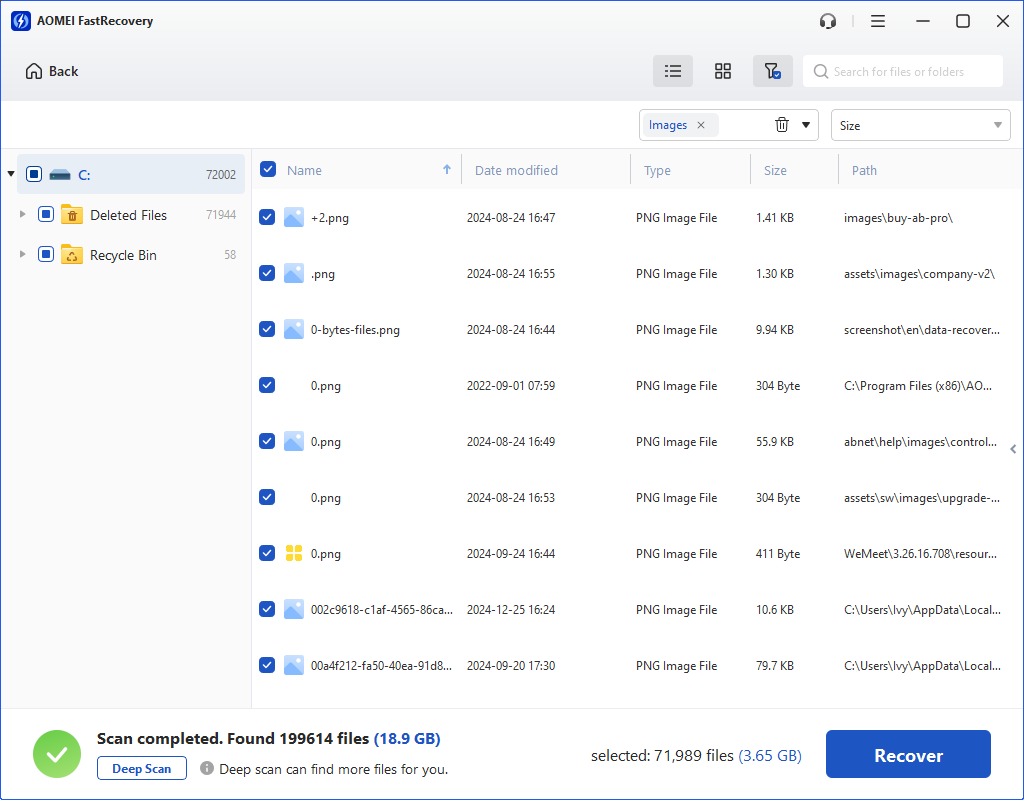
Step 1. Launch FastRecovery on your PC, then hover the mouse over the partition that contains the image files you want to restore. Then click Scan.

Step 2. Search your desired photos or wait to see all the deleted and other missing files after performing Quick Scan and Deep Scan.

Step 3. Go to the Deleted Files/Other Missing Files folder, and choose your desired photos. Please click “Recover x files” and save these restored photos in a new location.
2. Recover permanently deleted photos free via Windows File Recovery
How to recover permanently deleted photos free? Windows File Recovery is among the free photo recovery software. Released by Microsoft, Windows File Recovery works to recover deleted/lost Word, Excel, PPT, ZIP, PDF, JPG, JPEG, PNG, and other files from internal and external hard drives, USB sticks, SD cards, and SSD without paying.
- ✎... Notes: Nevertheless, the free feature also means that it has several limitations.
- Windows File Recovery is only compatible with Windows 10 and later.
- You need to resemble the basic command format winfr source-drive: destination-drive: [/mode] [/switches] based on your selected mode and switches because it’s a command-line tool without a GUI (graphical user interface).
- Ensure the source drive (which stores the permanently deleted photos before data loss) is different from the destination drive (which stores the recovered photos after data recovery).
- Four modes (Extensive, Regular, Segment, and Signature) can support four (NTFS, FAT, exFAT, and ReFS) file systems.
Let’s start with how to select the mode and switches you need.
Step 1. Press “Win + E” to open Windows File Explorer, then click This PC > right-click on the hard drive that includes your desired photos before data loss > Properties.
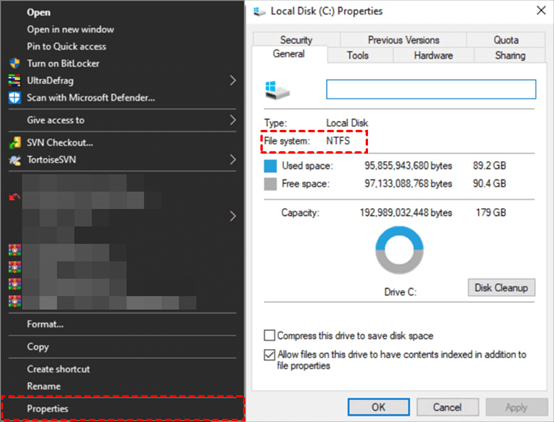
Step 2. Choose a recommended mode after figuring out the file system of your selected hard drive and data loss scenarios.
|
File system |
Scenarios |
mode |
|
NTFS |
Deleted recently |
Regular |
|
NTFS |
Deleted for a while |
Extensive |
|
NTFS |
Formatted disk |
Extensive |
|
NTFS |
corrupted disk |
Extensive |
|
FAT and exFAT |
Any |
Extensive |
Step 3. Choose some switches you want from the following form.
|
Switch |
Description |
Supported modes |
|
/y: |
Recover specific extension groups, comma-separated |
Signature |
|
/p: |
Saves a log file of the recovery operation in a different location than the default location on the recovery drive (for example, D:\logfile). |
All |
|
/a |
Overrides user prompts, which is useful in a script file. |
All |
|
/u |
Recovers undeleted files, for example, from the Recycle Bin. |
NTFS Segment |
|
/k |
Recovers system files. |
NTFS Segment |
|
/g |
Recovers files without primary data streams. |
NTFS Segment |
|
/e |
To keep your results manageable and focus on user files, some file types are filtered by default, but this switch removes that filter. |
NTFS Segment |
|
/e: |
Specifies which file types are filtered. |
NTFS Segment |
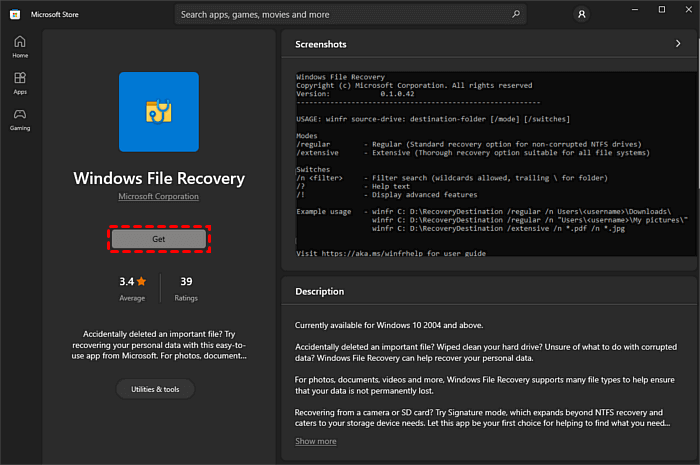
Step 4. Click “Get” to download Windows File Recovery from the Microsoft Store. After installation, “Open” it on your Windows 10/11 computers.
Step 5. Assume you want to recover PNG files from the C drive and save them in the E drive.
Enter “winfr C: E: /n \Users \UserName\Pictures \ *.PNG” in the command prompt window. Please remember to replace UserName with your own username.
Step 6. Press “y” to start the deleted photo recovery on Windows 10/11. If you want to stop the recovery process, press the “Ctrl + C” keys.
How to retrieve permanently deleted photos on iPhone
For iOS devices, how to recover permanently deleted photos free? Two types of iPhone data recovery plans are prepared for you: the traditional way and the alternative way.
1. Recover permanently deleted photos from iPhone using iPhone photo recovery software
If you never made backups, they cannot become your best hedge against data loss. After that, can you recover deleted photos on your iPhone after 30 days?
Or what can you do to recover permanently deleted photos from iPhone without backup? Perhaps you can give MyRecover for iOS a shot.
- ★Key features:
- With a bootable iPhone, everyone is ready to begin the iPhone data recovery process.
- No need to reset your iPhone and restore from backups or erase all content and settings on your iOS devices.
- Before recovery, you can preview all the iPhone data and choose your lost images. And the recovery process can restore selected data to your iPhone.
- Recover Photos, Videos, Contacts, Notes, Reminders, WeChat History, Call History, Calendars, Voice memos, etc.
- Support varied types of iPhone, iPad, and iPod Touch and be compatible with iOS 10.0 and later.
Download MyRecover for iOS on your Windows to recover permanently deleted photos from iPhone 11 pro, 12, 13,14, 15, and 16!
Step 1. Launch this software on your PC and connect your iPhone to the computer.
Step 2. “Trust This Computer” on your iPhone and click the “Scan Now” button.
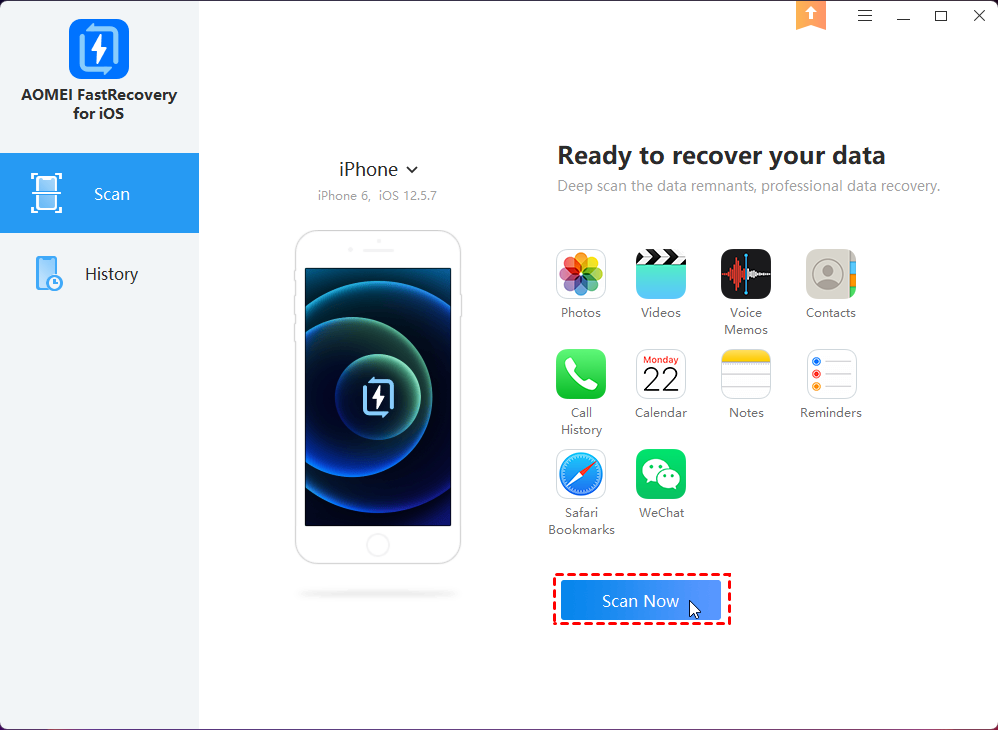
Step 3. After scanning, the window will show all the recoverable photos. You can click the “Recover” button to restore your selected image files.

2. Restore permanently deleted photos from iPhone via iTunes backup
Let’s begin with the conventional method. That is making good use of iCloud or iTunes backups released by Apple. In brief, you can restore your iPhone from iCloud or iTunes backups to recover permanently deleted photos without paying.
As long as you can ensure your selected iTunes backup that includes your desired image files, you’re ready to begin the iPhone permanently deleted photo recovery process.
- Notes:✎...
- If you’ve enabled iCloud Photos, iTunes backup cannot contain the same photos.
- You cannot preview all the files and restore your needed photos before restoration.
- Your selected iTunes backup will overwrite all the existing data on your iPhone.
Step 1. Run the latest iTunes and connect your iPhone to your PC, then click “iPhone” on the left.

Step 2. Select “Restore Backup” after clicking the “Summary” button.
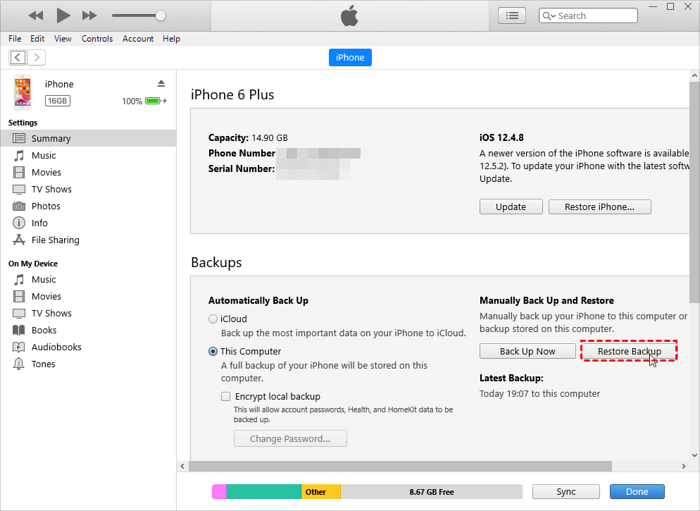
Step 3. Choose an iTunes backup you want and click the “Restore” button. The size of your selected iTunes backup will influence the restoration process. Please wait patiently.

How to recover permanently deleted photos from Android?
Google Photos is becoming increasingly popular worldwide, thanks to Google Drive, which allows users to store, sync, and share files across devices.
Recover permanently deleted photos from Google Drive on Android
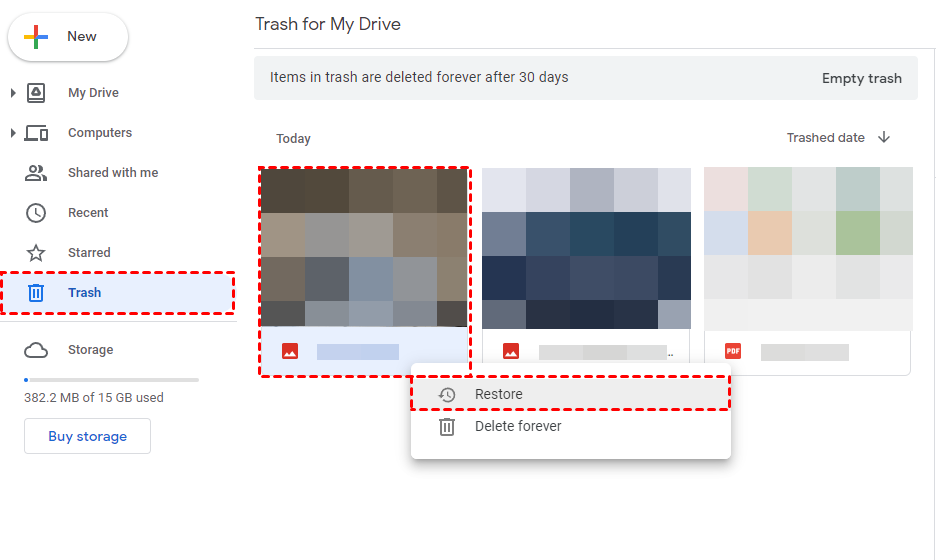
If your photos were deleted within the last 30 days, you can easily restore them from the Trash.
- Sign in to your Google account and navigate to Trash.
- Select the photos you want to restore, right-click on them, and choose "Restore." You can also hold down "CTRL" to select multiple photos at once.
What if Your Photos Were Deleted Over 30 Days Ago?
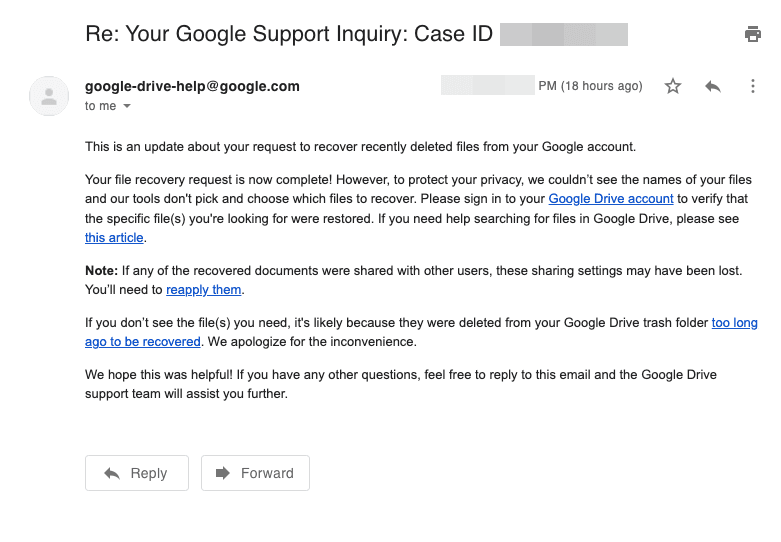
If you need to recover images deleted more than 30 days ago and you've synced or shared those files, you can contact Google Drive Help to recover permanently deleted files.
Step 1. Sign in to your account and go to the Google Drive Help site.
Step 2. Fill in your first and last name, and check the box for “I consent to allow Google to attempt…” Then, click “Submit.”

Step 3. Wait for a response, and you’ll find out if Google Drive can restore your permanently deleted photos.
Relevant Q&A for photo recovery
For Windows and iPhone, how to recover permanently deleted photos free? Please read the corresponding part to get targeted methods. Meanwhile, there’re relevant tips about photo recovery.