How to Use Windows File Recovery to Recover Deleted Files
Wondering how to use Windows File Recovery in Windows 11/10? This article shows you how to recover lost or deleted files using Windows File Recovery and its best and easy alternatives.
By Lori / Updated on March 9, 2026
What Is Windows File Recovery?
Windows File Recovery is a free file recovery software from Microsoft to recover deleted files in Windows 10 version 2004 and Windows 11. It does not have a graphical interface but uses command prompts. Below are main features of it:
- Provides two basic modes- Regular and Extensive for recovering files, suitable for different file systems and file loss scenarios.
- Recover files from healthy, formatted, or corrupted HDD, SSD, external hard drive USB, and memory cards(including SD card).
- Support multiple file systems (NTFS, FAT, exFAT, and ReFS) and file types, such asphotos, documents, videos, etc.
In Windows systems, the deleted files are not removed from the hard drive immediately, because the space is just marked as “free” to store new data not overwritten. So your data are still recoverable.
Pretty confused, right? But don’t panic, you will learn the detailed tutorial about how to use Windows File Recovery below.

If you want to recover deleted or lost data in an easy-to-use way, using simple and professional Windows data recovery software is the wise choice, just go directly to the "Alternative" below.
Knowledge Necessary for Using Windows File Recovery
In Windows File Recovery, you will use the winfr command based on the following format. And it will automatically create a directory named “Recovery_[date and time]” on the destination drive you specify.
winfr source-drive: destination-folder /mode /switches
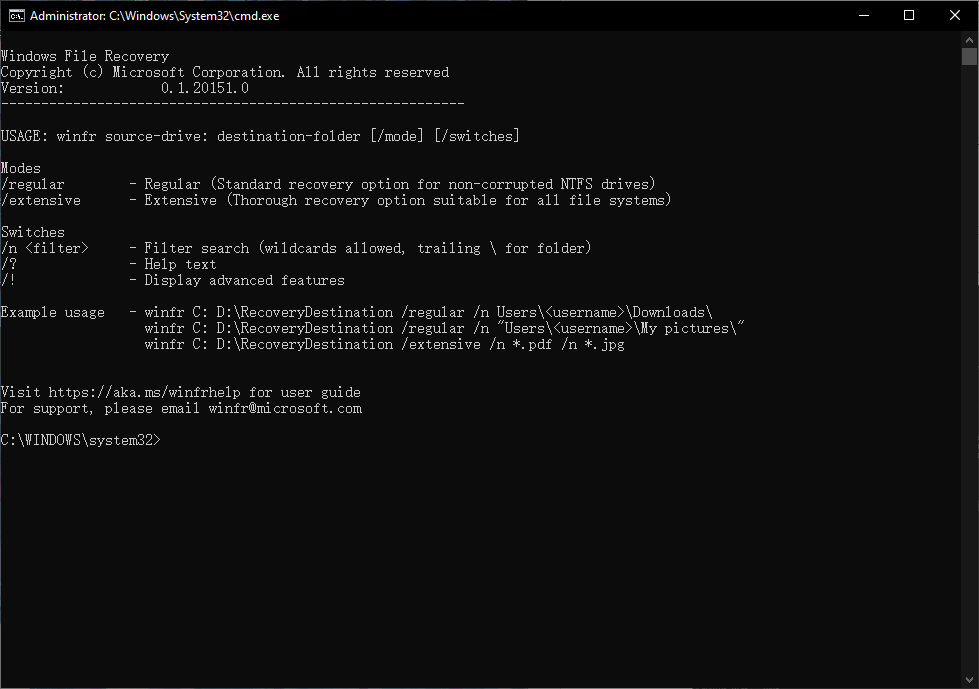
- The source drive contains deleted files while the destination drive is where you want to save them.
- The modes are recovery options for different file systems and data loss scenarios.
- The switches decide the file or file types to search.
Which Mode Should You Use?
In newer versions of Windows File Recovery, Microsoft lists only the regular and extensive modes in its command. The old modes (default, segmented, signed) all moved to the advanced switch.
- Regular mode is the standard mode that uses the Master File Table (MFT) on your drive to search for deleted files. It applies to a healthy (not corrupted) NTFS drive.
- Extensive mode offers more through recovery options to scan your drive, which applies to all file systems including FAT, FAT32, ReFS, etc.
|
File system |
Scenarios |
mode |
|
NTFS |
Deleted recently |
Regular |
|
NTFS |
Deleted for a while |
Extensive |
|
NTFS |
Formatted disk |
Extensive |
|
NTFS |
Corrupted disk |
Extensive |
|
FAT and exFAT |
Any |
Extensive |
For old modes:
- Default mode using MFT tables to search for deleted files. It is the fastest mode to search for recently deleted files on a NTFS drive.
- Segment mode is a slower but more thorough option to search for various attributes of a file on NTFS disk: name, size, type, dates, etc. It is able to recover deleted files a while ago, or after you formatted a drive, or you are dealing with a corrupted drive.
- Signature mode searches for the signature of file types, such as ASF, JPEG, MP3, MPEG, PDF, PNG, and ZIP files (including official documents like DOCX, XLSX, and PPTX). It applies to NTFS, FAT, exFAT, etc.
About file systems:
- If it is a USB drive, flash drive, or SD card, smaller than 4GB, it is usually formatted to FAT or exFAT.
- If it is an internal or external hard drive, USB drive, or flash drive over 4GB, it is usually formatted to NTFS.
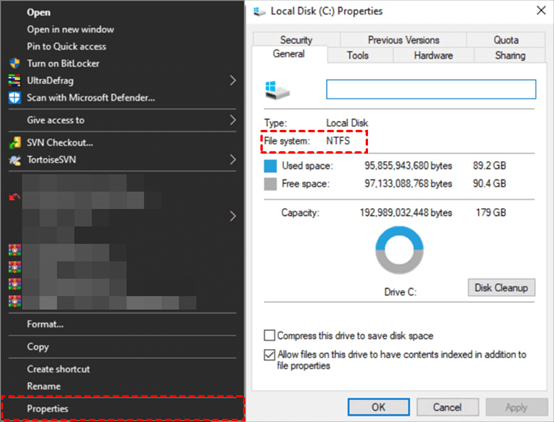
To check your file system, press Win+E to open This PC, locate and right-click on the drive containing deleted files, and select Properties. Then, go to General and find out the file system.
Which Switch Should You Use?
The switch is to filter and narrow the scanning range as well as shorten the recovery time. Below are the most commonly used switches of Windows File Recovery commands.
|
Switches |
Meaning |
Supported mode(s) |
|
/n |
Filter the scan range: scans for a specific file with its file name/path/type, etc. For example:
|
All |
|
/y: |
Recovers specific extension groups. |
Signature |
|
/k |
Recovers system files. |
NTFS Segment |
|
/segment |
Segment mode; recovers files under NTFS drives using file record segments. |
Segment |
|
/signature |
Signature mode; recovers files under all file system types using file headers. |
Signature |
|
/u |
Recovers undeleted files, for example, from the Recycle Bin. |
NTFS Segment |
You can also type winfr /? or winfr /! to get a quick summary of syntax and switches. For more switches, refer to Microsoft documents.
How to Download and Install Windows File Recovery
Windows File Recovery does not install on Windows 10 or 11 by default. So you need to download and install this software before using it. It only works for Windows 10 version 2004 (May 2020) or later versions.
Step 1. Type Microsoft Store on the search box and select the top result.
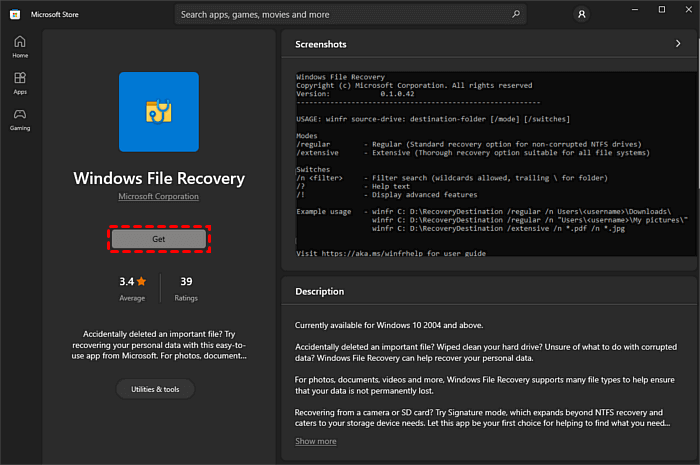
Step 2. In Microsoft Store, search for Windows File Recovery and press Enter.
Step 3. It will show you the search results. Click Get to download and install the Windows File Recovery tool.
Step 4. After the installation process completes, click the Open button. If you don’t want to use it now, just close the Microsoft Store.
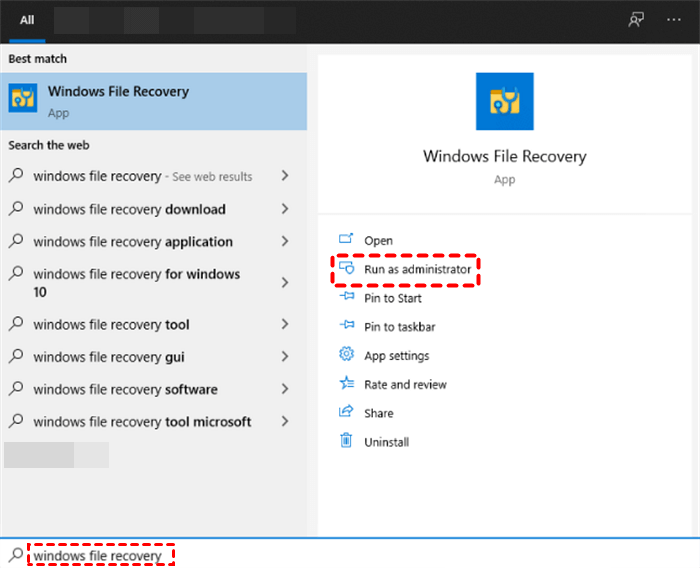
Step 5. To use it later, open your Start menu and type Windows File Recovery. Then, select Run as administrator and Yes to allow User Account Control.
How to Use Windows File Recovery to Recover Lost Files
How to recover files using Windows File Recovery? After learning the knowledge necessary for using Windows File Recovery, you can then follow the examples below to recover deleted files in Windows 10 version 2004 or later.
1️⃣ To increase the data recovery success rate, you need to minimize or stop using the computer. Because any use of your computer can create files that overwrite the “free” space containing deleted files.
2️⃣ To use the Syntax correctly, below are some useful points you can follow. It applies to both Regular and Extensive modes.
- Always use drive letters in the source and destination path, don’t forget the colon (:) after the drive letter, and make sure there is a space between the source and destination.
- When you specify just a folder name, such as /n \Documents\, add a backslash (\) at the end of it.
- If a file or folder name has spaces, surround it with quotes, such as "\Users\\Documents\pendingproject.docx".
Recover Lost Files via Windows File Recovery (Regular Mode)
Open Windows File Recovery and type the command based on its syntax: winfr source-drive: destination-folder [/mode] [/switches]. Here you need to know the destination drive cannot be the same as the source drive. For example:
▶ Example 1: Recover your Documents folder from D: drive to E: drive. Don’t forget the backslash (\) at the end of the folder.
Winfr D: E: /regular /n \Users\\Documents\
▶ Example 2: Recover a file named pending project in the Documents folder from D: drive to E: drive. It will include a real user, folder, file name, and extensions.
Winfr D: E: /regular /n “\Users\\Documents\pending project.docx”
▶ Example 3: Recover all the Word documents from D: drive to E: drive.
Winfr D: E: /regular /n *.docx
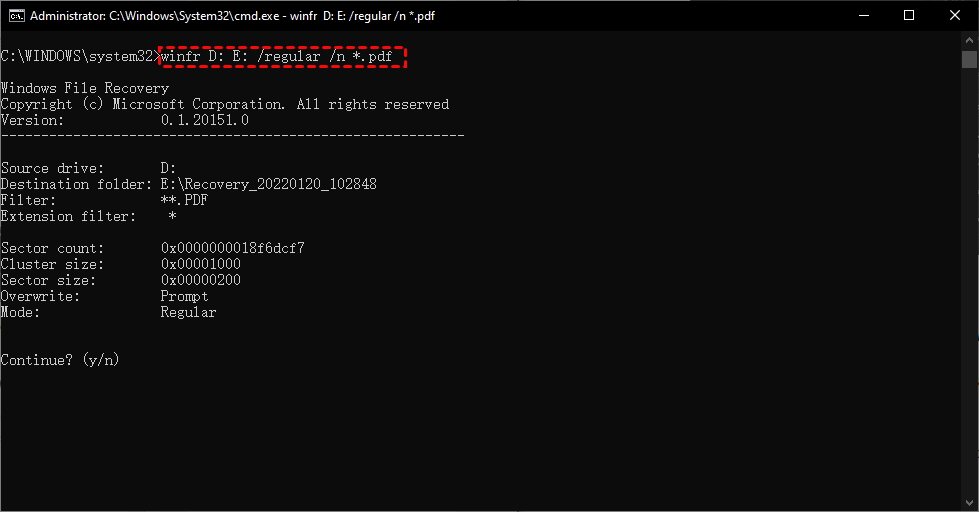
▶ Example 4: Recover PDF and Word files from your D: drive to E: drive.
Winfr D: E: /regular /n *.pdf /n *.docx
You can also search for file extensions like .mp3, .MPEG, .xps, .png, .jpeg, .jpg, and more.
When seeing Continue? (y/n), type Y to continue the recovery process. The recovery time depends on the size of your source drive. To stop this recovery process, press Ctrl + C.
Recover Lost Files via Windows File Recovery (Extension Mode)
Similarly, Open Windows File Recovery. Here you will use Extension mode to recover deleted files. It takes a longer time and applies to all file systems and comprehensive data loss scenarios. For example:
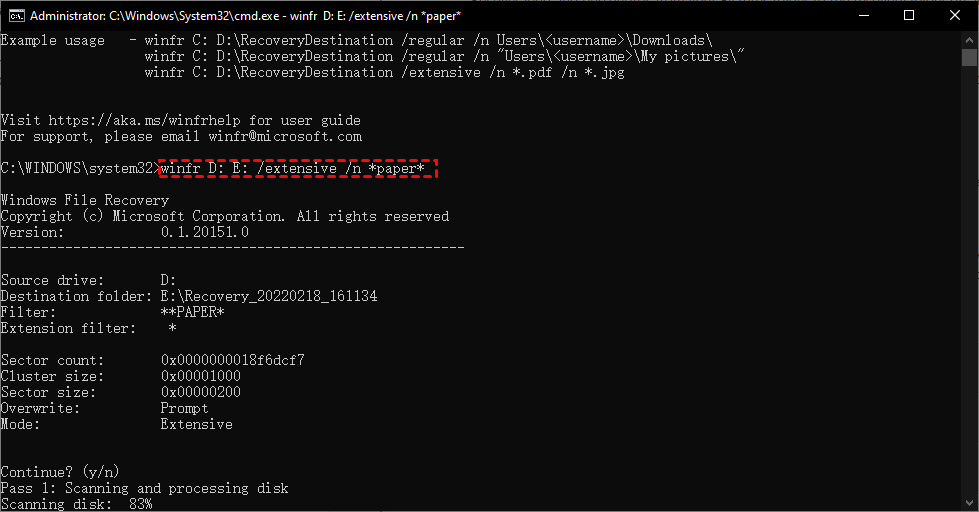
▶ Example 1: Recover deleted files with the string “paper” in the file name from D: drive to E: drive.
Winfr D: E: /extensive /n *paper*
▶ Example 2: Recover jpeg and png images from your Pictures folder to E: drive.
Winfr D: E: /extensive /n \Uses\\Pictures\ *.JPEG /n \Users\\Pictures *.PNG
After the recovery process completes, it will automatically create a folder named “Recovery_date and time” on the destination drive. You access and view all of the deleted files in this folder.
If you are using Extensive mode, this tool will ask if you want to view recovered files, type Y to confirm it.
However, this tool is very difficult for most users who lack computer expertise and skills. Besides, it still has some other shortcomings.
- This tool does not support recovering files from Recycle Bin, cloud storage, and network file shares.
- It is able to extract the file contents, but there is no guarantee that the restored files are usable.
- You may receive error messages like Winfr.exe is not recognized as an internal or external command, WinFR requires admin privileges to run, Windows File Recovery stuck at 99%, etc during the use of Windows File Recovery.
Best Alternative for Windows File Recovery to Recover Data 🔥
If you don’t want to rack your brains to learn how to use Windows File Recovery, try other simpler Windows recovery tools like FastRecovery. It is a great option to help you recover deleted or lost data keeping the original file names, formats, quality, paths, and without omission.

- It has an easy-to-use interface and high success rate & fast recovery speed.
- Recover 1000+file types, such as recover deleted Word documents, Excel, PPT, texts, Emails, images, videos, etc.from heath or damaged HDD, SSD, USB drive, SD card, and more.
- Support filter, preview and recover deleted or lost files during the scanning process.
- Applyto all data loss scenarios, such as lost or deleted partitions, virus infection, formatted disks, recycle bin recovery, computer crashed recovery, etc.
- Suppport Windows 11/10/8/7 SP1 & Server and the all file systems, including NTFS, FAT32, FAT, exFAT, and ReFS.
- 🔥 500 MB of data can be recovered for free.
How to recover deleted files in Windows 10/11 easily? Detailed Windows file recovery instructions are given as follows. Now start Windows data recovery quickly and efficiently.
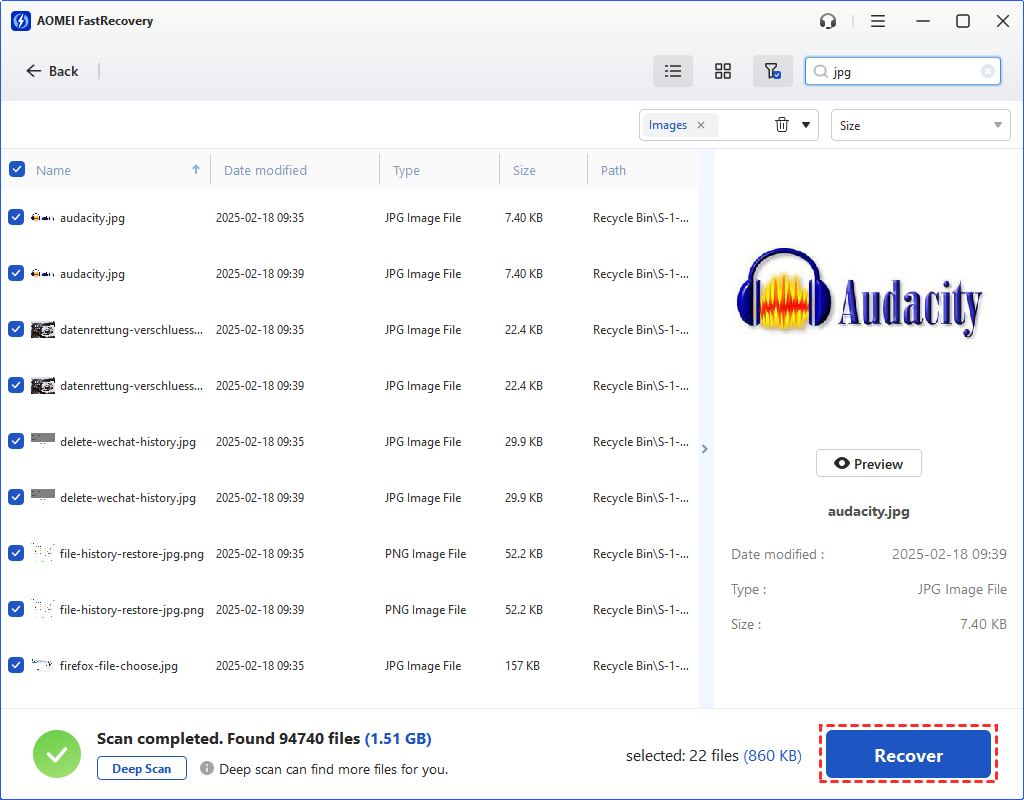
Step 1. Launch the best data recovery software - FastRecovery. Hover the mouse over the drive and click Scan to scan.

Step 2. The software will run Quick Scan and Deep Scan automatically. As soon as any deleted data is found, the tool will display it in the list.


Step 3. Select the files you want to recover and click the Recover x files button to recover deleted files in Windows 7, 8, 10, 11, etc. It will display the number of files to recover and its total size.
- Please save these files to a new location to avoid data overwriting.
- To recover unlimited files simultaneously, please upgrade FastRecovery.
- To avoid losing any data, you need free backup software like AOMEI Backupper Standard to create a copy of your files automatically.
FAQs about Windows File Recovery
How to open Windows File Recovery?
Does Windows recovery bring back files?
Can permanently deleted files be recovered?
Is Windows File Recovery any good?
Summary
With a detailed tutorial above, you can correctly know how to use Windows File Recovery in Windows 10 version 2004 and Windows 11. If you don’t understand it, try the best alternative to Windows File Recovery - FastRecovery. This software also helps to recover deleted files Windows Server 2016, 2019, 2022, etc.
Thanks to its intuitive interface, all users can use it easily. It is capable of recovering deleted files on different storage devices with a high success rate and fast recovery speed, and the supported file types are up to 1000+. Have a try!
It could be noted that please back up important data regularly. Here, you may consider trying this free data backup software for Windows like AOMEI Backupper Standard to create regular file backups.