Windows File Recovery Tutorial – Recover Deleted Files from Windows Better
On this page, an elaborated Windows File Recovery tutorial will be given with Windows File Recovery errors and questions frequently asked.
By Lora / Updated on March 9, 2026
About Windows File Recovery
Windows File Recovery, also shorted as Winfr, was released quietly by Microsoft in 2020.
Microsoft has stated that it can recover deleted or lost media/office/compressed files from healthy/corrupted/formatted HDD/SSD/USB/memory cards in Windows 10 2004 and above.
So many users are very glad and willing to install and use this app to restore lost files on Windows 10.
As a command-line utility, though many users installed it on their devices, so many of them complained about its inconvenience, errors, usability, etc.
Rest assured, whatever problems you are having, you could get help here. This Windows File Recovery tutorial aims at offering a help guide and several solutions to some frequently asked questions and errors.
>> Quick Navigation:
- How do I install Windows File Recovery?
- Why can't I download Windows File Recovery?
- How do I use Windows File Recovery?
- How do I access recovered files?
- Is Windows File Recovery any good?
- Easier Windows Data Recovery – FastRecovery
- WinFR requires admin privileges to run
- Failed to create destination folder
- There was an error parsing your command
- Winfr.exe is not recognized as an internal or external command
- Windows File Recovery Stuck at 99%
How do I install Windows File Recovery?
Firstly, to have it installed on your computer, make sure you are using Windows 10 2004 (Build 19041), or above. If your computer is lower than this, it is necessary to update it.
But you could also try a compatible Windows data recovery software – FastRecovery, which applies to Windows 11/10/8/7/Vista/XP/Server.
Step 1. Input Microsoft Store in the Windows search bar > Open.
Step 2. Input Windows File Recovery in the Microsoft Store search bar > navigate to the home page of this tool.
Step 3. Click Get to install it.
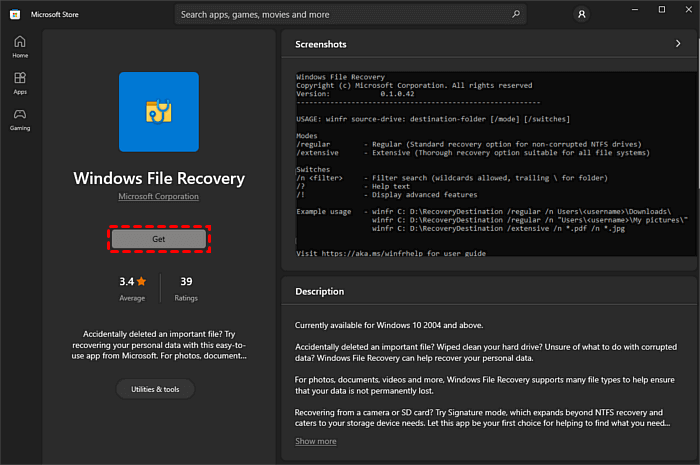
Wait for the downloading, and then it can get installed successfully.
Why can't I download Windows File Recovery?
If you are having a problem downloading this app, there may be something wrong.
Check if your OS and Build are above Windows 10 2004 (Build 19041).
Solution 1. Right-click on the Start menu > select Run > input winver.
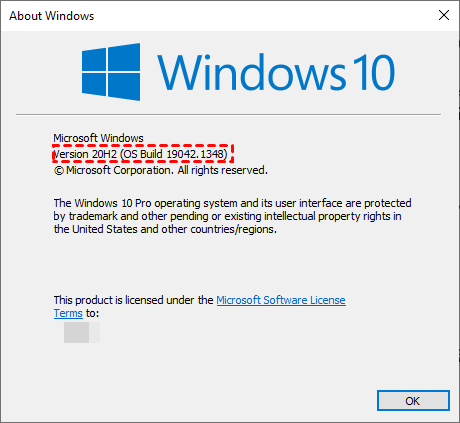
If it is lower than the required OS and Build, try to update OS.
Solution 2. Try to clean up some space on the destination drive where you want to have the Windows File Recovery installed.
Maybe there is not sufficient space to let the tool get downloaded. But before deleting it, please don’t forget to back up your important data on it.
How do I use Windows File Recovery?
If you have successfully installed this app, but don’t know how to use it, this section will be helpful. For time’s sake, here we only offer simple steps, to get more detailed info on how to use Windows File Recovery, please refer to the elaborated guide.
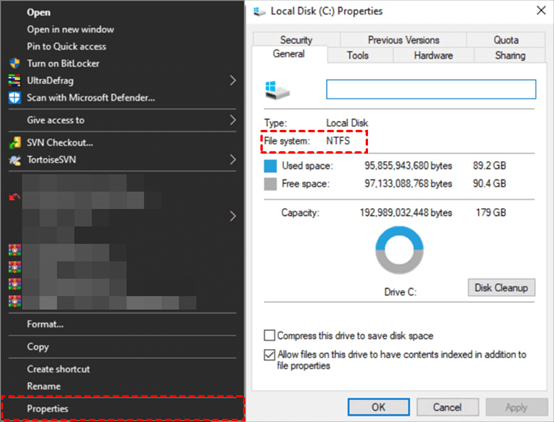
Step 1. Check the file system. Navigate to This PC > right-click on the drive that has lost files > Properties.
Step 2. Choose a recovery mode.
| File system | Scenarios | mode |
| NTFS | Deleted recently | Regular |
| NTFS | Deleted for a while | Extensive |
| NTFS | Formatted disk | Extensive |
| NTFS | corrupted disk | Extensive |
| FAT and exFAT | Any | Extensive |
Step 3. Choose switches to help you narrow the scanning range.
| Switches | Meaning | Supported mode(s) |
| /n | Filter the scan range: scans for a specific file with its file name/path/type, etc. | All |
| /y: | Recovers specific extension groups. | Signature |
| /k | Recovers system files. | NTFS Segment |
| /segment | Segment mode; recovers files under NTFS drives using file record segments. | Segment |
| /signature | Signature mode; recovers files under all file system types using file headers. | Signature |
| /u | Recovers undeleted files, for example, from the Recycle Bin. | NTFS Segment |
Step 4. Run Windows File Recovery > input the recovery command:
winfr source-drive: destination-drive: [/mode] [/switches]
The source drive refers to the drive that has lost files, while the destination can be anywhere you like, except the source drive – they cannot be the same.
To put it simpler, let’s take an example. You have deleted a file named “paper” in D: drive 3 weeks ago, and you want to have it recovered to E: drive. Then you could input:
winfr D: E: /extensive /n *paper*
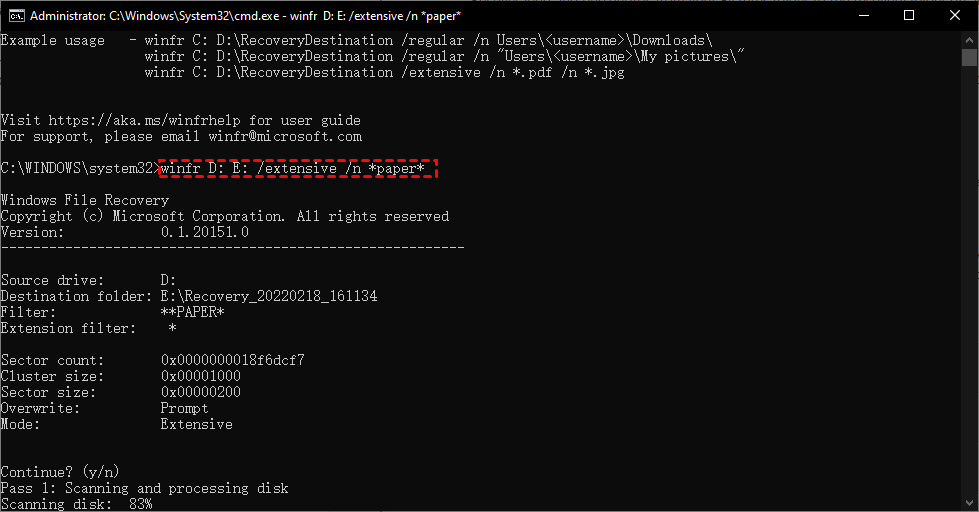
Wait for the scanning process to complete, and then you will get your files recovered.
How do I access recovered files?
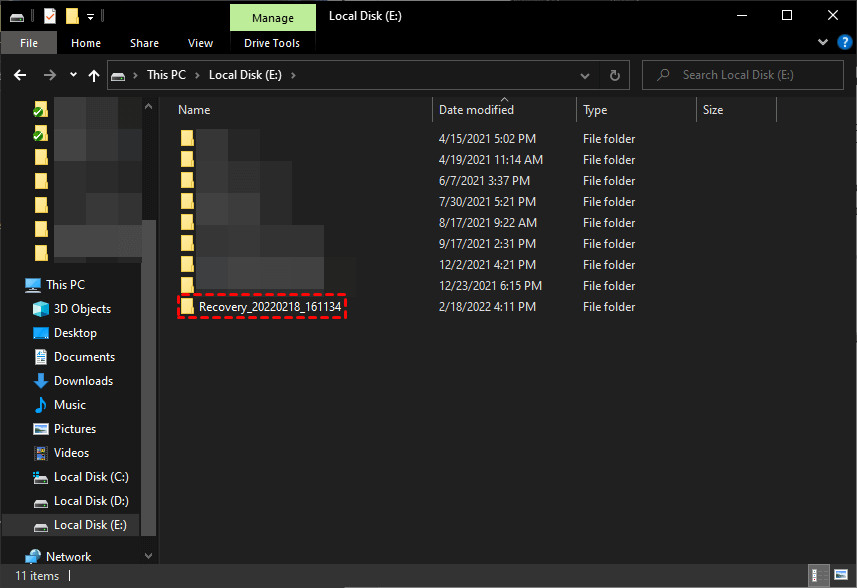
After file recovery, how to get access to the recovered files? Actually, Windows File Recovery will create a recovery folder in the destination drive. The folder will be named “Recovery_date and time”.
Just head over to the destination disk you have chosen, and check the recover folder there.
Is Windows File Recovery any good?
When it comes to the evaluation of a data recovery tool/software, several factors are to be taken into account. Simply put, a data recovery tool needs these to offer a good user experience:
- Usability. E.g., GUI. Software without GUI cannot be commented on as user-friendly.
- Recovery rate. A data recovery software that can actually work and help users get data back can be regarded as a good one.
- Recovery speed. How much time the tool needs to recover data is also significant.
- Compatibility. A good data recovery software needs to work satisfactorily in a different environment, e.g., a different OS.
- Installability. The capacity to be installed in a certain environment.
- …
A good file/data recovery tool needs to be excellent in several aspects. For Windows File Recovery, to some degree, it cannot be deemed as good as users want it to be.
>> In the first place, it is a command-line application, offering no graphical user interface. No interactive menu or option, all users can do is input commands to operate it.
>> What’s more, users need quite some time to learn how to use it – the commands are so difficult. It is so demanding that users are prone to get their grammar wrong. And then users will get errors.
>> Secondly, the recovery rate is quite high under certain conditions, but sometimes, it fails. Those recovery modes it provides can only work under specific situations.
>>Then, it scans 1 disk/partition at a time, and it takes longer. Users need to repeat their operations if they need to recover files from different drives.
>> Lastly, it is quite good at compatibility, to be honest. It applies to NTFS/FAT/exFAT/ReFS and can recover files from HDD/SSD/USB/memory cards.
In a nutshell, it is not that good actually. At least, it didn’t meet users’ imagination and requirements.
Better choice of Windows Data Recovery – FastRecovery
Need a better Windows recovery tool? Users would rather use a professional Windows data recovery software than waste time and labor.
FastRecovery can meet your satisfaction. Compared with Windows File Recovery, this tool is much easier to use, faster, and more compatible.
Using this software, you could easily recover deleted/lost data in Windows 11/10/8/7 SP1 & Server. 200+ types of data/files can get restored with an advanced scanning algorithm.
FastRecovery
A reliable and efficient data rescue tool designed for Windows
- Restore deleted data with all filenames, formats, and directories intact and unchanged.
- Easily restore deleted and missing files within 3 steps.
- 200+ types of recoverable data, including photos, videos, office files, etc.
- Support data recovery from HDD/SSD/USB/SD card, etc.
- Efficiently retrieve lost or deleted data at a very fast speed and a high recovery rate.
No matter how you have got the data lost: accidental deletion, system crash, disk formatting, virus attack, etc., you will get covered. You could also use it to restore permanently deleted files from Windows 10.
- Notes:✎...
- The destination to save the recovered data cannot be the same as the source drive.
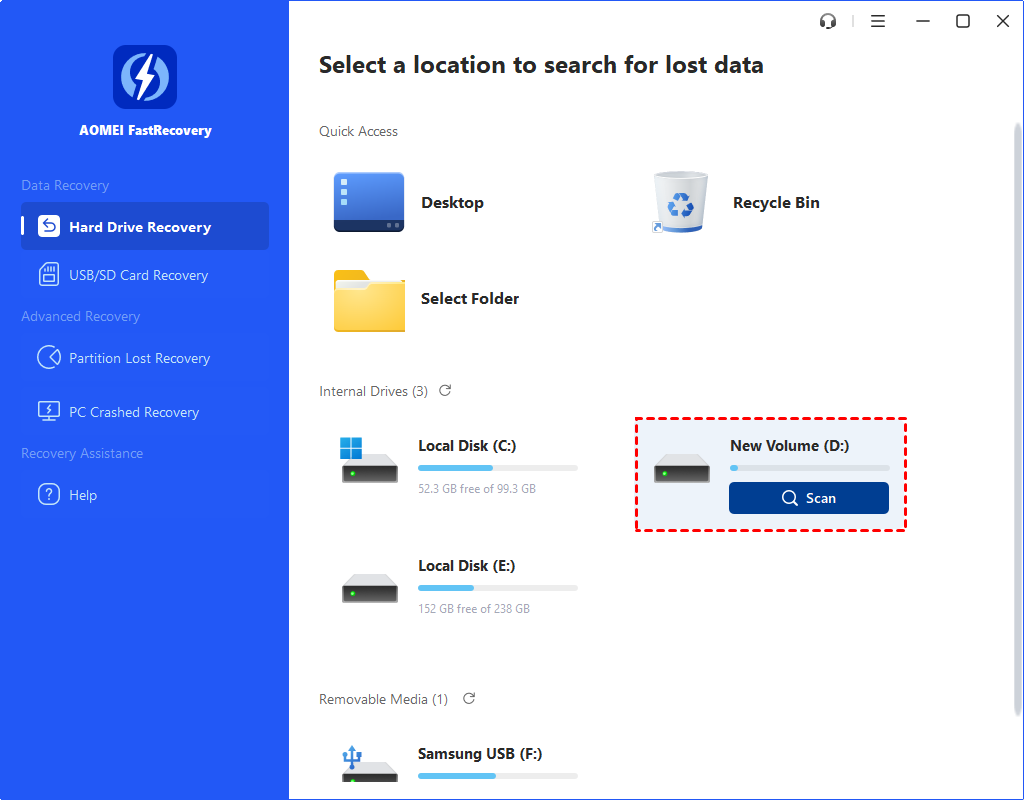
Step 1. Run the software > hover the mouse over the partition where you have deleted or lost data > click Scan.
Step 2. It automatically scans your disk with Quick Scan & Deep Scan to maximize and optimize the data recovery.
Step 3. Check the scanning result > choose what you want to recover > click Recover x files. Don't forget to select another place to save your recovered data.
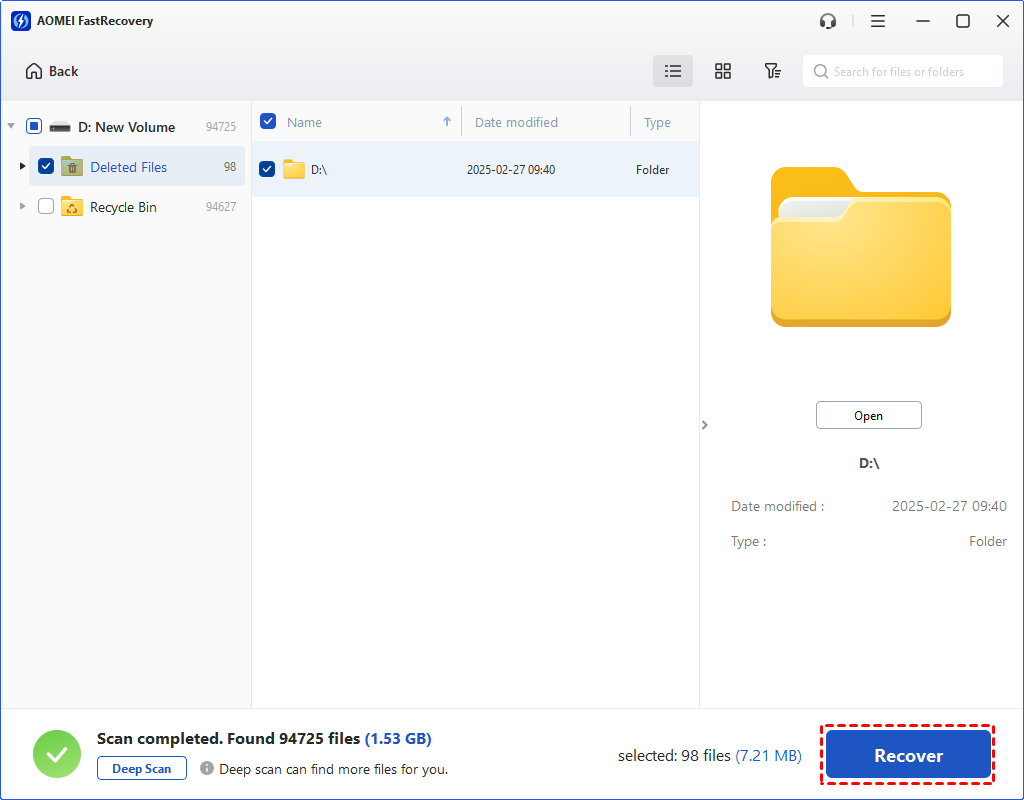
Not only internal hard disk, it can also assist you to recover files from external hard drives.
Windows File Recovery tutorial - errors
Due to difficult commands and demanding requirements, users are suffering from so many Windows File Recovery errors.
Solutions to some frequently encountered errors will be covered in this Windows File Recovery tutorial.
WinFR requires admin privileges to run
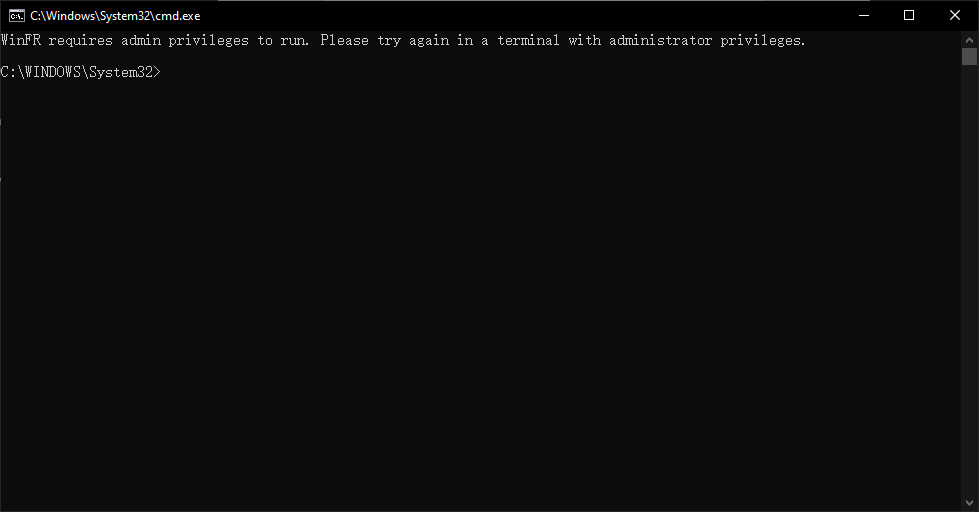
Solution 1. Check the Microsoft account. Go to Windows Settings > Accounts > Your info > confirm whether the account is the administrator. If not, click Email & accounts > Add an account > log in to the account when you download Windows File Recovery.
Solution 2. Open this app in Microsoft Store/PowerShell. Input Microsoft Store in the Search bar > Search Windows File Recovery > click Open. Or Press Win + X keys > select Windows PowerShell (Admin) > input winfr > hit Enter.
To get more info about the error “WinFR requires admin privileges to run”, please get help.
Failed to create destination folder
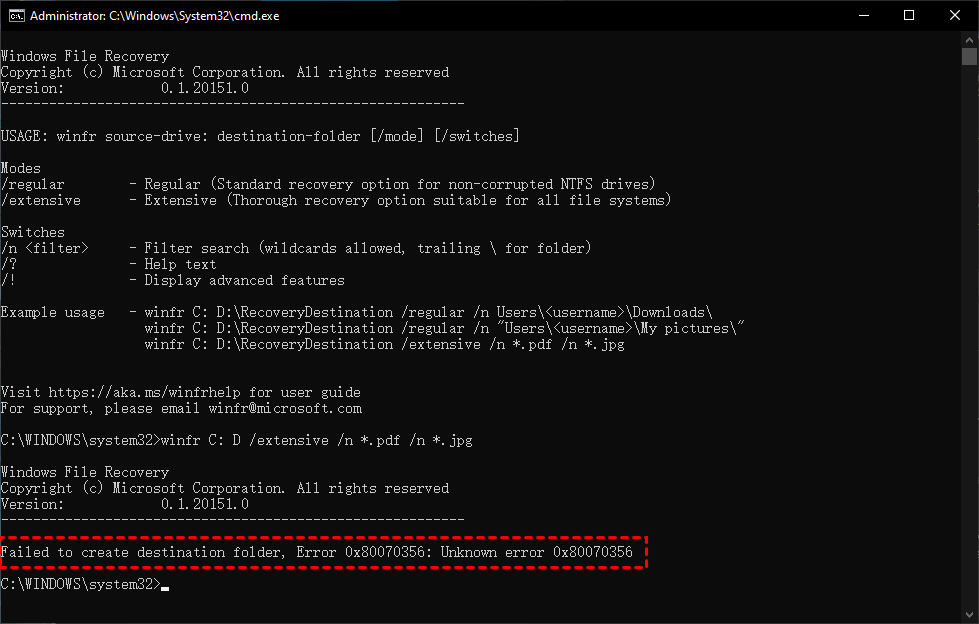
Solution 1. Check the storage space. If there is not enough storage space, try to free up some space by deleting some unimportant files.
Solution 2. Use another destination to store, an external drive is recommended.
Solution 3. Correct the command syntax.
To get a more detailed guide on command syntax, please refer to “Failed to create destination folder”.
There was an error parsing your command
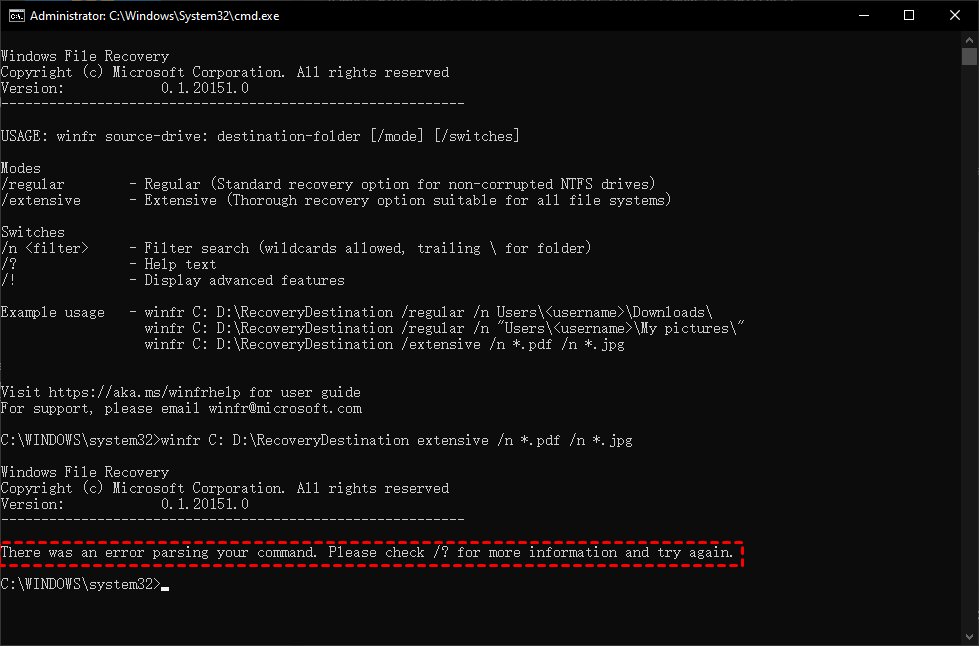
Solution: Check your command line syntax. Check for the source drive & destination drive, slashes, and backslashes, directory.
To get a more detailed guide on command syntax, please refer to “There was an error parsing your command”.
Winfr.exe is not recognized as an internal or external command
Solution 1. Use double quotes for a command with spaces.
Solution 2. Uninstall and reinstall this app.
Solution 3. Run SFC and DISM.
To learn more about the error “Winfr.exe is not recognized as an internal or external command”, please get help.
Windows File Recovery Stuck at 99%
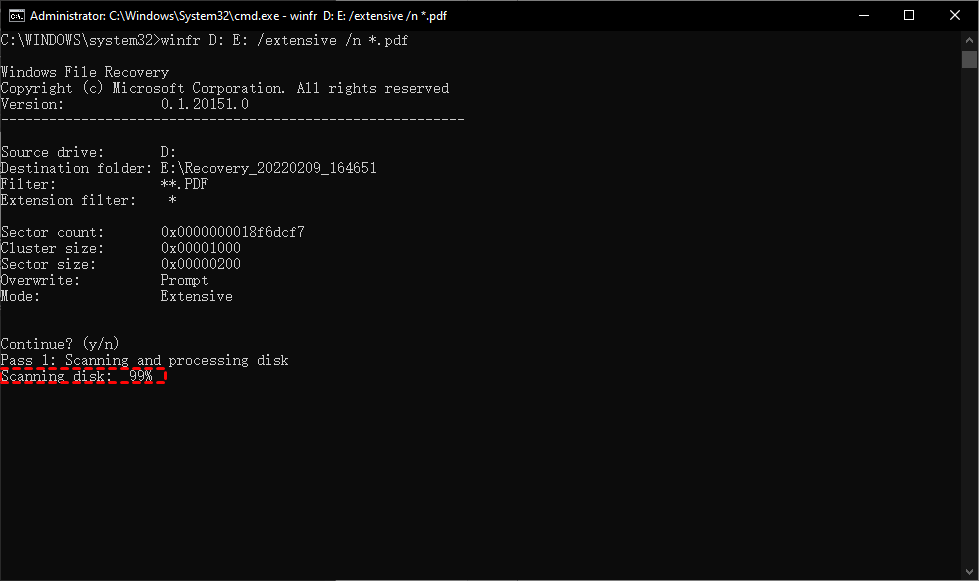
Solution 1. Cancel and retry. Tab on Ctrl+C to cancel it, and then retry the scanning by inputting the command again.
Solution 2. Close other apps. When finding your computer gets slow using this tool, try closing some apps, for example, some background programs.
Solution 3. Restart your computer.
Solution 4. Reinstall this app.
If you want to know more about how to fix Windows File Recovery stuck at 99%, please get help.
Wrapping up
Some frequently asked questions about how to use Windows File Recovery and relevant solutions to frequently encountered Windows File Recovery errors are elaborated in this Windows File Recovery tutorial.
If you need more compatible and efficient software, you might as well try FastRecovery. It applies to Windows 11/10/8/7 SP1 and Server.