How to Replace HDD with SSD in Desktop | Windows 11/10/8/7
You will get an ultimate guide on how to replace HDD with SSD in desktops without reinstalling Windows 7/8/10/11, and boot successfully from the new SSD.
By Ivy Updated on June 24, 2025
You may want to replace HDD with SSD by installing Windows on SSD from scratch. If you still have the installer disc in hand or do not be bothered by the creation and installation operations, it is fine.
Nevertheless, if you want to keep all personal configurations and installed applications on SSD, the most worry-free solution is to replace HDD with SSD without reinstalling everything. Well, before that, you may want to know this information.

How to choose the right SSD for your desktop
If you just have the idea of changing your desktop hard drive on your mind, you may check out this part to assist you in finding a proper SSD for your desktop. If you’ve already purchased one, before doing the migration, it is better to know if it is suitable. Generally, you’d better take these factors into consideration in this event.
#1: Compatibility.
Make sure the SSD you purchase could compatible with your desktop. For example, if you buy an M.2 SSD, be sure that your desktop’s motherboard supports M.2 SSD and there is an M.2 slot at least.
#2: Reasonable disk capacity.
Many desktop users choose to use SSD for OS and HDD for storage to better utilize the advantage of SSDs and HDDs. For only Windows OS and some important data, a 500GB SSD is more than adequate. But if you plan to move everything to a new SSD, a 1TB SSD is much better in the long term.
-
If you are interested in more advanced properties such as power consumption, SSD controller, storage memory (NAND flash), or endurance, you may check this link for reference.
-
If you still have no idea about choosing the right SSD, the most efficient way is to Google an SSD with your desktop brand, for instance, SSD for Dell desktop.
Reliable tool to replace HDD with SSD in desktop
To replace HDD, first, you have to connect the SSD to your desktop. Generally, installing SSD in the SATA port or right slot (eg: M.2, NVMe, PCIe) will be good. Make sure it can be detected by Windows.
Then, you will need professional cloning software like AOMEI Backupper to move everything from HDD to SSD, so that you don’t have to reinstall OS and programs.

- Clone HDD/SSD and MBR/GPT disks, even with different sizes. With the default clone method, you still can clone larger hard drive to smaller one as long as the SSD is no smaller than your used space.
- 4K partition alignment for SSD. AOMEI Backupper has the option to align partitions to optimize for SSD, which ensures SSD’s performance and lifespan by improving its reading and writing speed.
- Clone and resize partitions. You are able to resize partitions on the destination disk during the cloning proess. Also, it supports converting the destination disk from MBR to GPT or vice versa to prevent the cloned SSD won't boot issue due to partition style.
- OS migration only. With its System Clone feature, you can move only Windows drives and boot-related drives to SSD.
Other features like Create Bootable Media, Partition Clone, etc are also embedded. Get it and have a try. Note the Clone feature in this version can only be demonstrated. To execute the operation, please upgrade to the full version.
How to replace HDD with SSD in desktop step by step
1. Launch SSD cloning software - AOMEI Backupper Professional, click Clone, and then select Disk Clone.

-
To migrate OS to SSD only, please select theSystem Clonefeature at this step. All the left steps are the same.
2. Select your current HDD as the source disk.

3. Select the SSD as your destination disk.

4. Here you have the option to choose the highlight cloning features and methods. Be sure to tick the SSD Alignment box since the destination disk is an SSD. Then click Start Clone.

Also, you can use Sector by sector clone to keep the old partition layout or Edit Partitions to adjust the partition size on the destination disk. And the latter one is more practical since it resolves two potential issues during the cloning process.
#1: The cloned drive not show full capacity.
By default, all the cloning software makes an exact copy of source disk unless you change the partition size while cloning. To prevent this from the beginning, try the following 3 options. And the last two options are available on the Professional version.
👉 Copy without resizing partitions: It will not resize the partition size.
👉 Add unused space to all partitions: It will reallocate the unallocated space to each partition of the target disk, appropriate for the disk size.
👉 Manually adjust partition size: It allows you to extend unallocated space to any partition on the destination disk you want.

#2: The cloned drive not bootable after cloning.
One of the biggest reason is the destination and source disk has different partition style and you don't convert them to the same before cloning. In this situation, you can simply check Convert the destination disk from MBR to GPT or vice versa, depending on the disk partition styles of them.
Both MBR and GPT are two different disk types for data storage. And you can check its disk properties in Disk Management. The overall steps are below:
- Press Win + R to open the Run window. Then, type diskmgmt.msc and hit OK to open disk management.
- Then, right-click the disk you want to clone and select Properties in the pop-up window.
- In the Properties window, select the Volume tab and confirm the partition style. It can be MBR (Master Boot Record) or GPT (GUID Partition Table).
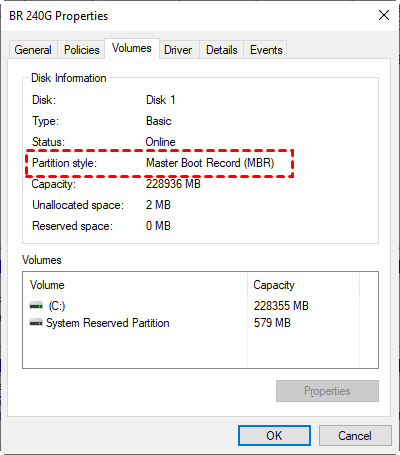
- Similarly, check the disk partition tyle of the destination disk. If it is still MBR, you can clone hard drive from bootable USB for free. To clone GPT to GPT (eg: clone NVMe to NVMe), MBR to GPT, or GPT to MBR, try the professional version.
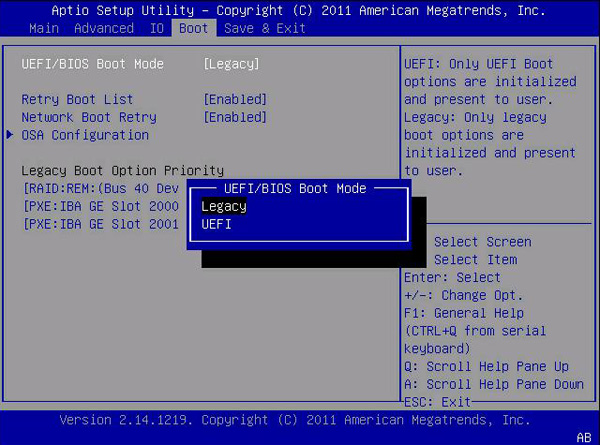
5. Shut down your PC on completion. It is suggested to remove HDD to do a direct test. Or, you can just change the boot order in BIOS. Note that, if you clone MBR to GPT, you need to change Legacy to UEFI in BIOS as well.
Bonus: Why replace HDD with SSD in desktop?
Solid-state Drives, as the trend disk in the hard drive field, are equipped with many advanced features compared to traditional hard disk drives (HDD). Other than desktop users, many people upgrade hard drive to SSD on laptops as well. What are the merits they are pursuing on the SSDs?
-
Better experience. SSDs come with portability and lower power consumption and have faster reading and writing speed. That makes operating systems and applications including games load in a shorter time.
-
Zero vibration and heat. SSDs work with nearly no vibration and heat. It can reduce the risk of losing data caused by shakes and strikes.
-
Strong temperature tolerance. SSDs can work at a temperature from 10 centigrade below zero to 70 centigrade with mighty property.
-
Greater compatibility. For advanced requirements, SSD could be used as a RAID array easily while that will be hard for HDD.
In consideration of all mentioned components, it is pretty necessary to change from HDD to SSD either on a desktop or laptop.
FAQs about replacing HDD with SSD in desktop
1. Can I replace my desktop HDD with an SSD directly?
2. Is there enough space for an SSD in my desktop case?
Typically yes. Standard desktops have multiple drive bays:
-
Use a 2.5-inch to 3.5-inch bracket if replacing a larger 3.5" HDD.
-
For M.2 or PCIe SSDs, check your motherboard and slot availability.
3. Can I keep the old HDD for extra storage?
Conclusion
In summary, it is easy to solve how to replace HDD with SSD in desktop through AOMEI Backupper. As a matter of fact, AOMEI Backupper is capable of a lot of things except for the cloning feature. For example, you can use it to backup data from corrupted hard drive, transfer files between laptop and desktop, and perform scheduled system backup and backup files to Clouds. Incremental backup and Differential backup are also available.

