Complete Guide: Acer Nitro 5 NVMe Upgrade
Are you considering perform Acer Nitro 5 NVMe upgrade, this article provides you with a complete guide. Read this article carefully to safely and successfully complete your SSD upgrade.
By Maggie Updated on September 1, 2023
“Hi, I have Acer Nitro 5 AN515-57. I want to fill a second M.2 slot, but I don't know if there is a second M2 slot. I want to replace it with an NVMe SSD, is it supported by Acer Nitro 5? Can you help me?”
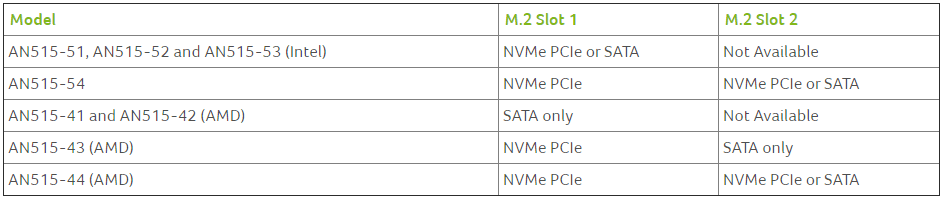
What Type of M.2 SSD Drives Are Supported on the Nitro 5
Some Nitro 5 models have an M.2 expansion slot to add additional storage. See the table below for information on what types of drives your model supports.
Why Upgrade Acer Nitro 5 with NVMe SSD?
Upgrading to an NVMe SSD can greatly improve your laptop's performance and storage capacity, making it a worthwhile investment for those who need a faster, more reliable storage solution. Specific benefits include the following.
- Faster data transfer speeds. NVMe SSDs offer faster read and write speeds compared to traditional SATA-based SSDs or hard drives. This means faster boot and load times, and faster transfers of large files.
- Improved overall system performance. Because NVMe SSDs offer faster read and write speeds, they can significantly improve the overall performance of your laptop. Applications will load faster and your system will be more responsive.
- Lower power consumption. Compared to traditional SATA-based SSDs or hard drives, NVMe SSDs are more power efficient, which can translate into longer battery life for your laptop.
- Increased storage capacity. NVMe SSDs can provide greater storage capacity compared to traditional SATA-based SSDs or hard drives. This means you can store more files, photos, videos and other data on your laptop.
Detailed Steps of Acer Nitro 5 NVMe Upgrade
If you are not sure how to perform Acer Nitro 5 SSD upgrade, you can refer to the detailed steps below. The following steps apply to users who want to replace their old disks to upgrade their capacity on Acer Nitro 5. You can also simply choose to install the new NVMe SSD directly into the second M.2 slot. Before you start, you may need to prepare some necessary tools.
- NVMe SSD supported by Acer Nitro 5.
- Metal Spudger.
- Phillips #0 Screwdriver.
- Reliable data transfer software.
💥 Note: Make sure the laptop is turned off and unplugged before starting the replacement.
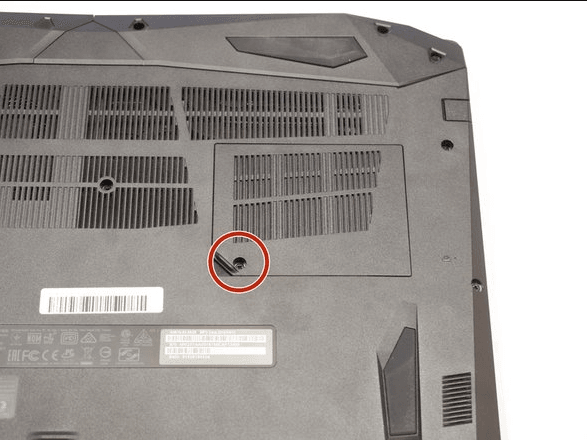
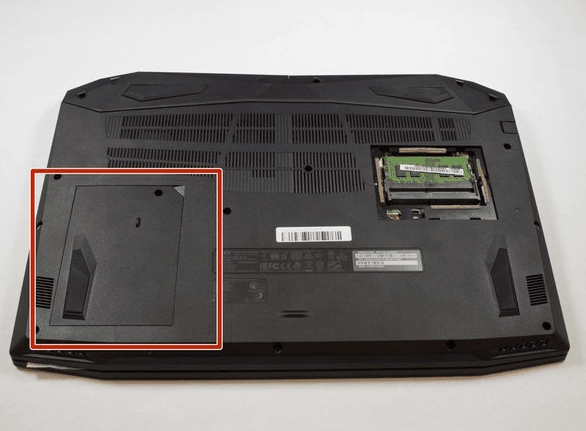
- Turn the laptop upside down so the bottom is facing up. Locate the RAM tray on the bottom of the laptop. Use the Phillips #0 screwdriver to remove the 9 mm screw in the bottom left corner of the RAM tray covering. Remove the RAM tray cover by prying up with a spudger.
- Identify the Hard Drive tray to the left side of the laptop. Remove screw with a #0 Philips screwdriver. Lift up the Slot covering using a spunger.
- Use a #0 Phillips screwdriver to remove the 9 mm screws holding the rear cover in place. Remove the screws from the hard drive and remove it from the unit.

- Carefully remove the back shell from the device working your way around all the edges.
- Remove the back case of the computer. Locate the connector for the battery to the motherboard. Remove the battery from the device.

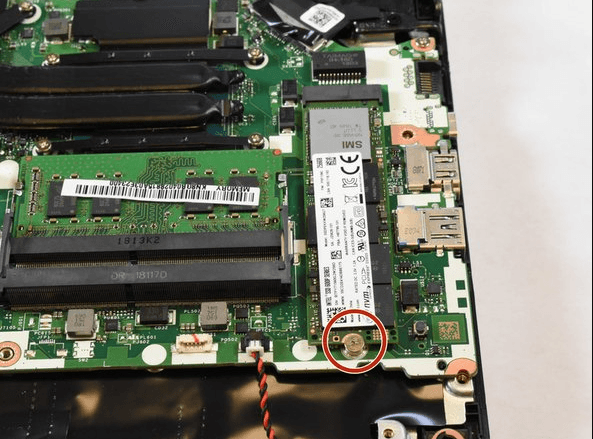
- Locate the SSD in the upper right corner of the laptop. Use a #0 Phillips screwdriver to remove the 3 mm screw holding the SSD card in place, when the screw is removed the SSD will pop out at an angle.
✨ Tip: If you want to keep your original disks, you can choose to install your new NVMe into the second M.2 slot here for the Acer Nitro 5 NVMe upgrade.
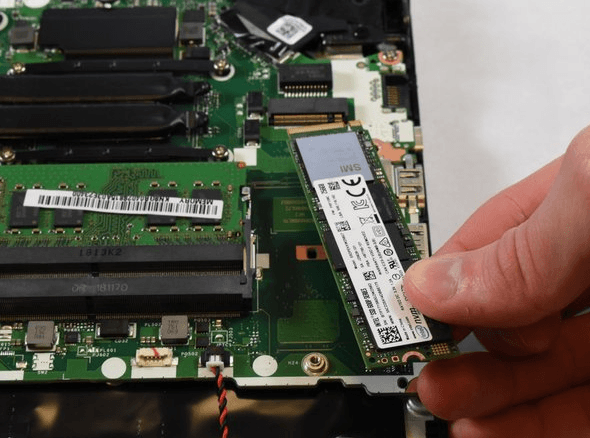
- Slide the old SSD out of its slot. Then insert your new NVMe SSD to implement the Acer Nitro 5 storage upgrade.
Initial New NVMe SSD for Acer Nitro 5 (Optional)
If you are replacing a new NVMe drive, you will need to initialize it after installation. Initializing the SSD is a critical step and not doing so may prevent the SSD from working properly with your PC.
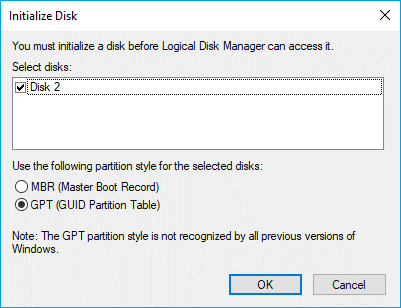
- Install your battery back in its original location and restart your computer. Press Windows + R to open the Run dialog box, type diskmgmt.msc, and click OK to open Disk Management.

- Right-click on the new SSD and select Initialize Disk. Select the MBR or GPT partition style for the SSD.
Securely Transfer System or All Data on Acer Nitro 5
If your disk upgrade process involves migrating your system or data, you can use disk cloning software to help you with this operation. If you are upgrading an Acer system disk you can boot directly from the cloned disk without having to reinstall the system. Whether you want to upgrade your hard drive or replace it with an SSD, the best disk cloning software - AOMEI Backupper Professional - can help you.
This is a cloning software that integrates multiple functions.
- It provides you with Disk Clone, Partition Clone and System Clone. You can select one according to your different needs. If you use the Disk Clone function, all data in the source disk, including the OS, app programs, and user files, will be transferred to the destination disk after cloning.
- It provides you with two cloning methods, including Sector by sector Clone and Intelligent Clone (default). Using the default cloning method, even if the SSD is smaller than your current hard drive, as long as the SSD is not smaller than your used space, you can clone larger hard drive to smaller one.
- And if you want to replace hard drive with SSD in Windows 11, you can use the SSD Alignment option to optimize the SSD performance.
- Other features like Create bootable media, Universal Restore and GPT clone are also embedded.
All Windows PC operating systems like Windows 11/10/8.1/8/7 are supported by this software. Click the download button below to install this powerful software on your computer. If you are a Windows server user, you can try to upgrade your hard drive with AOMEI Backupper Server.
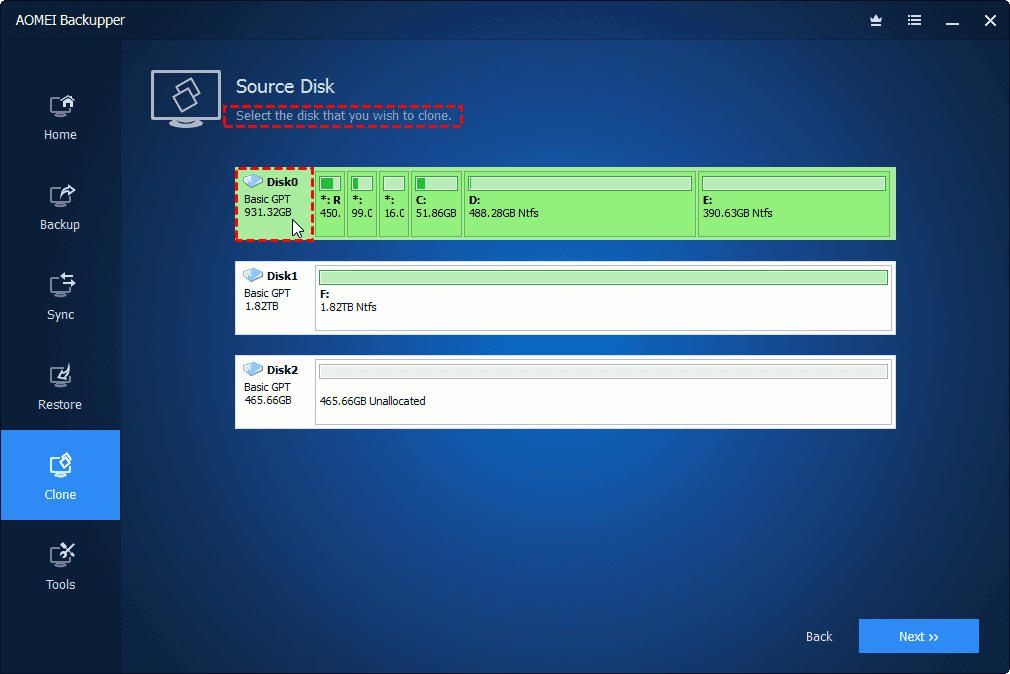
- Launch AOMEI Backupper. Click Clone -> Disk Clone in order.

- Select the disk that you want to clone as the source disk and click Next.
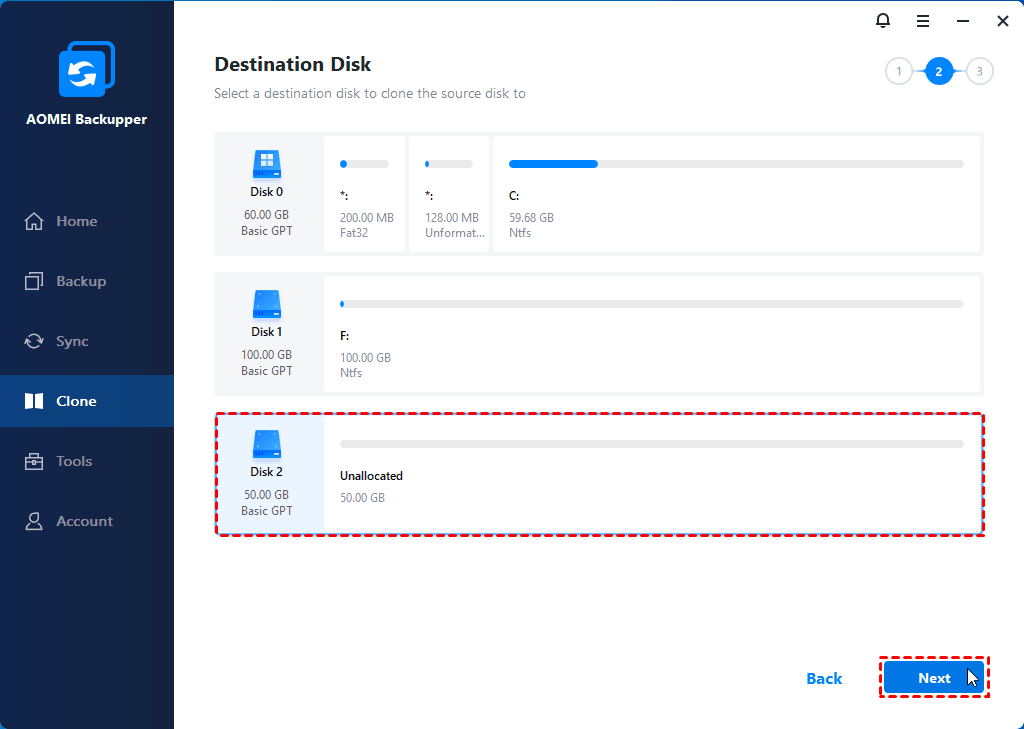
- Select the NVMe SSD you installed on your computer as the target disk, and then click Next.
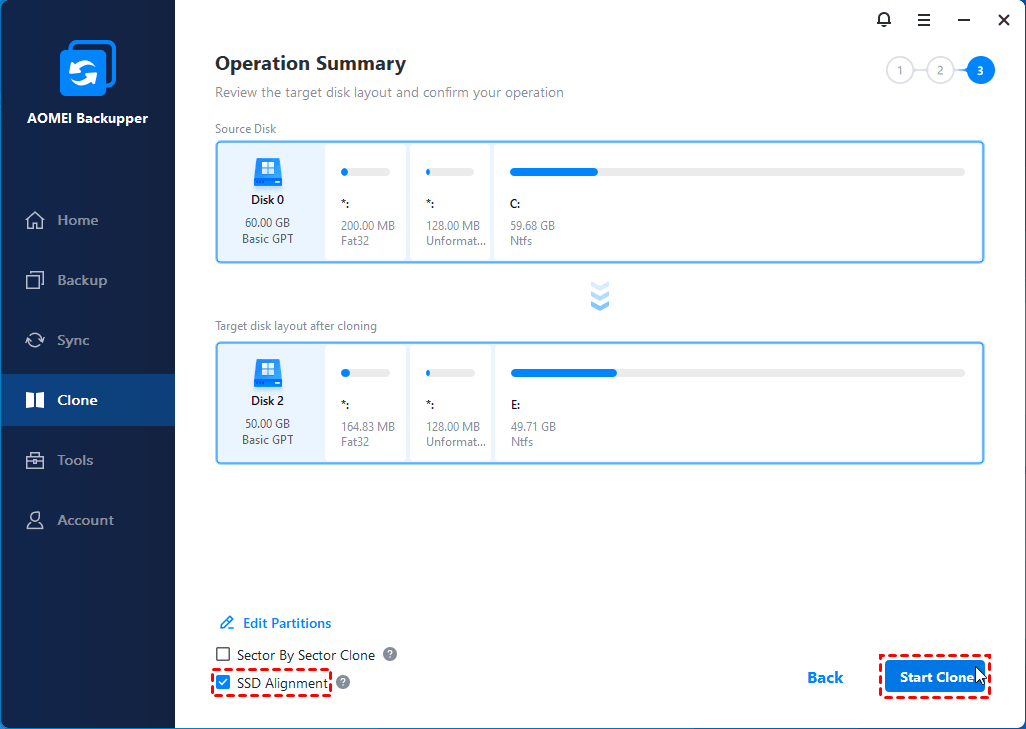
- You will then see the Operation Summary screen. Since you are doing Acer Nitro 5 SSD upgrade, you can click SSD Alignment to increase the read/write speed of the target SSD. After confirming all settings, click Start Clone.
Final Words
To perform an Acer Nitro 5 NVMe upgrade, follow the instructions above in order. If you have some important data on the NVMe you are replacing, remember to create a disk backup in advance using the software described in the article. It can also help you migrate data or systems directly to the new NVMe SSD. You can boot directly from the cloned disk without encountering any problems. Hurry up and try it out!

