Delete or Restore Windows Recovery Environment Partition Safely
You will learn to delete Windows Recovery Environment partition safely or restore this partition without reinstalling Windows. Scroll down to get the stepwise guide and do what you want.
By Ivy Updated on August 28, 2025
What Is Microsoft Windows Recovery Environment Partition?
Here what we say Windows Recovery Environment Partition is an image file created by Microsoft and store as a winre.wim file on device hard drive or SSD in Windows 10/8.1/8/7. It is based on Windows Preinstallation Environment, and can be customized by adding different languages, device drivers, new diagnostic tools etc.
It usually keeps on the same partition where you install Windows or hidden system reserved partition or factory made OEM partition. It contains several recovery tools that allows you to install, upgrade, reinstall or repair your computer when it’s unbootable.
For example, when your computer goes wrong, such as, failed startup attempts, unexpected shutdowns, security boot errors etc, Startup Repair will be invoked automatically to diagnosis and repair problems it can.
Is It Safe to Delete Windows Recovery Environment Partition?
Though Windows RE is not required to start Windows, it’s really important when your computer is not bootable. Thus, it’s not suggested to delete Windows Recovery Environment Partition, especially for personal users. It can help you quickly restore your computer to a good status.
But if your hard drive has multiple recovery partitions, just like the following picture, you can choose delete the nonfunctional recovery partitions to free up disk space. And every time a new recovery partition is created at the right side, the previous one is nonfunctional.

Among them, the 100MB recovery partition was created when you install Windows 7, the 200MB recovery partition was created when upgrading from Windows 7 to Windows 8, the 500MB recovery partition was created when upgrading from Windows 8 to Windows 10.
Remove Windows Recovery Environment Partition Safely using Command Prompt
Step 1. Run cmd as administrator. Then, type diskpart and hit Enter to start the deletion.
Step 2. Type list disk and press Enter.
Step 3. Then, you will see all the disks, type select disk #(it refers to the number of the disk with recovery partition) and press Enter.
Step 4. Next, type list partition and press Enter.
Step 5. After that, you will see all the partitions, type select partition # (it refers to the number of the recovery partition) and press Enter.
Step 6. Type delete partition override and press Enter. Then, wait until you see “Diskpart successfully deleted the selected partition.” or similar.
Note: If there are multiple recovery partitions, please repeat Step 2 to Step 6 until all of them are deleted.
Restore Windows Recovery Environment Partition without Reinstalling Windows
Sometimes, you may need to repair your computer with recovery tools, but you cannot access the recovery environment. Because the Microsoft Windows Recovery Environment Partition is missing. At this time, you need to restore Windows Recovery Environment Partition first. Here are two useful methods you can learn.
Method 1: Manually Copy Windows Recovery Environment Partition from Installation Disc
Step 1. Make hidden and system files available using Folder Options. You need to show hidden hidden files, folders and drives , uncheck Hide extentions for known file types and Hide protected operating system files(Recommended).
To access the Folder Options, there is a little difference in different operating system.
>> In Windows 7: Go to Computer -> Tools -> Folder Options.
>> In Windows 8/8.1/10, Go to This PC -> View -> Options, then you will see a Folder Options window.
Step 2. Copy the full path of winre.wim file. Go to the installation disc -> Source folder, hold Shift key and right click the winre.wim file, then choose Copy as path.
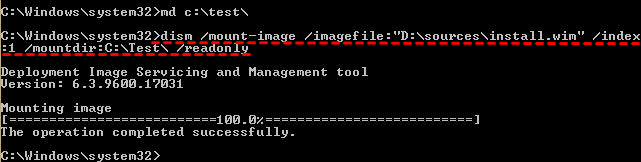
Step 3. Run cmd as admin. Then, type md c:\test\ in the command prompt window and hit Enter, it will create a folder named test on the C: drive.
Step 4. Mount the image file to the created folder using DISM command line.
In Windows 7:
dism /mount-wim /wimfile:"D:\sources\install.wim" /index:2 /mountdir:C:\test\ /readonly ("D:\sources\install.wim" is the location of winre.wim file)
In Windows 8/8.1/10:
dism /mount-image /imagefile:"D:\sources\install.wim" /index:1 /mountdir:C:\test\ /readonly
Step 5. Copy the winre.wim file from the created folder to C:\Windows\System32\Recovery folder. If you are asked to authorize this folder, click Continue to move on.
Step 6. Set the path for winre.wim file. Type the following cmd and run it in the command prompt window.
reagentc /setreimage /path C:\windows\system32\recovery
Step 7. Unmount the install.wim image file using DISM command line. Then, enable the recovery environment and check its status.
In Windows 7: dism /unmount-wim /mountdir:C:\test\ /discard
In Windows 8/8.1/10: dism /unmount-image /mountdir:C:\test\ /discard
Tip on how to access the recovery environment:
♥ Type reagentc /boottore in the command prompt and then restart your computer, it will boot into Windows recovery environment automatically. (This only happen once after you use this command.)
Method 2: Create Windows Recovery Environment Partition with Third-Party Backup Software
If you want an easier way or alternative having the same effect as Windows Recovery Environment partition, you could consider using a trust and reliable third-party backup and restore software like AOMEI Backupper Professional.
Here are two useful feature in this software that allows you to boot your computer when it’s unbootable and then restore system image to new hard drive easily and quickly, namely, “Create Bootable Media” or “Recovery Environment”. The previous one requires a CD/DVD or USB drive, while for the latter one does not require any media. Thus, I’ll introduce the latter one in detail.
Then, let’s start to create Windows 10 recovery environment as an example. And the following steps are applicable to Windows 7/8/8.1 and the latest Windows 11.
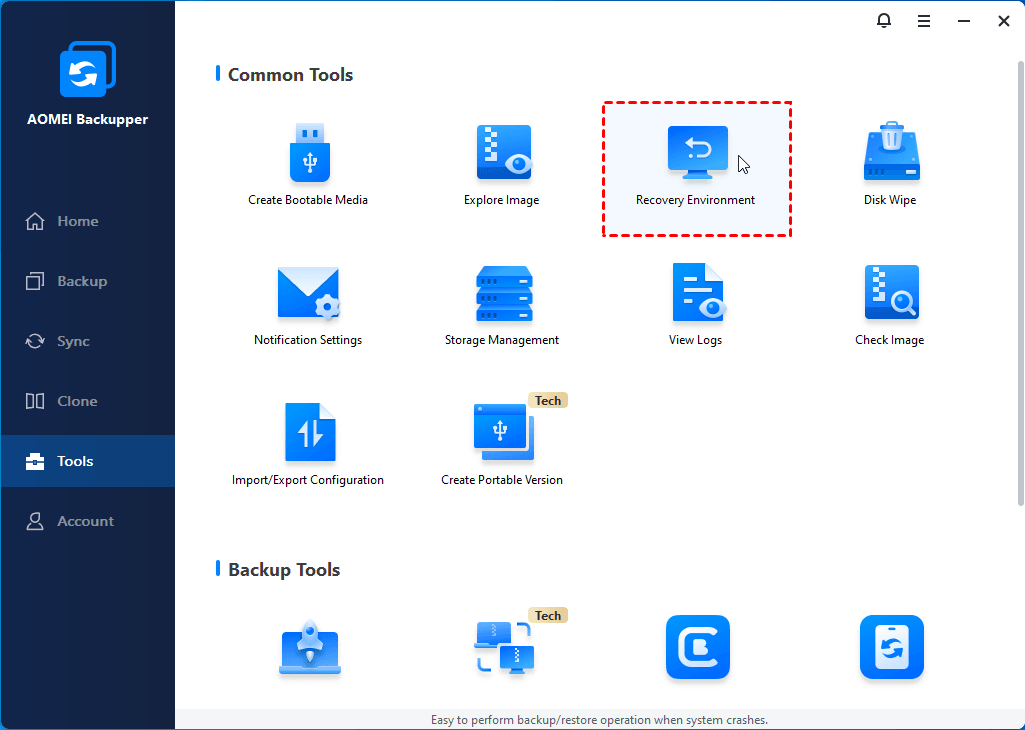
Step 1. Download AOMEI Backupper Professional, install and launch it. Then, click Tools and select Recovery Environment under the Common Tools line.
Step 2. In the Recovery Environment Settings window, tick the option Enable the boot option of AOMEI Backupper recovery environment. Then, set the standing time, it’s 3 seconds by default. You can change it per your needs.

Step 3. Click OK when you are told the boot option will take effect at the next system startup. Then, it will start the creation automatically, you just need to wait.

Step 4. Restart your computer and then you will see two boot options. One is the operating system of your computer, the other is Enter into AOMEI Backupper.

Notes:
♥ The tool currently does not support systems before Windows 7.
♥ The tool currently does not support dynamic system.
♥ You can easily remove AOMEI Backupper Recovery Environment by unchecking Enable the boot option of AOMEI Backupper recovery environment.
Now, you may already create a recovery environment for your computer. Then, it’s time to create a system image or disk image that contains the boot drive(s) required to start Windows, so you can restore Windows 10 backup to new hard drive even with dissimilar hardware. It will be better if you can schedule backup system or disk, this will keep track of changes made later.
Wrapping things up
Windows Recovery Environment partition will be nonfunctional when a new recovery partition is created during the upgrade process, therefore some users may want to delete Windows Recovery Environment partition to free up disk space. You could use DiskPart command line to complete the deletion. Please follow the given stepwise guide carefully, any human error may cause data loss.
Also, some users say they want to access the recovery environment to repair their computer, but the recovery partition is missing. At this case, you can restore Windows Recovery Environment partition using installation disc or directly create a new one with AOMEI Backupper, which is easier.
In addition, this software is still a free yet powerful backup software that can help you protect your system and data continuously by its complete backup and restore features, such as, system backup, disk backup, file backup, schedule backup, incremental backup or differential backup etc. If you happen to have this need, please download it to have a try right now!

