8 Ways to Fix Files Keep Reappearing after Deletion in Windows 10
You can learn why files keep reappearing after deletion in Windows 10 and 8 ways to solve it, as well as the importance of backing up your files regularly and how to do it. Read on for more details.
By Clytze Updated on May 22, 2025
User Case
"I upgraded an old notebook computer to Windows 10 and renamed a folder with my name. After using it normally for a few days, only to find an empty folder with the same name suddenly appeared, and I simply deleted it. However, a week later, the folder with the same name reappeared and I deleted it again, only to have it reappear a few days later and I felt as if I was stuck in a cycle of constant deletion. In the meantime I tried to close OneDrive, but this was pointless and the problem persisted. I can confirm that there are no hidden files in this folder, it is empty, but it just can't be permanently deleted. What should I do now? I hope someone can give solid advice."
Many users are under the impression that deleting files is a simple operation, and the only point of knowledge that needs to be mastered is emptying the resource recycle bin in time to achieve permanent deletion. However, it turns out that the same simple operation can cause no less trouble when it goes wrong, such as the problem described in the case above that keeps reappearing after deleting files on Windows 10. Although the problem does not affect your computer experience, it is still a problem that needs to be solved, and how can you fix it? Starting with the cause is a good way to think about it.
Why files keep reappearing after deletion in Windows 10?
Why do my deleted files keep appearing? If you don't know the reason, please read the following in detail, which will help you to solve the problem next.
- The resource recovery cylinder is damaged
- Virus or malware attack attacks
- Cloud storage software or cloud sync service affects
- Incorrect system permissions
- System file is corrupted
8 ways to fix files keep reappearing after deletion in Windows 10
When you understand the cause of the problem, then try the following 8 methods in turn, I believe these methods can help you solve the problem of deleted files keep appearing.
- Repair damaged resource recovery canisters
- Check system permissions
- Performing a Microsoft Security Scan
- Uninstall cloud storage and turn off cloud sync service
- Enable to prevent roaming profile changes from being propagated to the server
- Delete files with professional software
- Repair corrupted system files
- Deleting files from safe mode
Method 1. Repairing damaged resource recovery cartridges
Deleting a file on Windows 10 actually only marks the space occupied by the file as free space, while the file is still stored in the Recycle Bin, so to delete the file permanently, you need to empty the Recycle Bin. If you see files keep reappearing even after you have emptied all the files in the Recycle Bin, it means that there is probably a problem with the Recycle Bin. In this case, you can try to fix the corrupted Recycle Bin to resolve the problem of files reappearing after deletion. Here are two different ways to do this, you can choose either one.
Repair via Command Prompt
1. Use Windows+S to open the search bar, type cmd, and select Run as administrator.
2. At the Command Prompt window, type rd /s /q C:\$Recycle.bin and press Enter.

3. Type exit again and press Enter to close the Command Prompt and restart the computer.
Repair via File Explorer
1. Use Windows+E to open the File Explorer and tap the View tab at the top.
2. Check the Hidden items checkbox and tap the Options button on the right.
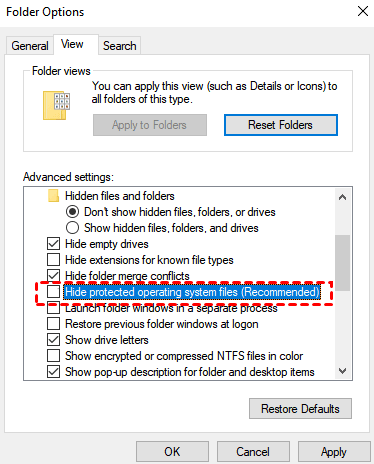
3. Double-click Folder Options, uncheck the Hide protected operating system files (Recommended) checkbox in the Advanced Settings list, and tap OK.
4. Go to the local computer where Windows is installed. disk, tap the search bar in the upper right corner, type $recycle.bin and press Enter.
5. Select the file in the search results, right-click on it, and select Delete in the expanded menu.
6. You will be prompted to permanently delete, tap Yes to confirm permanent deletion.
7. In the Deny Access to Files window, tap the Continue button.
8. Next, follow the prompts to continue confirming the deletion operation.
9. After you see the prompt to delete the file, check the Perform this action on all current items checkbox and tap Yes.
10. After restarting the computer, uncheck the hidden items checkbox and restore all changes made previously.
Method 2. check system permissions
If the system permissions are not correct, then you will not be able to delete or change files, which will probably lead to the problem of deleted files on Windows 10 constantly appearing. Therefore, if you want to fix the above mentioned problem, the first thing you need to do is to check the system permissions.
1. Select the file you want to delete, right-click it, and select Properties in the expanded menu.
2. Switch to the Security tab at the top, then tap the Advanced button at the bottom right.
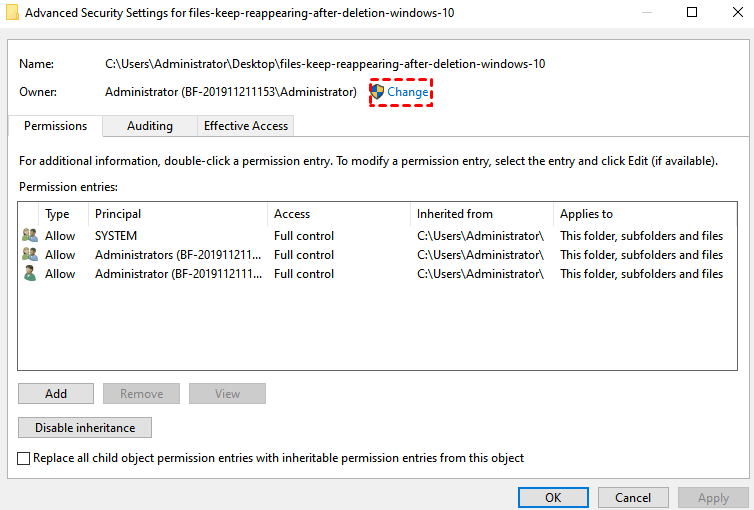
3. At the top of the Advanced Security Settings window, click the Change button next to Owner.
4. Enter Everyone in the box and tap the OK button.
5. Return to the Security tab and click the Edit button.
6. Find the System Permissions section, check the Allow all permissions checkbox, and tap the OK button.
Method 3. Perform a Microsoft Security Scan
In fact, viruses or malware can also cause problems that keep reappearing after deleting files on Windows 10. Therefore, you need to use a specific tool to scan and remove possible viruses or malware in time, and Microsoft Security Scan is a good tool to use. Please note that Microsoft Security Scan is not a tool built into Windows 10, you need to download and install it from the official Microsoft website first.
1. Open your browser and go to the official Microsoft website, find Microsoft Security Scan to download and install it.
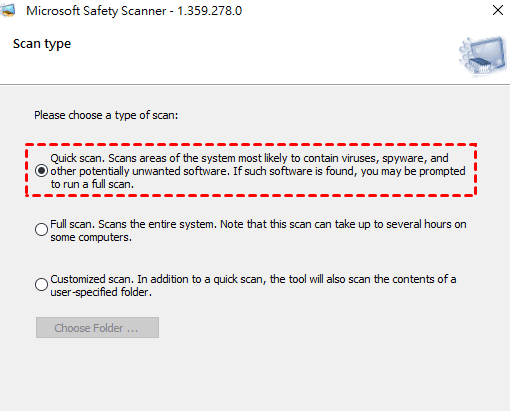
2. Run Microsoft Security Scan which includes Quick Scan, Full Scan and Customized Scan. Select the scan type according to your needs, and click Next when you are done.
3. During the scanning process, if a virus is found, the tool will automatically remove the virus; if malware is found, the tool will automatically remove the malware, and in any case the final scan result will inform you. You can also view the detailed scan results for more information after the scan is completed.
Method 4. Uninstall cloud storage and turn off cloud sync service
Cloud storage can save you storage space and do some extra needs with cloud sync service. For many users, cloud sync is a convenient feature, but at some point, it automatically re-add files that have been deleted to their original location and causes problems that keep reappearing after deleting files on Windows 10. At this point, you may consider uninstalling the cloud storage software or turning off the cloud sync service to solve the above problem.
Uninstall Cloud Storage Software
1. Use Windows+R to open the search bar, type appwiz.cpl and press Enter.
2. In the Programs and Features window, find and select a cloud storage application, such as OneDrive, Dropbox, Google Drive, etc.
3. Right-click on it and select the Uninstall option, then follow the prompts to complete the uninstall process and restart your computer.
Turn off cloud sync service (OneDrive as an example)
1. Tap the arrow icon in the notification area on the far right of the taskbar and tap the OneDrive icon.
2. In the OneDrive window, tap the More button.
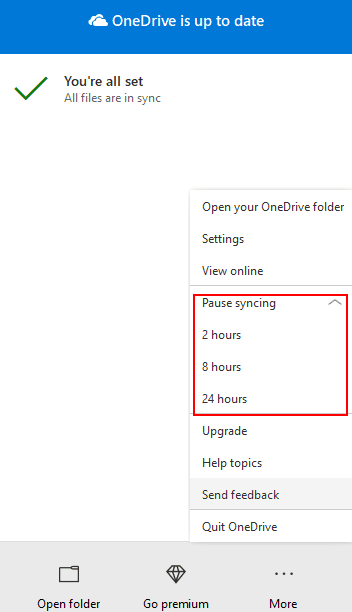
3. Click Pause syncing in the expanded menu, and select the length of pause sync according to your actual needs, including 2 hours, 8 hours and 24 hours.
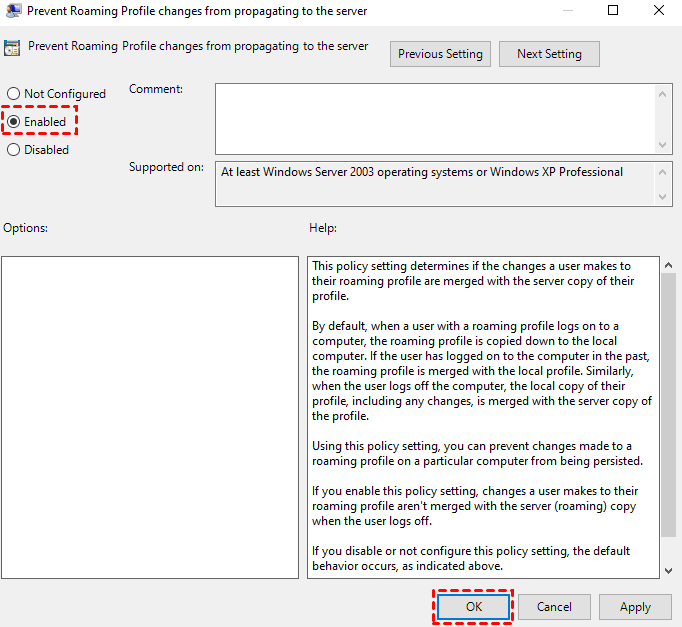
Method 5. Enable to prevent roaming profile changes from being propagated to the server
When we close Remote Desktop Connection, the remote session is simply disconnected and the files configured on the local computer are still synchronized, which can also cause problems with files constantly reappearing after deletion on Windows 10. If you have used Remote Desktop Connection before, you will need to enable the Prevent Roaming Profile Changes from Propagating to Server feature in the local Group Principles Editor, which will help resolve the above issue. Please note that Windows 10 Home Edition does not have a Local Group Policy Editor, so if you want to use this method, it is recommended that you first change your product Gold Wheel to upgrade your Windows 10 version.
1. Use Windows+R to open the search bar, type gpedit.msc and press Enter.
2. In the left panel of the Local Group Policy, click Computer Configuration > Administrative Templates > System > User Profiles.
3. Find Prevent Roaming Profile changes from propagating to the server in the right panel, and double-click to turn on the function.
4. Select Enabled at the top left of the new window and tap the OK button to save the changes.
Method 6. Use professional software to delete files
If none of the above methods can solve the problem that files keep reappearing after being deleted on Windows 10, the reason may be a problem with the deletion feature built into Windows itself. In this case, you can try using professional third-party software to delete the reappearing files.
For example, Easy File Shredder and Secure Eraser are popular applications on the market that can help you permanently delete files, and you can try using these two programs to solve the above mentioned problems.
Method 7. Repair corrupted system files
When a system file is corrupted, it may cause some incomprehensible errors to appear, and the problem that keeps reappearing after deleting files on Windows 10 is exactly one of them. For this reason, you can try repairing corrupted system files to solve the above mentioned problem, which is a worthwhile method to try anyway.
1. Use Windows+S to open the search bar, type cmd and select Run as administrator.
2. In the Command Prompt window, type sfc /scannow and press Enter, this will take you some time.
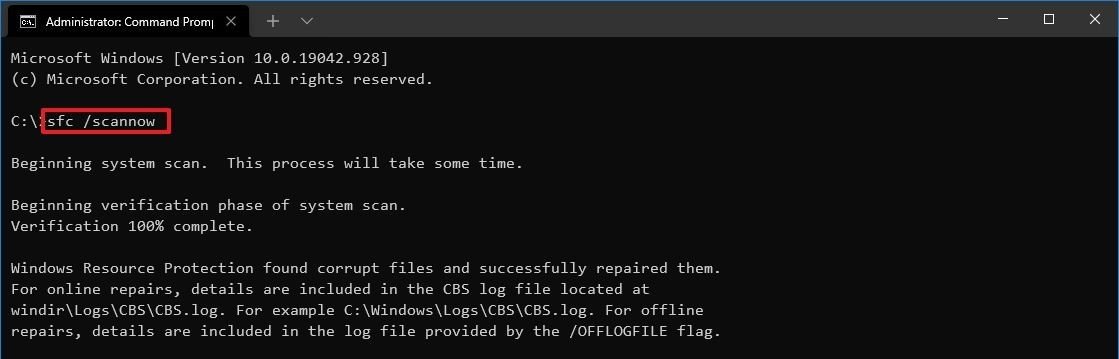
3. Wait for this process to complete and restart your computer.
Method 8. Delete files from safe mode
Safe Mode is a special diagnostic mode of Windows that is able to boot the computer in a minimal state, where only the essential files and drivers needed to execute Windows are started and can effectively exclude the effects of viruses. You can try again in Safe Mode to delete files or explicit malware to solve the above mentioned problems.
1. Tap the Start button, and then tap the Power button.
2. Press and hold the Shift key and select Restart.
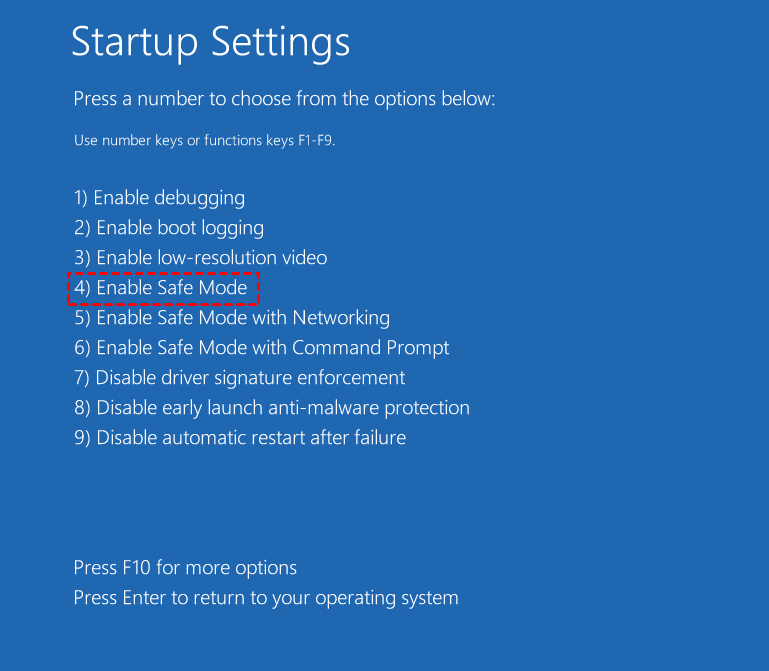
3. After entering Windows Recovery Environment (Windows RE), click Troubleshoot > Advanced Options > Startup Settings, and press F4 or the number key 4 to start Windows Safe Mode.
4. In Safe Mode, remove the problematic files again or uninstall the explicit malware.
5. Open System Settings again, select Normal Boot and then click OK and restart your computer.
Back up files on a regular basis for restoration when needed
From another perspective, the above problem also brings some additional inspiration, such as what should you do if you accidentally delete an important file completely? After all, accidental file loss is not uncommon, and it is an unexpected situation that deserves attention and prevention. For this reason, it is recommended that you use AOMEI Backupper Standard to make regular file backups so that you can restore them as soon as possible in case of accidental file loss.
AOMEI Backupper Standard is a free backup software with a clear and easy-to-use interface that allows you to quickly backup selected files on multiple system versions such as Windows 11/10/8.1/8/7. If you are backing up folders, you can also upgrade to the Pro version and automatically back up files with specific file extensions. In addition, the software allows you to back up the selected files to any location, for example to the cloud. Other hard drives . NAS devices, etc.
If you have never come across this software before, then please read the following steps in detail to ensure that you are able to backup the required files correctly. First, please download and install the software:
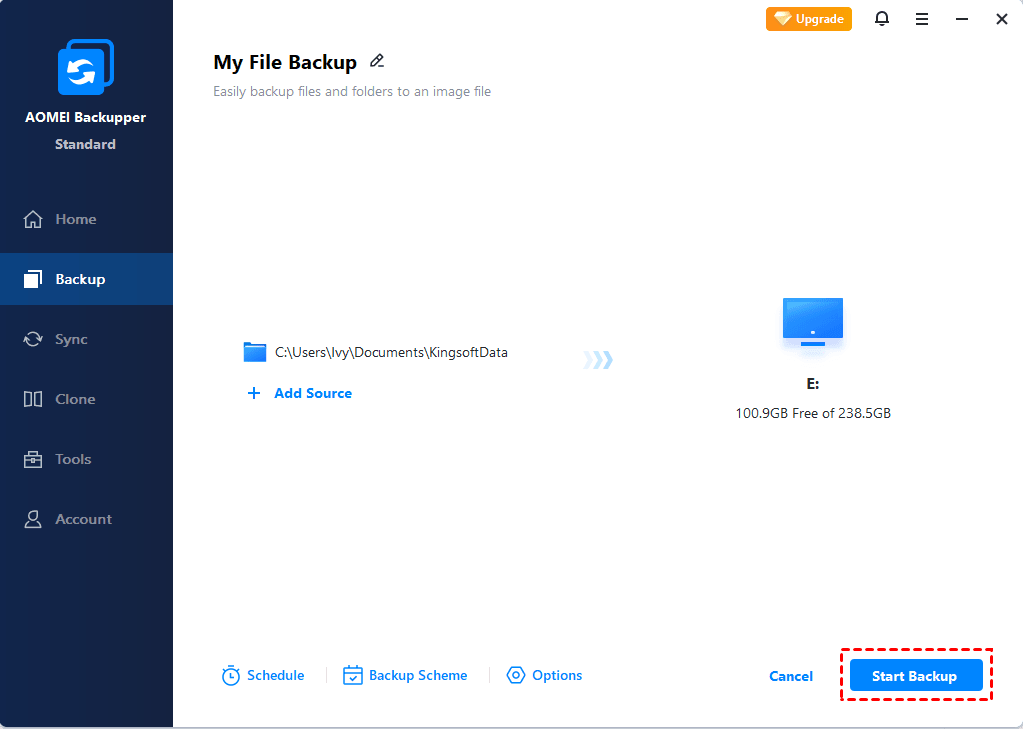
Step 1. Open the software. Select Backup > File Backup. You can also backup files with the Cloud Backup feature.

Step 2. Click Add File or Add Folder, then select the files or folders to be backed up.

Step 3. Choose the destination for your file backup.

Step 4. Click Start Backup to backup your files.
Notes:
- Options: It allows you to compress or split an image file and enable email notification.
- Schedule Backup: It supports setting a backup task to run automatically at fixed intervals, such as Daily, Weekly, Monthly, Event trigger and USB plug in. The last two are available in the Pro version.
- Backup Scheme: You can choose different backup methods. To help you save disk space by deleting older backups, you can enable automatic backup cleanup feature by upgrading to the Professional or higher version.
Summary
Although the problem that keeps reappearing after deletion in Windows 10 does not affect your computer experience, it is recommended that you read this article and fix the problem as soon as possible with the 8 methods provided in the article. For file security reasons, it is recommended that you use AOMEI Backupper Standard to back up your files regularly so that you can restore accidentally lost files as soon as possible.
AOMEI Backupper Standard provides you with free and professional file backup services in multiple Windows versions, so you can backup your important files to any location you want with just a few clicks. You can also use the software to perform. Disk Clone to completely migrate the data from the selected disk to another disk, which is perfect for hard drive replacements or upgrades. In addition, the software can also provide you with Partition Backup and Partition Clone to meet more of your needs.