Error: “DISM Does Not Support Servicing Windows PE” - 5 Solutions
Are you troubled by the error of “DISM does not support servicing Windows PE”? Read this article to learn about 5 repair solutions and another method to protect your computer from failure.
By Yuka Updated on August 28, 2025
Troubled by “DISM does not support servicing Windows PE” Error
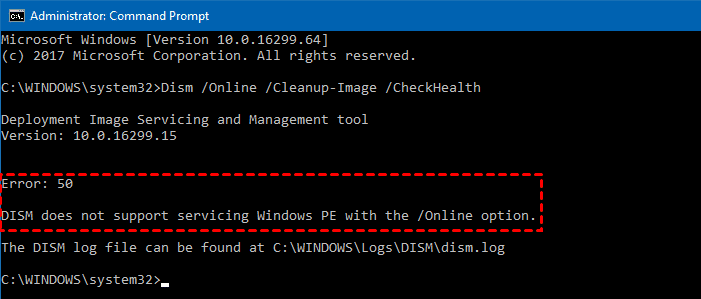
“When I try to run the following command from the recovery environment command prompt: dism.exe /image:C: /cleanup-image /revertpendingactions, I only get an error message: Error 50: DISM does not support servicing Windows PE with the /Online option. Can anyone tell me how to solve this problem when the operating system crashes?”
DISM, an abbreviation for Deployment Image Servicing and Management, is a command line tool that can be used to service a Windows image (.wim) or a virtual hard disk (.vhd or .vhdx). It can be used for Windows PE (Windows Preinstallation Environment), Windows RE (Windows Recovery Environment) and Windows Setup. Among them, Windows PE is an independent pre-installation environment and is a component of other installation and recovery technologies, such as Windows Setup, Windows DS (Windows Deployment Services), Windows RE, etc.
Normally, DISM checks the integrity of the operating system and repairs damaged or modified system files. But just like the dilemma encountered by the user above, errors may occur during the use of DISM, which will seriously affect the user experience. You must try to fix it as soon as possible. Below we will provide you with repair solutions for the above error message. But before starting, it is recommended to understand the cause of the error, so that we can better fix it.
Why Does the “DISM does not support servicing Windows PE” Error Occur?
DISM is usually used to repair errors such as system crashes, but some users will receive the error message: Error 50, DISM does not support servicing Windows PE with the / Online option when running the following commands:
◑ Dism /Online /Cleanup-Image /CheckHealth
◑ Dism /Online /Cleanup-Image /ScanHealth
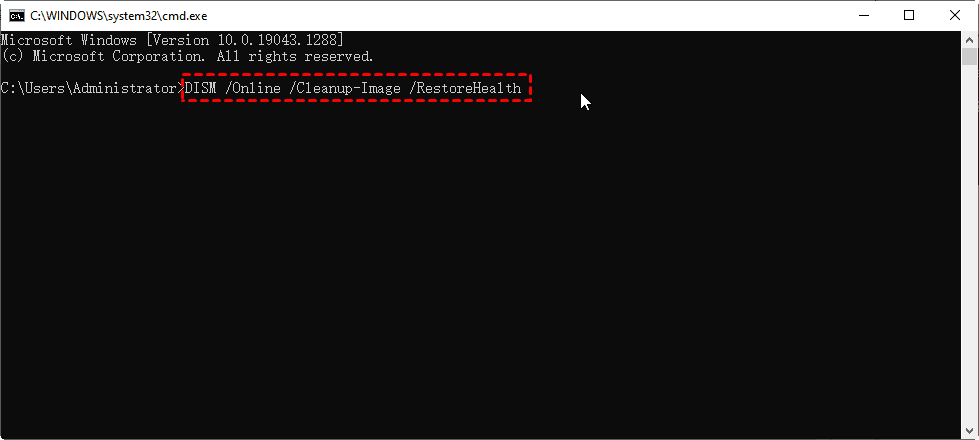
◑ Dism /Online /Cleanup-Image /RestoreHealth
The reasons for this error are: DISM tool thinks that you are not running commands on Windows system, but running commands on Windows PE. Continue to dig deeper, and you will find that this is caused by the wrong placement of the registry key. If you want to fix this error, you can try the following 5 solutions.
How to Fix the Error of “DISM Does not support Windows PE”
Next, I will provide you with 5 different repair solutions to ensure that your computer can return to normal.
Solution 1. Refresh DISM
When you encounter an error like “DISM does not support servicing Windows PE”, you should first try to refresh the DISM tool, which can help you solve various minor software-related problems to fix the error.
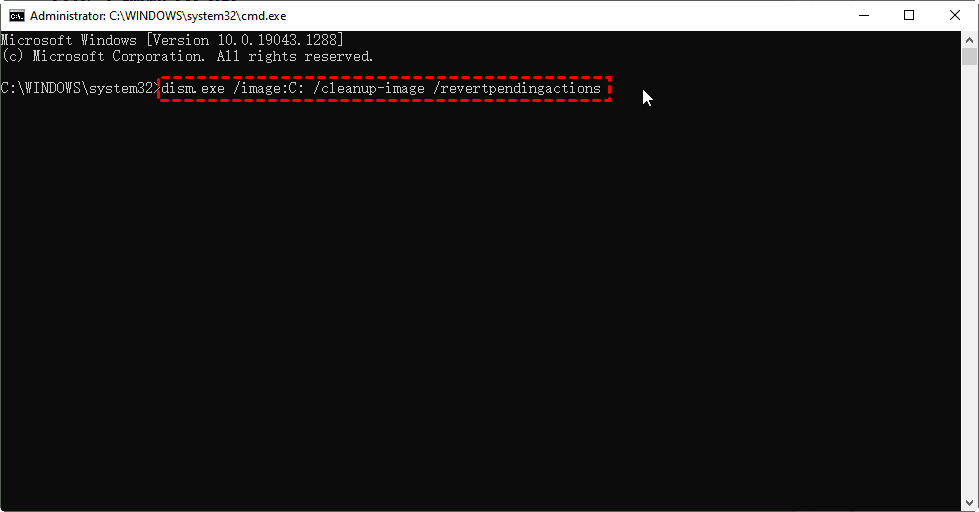
- Press Win + R keys together to open the Run dialog. Type cmd and press Ctrl+ Shift+ Enter together to run the Command Prompt as an administrator.

- Type the following command: dism.exe /image:C: /cleanup-image /revertpendingactions, and then press Enter to execute this command.
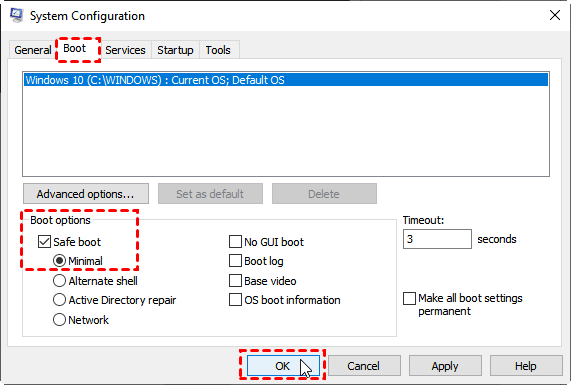
- Type msconfig in the run dialog box and press Enter to start System Configuration.
- Switch to the Boot tab at the top of the opened window, check the Safe boot option and select Minimal. Then click on OK to save changes and exit. After restarting the computer, you will enter Safe Mode.
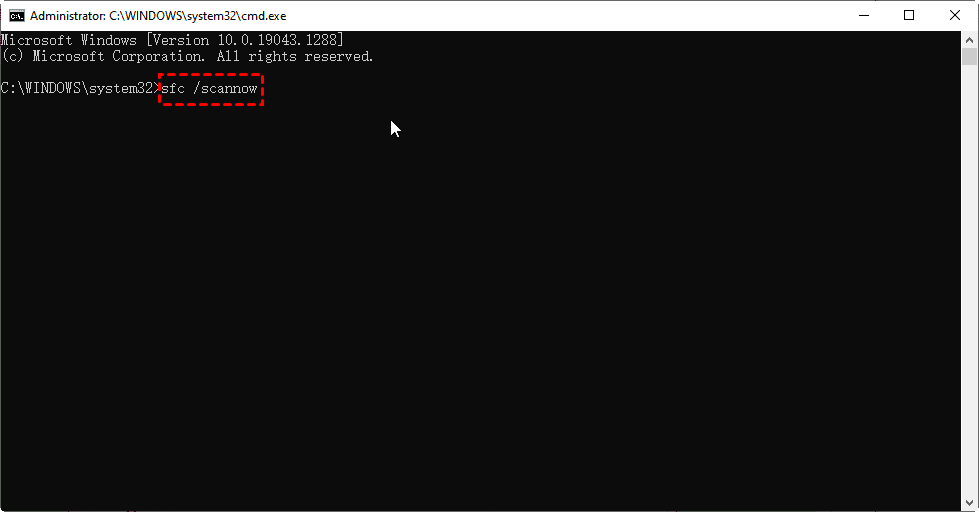
- In safe mode, refer to the above method to start the Command Prompt as an administrator, enter sfc /scannow and press Enter, and wait patiently for the command to complete.
Solution 2. Delete the Related Windows PE Registry Key
Misplacement of the Registry Key is the direct cause of Windows 10 “DISM does not support servicing Windows PE” error. Therefore, if you want to fix the error, you need to delete the associated registry key.
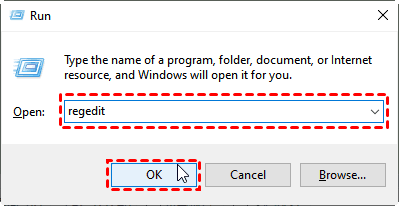
- Type regedit in the Run dialog and press Enter to run Registry Editor.
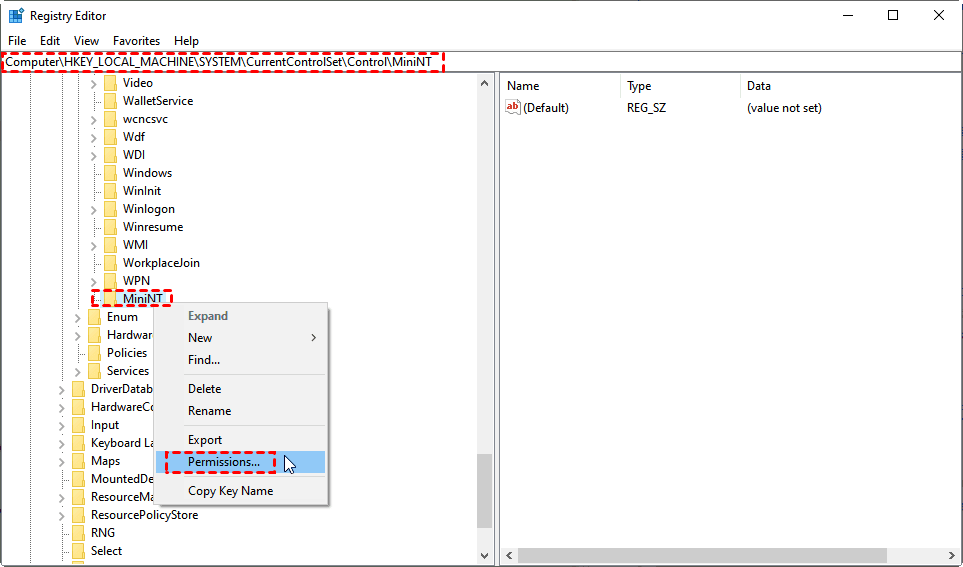
- Navigate to the following path. Find and right-click the MiniNT folder in the left window, and select Permissions from the drop-down menu.
☛ HKEY_LOCAL_MACHINE\SYSTEM\CurrentControlSet\Control
- Find and click your UserName under the Group or user names list, check the Allow box next to the Full Control option, and then click OK.

- At this point, you can choose to delete the MiniNT folder and restart the computer.
Solution 3. Use the Command Prompt
When you run the Dism /Online /Cleanup-Image /RestoreHealth command, you may also receive the error message that DISM does not support Windows PE. The reason is that there are problems with the operating system of the /RestoreHealth parameter, and you need to fix them. In order to solve this error, you can execute some commands in the Command Prompt to solve this problem.
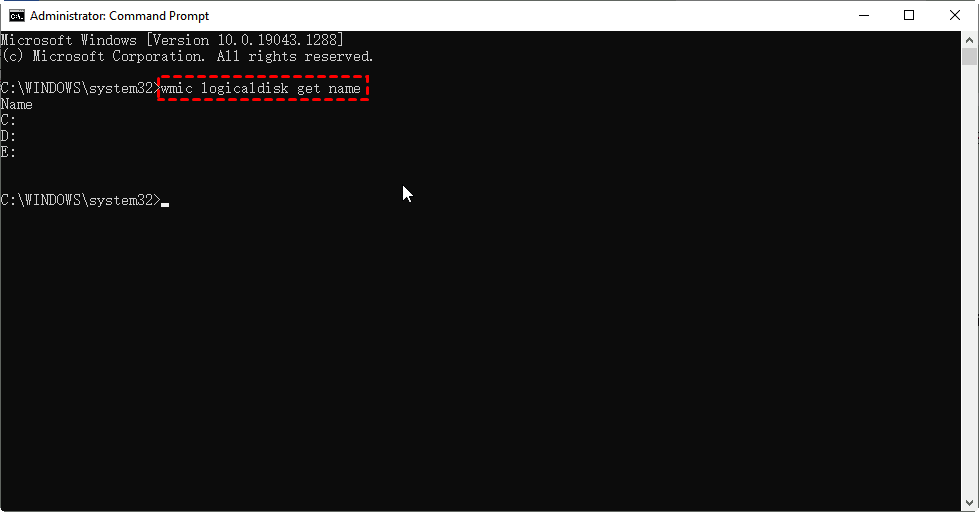
- Start the computer from the Windows 10 installation media and use the Shift + F10 key combination on the first installation screen to open the Command Prompt. In the Windows RE Command Prompt window, enter: wmic logicaldisk get name command to get a list of all available system partitions.
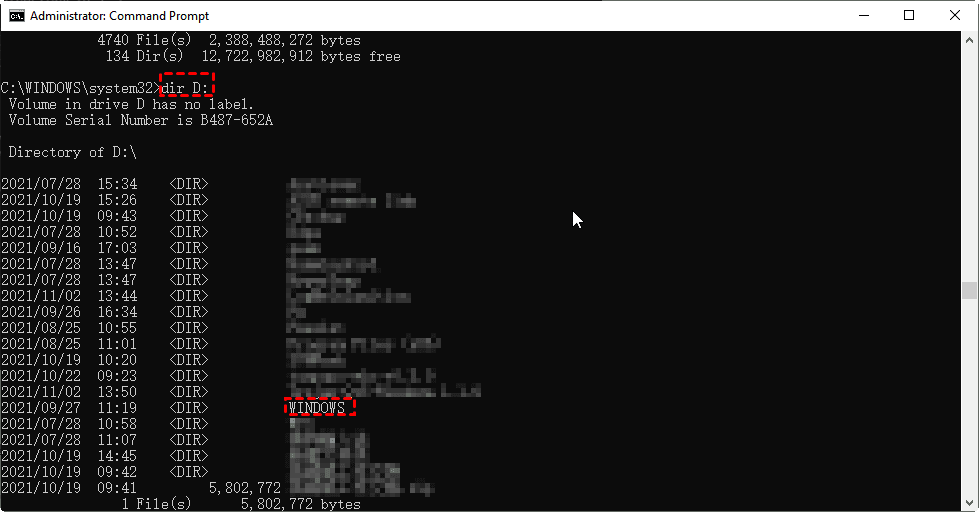
- Type dir drive-letter: to find the system partition that contains the Windows folder (replace drive-letter with your system drive letter).
Note✍: if you want to view the contents of the C: system partition, enter the dir C: command; If you cannot find the Windows folder in the C: system partition, enter the dir D: command to go to the next system partition until you see the Windows folder.
- After finding the system partition containing the Windows folder, enter the dism.exe /Image: D:\ /Cleanup-Image /Restorehealth command to repair the offline Windows image.
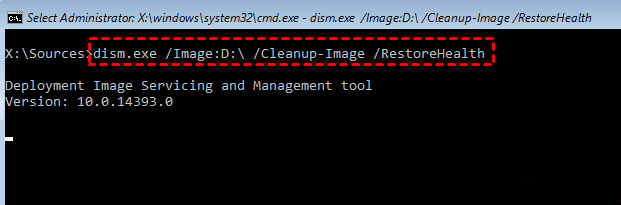
Note✍: Where D=Windows system partition, so you need to replace D with the drive letter of the system partition containing the Windows folder. This article takes D: system partition as an example.
- If you receive the error message "Error 0x800f081f" during this step, it means that you must perform a repair upgrade (if no errors are encountered, skip to step 6).
- Before performing the repair and upgrade, please boot from the Windows installation disk. Click Next in the Windows installation wizard window, and then follow the prompts to successfully perform the repair and upgrade to repair the "Error 0x800f081f" error message. After completion, restart the Windows system in Safe Mode, open the Command Prompt again, and enter the DISM /Online /Cleanup-Image /RestoreHealth command.
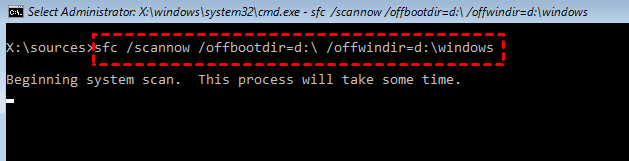
- Enter the SFC /SCANNOW /OFFBOOTDIR=D:\ /OFFWINDIR=D:\Windows command in the Command Prompt to complete the repair. Remember to replace D with the drive letter of the system partition containing the Windows folder.
Solution 4. Reset BIOS
BIOS (Basic Input/Output System) is responsible for managing the data flow between the operating system and external devices such as hard disks. Resetting the BIOS can restart the output/input system to the last saved configuration, which helps to fix the “DISM does not support servicing Windows PE” error.
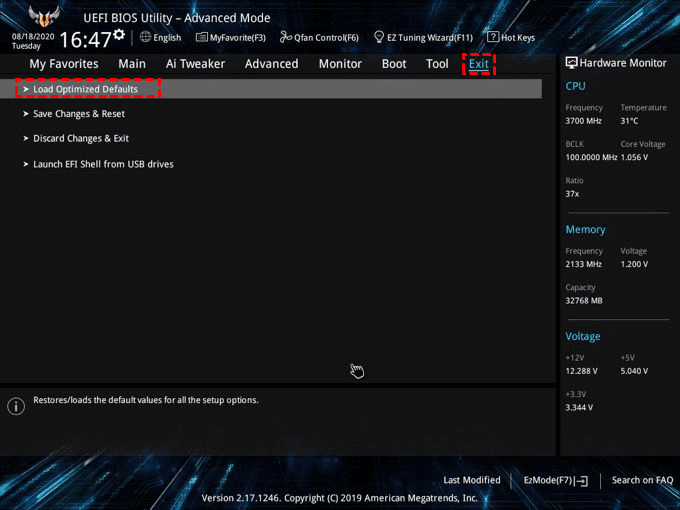
- Use the key set by your computer motherboard manufacturer to enter the BIOS, which could be F10, F2, F12, F1, or DEL.
- Select the Exit item, and click the Load Optimized Defaults option. Confirm to save the changes and restart your computer after the reset is complete.
Note✍: If you have an in-depth understanding of the operating system structure, then resetting the BIOS may be a good solution; if you do not know anything about the operating system structure, it is recommended that you operate under the guidance of professionals to prevent unexpected situations.
Solution 5. Create Another User Account
In most cases, the “DISM does not support servicing Windows PE” error message is related to a specific user account. To do this, you can create another user account and log in to your computer to avoid this error.
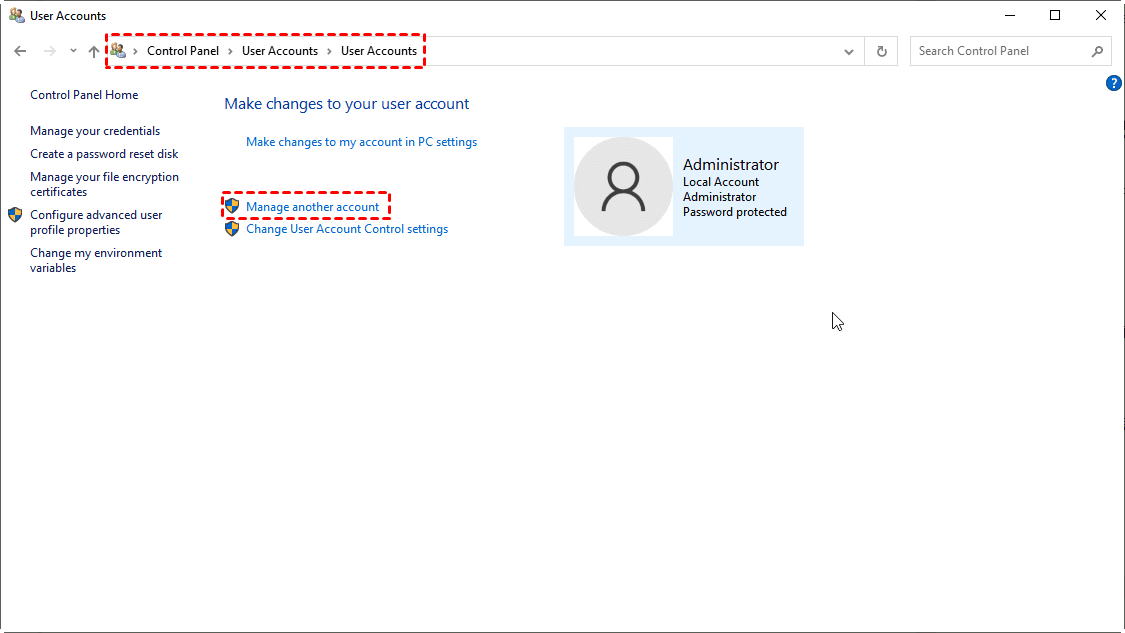
- Enter User Accounts in the search box next to the Start menu in the taskbar and open the corresponding settings. Then click the Manage another account option at the top of the right window.
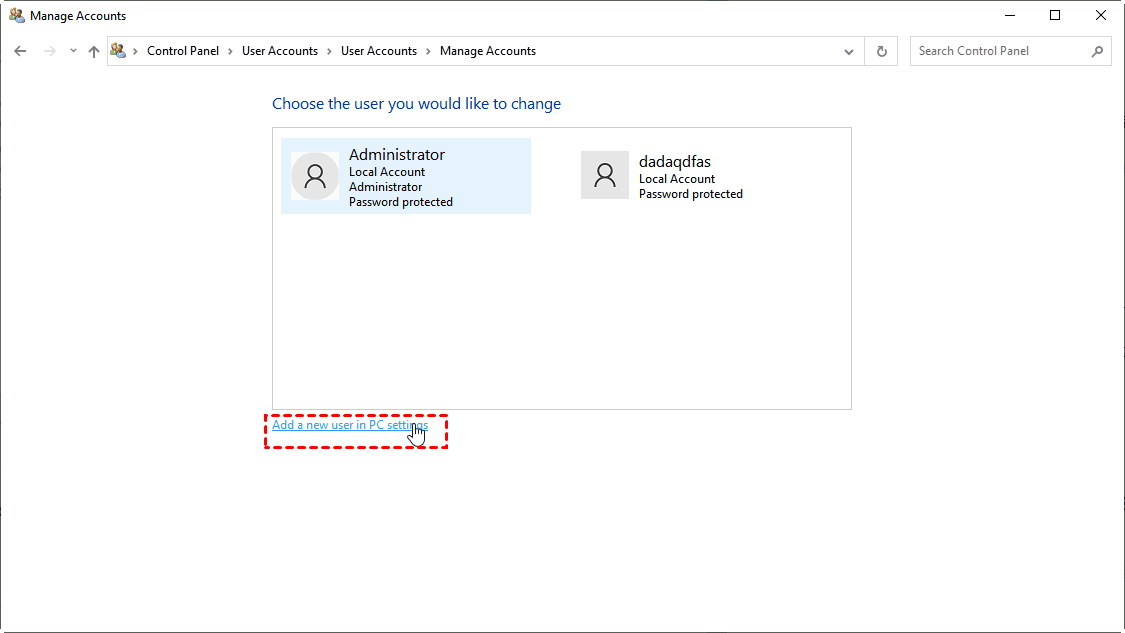
- On the Manage Account page, click Add a new user in PC settings below.
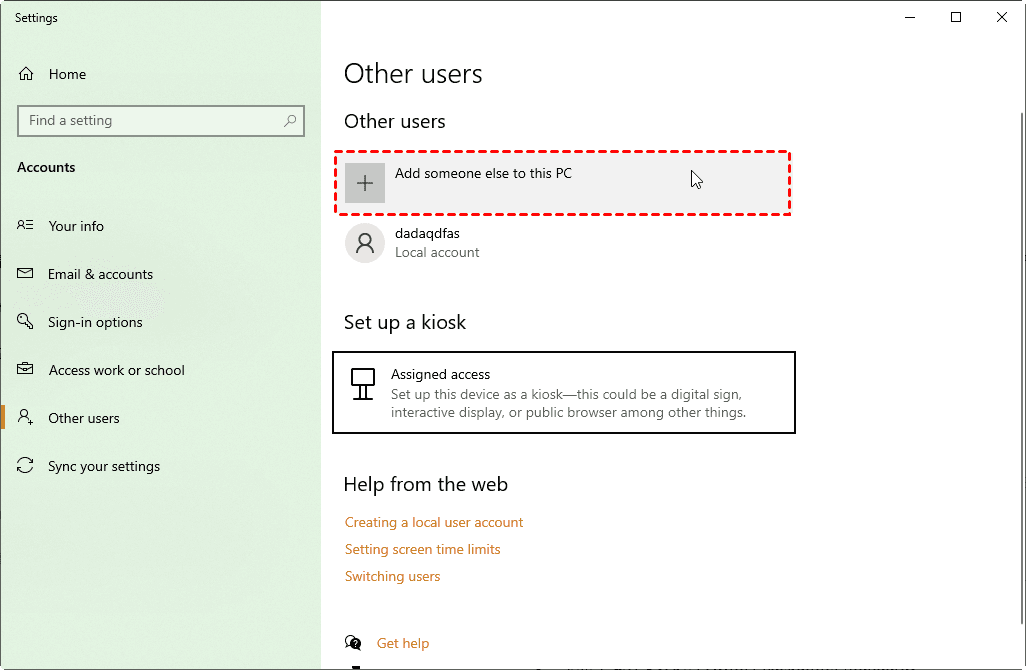
- Select Add someone else to this PC under the category of other users.
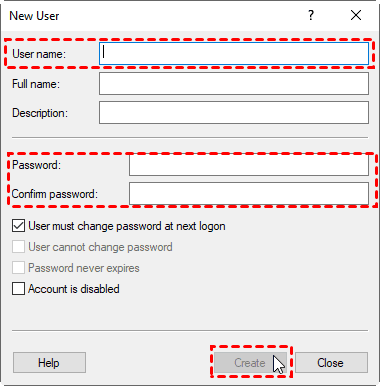
- Click Users in the left window and select the account described as User account managed by the system. Then click More Actions in the right window, and click New User in the menu.
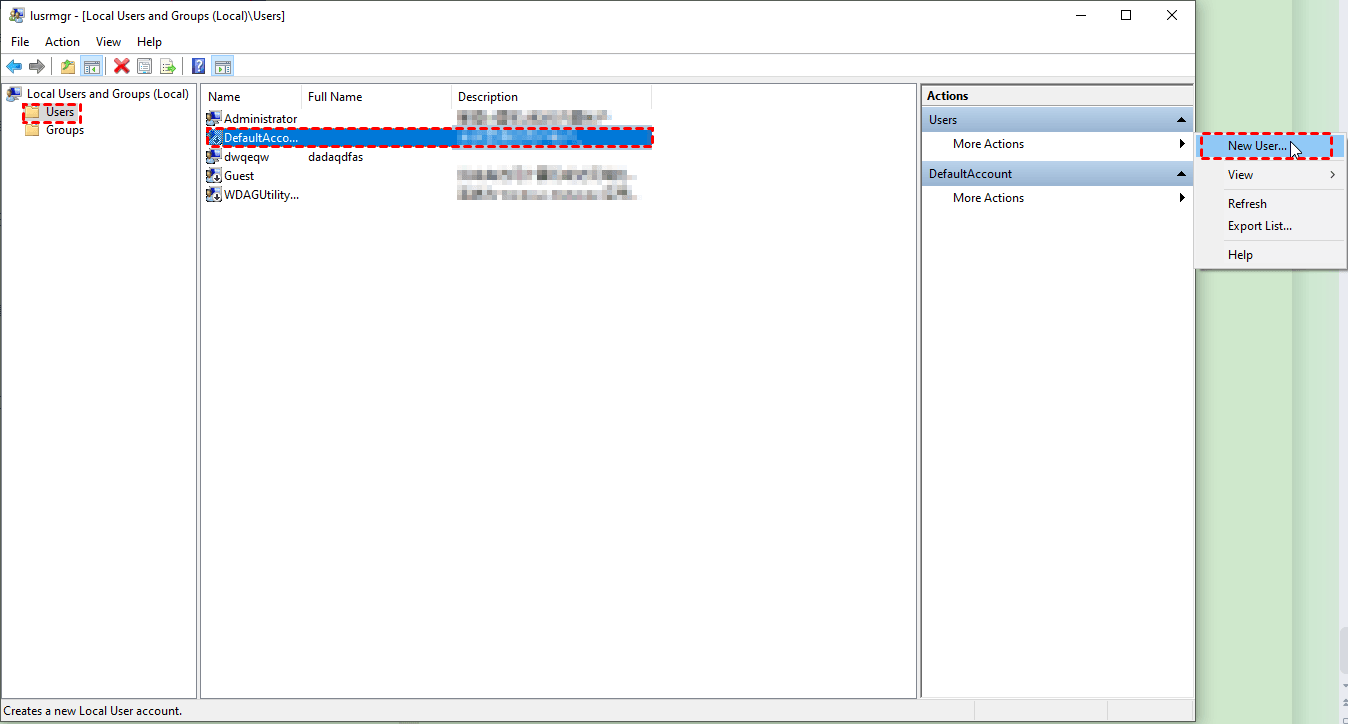
- Fill in the User name in the pop-up window, then fill in Password and Confirm password. Next, click Create in the lower right corner to create another user account, and then log the account into your computer.
If none of the above 5 solutions can help you solve the problem of "DISM does not support servicing Windows PE" when the system crashes, and you have backed up the system with AOMEI Backupper Standard before the system has problems, then you can restore Windows 10 system to a normal state to solve system problems.
Another Solution to Repair System Crash—AOMEI Backupper Standard
AOMEI Backupper Standard is a powerful backup and recovery tool, suitable for Windows 11/10/8.1/8/7/Vista and other systems. You can download it for FREE, and there is no need to register an account to use it. It can help you repair a crashed system and restore it to a normal state, thereby protecting the security of your data.
If the computer cannot start or has crashed, you can create a Windows PE bootable disk on another healthy computer. Then, go to the computer with the system crashed and perform a system restore from the Windows PE bootable disk to solve the problem.
Create Windows PE Bootable Media
If you want to restore the system on Windows PE, please make sure you have a system backup and a Windows PE bootable disk. First, we need to do some preparatory work:
▶ Prepare a USB (or CD/DVD) with a capacity greater than 16GB, and connect it to a well-functioning Windows computer.
▶ Download and install AOMEI Backupper Standard on your computer for free.
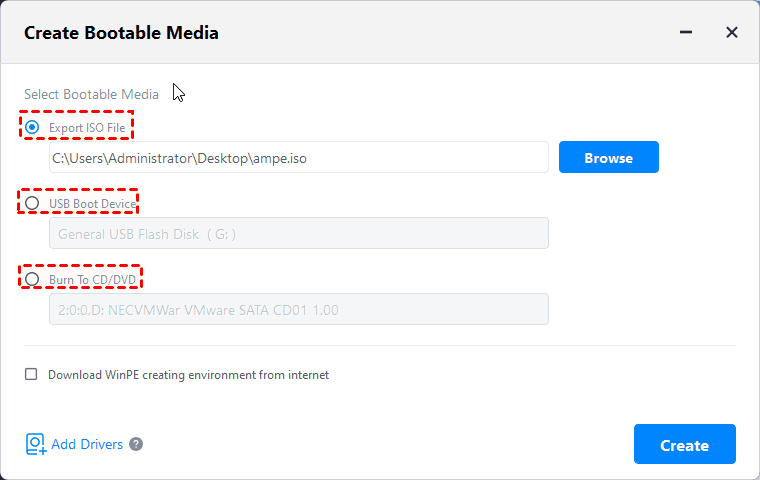
Step 1. Click Tools tab on the left, and select Create Bootable Media in the right window.

Step 2. Then, choose the storage media, including USB, CD/DVD, or ISO Image File, and click Create. If your computer is Windows 7 or Windows 8, you need to download AIK or ADK).
Recover the System from the Windows PE Bootable Media
Step 1. Insert the bootable media into the crashed computer and boot from it (you may need to change the boot order and boot mode in the BIOS). After the computer starts successfully, AOMEI Backupper (installed on the bootable device) will run automatically.
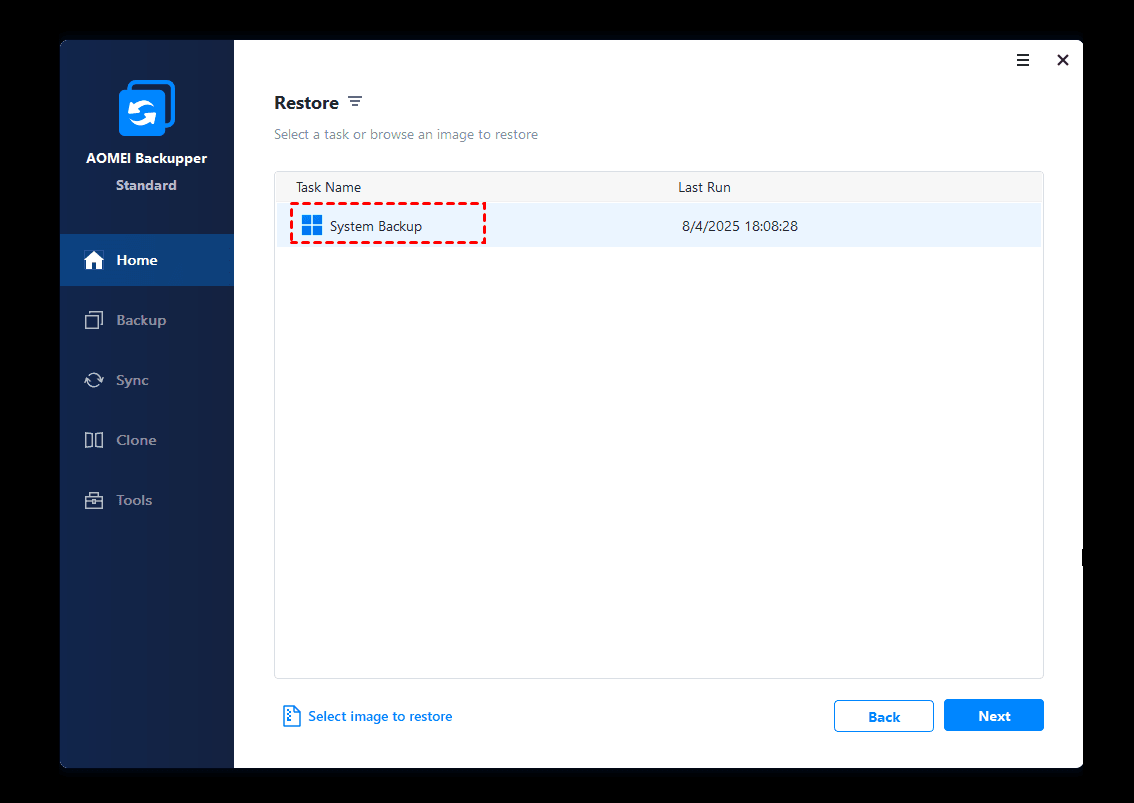
Step 2. Go to the Home tab and click Restore. Then, select a system backukp task, or click Select image to restore to find the system backup you created.
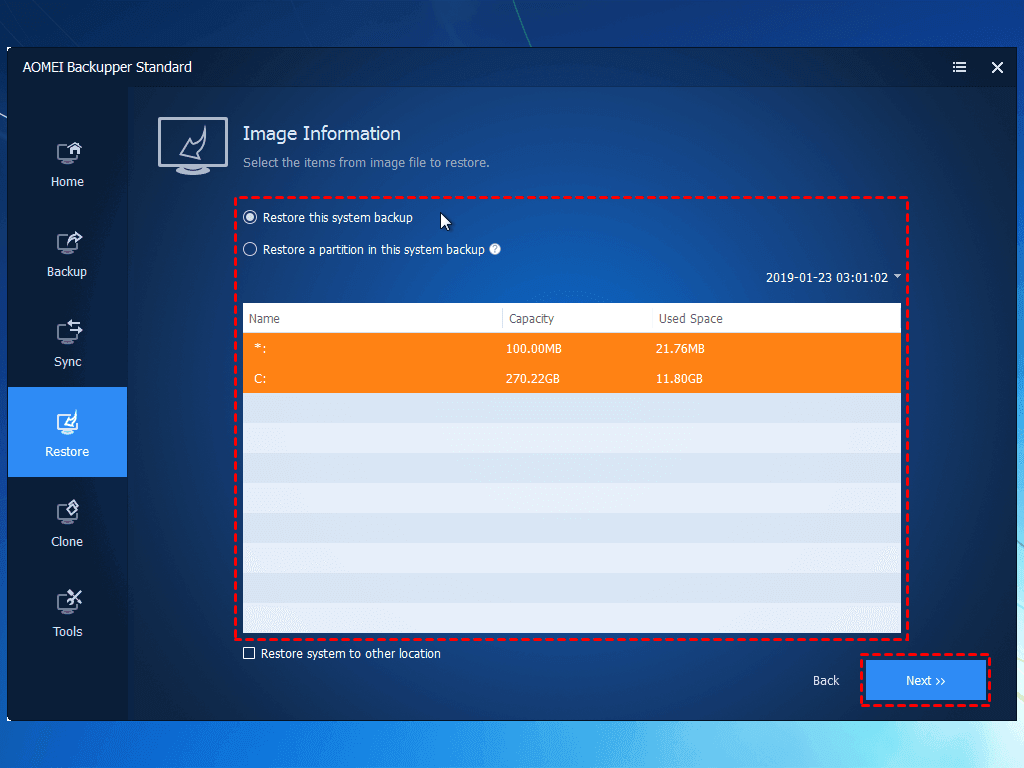
Step 3. Select Restore this system backup and click Next.
Step 4. By default, it will choose to restore to original location. You can also consider using “Restore to a new location”
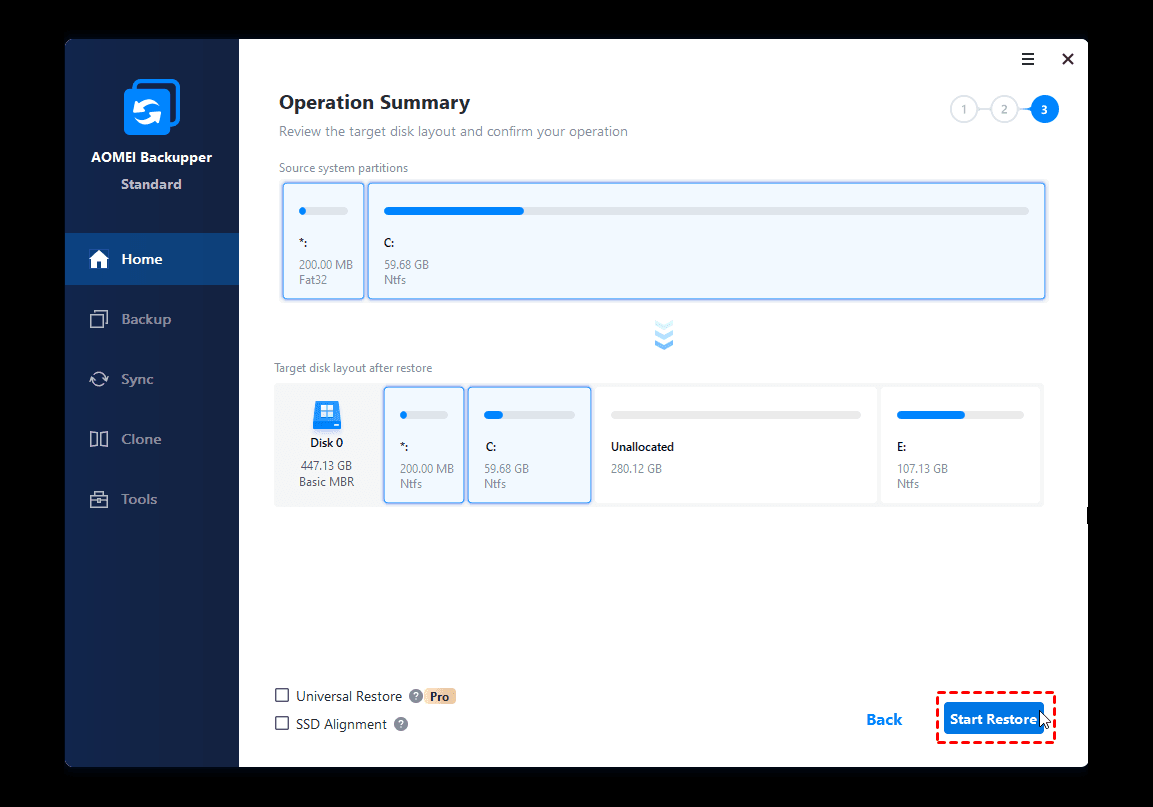
Step 5. Confirm the operation and click Start Restore and wait for the system to be restored.
Step 6. Remove the bootable media and restart the PC (you may still need to change the boot order and boot mode in the BIOS).
Important Hints:
❀ You can schedule regular automatic backups of the system, and each backup will generate an image at a given point in time, so there may be multiple backup points to choose from.
❀ When restoring the system, the target disk or partition will be completely overwritten. If the target disk or partition contains any sensitive data, you can use the File Backup function to copy it to another location.
❀ During the system restore process, the program will prompt you to restart your computer, and then enter the "Restart Mode" to perform the restore operation.
❀ If your system adopts the layout of "EFI partition + system partition + recovery partition", there may be multiple EFI partitions after restoration. In this case, the recovered system may not boot, you can try to delete the extra EFI partition and keep only one.
❀ If the system image you are using comes from another computer, you can upgrade to the professional version and use the Universal Restore function to ensure that the system starts normally after recovery.
To Sum Up
If you are struggling with “DISM does not support servicing Windows PE” error, you can try the 5 solutions mentioned in the article in turn to ensure that your computer can return to normal. If the above 5 methods failed to help you solve the problem, then it is recommended to use AOMEI Backupper Standard to restore the system.
AOMEI Backupper Standard can be used for free without registration, and the operation is simple. If you have used the software to back up the system before the error occurs, you can directly restore the system to the point in time of the previous backup to skip repairing the error that DISM does not support Windows PE.
In addition, the software also provides you with functions such as regular automatic backup systems, file backups, disk wiping, etc., to provide all-round protection for your computer data.

