Create Windows 11 Image for Raspberry Pi 4: Full Guide
This article will provide a detailed guide on how to install Windows 11 on Raspberry Pi 4 and create Windows 11 image for Raspberry Pi 4.
By Jonna Updated on September 24, 2025
Can Windows 11 Run on Raspberry Pi 4?
The short answer is yes, but with caveats. The idea of running Windows on Raspberry Pi has fascinated tech enthusiasts for years. The Raspberry Pi 4 isn't designed out of the box to run Windows 11. Microsoft's official support doesn't extend to ARM-based boards like the Pi in the same way it supports x86 PCs. However, thanks to the tech community and tools like WoR (Windows on Raspberry) and custom drivers, it's possible to install and run Windows 11.
This article covers how to install Windows 11 on Raspberry Pi 4 with step-by-step installation instructions, and the best way to create Windows 11 image for Raspberry Pi 4.
How to Install Windows 11 on Raspberry Pi 4
Installing Windows 11 on Raspberry Pi 4 isn't as simple as flashing Raspberry Pi OS, but with the right tools, it is achievable. Here's a clear process to get started with how to install Windows on Raspberry Pi 4:
Step 1. Prepare the tools
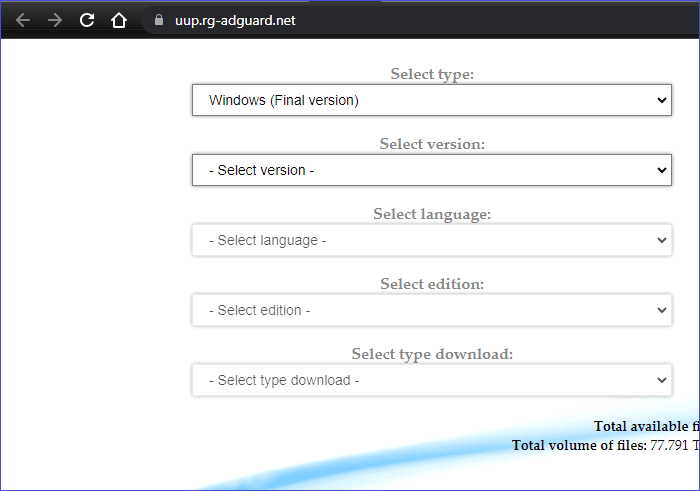
- Get the WoR Imager from its official GitHub page. Also, use UUP Dump to download the ARM64 build of Windows 11.
- Insert your microSD card or SSD into your Windows PC. Make sure to back up any important data because the process will erase the drive.
Step 2. Flash Windows 11 onto SD card/SSD
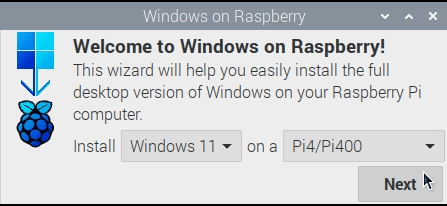
- Open WoR on a Windows PC.
- Insert your microSD card or SSD.
- Select the Raspberry Pi model and choose the Windows 11 ARM64 image.
- Start the flashing process and wait for it to complete.
Step 3. Boot into Windows 11
- Insert the prepared microSD card or SSD into the Raspberry Pi 4, connect peripherals, and power it up. After a few moments, Windows 11 should load. Initial setup might take longer than on a standard PC, but once completed, you’ll be greeted with the Windows 11 interface.
Although installation is straightforward, performance optimizations and driver updates may be needed for a smoother experience. That's why creating a tailored Windows 11 image is the best way to ensure stability and reusability.
Best Way to Create Windows 11 Image for Raspberry Pi 4
Instead of repeating the flashing process every time, you can create a Raspberry Pi 4 Windows 11 image and store it for backup or reuse. This approach saves time and ensures that you always have a working system ready to deploy.
One of the most effective tools for this task is AOMEI Backupper Standard, a free yet professional backup software that makes the image creation process simple. With this software, you can capture your configured Windows 11 system on Raspberry Pi and restore it whenever needed.

- You can create system backup, disk backup, partition or volume backup, or file backup as needed.
- It also allows you to create bootable USB or CD/DVD for computer disaster recovery.
- It lets you set a flexible scheduled backup task on daily, weekly, monthly, etc.
- You can choose to save Windows image to external hard drive, local disk, NAS, or network shared folder, and so on.
- It supports system image restore to different computer, even with different hardware (Available in advanced version).
Step-by-Step Guide to Create Windows 11 Image for Raspberry Pi 4 Using AOMEI Backupper
Step 1. Download and install AOMEI Backupper on your Windows PC. Insert the Pi’s microSD card or SSD into your computer using an adapter.
Step 2. Run the program and go to the "Backup" tab. Choose Disk Backup to create an image of the entire storage, including all partitions. You can also use System Backup if you only want the Windows 11 OS partition.

Step 3. Click Select Source to pick the storage drive containing your Raspberry Pi’s Windows 11 installation.

Step 4. Select an external hard drive, NAS, or another secure location to save the image. Then, click Start Backup.

FAQs about Windows 11 Image for Raspberry Pi 4
#1. Can Raspberry Pi run Windows 11?
Yes. Raspberry Pi 4 can run Windows 11 using ARM-based builds. However, it's not officially supported by Microsoft, and performance may not match that of a standard PC. Still, for learning, development, and lightweight use, it works surprisingly well.
#2. Can Raspberry Pi run Windows applications?
Raspberry Pi 4 running Windows 11 can handle many Windows applications, especially those compiled for ARM architecture. Standard x86 apps may require emulation, which could slow things down. Lightweight software and universal apps from the Microsoft Store usually work best.
#3. Can a Raspberry Pi 4 replace a PC?
For basic tasks like browsing, word processing, and media playback, yes. But for gaming, video editing, or heavy workloads, the Pi 4 can't fully replace a modern desktop.
Conclusion
That's all about how to put Windows 11 on Raspberry Pi 4 and create Windows 11 image for Raspberry Pi 4. Though it's not officially supported, you can run Windows environment on this small device with the help of specific hardware and software.
Also, using tools like AOMEI Backupper helps you capture and restore your customized system effortlessly. Besides, this tool is capable of cloning Windows to new hard drive for one-click OS migration, syncing files across disks and computers, and so forth.

