Settle Slow File Transfer in Windows 11 (7 Fixes and 1 Tip)
In order to settle the slow file transfer in Windows 11 issue, you can try the presented 7 fixes. Meanwhile, you can get one fast file transfer software here. Read on to get the detailed tutorial.
By Clytze Updated on August 28, 2025
Scenario: Need to speed up file transfer
“I recently built myself a new PC and I have been having an issue with copying files between storage spaces/drives on the PC. Whenever I begin a file copy/move operation, the speed usually starts out at a respectable speed (ie. 40-50MB/s) and then rapidly drops down and fluctuates somewhere between 50KB/s - 800KB/s, occasionally going down to 0KB/s for a few minutes.
I was wondering if someone could point me in the right direction on troubleshooting this issue and help me find out what is causing the bottleneck. If anyone can help me with this issue, I would greatly appreciate it!”
– Microsoft Community
7 Fixes to solve slow file transfer in Windows 11
If you need to transfer files frequently, try the following provided 7 methods in turn to troubleshoot them. Alternatively, you can use third-party file transfer freeware to transfer numerous files at once at a fast speed. Thus, your efficiency will be greatly improved.
👉 Fix 1: Change the limit reservable bandwidth
👉 Fix 2: Disable Windows Auto Tuning
👉 Fix 3: Disable RDC (Remote Differential Compression)
👉 Fix 4: Update the USB drivers
👉 Fix 5: Convert format from FAT32 to NTFS
👉 Fix 6: Change device for Better Performance
👉 Fix 7: Disable drive indexing
To speed up file transfer in Windows 11, try a fast file transfer tool.
Fix 1: Change the limit reservable bandwidth
By default, Microsoft reserves the right to limit network bandwidth by up to 80% to accommodate system activity. When transferring large files, this limit may kick in and limit your PC's network performance, resulting in Windows file transfer. You can follow the how-to tutorial to limit or disable the default setting.
1. Press Windows+R to open Run, type gpedit.msc and tap Enter to open the Group Policy Editor.
2. Select Computer Configuration>Administrative Templates>Network>QoS Packet Scheduler in turn.
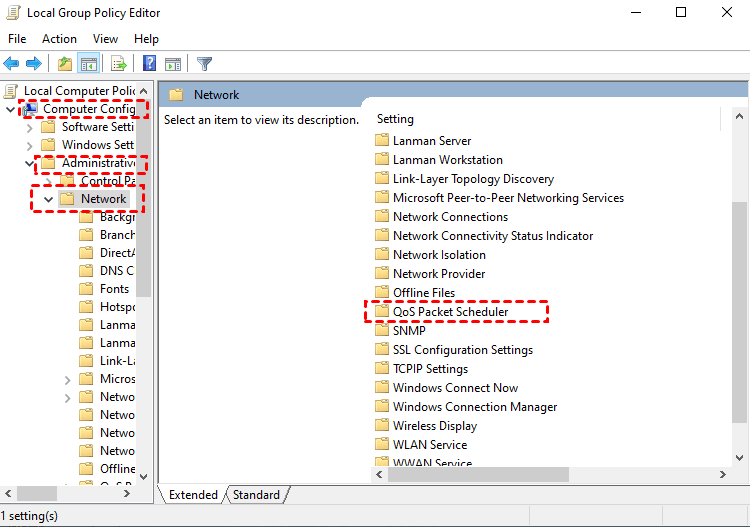
3. Under the QoS Packet Scheduler option, double-click Limit Reservable Bandwidth from the right list.
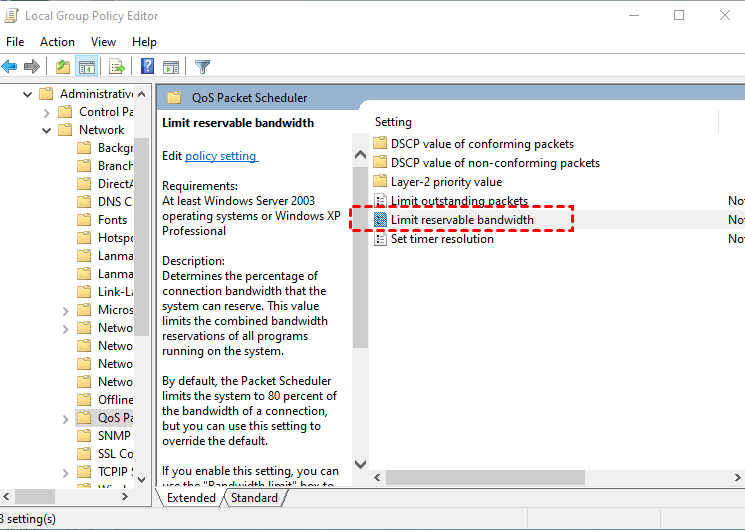
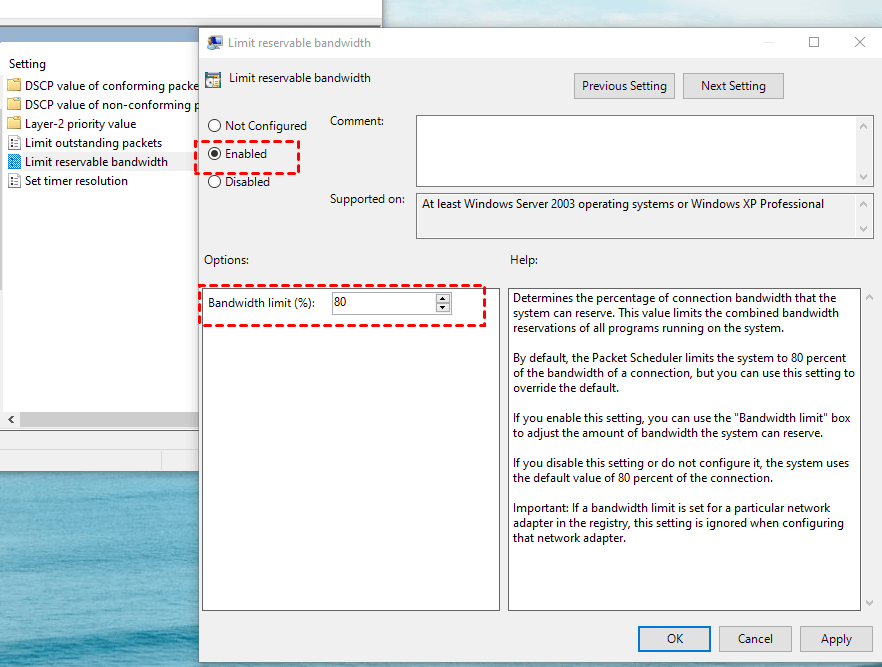
4. In the pop-up window, click Enabled, then you can adjust the default Bandwidth limit values to a smaller percentage or to zero.
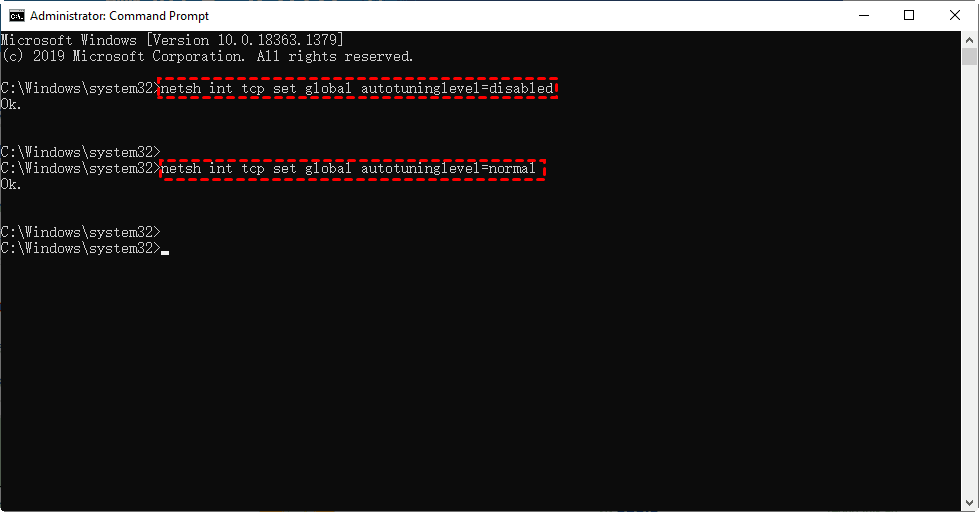
Fix 2: Disable Windows Auto-Tuning
If you plan to transfer files over the network, the auto-tuning feature can improve the performance of programs that receive TCP data over the network, making your transfer process more efficient. However, in some cases, disabling this feature may accelerate the transfer speed.
1. Search for Command Prompt in the search bar. Select the option and Run as administrator.
2. Type the following command and press Enter to execute it:
netsh int tcp set global autotuninglevel=disabled
3. Now, try to transfer the file again to see if the speed is back to normal. If not, type following command to try it again.
netsh int tcp set global autotuninglevel=normal
Fix 3: Disable RDC (Remote Differential Compression)
1. Search for Turn Windows features on or off in the Windows search bar and click it.
2. Uncheck the box for Remote Differential Compression API support and click on OK to save the settings.
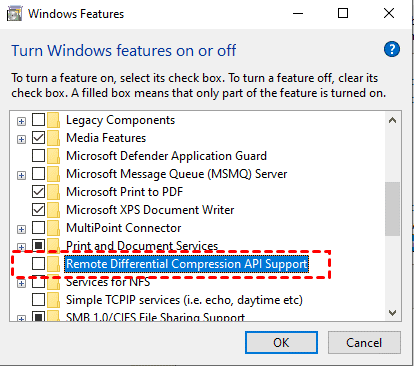
3. Restart your PC to see if it works.
Fix 4: Update the USB drivers
Here’s the procedure you can follow to update the USB drivers:
1. Right-click Start icon, and select Device Manager from the list.
2. Locate the Universal Serial Bus Controllers. Right-click on them one by one and select Update driver.
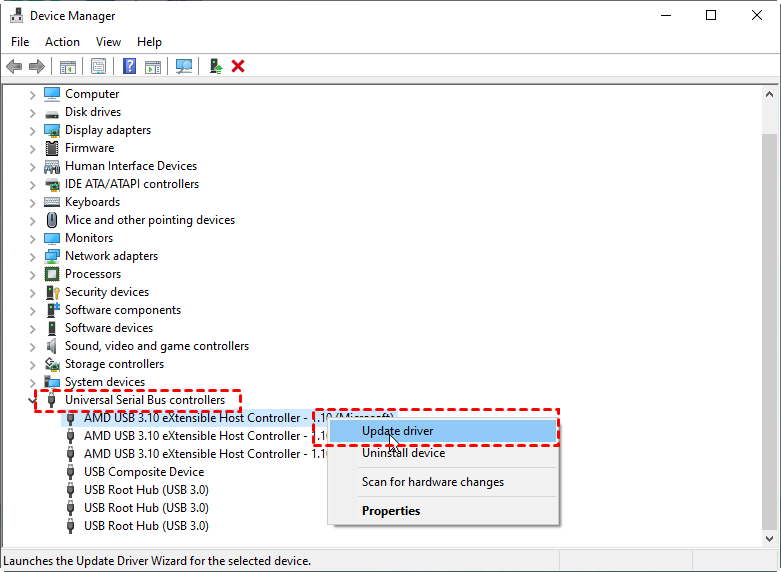
3. Select Search automatically for drivers and wait for the process to complete.

Fix 5: Convert format from FAT32 to NTFS
A USB drive is normally formatted with FAT32 by default, which will indeed run slower, it is better to update to the latest NTFS format. Here’s how to perform it.
Note: Since this operation will delete all existing data on the USB drive, you’d better make a backup of this drive before the operation.
1. Search Command Prompt in the search box, select it and Run as administrator.
2. Type convert F:/fs:ntfs ( F refers to the drive name, set according to yours), then tap Enter.
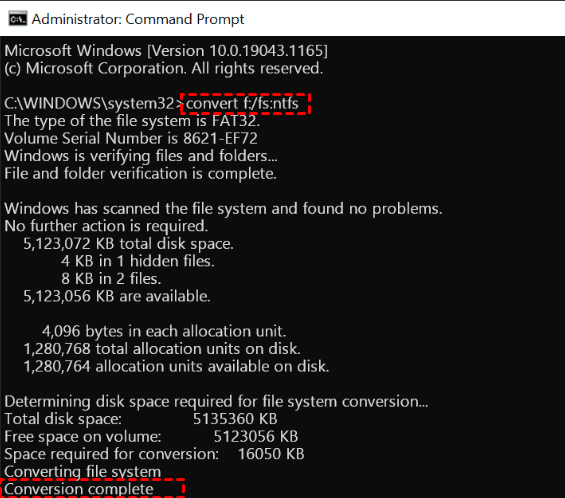
3. Wait for the process to successfully complete until you see Conversion complete.
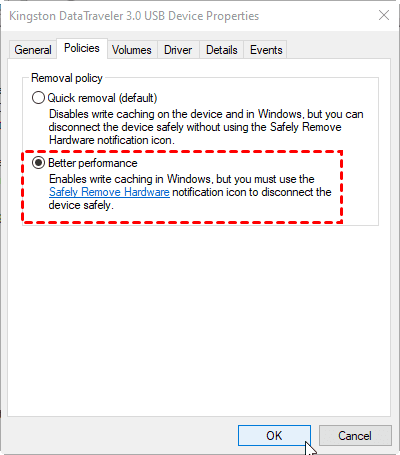
Fix 6: Change device for Better Performance
In normal computer use, many people encounter the need to connect a USB flash drive to the computer to transfer files. During the process, you will find that it is very slow and takes a long time to wait. In such a case, you can follow the steps to optimize the performance of the USB drive.
1. Right-click the Start icon and select Device Manager from the list.
2. Find and expand the Disk drives, select the desired USB drive, then click on Properties.
3. In the newly opened window, click on Policies, tap Better Performance, and enter OK.
Fix 7: Disable drive indexing
1. Right-click on the drive you want to perform file transfer, and click on Properties.
2. Under the General tab, uncheck option Allow files on this drive to have contents indexed in addition to file properties, then click Apply.
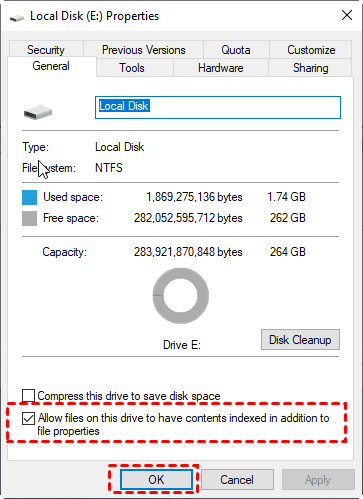
3. Restart your PC to make sure whether it works.
What exactly causes Windows file transfer slow issues?
Information technology has now shown a rapid development and stabilization trend. Every day, countless files need to be uploaded, downloaded and transferred, when the problem of slow file transfer speed gradually emerges. It is not rare for a large file or plenty of files to take several hours or a day to transfer. For people who pursue efficiency, this problem can make them feel so much depressed.
As mentioned in the case above, a large number of Windows 11 users have reported experiencing slow transfer speeds during file transfers, either between two internal drives, between an internal drive and an external drive, or between two PCs over a network. Users are puzzled as to what exactly is causing the slow file transfer speed and what practical ways can be used to solve it.
The slow file transfer in Windows 11 issue can be caused by many factors, including network problems, external drive problems, or computer problems. Therefore, to fix these issues, here are some simple methods, that you can use and make sure the issues are resolved for a better file transferring ability.
Recommended: Fast file transfer software for Windows 11
If you have tried the above methods and they still do not work well or just can’t satisfy your needs, it is time to take third-party measures. In order to transfer files quickly in your work and life, or in large quantities at once, you can use a fast file transfer tool – AOMEI Backupper Standard. The free file transfer software has the following professional features:
❀ It offers you an easy-to-use interface, simple operation steps, and fast file transfer speed to sync files to local folders, to external hard drives, or to sync files between two computers.
❀ You can set up a schedule to run the file sync task daily, weekly, monthly, etc.
❀ It supports devices including internal/external hard drives, USB drives, NAS/network share, or cloud drives.
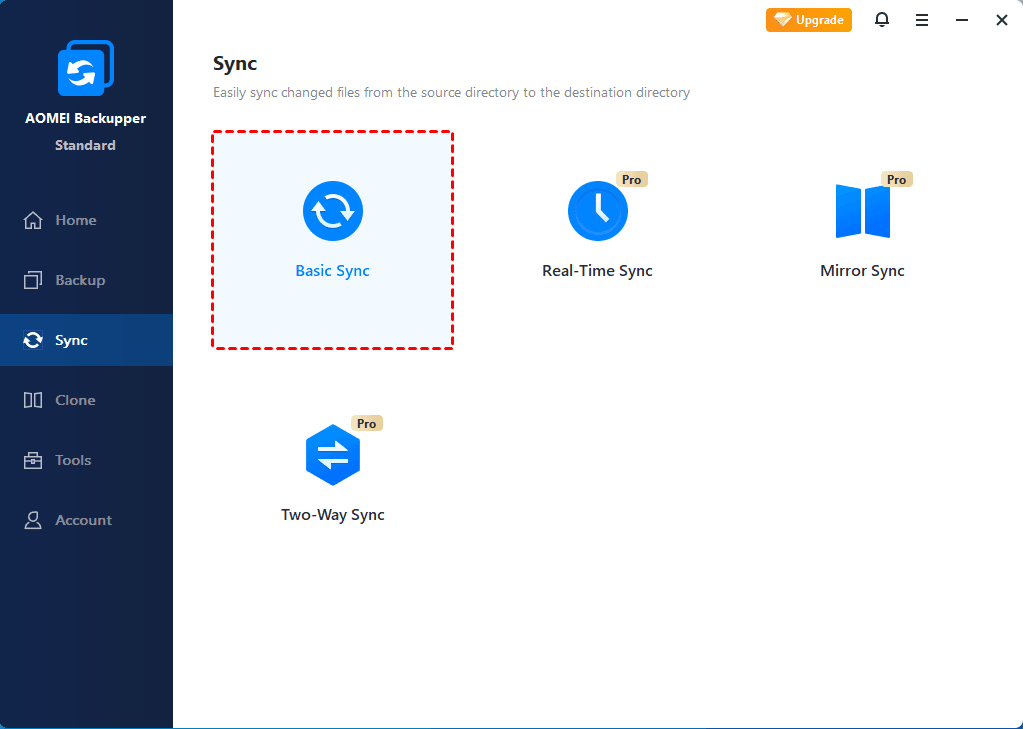
❀ In addition to Basic Sync, it offers 3 other sync modes: Real-time Sync, Mirror Sync, and Two-way Sync. You can upgrade to an advanced edition to enjoy them.
Here’s the stepwise guide on how to speed up file transfer in Windows 11 you can follow. Just download this freeware to your PC and have a try.
Step 1. Click Basic Sync under the Sync option.
Step 2. You can change the Task Name to distinguish it from other sync tasks. Click Select Source to select the files and folders that you want to synchronize to your desired place. You can click the Add Source option to select more folders to sync at the same time.
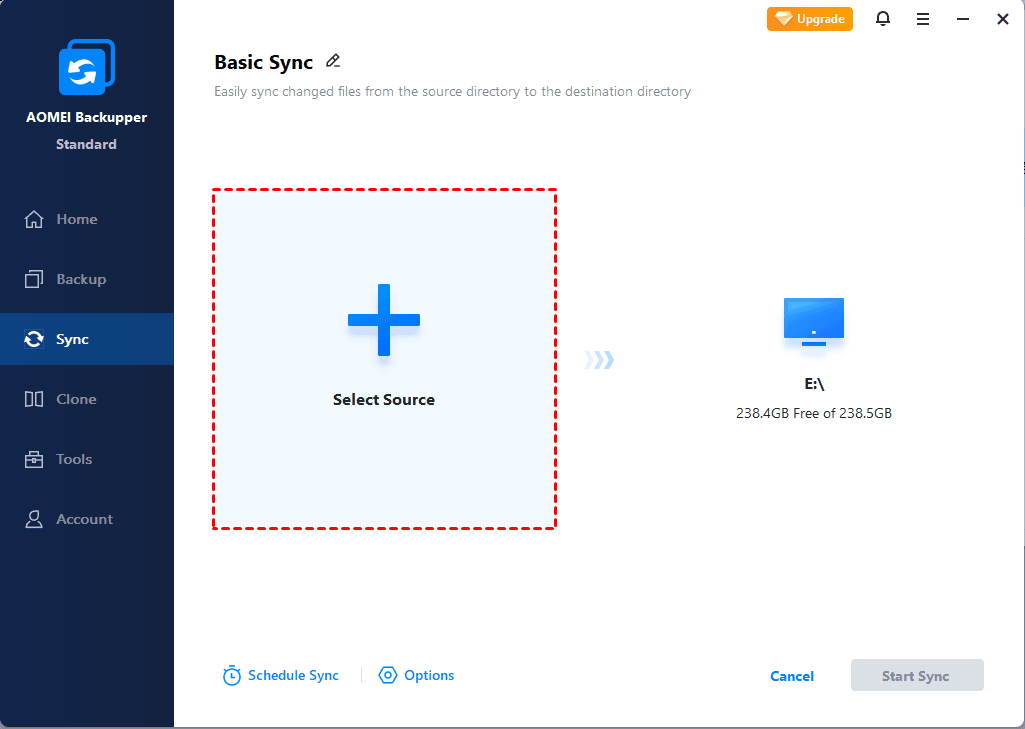
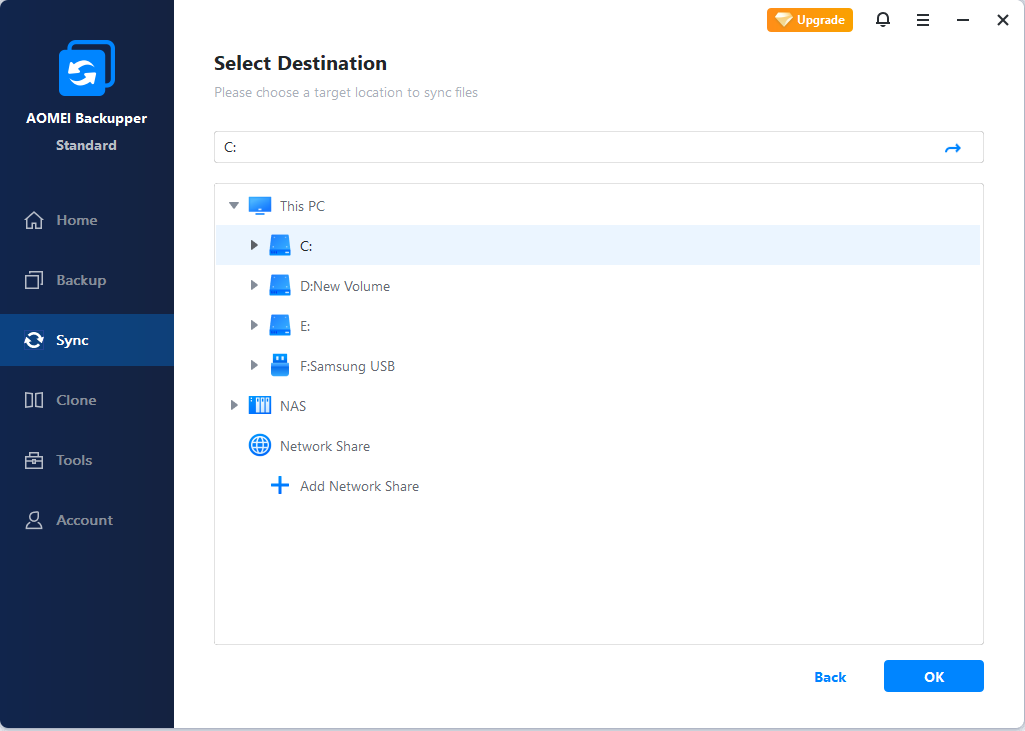
Step 3. Select the target directory to store the files. Click the PC icon and select from This PC, NAS, or Network Share.
Tip: If you want to transfer files from external hard drive to PC, connect a removable device first.
Options: You can write comments for your task and set an email notification.
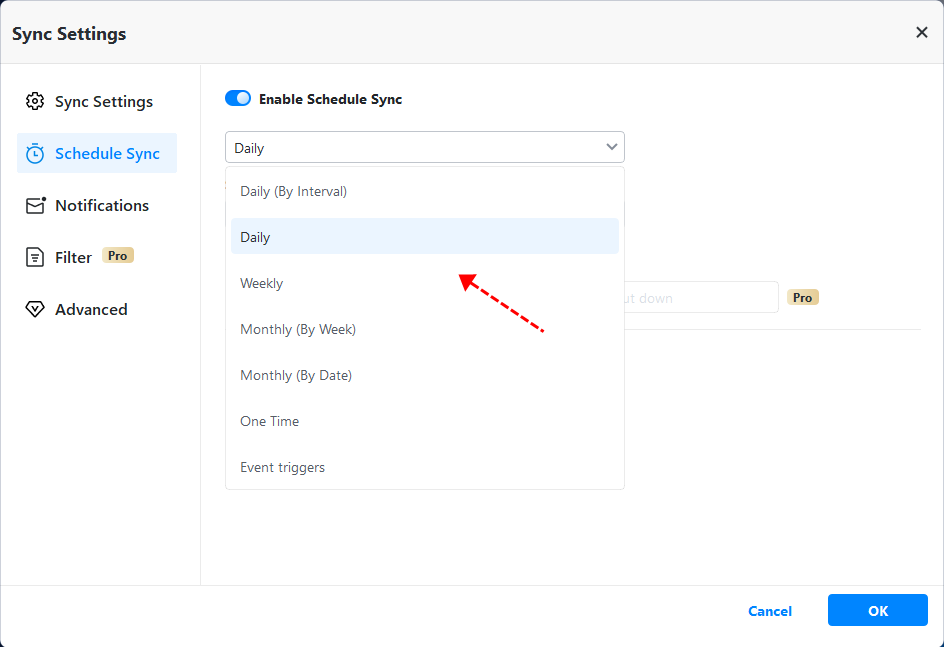
Schedule Sync: You can enable scheduled sync at a frequency for daily, weekly, monthly, etc, or Event triggers.
Step 4. Confirm your settings and then click Start Sync to operate.
Summary
It is very common to encounter slow file transfer in Windows 11. This issue may be caused by many reasons, you can patiently try the 7 solutions provided above to troubleshoot this problem. But if the above fixes don't meet your needs or don't work well for you, then it is worth trying AOMEI Backupper. It has an easy-to-use interface and transfers files quickly, it is particularly effective when you want to transfer a large number of files.
It has integrated powerful features and other tools to ensure the security of your important data. For example, it is the best way to backup your Windows 11. Or if you are seeking for the best free WD Green clone software, then AOMEI Backupper can be the most appropriate choice for it can help you clone the whole disk without losing data. AOMEI Backupper owns more powerful features that waiting for you to explore, so why not give it a try?