Can’t Drag and Drop on Windows 11 – 6 Solutions
How to fix can't drag and drop problem on Windows 11? Read through this article to learn the detailed steps of the 6 fixes and also learn the easy ways to secure your system.
By Miya Updated on September 2, 2025
User Case: Drag and Drop Not Working Windows 11
“I am a designer and I need to drag and drop in XD, Photoshop, Illustrator and other applications frequently in my daily work. But on a Windows 11 computer, it seems impossible to drag and drop an application to another application in the taskbar, which I remember is possible on Windows 10. Does anyone know how to fix this problem? Maybe I'm not doing it the right way? Hopefully someone can offer some solid advice.”
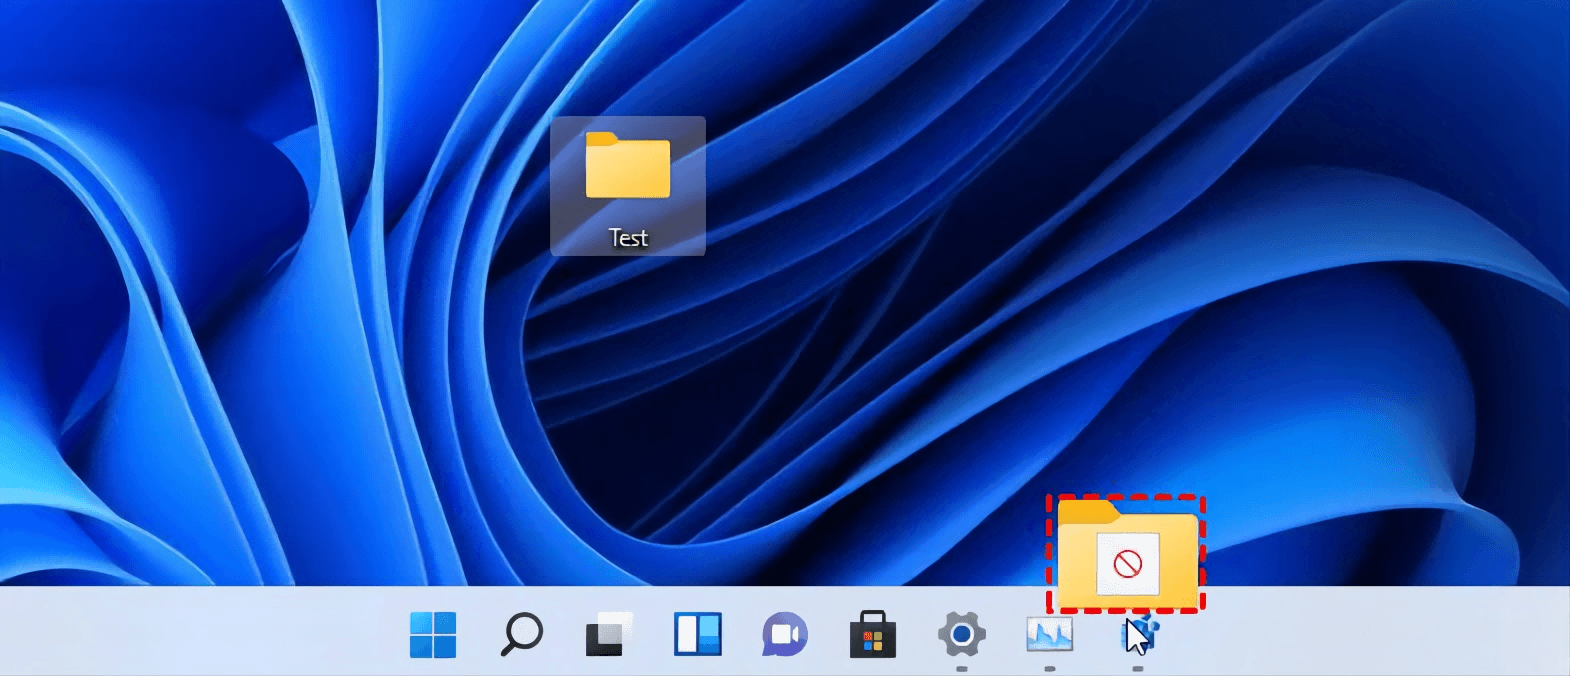
The new taskbar is one of the most controversial changes in Windows 11. The lack of basic functions such as drag and drop has led to changes in the daily habits of many users, and some users even chose to roll back to Windows 10 or uninstall Windows 11 when they could not stand it.
And Microsoft finally realized the previous mistake after collecting a lot of feedback. And began to drag and drop functionality integrated into the new Windows 11 version. But this feature wants to be really popular I'm afraid it will take some time. This means that if you want to use the drag and drop feature in Windows 11 at this stage, you will have to fix it through some other solutions.
6 Ways to Fix Can’t Drag and Drop on Windows 11
If you are troubled with the problem of Windows 11 can’t drag and drop in the taskbar, please try the following 6 solutions in turn, which are believed to be effective in fixing this problem. Please note that these solutions below are also applicable to the problem of drag and drop not working in Windows 10.
👉Create A System Backup Image to Prevent System Problems
Solution 1. Use Esc key
If the problem that Windows 10/11 can’t drag and drop appears suddenly, then it may be because the computer is still processing the previous drag and drop operation and the new drag and drop operation cannot be executed. In this case, you can use the ESC key to interrupt the previous drag-and-drop operation so that you can perform a new drag-and-drop operation.
Solution 2. Use Alt + Tab Shortcut Keys
Alt + Tab is one of the common shortcuts in Windows 10/11, when you want to drag and drop applications from one location to another, you can use Alt + Tab to save time. For professionals who frequently use Photoshop, Illustrator, Maya and other software, mastering the Alt + Tab shortcut can effectively solve the problem that can’t drag and drop on Windows 11.
- Use Windows + E to open the File Explorer and navigate to the file or folder you need to drag and drop.
- After selecting a file or folder, press and hold the left mouse button for capture mode. Please note that at this time you can press the right mouse button again to unselect the file or folder.
- Press Alt + Tab at the same time to review all currently open applications.
- Next, just hold down the Alt key and press the Tab key repeatedly to switch between different applications.
- Till you switch to the desired application, release the Alt and Tab keys at the same time to enter the desired application, move the mouse cursor to the window and release the left mouse button to drag and drop the file or folder to the corresponding window.
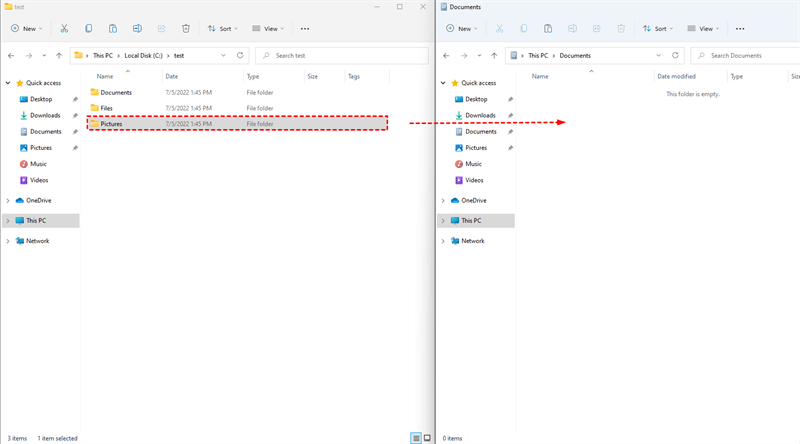
Solution 3. Split Screen Open Two Windows for Drag and Drop
In addition to using the Alt + Tab shortcut, you can open two windows and place them side-by-side for easy drag-and-drop files, which also helps fix the problem that can’t drag and drop on Windows 11.
- Open the two windows (folders or applications) you want to use the drag and drop function in turn, and use the Windows + arrow keys (← or → keys) in one of the windows, the window will be automatically left or shrunk to half its original size.
- At this point, you can automatically fill the remaining blank screens by selecting another previously opened window, so that they are placed side by side.
- Select the file or folder in one of the windows on one side and drag it to the window on the other side by pressing the left mouse button.
Solution 4. Modify the Value of the Login File
Windows logon file is one of the main components which contains Windows settings, software settings, driver messages, and user settings. According to some users' feedback, you can fix can’t drag and drop on Windows 11 by changing the login file editor value.
🌟 Note: This solution will cause the Start button, Search bar and Cortana in the taskbar to be disabled, so please choose carefully.
- Use Windows + R to open the Run window, type regedit and press Enter.
- In the Registry Editor program window, navigate to the following paths in order.
- Computer\HKEY_LOCAL_MACHINE\SOFTWARE\Microsoft\Windows\CurrentVersion\Shell\Update\Packages
- In the right panel, right-click the blank area and select New, then select the DWORD (32-bit) value.
- Rename the newly created DWORD value to UndockingDisabled, and lightly double-click to open it.
- Set the bottom number to Hexadecimal, set the value data to 1, and tap the OK button.
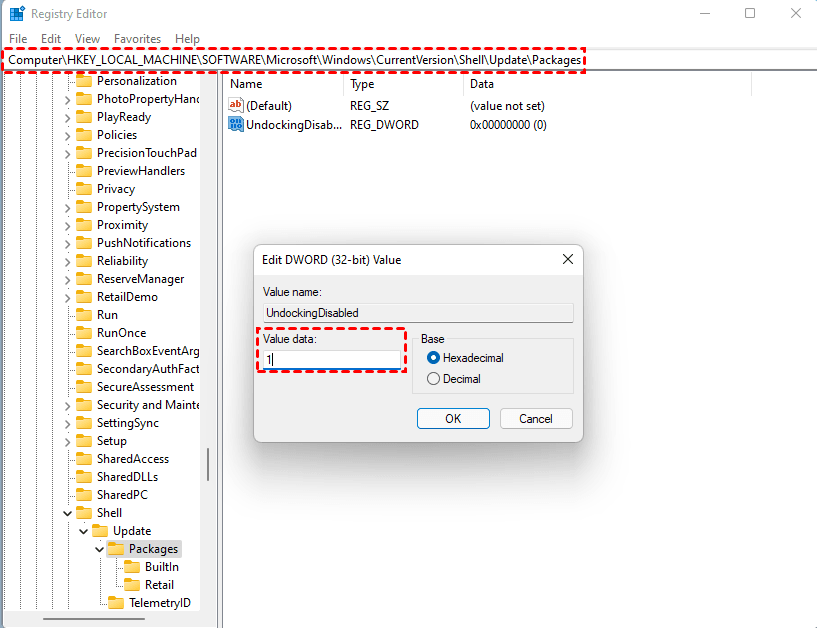
🌟 Tip: You will need to restart your computer or restart Windows Explorer to implement the changes.
Solution 5. Using Third-Party Applications
Until Microsoft fixes the drag and drop feature in Windows 11, using third-party applications as an alternative is a good option. Here we recommend DragAndDropToTaskbarFix for Windows 11 and Drag and Drop Toolbar for Windows 11, two applications that you just need to download and install in order to use drag and drop functionality in Windows 11.
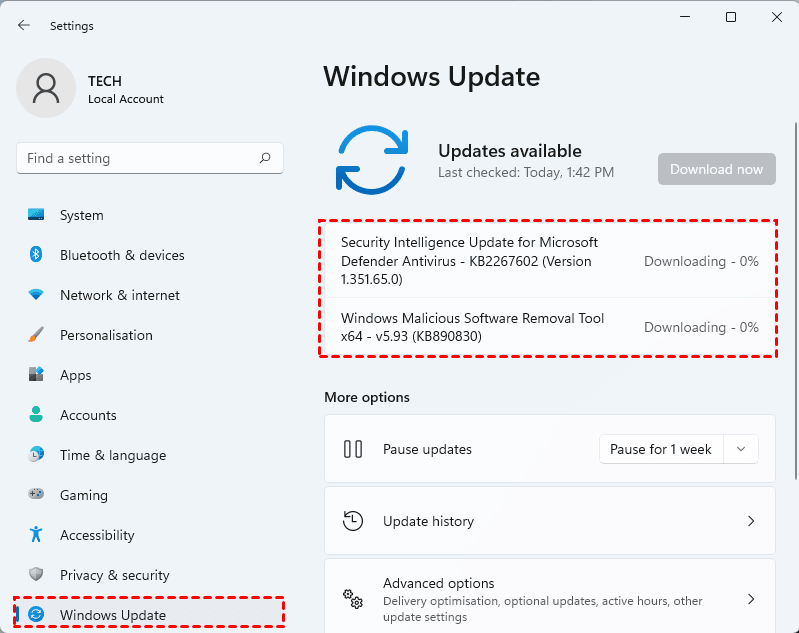
Solution 6. Update Windows 11
After receiving a lot of feedback from users, Microsoft has finally enabled drag-and-drop support for the taskbar in the new version. Although the drag-and-drop feature is only available in the new Insider Dev Channel version 22557, it is believed that the feature will be added to the stable version of Windows 11 soon. Therefore, you need to update your Windows 11 version in time, which will help fix the issue of Windows 11 not being able to drag and drop.
- Use Windows + I to open Windows Settings and select Windows Update in the left panel.
- Tap the Check for updates button in the right panel, if there is any available update, please download this update and tap the Install now button.
Create A System Backup Image to Prevent System Problems
When you realize the trouble caused by Windows 11 not being able to drag and drop, please try the 6 solutions provided in the article in turn to fix the problem and get your work progress back to normal.
Note that these solutions mentioned above will involve modifying the Registry Editor values, which may lead to serious problems, such as system crashes, if done incorrectly. So it is recommended that you use AOMEI Backupper Standard to make a system backup before doing so to prevent any system problems that may occur.
AOMEI Backupper Standard, a free and professional software, has these features.
💻 Compatibility with Windows Versions: Highly compatible with multiple versions of Windows 11/10/8.1/8/7 and more.
📰 Comprehensive Windows 11 System Backup: Backup all contents of Windows 11 system partitions, encompassing system files, boot file-related partitions (EFI system partition and recovery partition, etc.), as well as application and user profile files of the system disk.
💿 Flexible Backup Locations: You can back up your Windows 11 system to any location, be it external hard drives, network shared folders, NAS devices, or other locations.
If you are using AOMEI Backupper Standard for the first time, please go through the following to learn the detailed operation steps. However, before you start backing up, please download and install the software first:
- Run AOMEI Backupper Standard, select the Backup tab in the left panel, and select System Backup in the right panel.

- In the System Backup window, change the storage path of the system backup and then click the Start Backup button. If you have more than one backup task at the same time, you can also change the task name by tapping the pencil icon in the upper left corner.

✨ Note:
Before the backup starts, you can click Schedule, Backup Scheme, and Options in the lower left corner for additional settings.
🎈 Schedule: Allows you to turn on scheduled backups for free and set up daily, weekly, and monthly scheduled automatic backups of Windows 11. When upgrading to the Pro version, you can also set up automatic backups of your system when event triggers and when a USB is plugged in.
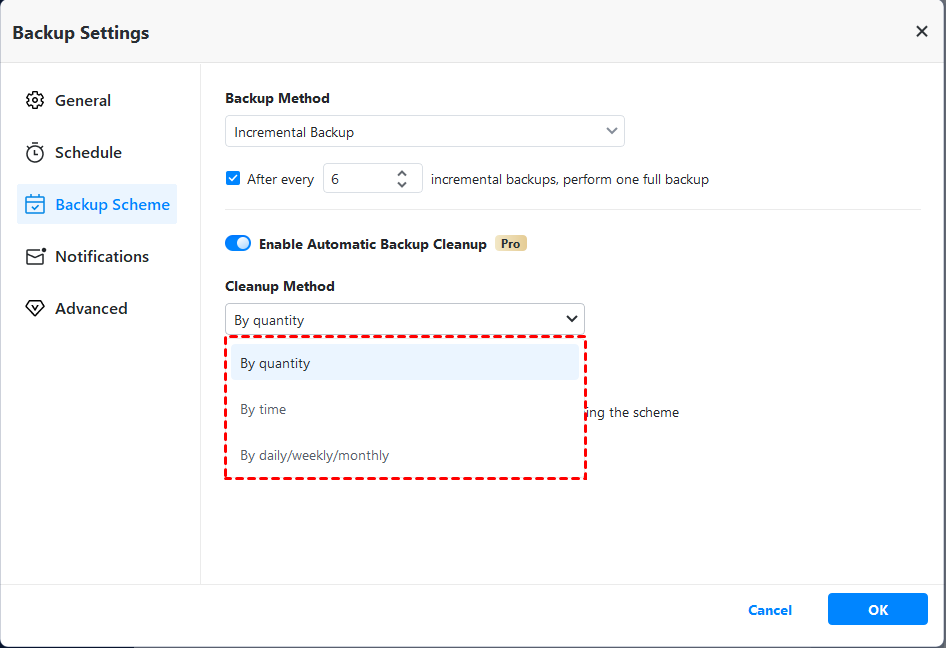
🎈 Backup Scheme: Allows you to change the backup method of Windows 11 to an incremental backup or full backup for free. After upgrading to the Pro version, you can also use differential backup and turn on the automatic cleanup backup feature.
🎈 Options: Allows you to add comments to Windows 11 system backup tasks and enable email notifications for free, and after upgrading to the Pro version, you can also enable encrypted backups to improve the security of Windows 11 system backups.
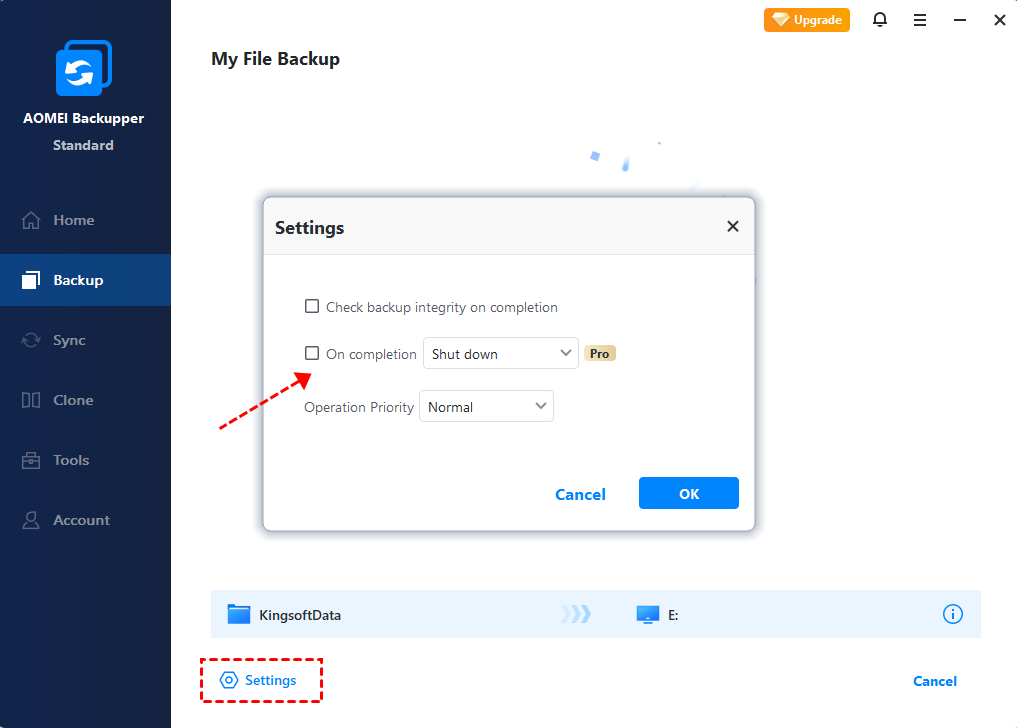
- During the system backup process, you can tap the gear icon in the lower left corner and check the Check backup integrity on completion checkbox. After the system backup is completed, tap the OK button again.
As mentioned above, the System Backup feature only backs up all data in the partition where the Windows 11 system files are located, so if you only want to back up single or multiple files (folders), then it is recommended that you use the File Backup function. If you want to completely migrate your Windows 11 system to another hard drive, upgrade to the Pro version and use the System Clone feature to ensure a safe boot of your migrated system.
Summary
For users who are used to using drag-and-drop function, can’t drag-and-drop Windows 11 on is definitely an unbearable trouble. Therefore, please read the above in detail and try the 6 solutions provided in the article in turn to restore the desired drag-and-drop function.
For system security reasons, it is recommended that you use AOMEI Backupper Standard to perform a system backup before repairing the login file to prevent any possible system problems. If you encounter any system-related problems after modifying the login file editor values, you can use the previously created system backup image to quickly restore your computer system to a normal state using the System Restore function.
To prevent Windows 11 system crashes due to login file modification errors, etc., it is recommended that you create bootable media to ensure that your computer can safely boot and automatically execute AOMEI Backupper Standard for system recovery.

