How to Use Wbadmin Start Backup Backuptarget
In this article, you will learn the Wbadmin start backup backuptarget command line and backup to critical volume, shared folder, NAS.
By Ivy Updated on January 9, 2024
Wbadmin Schedule backup to network share
Windows Server Backup allows you to create backups to internal hard drive or external hard drive, and shared folder over NAS network is also supported, but creating scheduled backup to shared folder in Windows Server 2008 is not supported.
To get rid of this problem, you can use Wbadmin start backup -backupTarget command that can create schedule backup to network share.
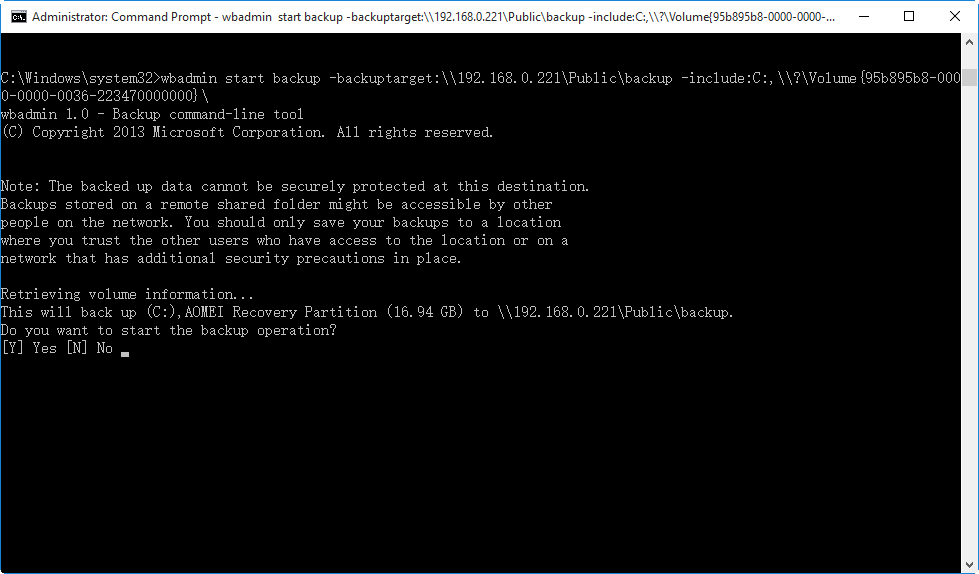
For example: To backup C: drive and recovery partition to shared folder, you can use the following command. wbadmin start backup -backuptarget:\\192.168.0.221\Public\backup –include:C:,\\?\Volume{95b895b8-0000-0000-0036-223470000000}\
The problems to use Wbadmin start backup backuptarget
The command line wbadmin start backup solve the problem of schedule backup to shared folder. However, here comes other problems:
The location for backup is a critical volume error. When specifying local disk or volume using its drive letter or GUID-based path as the wbadmin backup target volume, you cannot select any volumes included in the backup. At the same time, you will receive error message saying that the location for backup is a critical volume or something similar.
Backup will be overwritten at the next time. When specifying a backup to shared folder, the next backup will overwrite the previous one before even starting. Therefore there is a risk that you may lose all the backups if the running backup fails.
Few tricks to Wbadmin start backup backuptarget
Seemingly, configuring a backup using Wbadmin start backup has many restrictions and limitations. Luckily, some of them, there are solutions or workarounds to get over with.
1. Modify registry line before backing up to critical volume.
Windows backup utility won’t allow you to backup to critical volumes and throw out error message like “Error -the location for backup is a critical volume”. To solve this error, you can choose to modify some lines in Registry that allows you to backup to critical volumes.
Modifying things in the registry incorrectly may lead to serious status. This is not recommended unless you strongly need to save backups to critical volumes.
2. Create scheduled backup to NAS shared folder using scheduled task.
To create bare metal backup to a network shared folder at 00:00 every day and name it as DailySystemBackup, you can use the syntax - SCHTASKS/Create/SCDAILY/TN/RL HIGHEST/ST/TR. Type as follows:
SCHTASKS/Create/SCDAILY/TN DailySystemBackup/RL HIGHEST /ST 00:00 /TR "WBADMIN START BACKUP -backupTarget:\\192.168.0.221/Public/Schedule -allcritical -include:systemstate -quiet >> C:\backupLogs.txt"
Note: But if you want to create a weekly schedule backup or less frequent backup task, you can use the syntax: SCHTASKS /Create /SC WEEKLY /D/TN/RL HIGHEST /ST/TR.
3. Create incremental backup to network share by virtual hard disk.
To avoid being overwritten by the next backup, you need to make Windows think the shared folder as a local disk. You can create a virtual hard disk (VHD) in the shared location and initialize and format with NTFS, then use it as backup target location to run incremental backup.
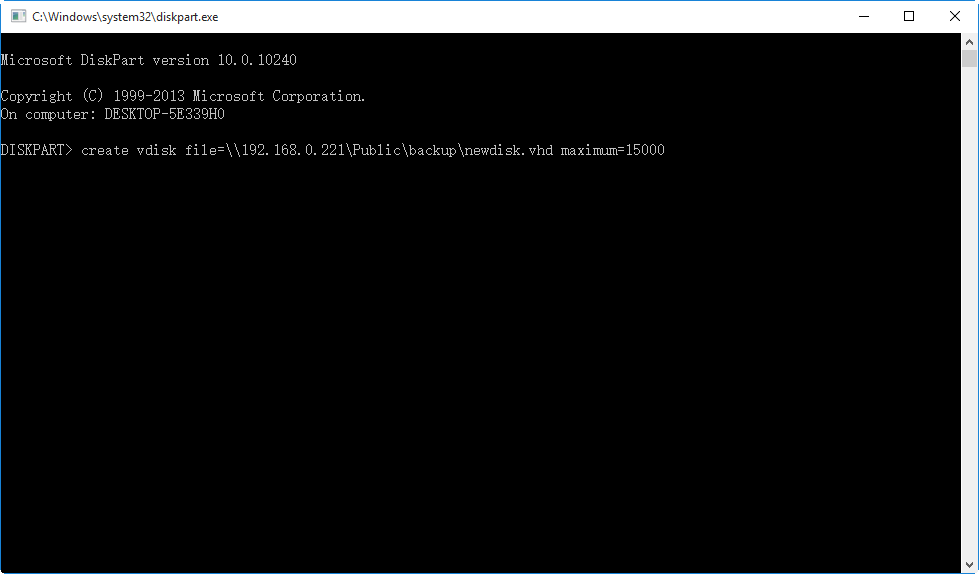
To create virtual hard disk in the shared location, you can use the syntax - create vdisk file=[] maximum=[disk size]. Type as follows:
create vdisk file=\\192.168.0.221\Public\backup\newdisk.vdh maximum=15000
Note: Windows only supports keeping one scheduled backup, and the scheduled backup will fail if there is a backup running when the scheduled time comes. If you do not content with these workarounds, you can try third party software like AOMEI Backupper Professional.
More flexible way to backup to network share with AMBackup.exe
Compared with Wbadmin, AOMEI Backupper Professional is a more flexible command line backup software in Windows 7, 8, 8.1, 10, 11. But if you are using server computer, such as, server 2008, 2012, 2016, 2019, 2022, you could consider using AOMEI Backupper Server.
Now, you need to know what does AOMEI Backupper can do. And I’ll introduce you in details.
AOMEI Backupper allows you to backup disk, system, partition as you like. Also, you can do incremental backup or differential backup, sector by sector backup, encryption backup, etc. What’s more, you can keep multiple scheduled backup tasks and all versions of backups can be saved as you wish.
Besides, this software supports multiple backup target, including, local disks, external disks, solid-state drive (SSD), USB flash drives, thumb drives, CD/DVD, network-attached storage (NAS), hardware RAID, dynamic disks. And these backups does not be overwritten by the next backup.
1. Download, install and launch AOMEI Backupper Professional.
2. Open command prompt with administrator rights. Type cmd in the search box, right-click it and run as administrator.
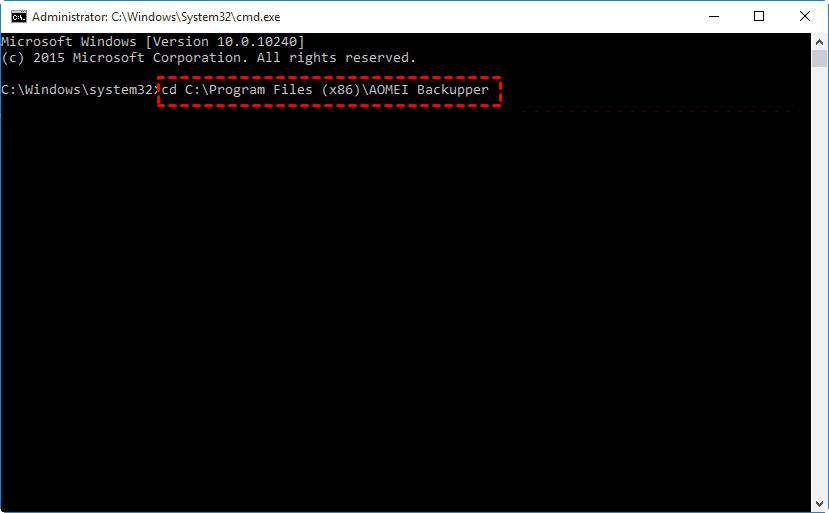
3. Type in the installation directory path of AOMEI Backupper and press Enter. For example: cd C:\Program Files (x86)\AOMEI Backupper.
4. To create a system backup on network, type the following command and hit “Enter”. AMBackup.exe /b new /t system / /d “\\192.168.0.100\Share\Imgfile.adi” /n “BackupToShare” /u “admin” /p “123456”
Here are some parameter in the commands you need to know. For more command line, you can go to this website and learn details.
{/b} refers to the backup type of this operation, including new, dif, inc, full.
{/t} specifies the type of source, containing, system, disk, partition.
{/d} is destination path to your backup.
[/n] implies the name of this backup task.
[/u] means the username of a network you want to backup to.
[/p] indicates the password of a network you will backup to.
Tips:
• AOMEI.exe not only support backup command line, but also have restore and clone command line. You can backup, restore or clone as you like.
• Besides command line utility, AOMEI Backupper also provide you a graphic users interface (GUI. It’s much easier and suitable for beginners. Because all the steps are fixed and difficult to make mistakes.

