


Top 5 VMware Backup Solutions to Protect Your VMs for Free
In this post, we will list the 5 most commonly used VMware backup solutions and make a comparison of them to help you protect critical data. Also, we will walk you through the details of how to backup VMware ESXi virtual machines.
By Crystal / Updated on July 24, 2024
VMware backup solutions to protect your VMs
Whether in enterprise production environments or individual development environments, virtual machine backups are extremely important. You need an effective VMware VM backup solution to protect your virtual environment and gain the ability to protect and recover your virtual machines when needed quickly.
Choosing a suitable solution can further promote your work efficiency and ensure your business continuity. And given the amount of knowledge involved and the wide range of options, you may struggle to choose the best backup way.
Here, I will list 5 VM backup solutions for VMware ESXi. And the best part is that you can use them for free.
![]()
VMware backup solutions comparison | how to pick
👉In summary, the commonly used VMware VM backup solutions include:
Specialized VMware backup software, copying VM files, exporting VM templates, clone VMs, and VM snapshots.
The last 4 backup ways for VMware are self-contained (both in ESXi and Workstation), but users who are not proficient in virtual machines may not be able to tell the difference and applicable scenarios between them. So I'd like to make an intuitive comparison and help you pick the best suitable for your case.
*You can click on the anchor text below to jump to the detailed solution description.
| Robust Backup software | Copy VM files | Export VMs | Clone VMs | VM snapshots | |
| Usage | Long-term and automatic backup for entire VMs and fast VM recovery | Download VM files for archive or re-creation | Create a OVF template for re-deploy | Create an identical new VM | Short-term rollback measure before unsafe operations |
| Batch operation | Yes | No | Use PowerCLI | Use PowerCLI | Use PowerCLI |
| Backup schedule | Yes | No | No | Use vCenter | Use vCenter |
| Cost | Varied | Free | Free | Requires vCenter | Free |
![]() Although in a broad sense, snapshot can be used as a short-term VM backup method, it is primarily used as a rollback point before major operations, not long-term data storage. Keeping a snapshot for too long will also affect the performance of virtual machines. So it's not recommended to use snapshot as a regular backup mean.
Although in a broad sense, snapshot can be used as a short-term VM backup method, it is primarily used as a rollback point before major operations, not long-term data storage. Keeping a snapshot for too long will also affect the performance of virtual machines. So it's not recommended to use snapshot as a regular backup mean.
So all in all, if you are computer savvy and familiar with VMware's tools, you can use the built-in backup solutions to achieve some specific data protection goals. But a reliable VM backup software is a better way for a long-lasting VMware backup that requires less administrative time.
In the following, I will introduce these backup solutions in detail with screenshots. The steps are based on VMware ESXi, if you are using Workstation, please turn to: VMware Workstation backup solutions.
Solution 1. Best free VMware backup solution to backup entire virtual machines
There are plenty of VMware backup software out there. They're either powerful but expensive, or they're inexpensive, but they cannot handle the majority of backup requirements.
Therefore, I recommend free VMware backup software - AOMEI Cyber Backup. It offers and easy centralized backup way to protect the whole VMs without resource contention and recover data quickly to fulfill most VMware backup and restore requirements.
AOMEI Cyber Backup includes plenty of cutting-edge features making it the best choice for VMware backup and restore
• Agentless Backup: Create image-based backup for entire VMware virtual machines without installing agents on each VM, resulting in a more efficient backup deployment procedure.
• Support Free ESXi: Support both paid and free versions of VMware ESXi.
• Easy-to-use and centralized: Comes with an intuitive web console for all VM backup and restore. Backup administrators can easily handle data protection without steep learning curving.
• Automated Execution: Set up your backup scheduling, this solution will automatically run backup tasks (support full/incremental/differential backup) daily, weekly, monthly, etc.
• Multiple Storage Destinations: Back up to local folders, network shared folders and NAS shared folders (folders shared via the SMB protocol). And you can also archive VMware backup to Amazon S3.
• Restore from Any Point: Support point-in-time recovery. You can Restore entire VM from any backed-up restore points.
AOMEI Cyber Backup supports VMware ESXi 6.0 and later versions. Here, I will demonstrate how to quickly schedule an automatic backup task for your multiple or all ESXi VMs. You can click the download button below to install this VMware backup software and follow the following steps.
*You can choose to install this VM backup software on either Windows or Linux system.
How to backup VMware ESXi virtual machines easily:
Step 1. Bind Devices: Launch AOMEI Cyber Backup web client, navigate to Source Device > VMware > + Add VMware Device. You can enter a vCenter or Standalone ESXi host information to add all related VMs > Click Confirm.

Step 2. Create Backup Task: Navigate to Backup Task > + Create New Task, and then set it up according to your needs.
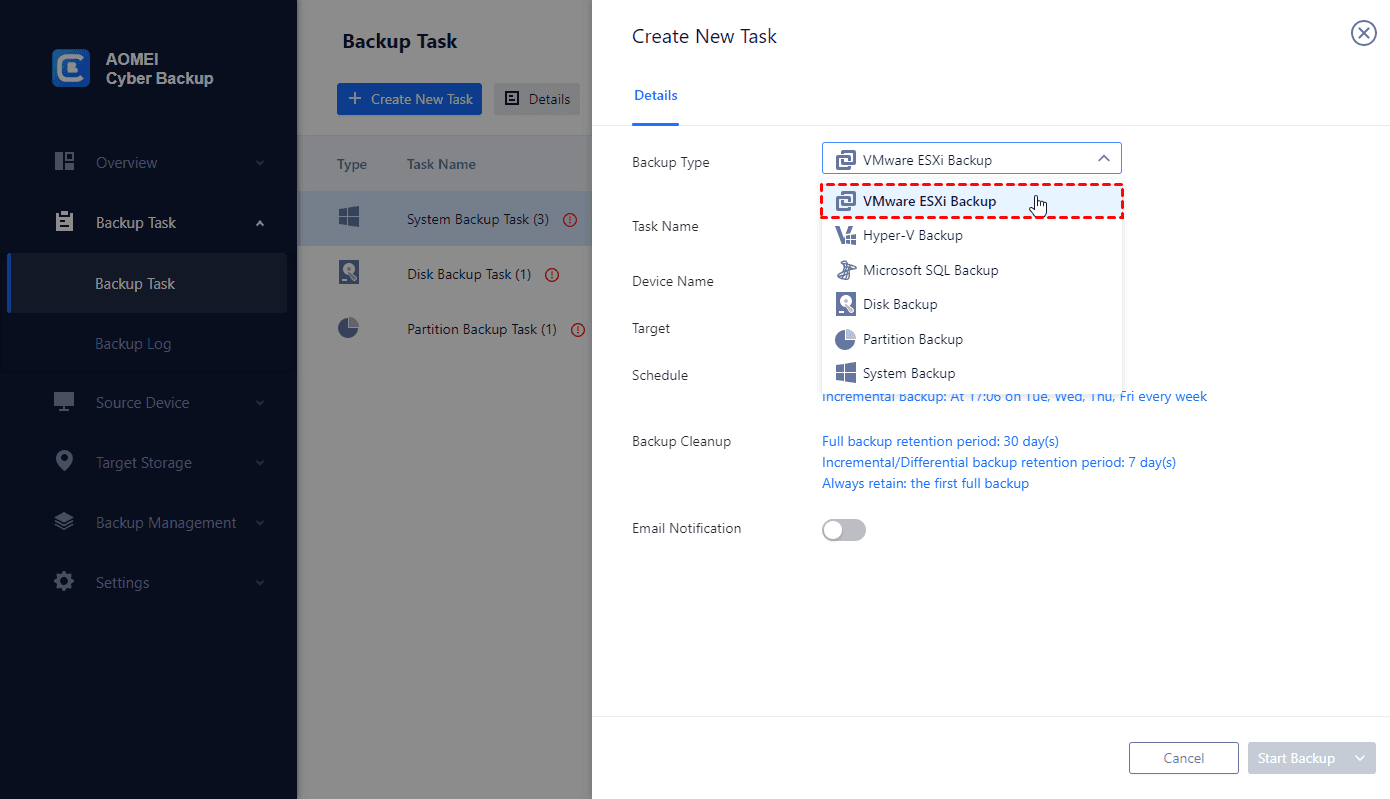
- Device: cover multiple VMs on the host in one backup task. Choose the VMs that need to be backed up.
- Target: selecting to back up to a local path, or a network path. Used paths will be saved in Favorite Storage for handy selection.
- Archive: Add an Amazon S3 storage and archive VMware Backup versions to this S3 storage.
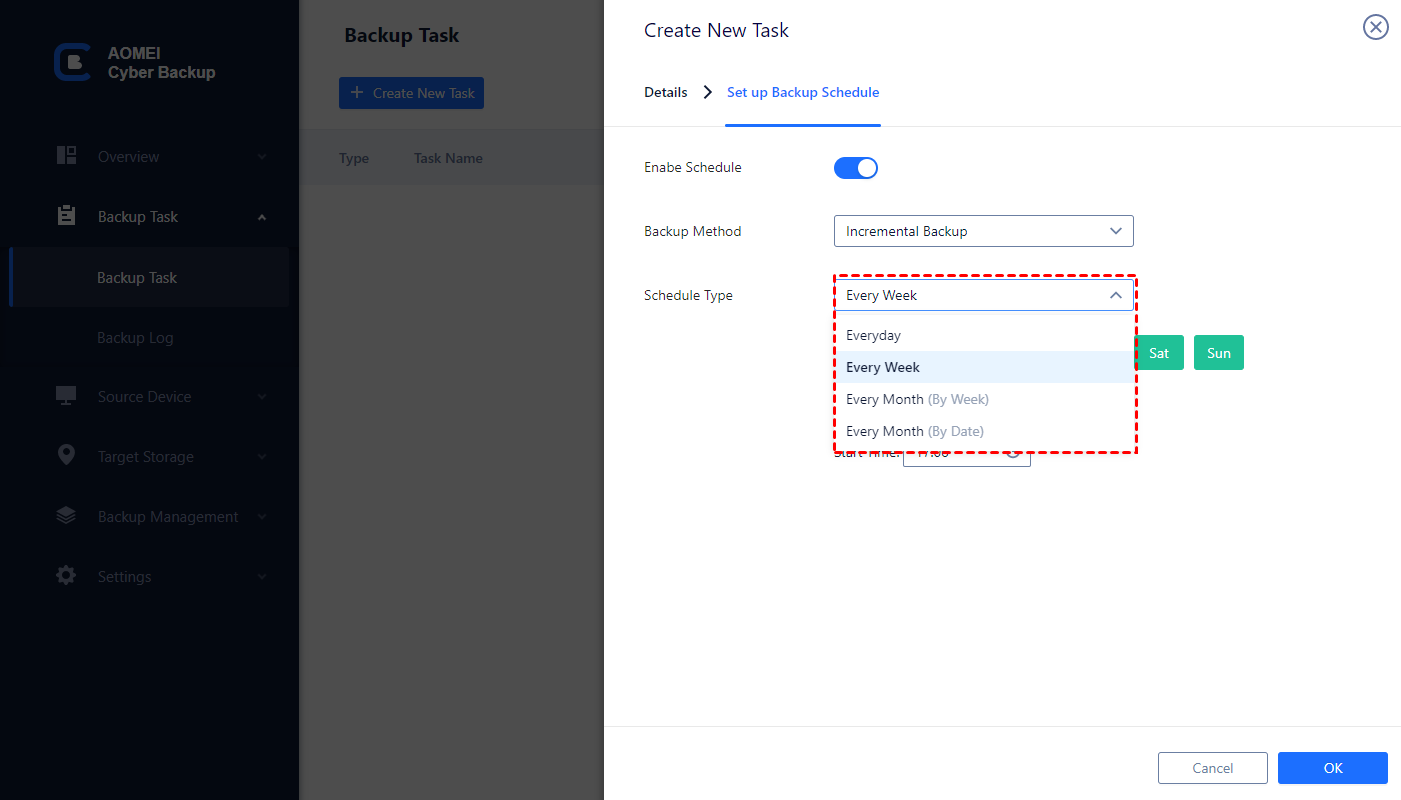
- Schedule: Choose to perform full, differential, or incremental backup, and automate execution daily, weekly or monthly according to the frequency you specified.
Step 3. Start Backup: Click Start Backup and select Add the schedule and start backup now or Add the schedule only.
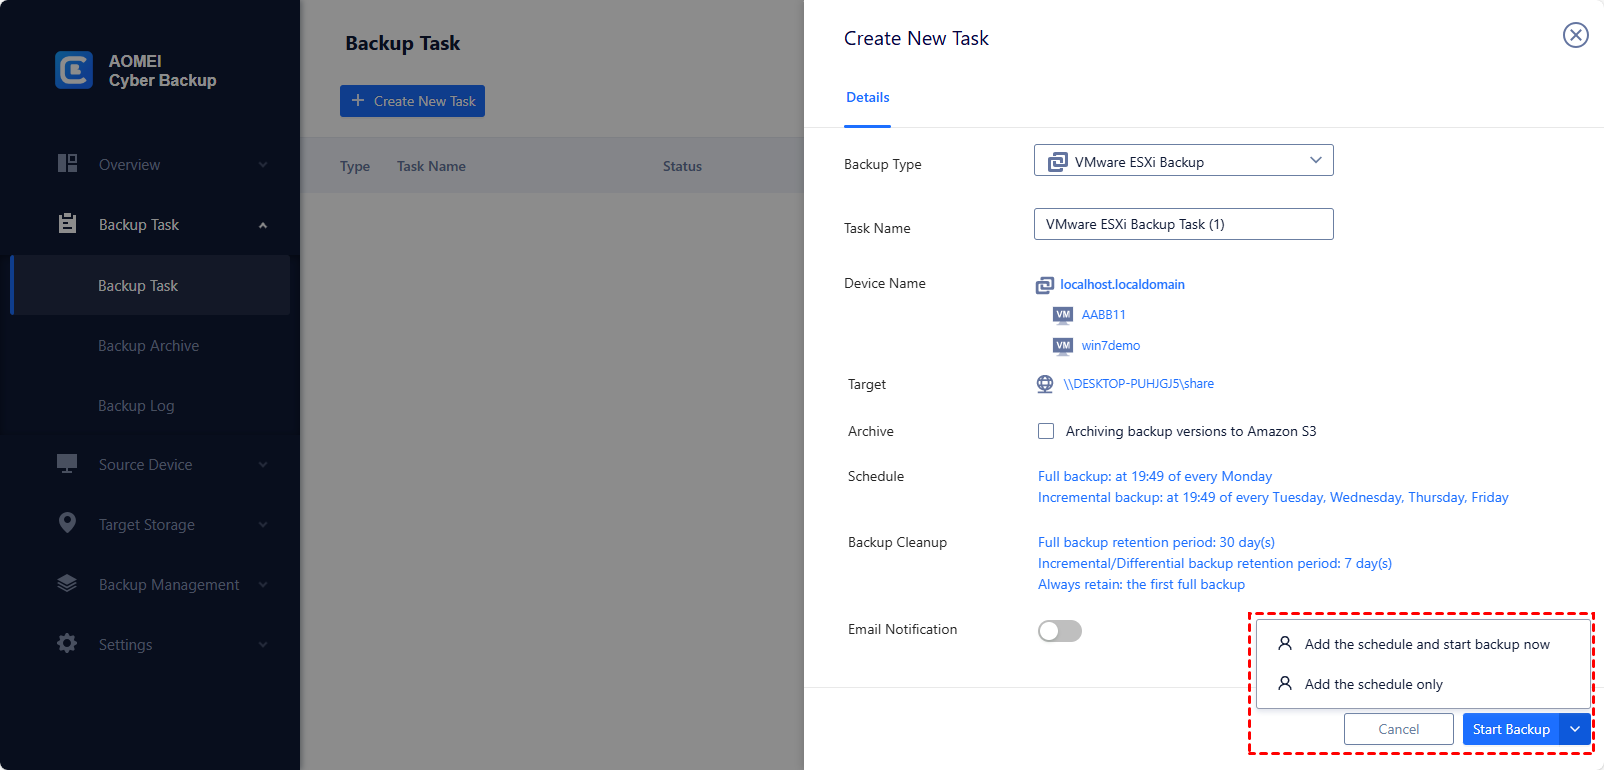
Created backup tasks will be listed and monitored separately for progress checking, editing and restoring.
While the Free Edition covers most of VM backup needs, you can also upgrade to enjoy advanced features:
Unlimited VM Backup: batch backup large numbers of VMs managed by vCenter Server or on standalone ESXi hosts.
Backup cleanup: Configure a retention policy to auto delete old backup files and save storage space.
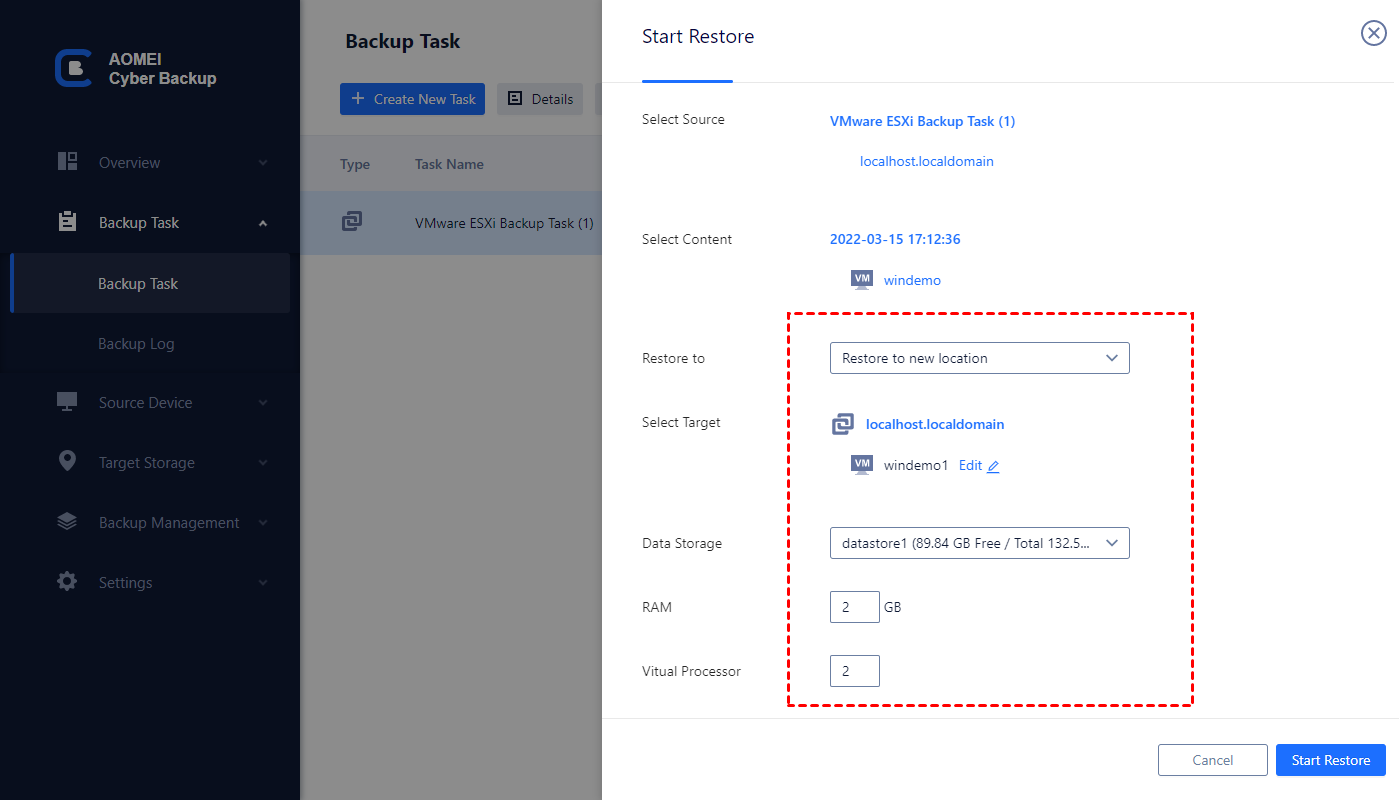
Restore to new location: Create a new VM in the same or another datastore/host directly from the backup, saving the trouble of re-configuring the new VM.
All backup tasks will be listed in the Backup Task window. Here you can click the 3-dot icon and choose Restore to restore backed-up VMware.
Solution 2. Download VM files from VMware
Manually downloading the VM files is probably the most direct one of VMware free backup solutions. By re-deploy (or “Open” on Workstation) the downloaded virtual disk files (.vmdk) and the configuration files (.vmx), you can directly create an instantly usable copy of the VM.
How to manually download the VM files
Step 1. Access ESXi Web Client, navigate to Storage in the left inventory, and click Datastore browser on the toolbar.
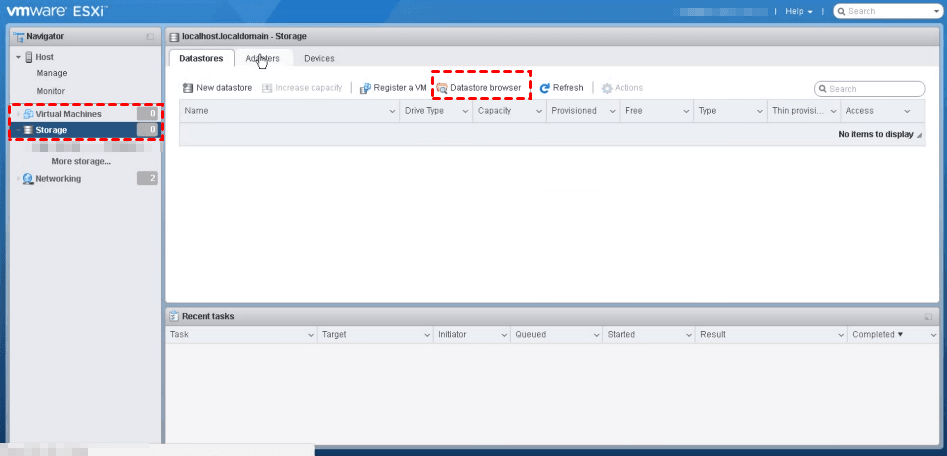
Step 2. Go to the folder of the virtual machine you want to back up. Select the .vmdk files and .vmx files and click Download on toolbar to download them to a local path.

Step 3. Close Datastore browser window, and you can see the progress in Recent tasks.
✎To create a new VM using the downloaded VM files, you can refer to VMware restore from backup.
Solution 3. Export VMware VM as template
By exporting VM to OVF/OVA templates, you will gain faster downloads since the OVF files are compressed, and supports exchange of virtual appliances across products and platforms.
How to export the ESXi VM to OVF:
Step 1. Access ESXi Web Client, commit all snapshots and power off the virtual machine you want to back up.
Step 2. Navigate to Virtual Machines page, right-click on the virtual machine you want to back up and select Export. Click OK in the pop-up window to continue.
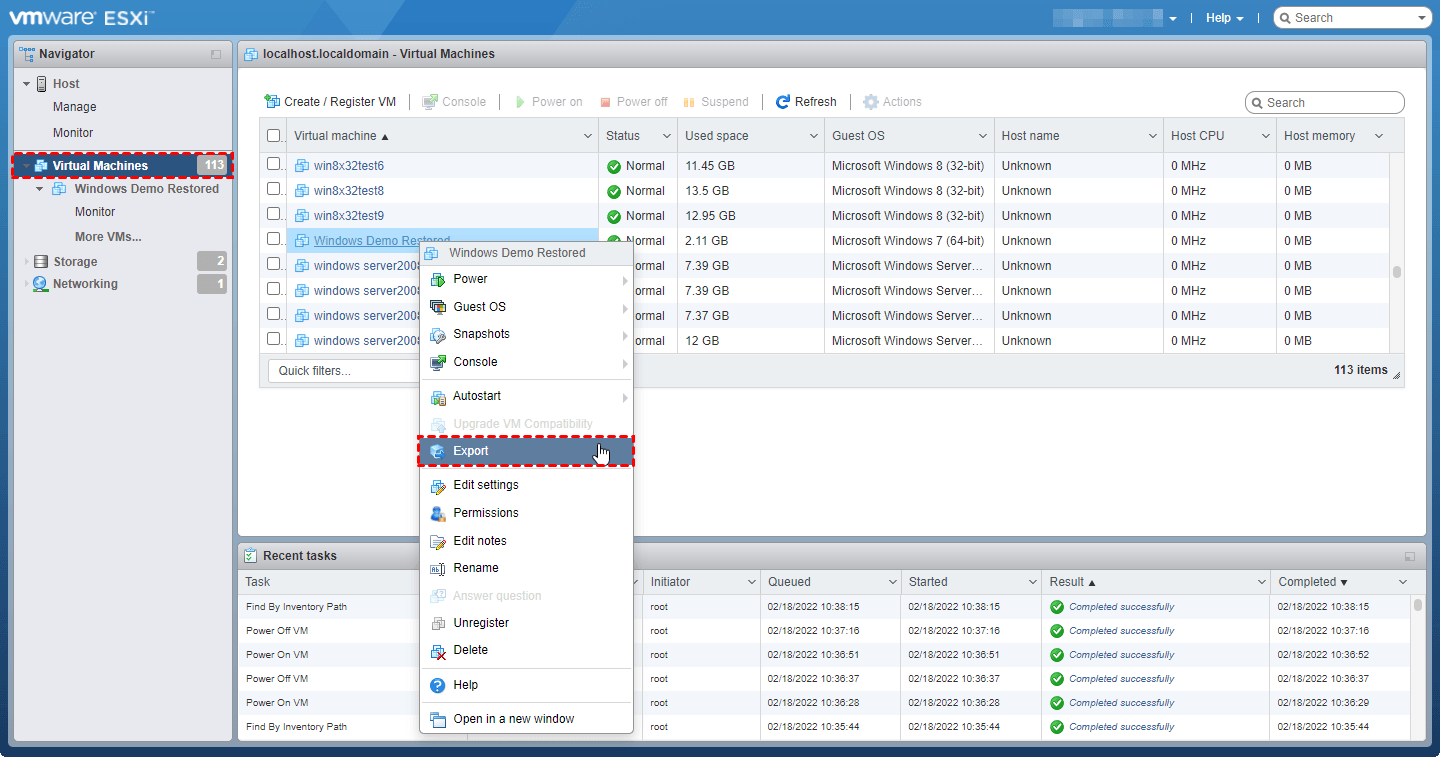
Step 3. Click Save File option twice to download the .ovf file and .vmdk file. Click OK to close the window. You can see the progress in Recent tasks.
When it’s done, you can click the Download button on the toolbar to find where these files are stored.
Solution 4. Use Vmware vCenter Client to clone VMware ESXi VM
VM cloning is a process of creating an exact copy of a virtual machine, including the virtual hardware and guest operating system. There are 2 kinds of clones - a full clone takes longer time, while a linked clone takes shorter, but the cloned VM may be unusable if the parent VM fails.
VM cloning may be different from other VMware backup solutions whose main focus is on data protection, but it's a convenient way to migrate virtual machines or create multiple identical VMs.
How to clone VMware ESXi VM using vCenter:
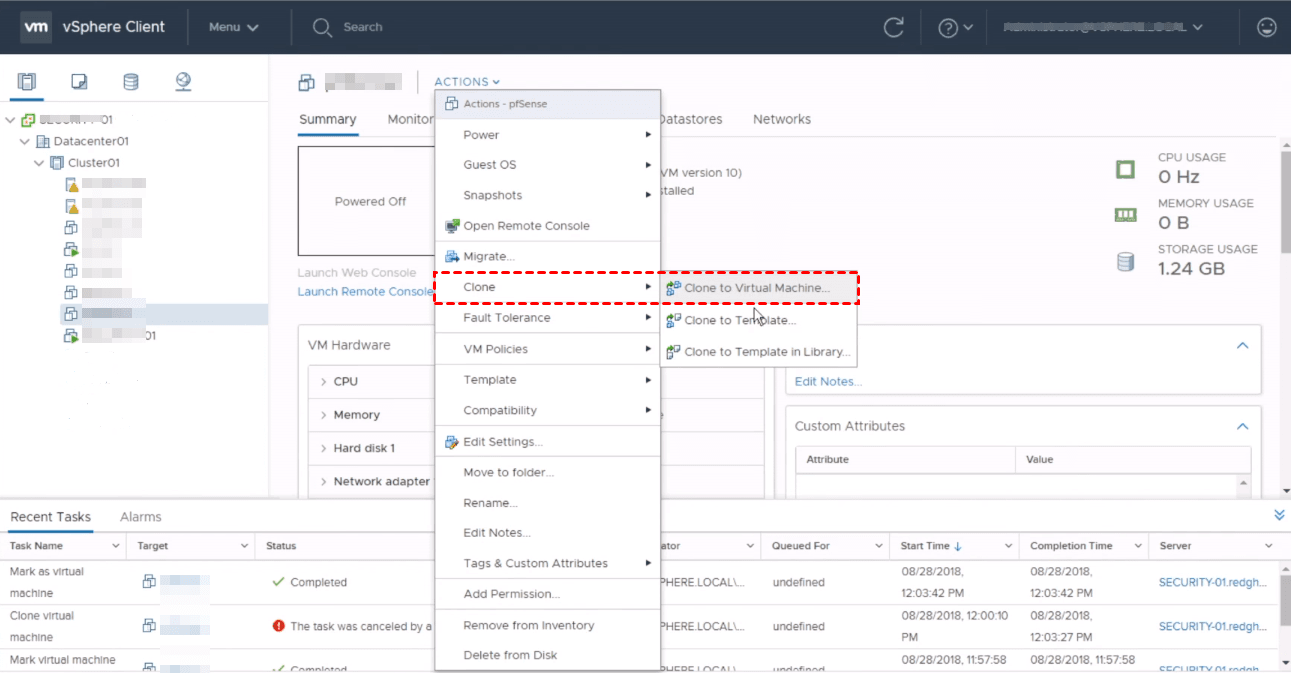
Step 1. Access vCenter Client, right-click on the VM name, and select Clone > Clone to Virtual Machine.
Except for this option, you can also select Clone to Template… or Clone to Template in Library.
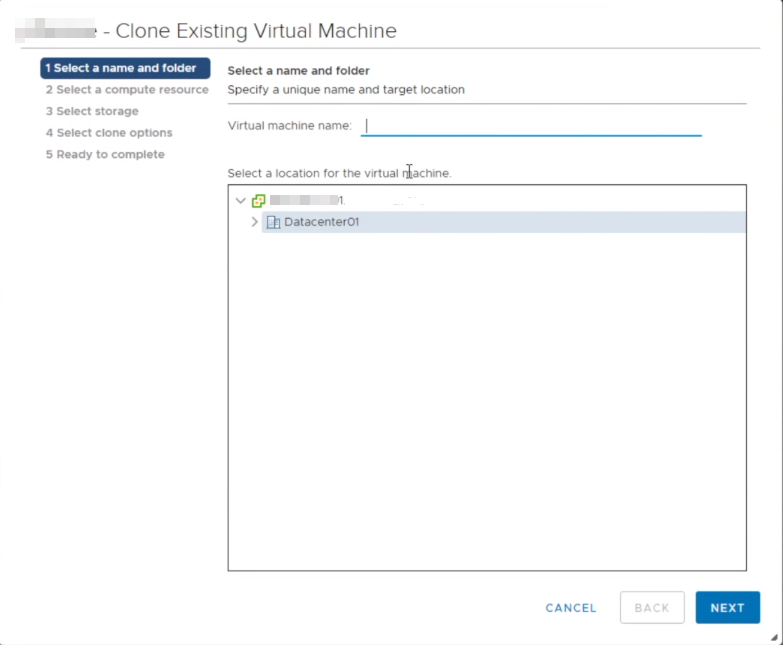
Step 2. Provide a Name and select a destination datastore folder location for the new VM. Then click Next.
Step 3. Select a destination host for the new VM, click Next.
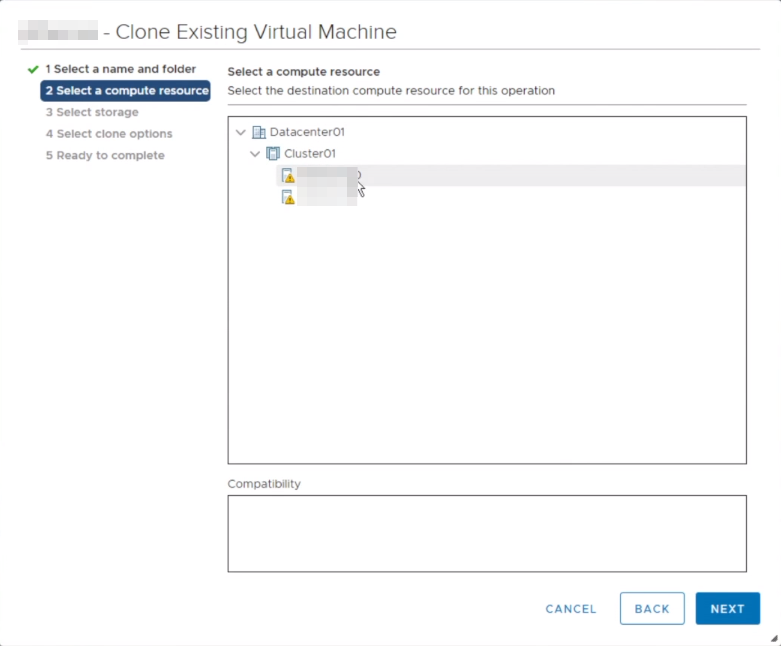
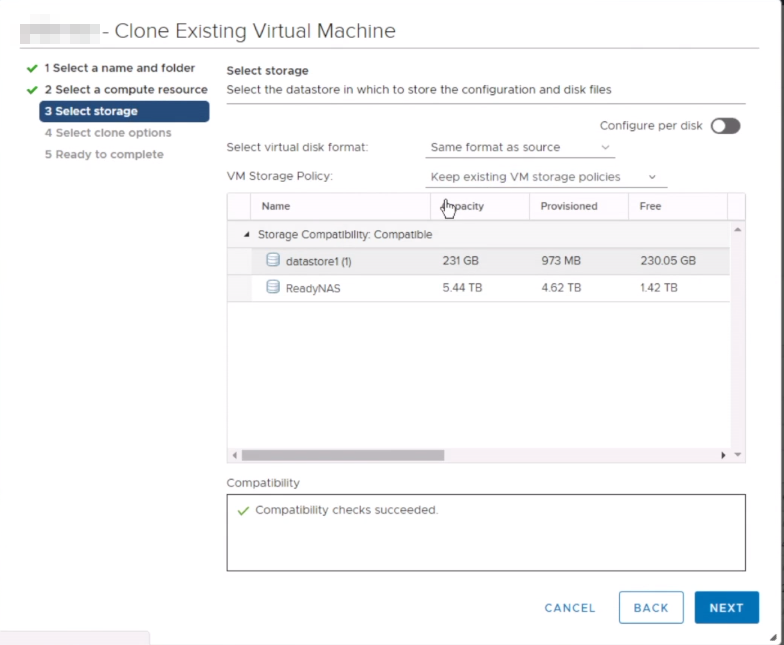
Step 4. On select storage page, Select virtual disk format as Same format as source, and VM Storage Policy as Keep existing VM storage policies. And then select a datastore location to store the VM files. Click Next to continue.
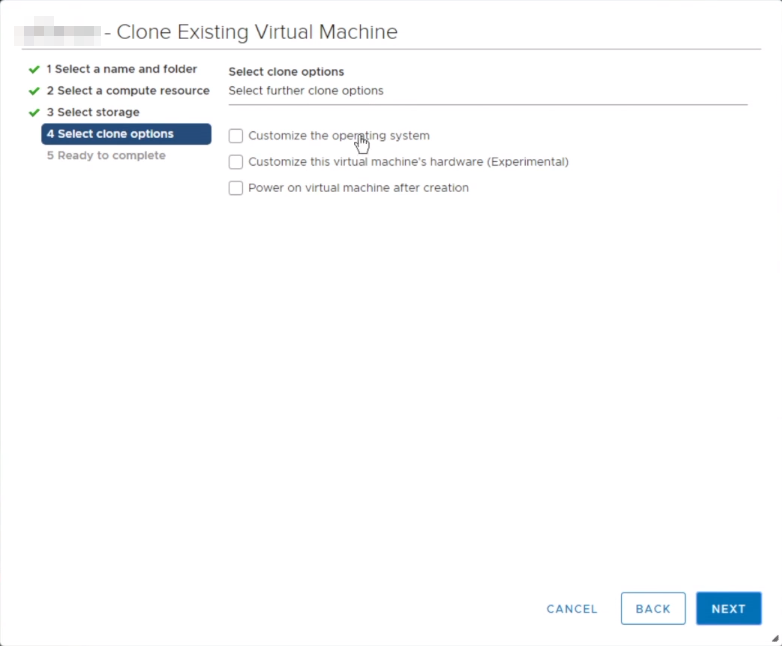
Step 5. Select further clone options, you can customize the operating system, the VM’s hardware, or select whether to power on the VM after creation. Click Next.
Step 6. Review your selections and click Finish to start. You can see the progress in Recent Tasks.
✎VM clone is a free feature in VMware Workstation. But for ESXi, it is supported by vCenter Server.
Solution 5. vSphere Web Client to take snapshot of VMware VM
A VMware snapshot is an image that captures the complete state and data of a virtual machine at a specific point in time. The state includes the power state of the VM (powered-on, powered-off, or suspended), and the data includes all the files that make up the VM (disk, memory, and other devices). It is a quick and efficient way to roll back VM to a specific point in time, just like the undo function.
How to take a snapshot of the ESXi VM:
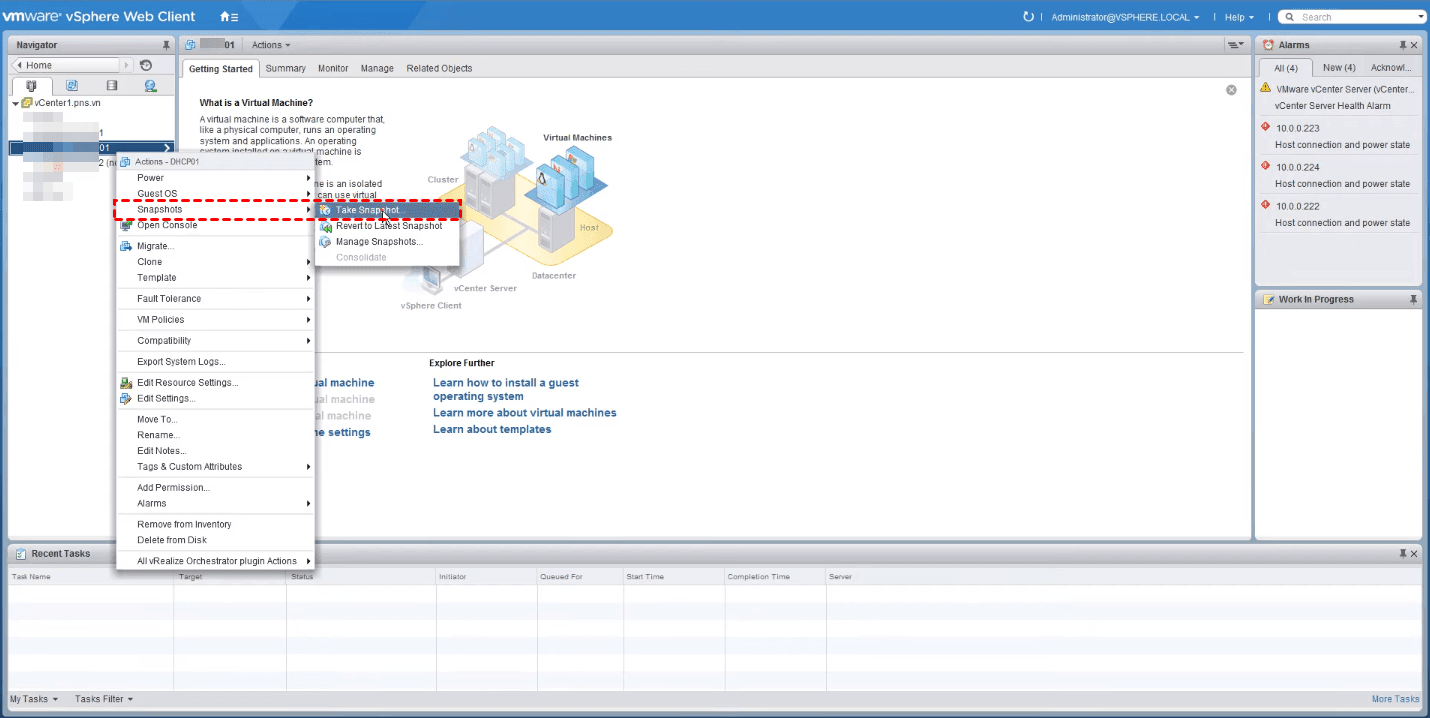
Step 1. Launch vSphere Web Client. Right-click on the VM name in the inventory and select Snapshots > Take Snapshot…
Step 2. In the pop-up window, provide a Name and optionally a Description for the snapshot. You can Edit them later in Snapshot Manager.
Step 3. There are 2 options to check:
- Snapshot the virtual machine’s memory: record the VM’s memory, allowing you to roll back the VM to the exact running state when the snapshot was taken, but takes longer. If you leave this option unchecked, then the VM will be powered-off after you roll back.
- Quiesce guest file system (needs VMware tools installed): pause the state of the processes that are running, or may modify the information stored on disk when the snapshot was taken, to guarantee consistency. Quiescing and Memory snapshots are mutually exclusive.
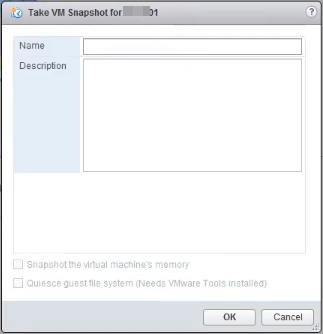
Step 4. Click OK to take the snapshot. You can see the progress in Recent Tasks.
✎As said above, it's not recommended to use VMware snapshots as regular, or even the only backup means. Depending on your usage scenario, you can combine it with other VM backup solutions to build an all-around data protection strategy.
Summary
Backup is one of the most important jobs for VM users, and choosing a suitable way can maintain business continuity and improve efficiency.
In this article, I presented 5 VMware backup solutions. But by comparison, The first backup solution - AOMEI Cyber Backup is suitable for most conditions. It offers an easy-to-use, centralized way to backup all backup VMware ESXi VMs, Besides backup and restore, it also allows one administrator to create sub-accounts with limited privileges for efficient collaboration.

