How to Open VMDK Files in VMware and Extract Data | Easy
How to open VMDK files in VMware and extract data? Read this post to get 5 proven methods to extract files from VMDK.
By Lori / Updated on April 8, 2025
VMDK files are an essential part of VMware virtual machines, storing everything from the operating system to user files. However, situations arise where users need to open VMDK files in VMware and extract data—whether due to corruption, accidental deletion, or migration needs.
![]()
In this guide, we will offer 5 different methods to open and extract data from VMDK files using tools like DiskGenius, 7-Zip, qemu-nbd, and VMware itself. Follow our detailed, step-by-step instructions to extract content from VMDK files safely and efficiently.
What is a VMDK File?
A VMDK (Virtual Machine Disk) file is a virtual hard disk format used by VMware to store all the data of a virtual machine (VM), including:
✅ Operating system files
✅ Application data
✅ User files
✅ VM snapshots
VMDK files act like physical hard drives for VMs. They come in 2 main types:
- Flat VMDK: Pre-allocated space for the full disk size.
- Sparse VMDK: Dynamically expands as data is written.
Why Extract Data from a VMDK File?
Users may need to open VMDK in VMware and extract data for several reasons:
🔹 VM Inaccessibility: The virtual machine won’t start, preventing access to files.
🔹 File Recovery: Need to recover deleted or lost files from a VMDK.
🔹 Migration: Moving specific files from one VM to another.
🔹 Backup & Archiving: Extracting important files for external storage.
5 Methods to Open VMDK Files in VMware and Extract Data
Since VMDK files are essentially virtual hard drives, accessing their data outside of a running VM can be tricky. Below, we’ll cover the 4 effective ways to extract files from VMDK files.
Method 1: Mount a VMDK File to a Workstation
One of the simplest ways to access a VMDK’s contents is by attaching it to another working VM. This method works on VMware ESXi, VMware Workstation, and other hypervisors.
Steps to Attach a VMDK to Another VM:
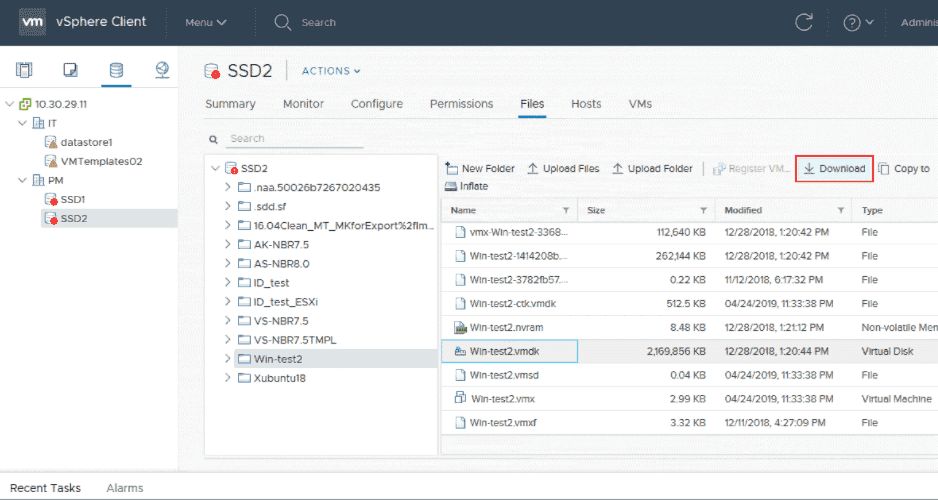
Step 1. In vSphere Client, access to Storage >> Datastore >> File >> Download. You can check the files downloaded in a ZIP archive. Then unzip the two files.
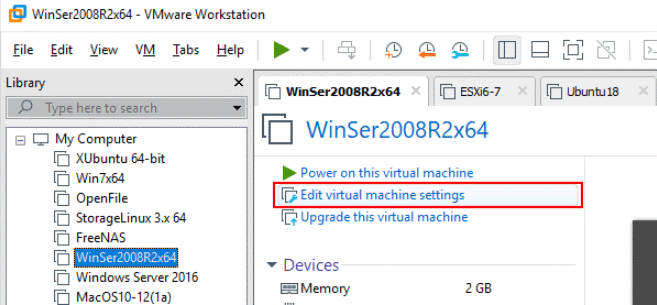
Step 2. Go to VMware Workstation, select a virtual machine and click Edit the virtual machine settings.
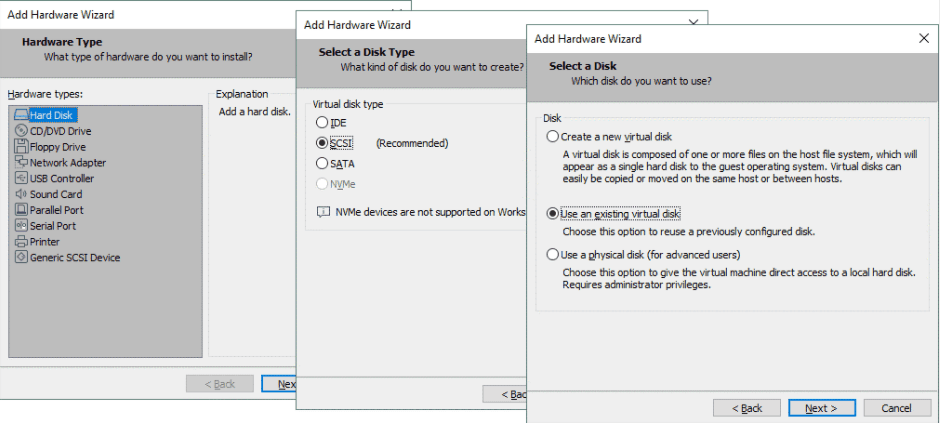
Step 3. In the open wizard, click Add. Then select Hard Disk >> SCSI >> Use an existing virtual disk. Then find the downloaded .vmdk file. Click Finish.
Step 4. Open the Disk Management in Windows, change your virtual disk status to online, assign a drive letter to a partition and browse the files.
Method 2: Use DiskGenius (Windows)
DiskGenius is a powerful tool that can open and extract files from a VMDK file without booting the VM. However, DiskGenius may not work effectively with Linux-based VMDKs due to differences in file systems.
Steps to Extract Data Using DiskGenius:
Step 1. Download and install DiskGenius on your Windows PC. Launch the program and click Disk → Open Virtual Disk File.
Step 2. Locate and select your VMDK file. The tool will display the file system inside the VMDK.
Step 3. Browse the folders and right-click on files you want to extract. Click Copy to and choose a destination on your physical PC.
Method 3: Mount the Virtual Disk in a Running VM (Linux)
For Linux VMs, the best way to extract files is to attach the VMDK to a working virtual machine and manually copy files.
Steps to Mount and Extract Files:
Step 1. Open VMware and start a working Linux virtual machine. Click Edit Virtual Machine Settings → Add Hard Disk.
Step 2. Select Use an existing virtual disk and choose the VMDK file. Boot the VM and open a terminal. Identify the new disk:
sudo fdisk -l
Step 3. Locate the correct partition (e.g., /dev/sdb3). Create a mount point and mount the partition:
sudo mkdir /mnt/vmdk
sudo mount /dev/sdb3 /mnt/vmdk
Step 4. Navigate to /mnt/vmdk and copy the required files to another location.
Method 4: Extract Data with 7-Zip (Windows & Linux)
If you have a simple VMDK file (not split into multiple parts), you can extract files using 7-Zip. This method works best for simple, non-split VMDK files. If the VMDK is split into multiple parts, they must be merged before extraction.
Steps to Extract Data Using 7-Zip:
Step 1. Install 7-Zip on your Windows or Linux machine. Right-click on the VMDK file and select "Open archive" from the 7-Zip menu.
Step 2. Browse through the folders inside the VMDK. Select the files you want to extract and click Extract.
Step 3. Choose a destination on your local system
Method 5: Use qemu-nbd (Linux)
For advanced users, qemu-nbd (QEMU Network Block Device) allows Linux users to mount a VMDK file as a network block device. This method is highly effective for advanced users but requires Linux command-line knowledge.
Steps to Extract Files with qemu-nbd:
Step 1. Install qemu-utils:
sudo apt-get install qemu-utils
Step 2. Connect the VMDK file as a virtual disk:
sudo qemu-nbd --connect=/dev/nbd0 /path/to/vmdk
Step 3. Identify partitions on the mounted VMDK:
sudo fdisk -l /dev/nbd0
Step 4. Mount the desired partition (e.g., /dev/nbd0p1):
sudo mount /dev/nbd0p1 /mnt/vmdk
Step 5. Navigate to /mnt/vmdk and copy the required files. When done, unmount and disconnect:
sudo umount /mnt/vmdk
sudo qemu-nbd --disconnect /dev/nbd0
Best Way to Back Up and Restore VMware VMs
To prevent data loss, always back up your VMDK files. AOMEI Cyber Backup is a top solution for automatic VMware backup with to safeguard data for both individual users and businesses. It has full compatibility that supports VMware ESXi 6.0-7.0 and Hyper-V of Windows Server 2012 and above.
🥇 Key features of AOMEI Cyber Backup:
VMware Backup: AOMEI Cyber Backup allows users to create comprehensive and centralized backups of VMware virtual machines.
Flexible Recovery Options: The software provides flexibility in choosing recovery points, allowing users to restore data to a specific point in time.
Incremental and Differential Backups: AOMEI Cyber Backup supports incremental and differential backup strategies, minimizing the backup size while ensuring that changes to virtual machines are captured efficiently.
User-Friendly Interface: With an intuitive interface, AOMEI Cyber Backup simplifies the process of VMware recovery, making it accessible to both novice and experienced users.
💡 To create a VMware backup using AOMEI Cyber Backup, follow these steps:
1. Launch AOMEI Cyber Backup, go to Source Devices >> VMware >> + Add VMware Device, and enter the required information to Add vCenter or Standalone ESXi host.

2. Click Create New Task to schedule the VMware ESXi backups as the following:
- Task Name & Backup Type: type a task name for the VMware ESXi backup, then select VMware ESXi Backup or Hyper-V Backup accordingly.
- Device Name: select one or more virtual machines on the ESXi host.
- Target: specify a location to store the virtual machine backups such as local or network place.
- Archive: You can add an Amazon S3 storage and enable the archive feature. Then this software will archive your backups to the S3 cloud.
- Schedule: choose full/incremental/differential backup and the backup period as daily, weekly, monthly (by date), and monthly (by week).
- Click Start Backup.
3. Click Restore. It’s easy to restore a virtual machine to its previous status without any complicated reinstallation and configuration.
✍ While the Free Edition covers most of the VM backup needs, you can also upgrade to Premium Edition to enjoy:
✦ Batch VM Backup: Batch backup large numbers of VMs managed by vCenter Server or standalone ESXi hosts.
✦ Backup Cleanup: Configure retention policy to auto delete the old backup files and save storage space.
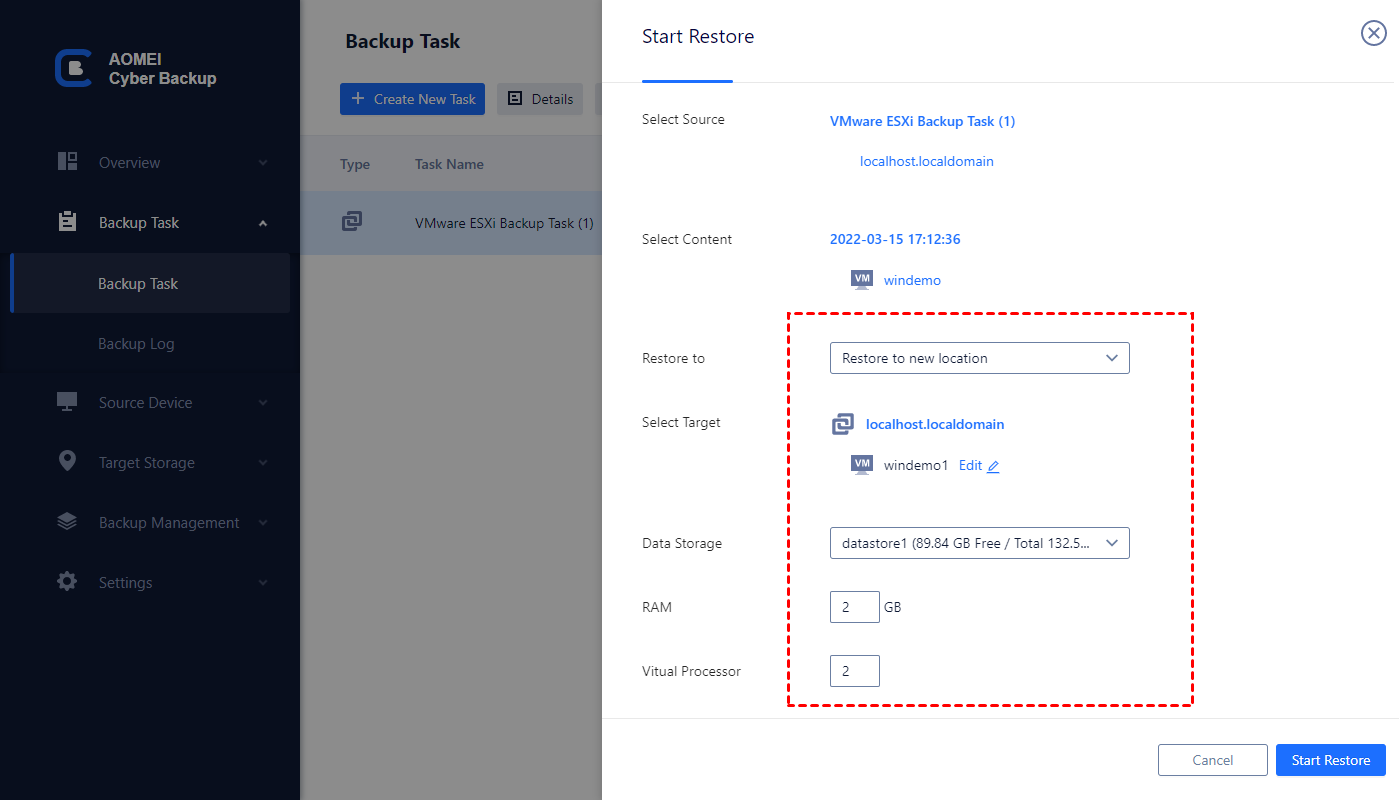
✦ Restore to new location: Easily make a clone of a virtual machine in the same or another datastore/host, without reinstalling or configuring a new VM.
FAQs About Extracting Data from VMDK Files
1. Can I convert a VMDK file to another format for easier extraction?
Yes, you can use qemu-img to convert a VMDK to another format like QCOW2 or RAW: qemu-img convert -O source.vmdk destination.img
2. How do I open a VMDK file in Windows without VMware?
You can use 7-Zip, DiskGenius, or qemu-nbd to open and extract data from a VMDK file without running VMware.
3. Can I merge split VMDK files before extraction?
Yes, you can use VMware Workstation to merge split VMDK files into a single file before attempting extraction.
4. Why can't I mount my VMDK file?
This could be due to:
- Corrupted VMDK – Try running vmkfstools -x repair (for VMware ESXi).
- Unsupported file system – Ensure you are using the right tool for the VMDK format.
Conclusion
By using the right method, you can open VMDK files in VMware and extract data efficiently. Whether using GUI tools like DiskGenius or advanced methods like qemu-nbd, you can access and recover your virtual machine files with ease. In order to avoid data loss, it’s recommended you to back up virtual machines regularly.