


How to Install vCenter on ESXi or Windows (Step by Step)
As the VMs you managed on the VMware platform grow to a certain scale, you may want to use vCenter Server for centralized management. This article will show you how to install vCenter Server 6.7 on Windows Server 2019 as an example.
By Crystal / Updated on August 22, 2024
VMware vCenter Server installation overview
VMware vCenter Server is an advanced server management software that provides a centralized platform for controlling your VMware vSphere environments and managing a large amount of VMs. Generally, there are 2 options available for installing vCenter Server:
- Windows Server based installation
- vCenter Server Appliance deployment
VMware has updated its most popular product, the vSphere suite and the type-1 hypervisor VMware ESXi to 8.
✍However, according to VMware’s product announcement on August 25, 2017, vCenter Server for Windows has been deprecated in versions after vSphere 6.7. This means you can still choose Windows-based installation for vCenter Server 6.7, but the next version of vSphere will not include vCenter Server for Windows.
In this article, I will introduce how to deploy vCenter Server Appliance to ESXi host, as well as how to install vCenter 6.7 on Windows Server.
![]()
How to install vCenter Server Appliance on ESXi host
You can deploy the vCenter Server appliance on an ESXi host 6.5 or later, or on an ESXi host or DRS cluster from the inventory of a vCenter Server instance 6.5 or later. Here I will give you an example.
Steps to install vCenter Server appliance 7 or higher on ESXi:
1. Download VMware vCenter Server Appliance ISO image from the official site, and then mount the ISO image as a virtual DVD drive.
2. Navigate to vcsa-ui-installer\win32 directory and find installer.exe, right-click on installer.exe and select Run as administrator.
Note: If you are using Linux, navigate to vcsa-ui-installer\lin64 and run installer.exe.
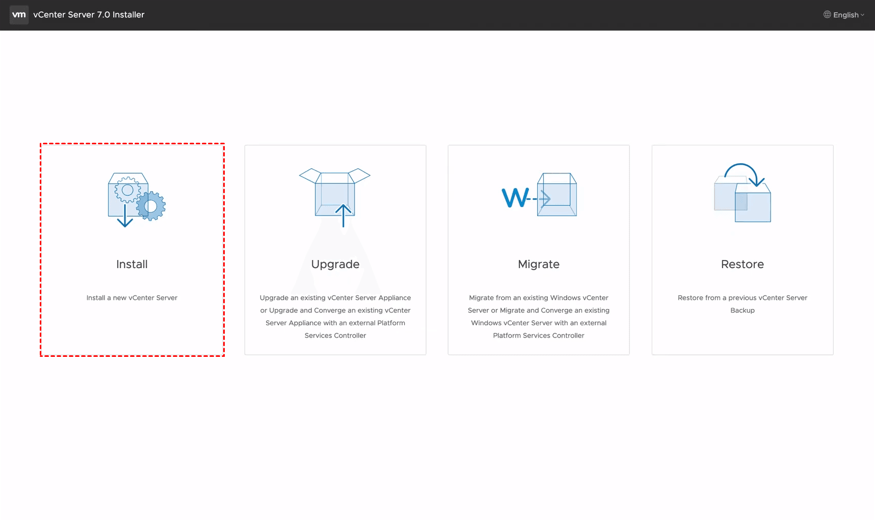
3. On the interface of vCenter Server Installer application, click Install to start the installation.
Tip: This application can also be used to upgrade, migrate, and restore vCenter.
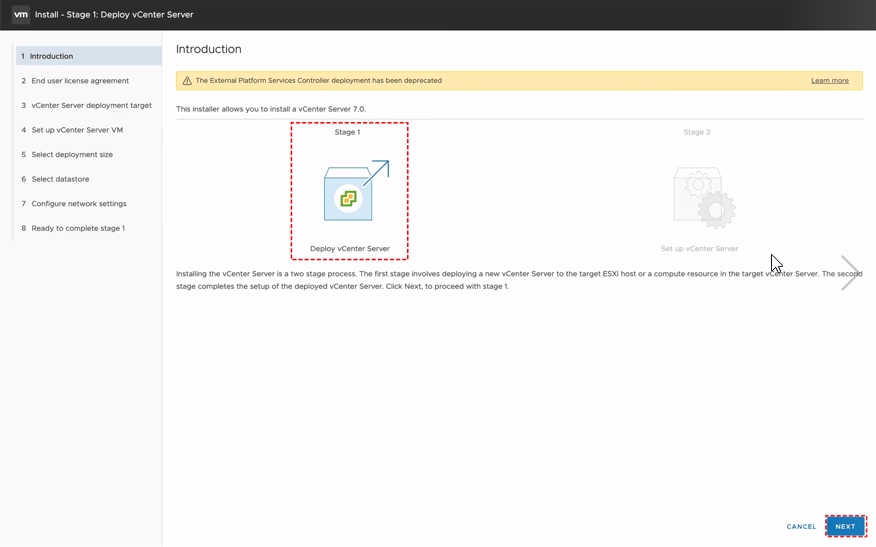
4. Follow the wizard of stage 1 vCenter Server deployment, select I accept the terms of the license agreement option, and click Next.
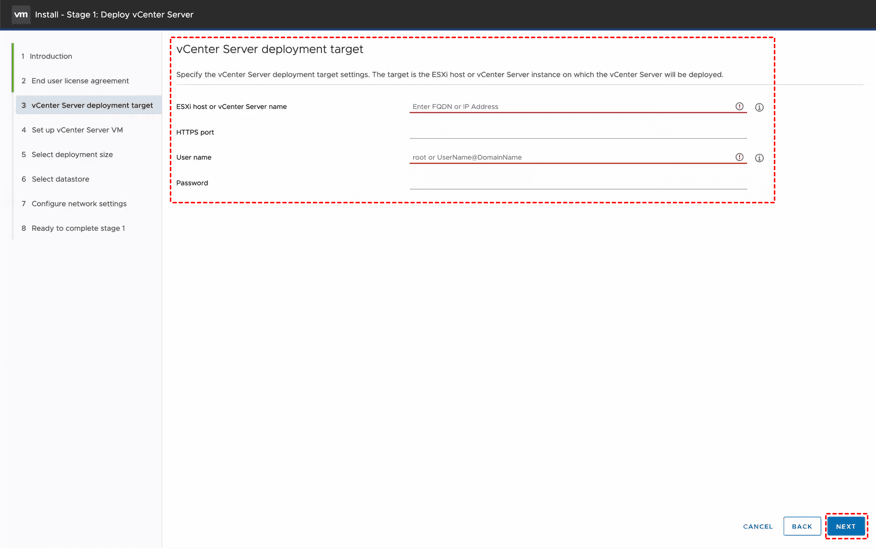
5. Specify the vCenter Server deployment target settings. The target is the ESXi host or vCenter Server instance on which the vCenter Server will be deployed.
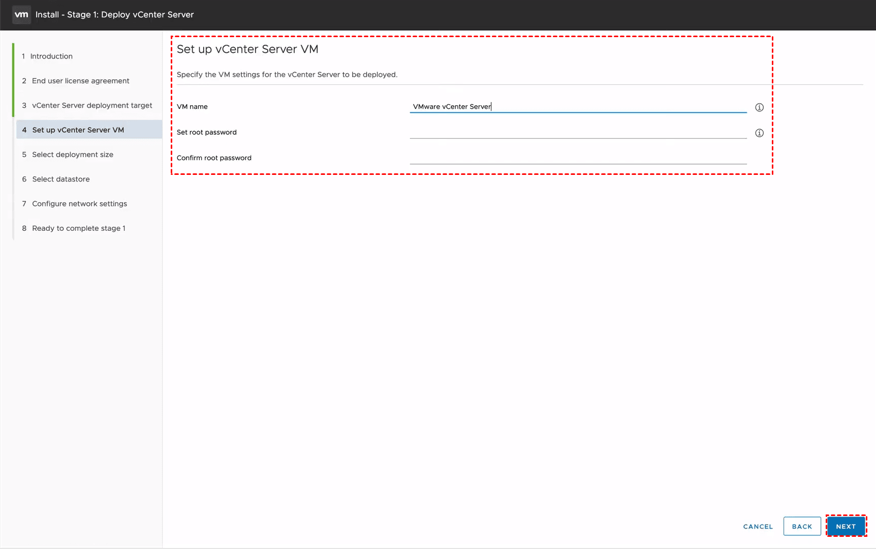
6. Specify the VM settings for the vCenter Server to be deployed.
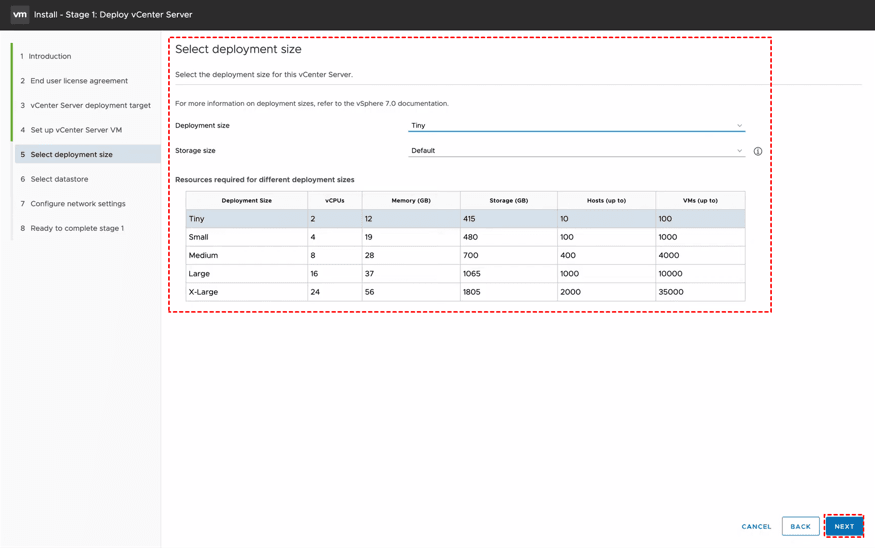
7. Select the deployment size for this vCenter Server. You can refer to the official chart of resources required for different deployment sizes.
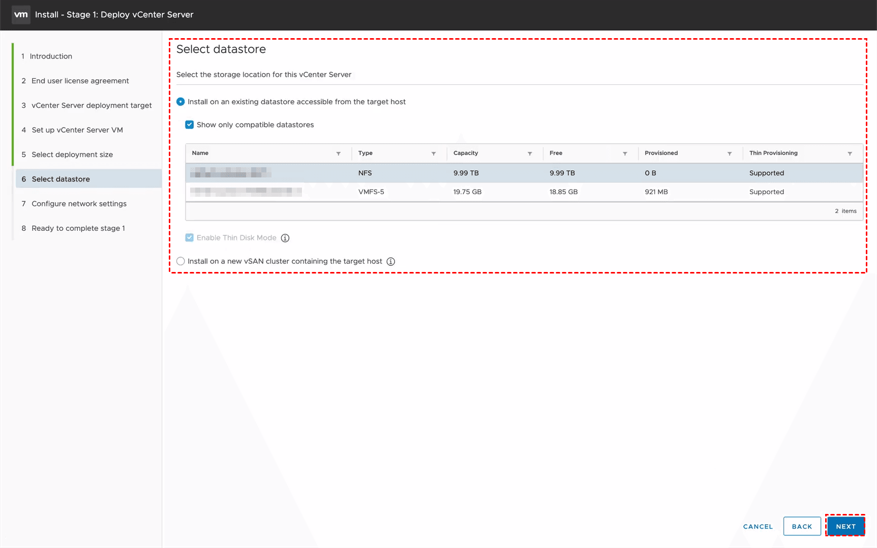
8. Select the storage location for this vCenter Server. By default, to install vCenter Server Appliance on ESXi host you need to install it on an existing datastore that is accessible from the target host.
9. Configure network settings for this vCenter Server.

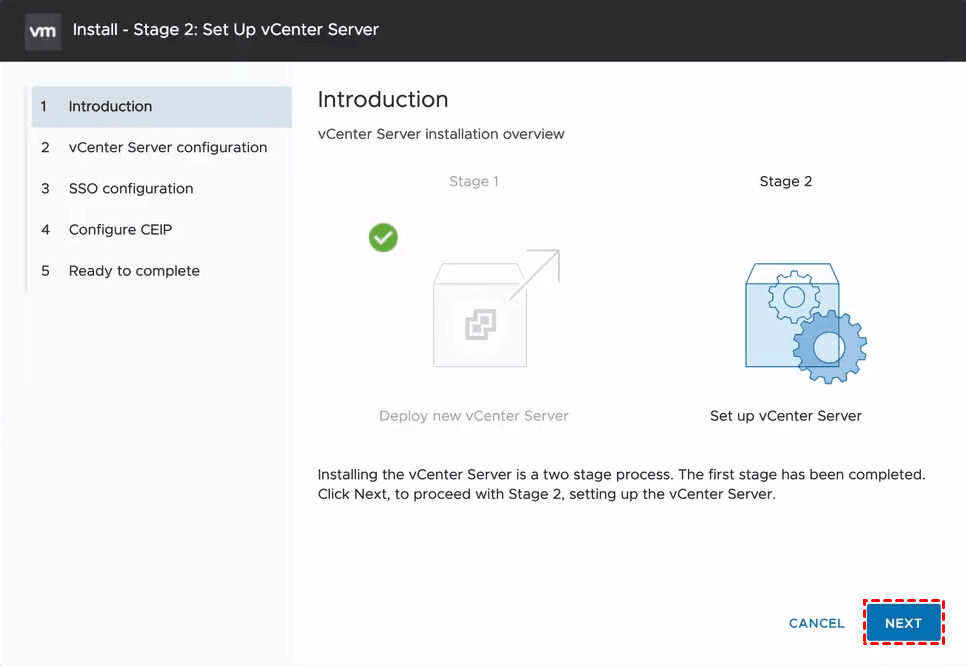
11. Review the settings and click Finish to initialize stage 1 deployment. When it completes, click Next to continue stage 2 vCenter Server setup.
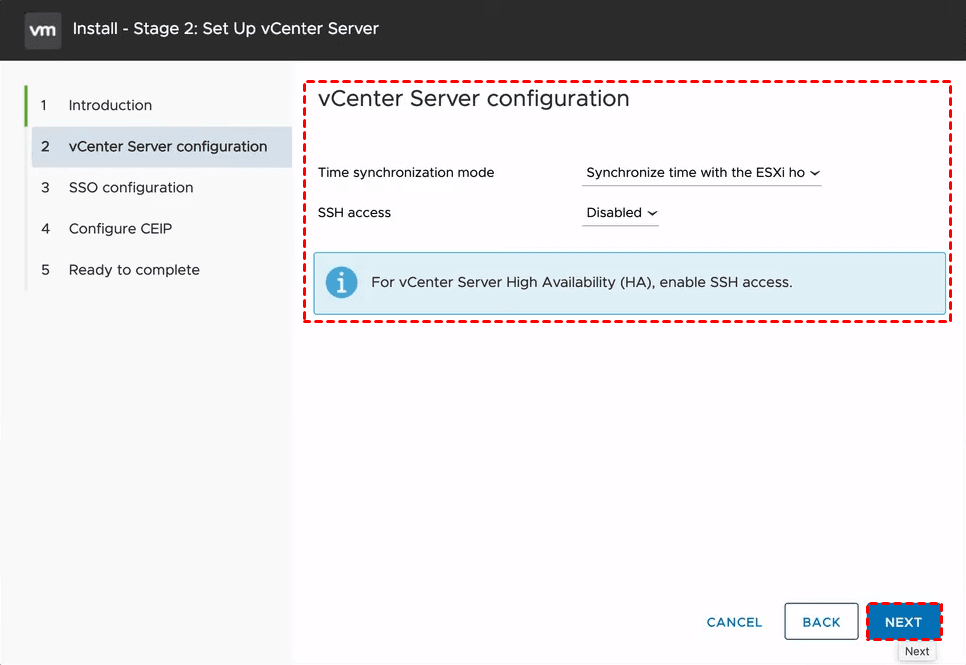
12. Set the time Synchronize mode. Click Next to continue.
13. Select to Create a new SSO domain, or Join an existing SSO domain, provide relevant credentials and then click Next.

14. Check Join the VMware’s Customer Experience Improvement Program (CEIP) option and click Next to review the settings. Then you can click Finish to initialize the setup.

💡By following these guidelines, you can install the VCSA onESXi hosts or clusters effectively. For more details, you can refer to: Install vCenter Server Appliance on ESXi Host
How to install vCenter 6.7 on Windows
In this part, I will present how to install vCenter 6.7 based on Windows Installer. Before you start, please check the vCenter Server 6.7 compatibility with plugins and third-party products. Make sure the current version of your software support vSphere 6.7 to avoid compatibility errors. Here I will take the Windows Server 2019 as an example.
Steps to install vCenter 6.7 on Windows Server 2019:
1. Download the vCenter Server 6.7 ISO image file from the VMware’s official product download website, and then mount the ISO file on your Windows server 2019.
2. Navigate to the root directory of the ISO image, right-click at autorun.exe and select Run as administrator.
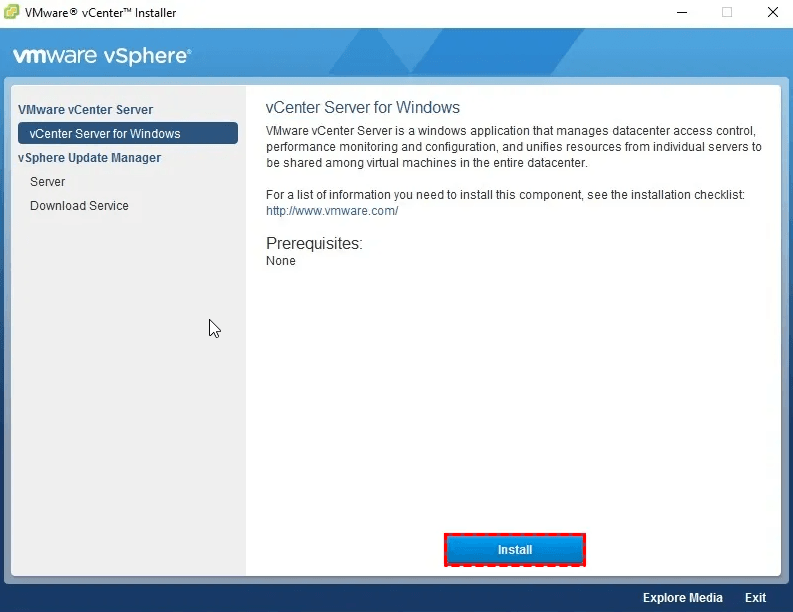
3. Click Install on the pop-up VMware vCenter Installer wizard.
4. Click Next on VMware vCenter Server 6.7 Installer Welcome page, and Accept the terms of the End User License Agreement.

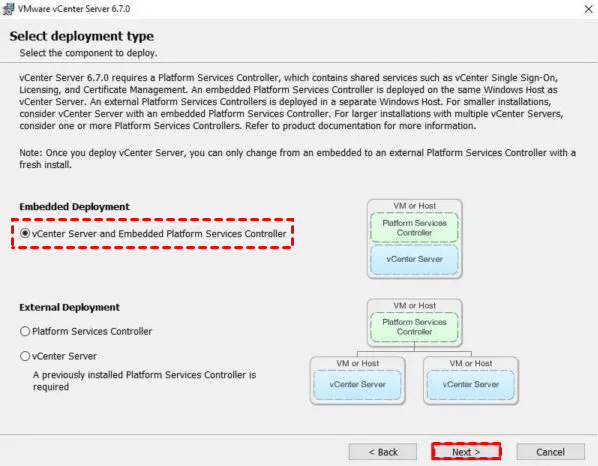
5. On Select deployment type page, select Embedded Deployment or External Deployment as need.
Note: If you select External Deployment, the PSC must be deployed before installing the vCenter Server.
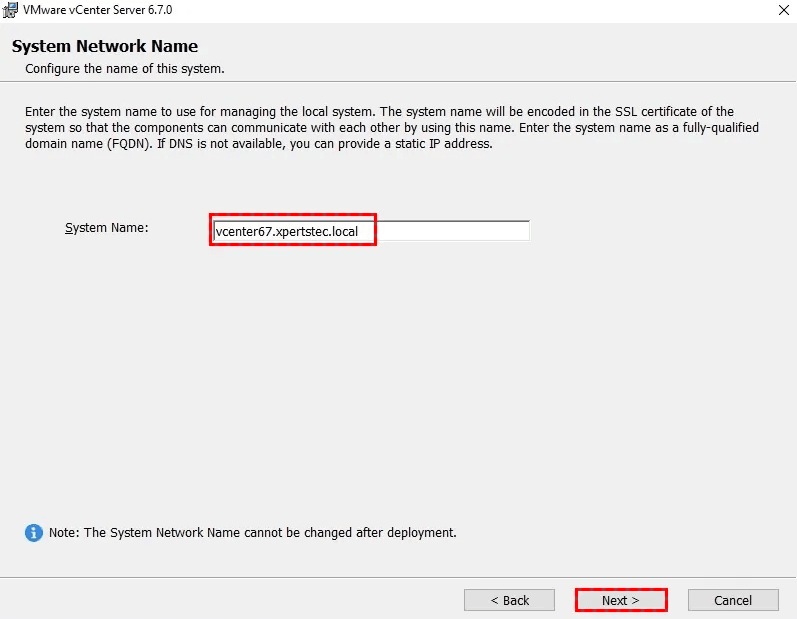
6. Configure the name of this system, provide the IP address or the FQDN of your vCenter Server, and click Next to continue.
Note: Ensure you have a static IP address for the vCenter Server. And both the System Network Name and vCenter Single Sign-On configuration in the next step cannot be changed after deployment. Ensure you have a static IP address for the vCenter Server.
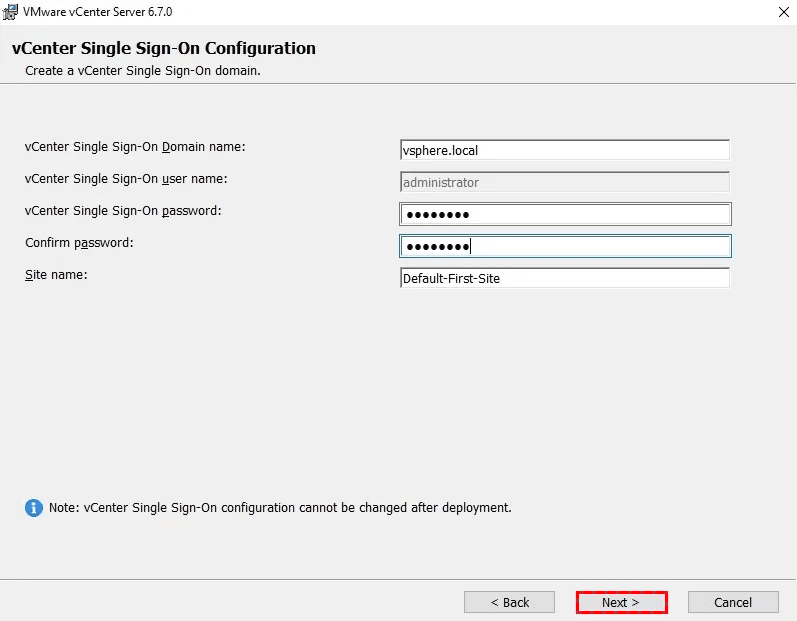
7. On vCenter Single Sign-On Configuration page, provide your existing SSO Domain name or create a new domain. Click Next to continue.
8. Enter the vCenter Server service account information, you can use Windows Local System Account, or Specify a user service account.

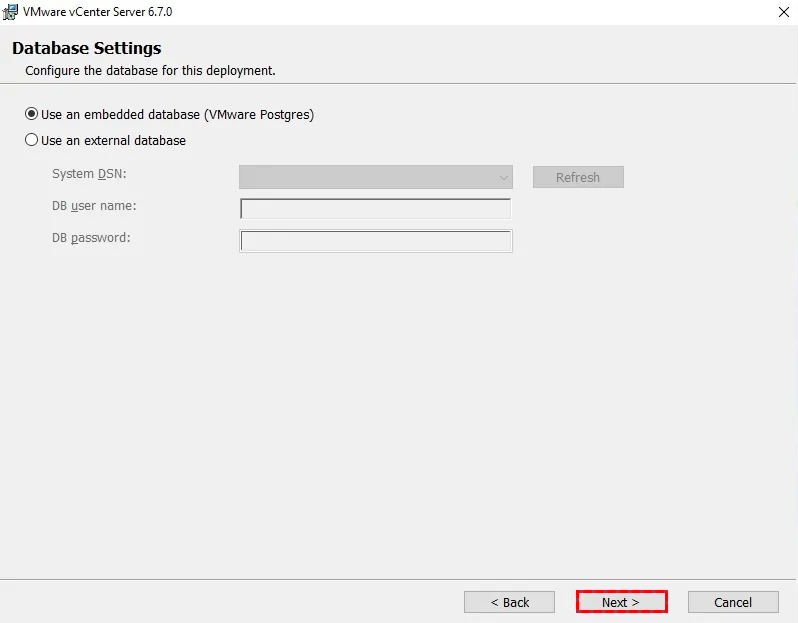
9. On Database Settings page, you can select to Use an embedded database (VMware Postgres), or Use an external database. And click Next.
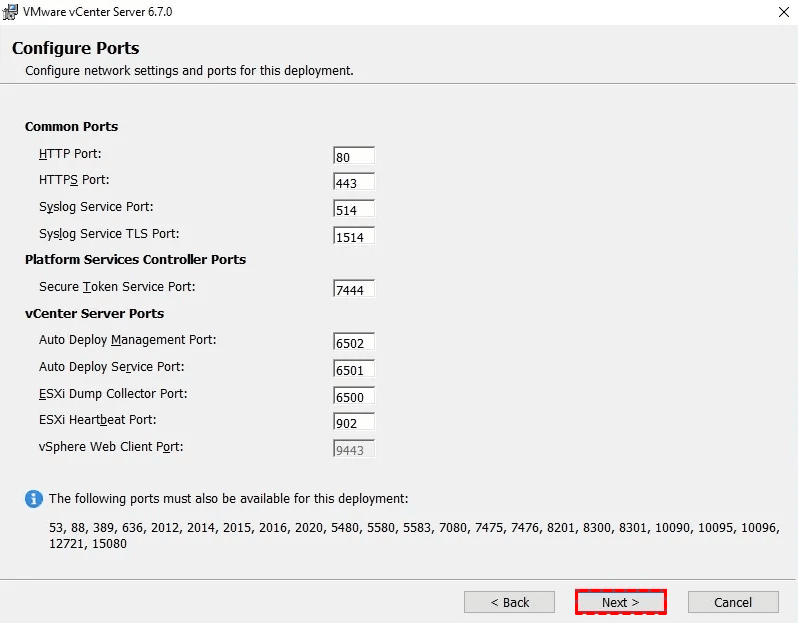
10. Configure network settings and ports for this deployment, you can change the values or just leave the default port configuration. Click Next.
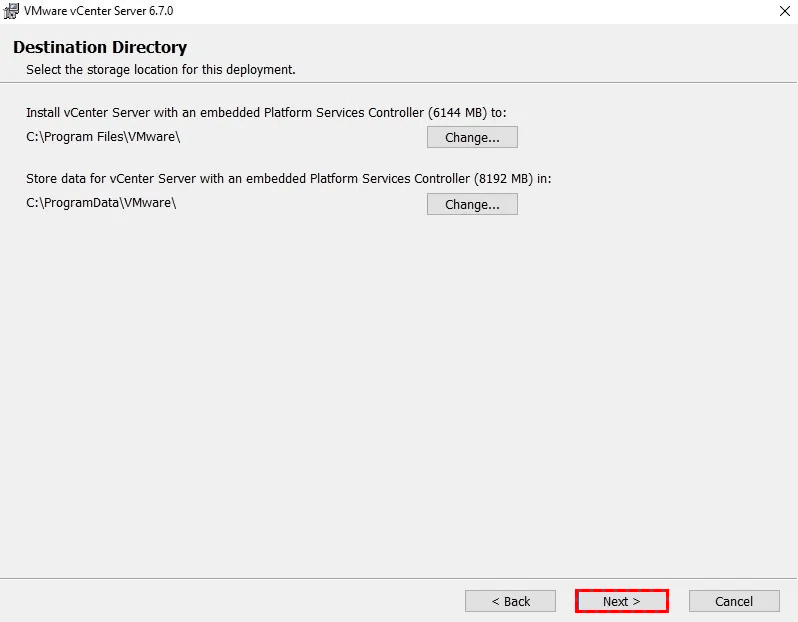
11. On the Destination Directory page, click Change… to select the storage location for this deployment.
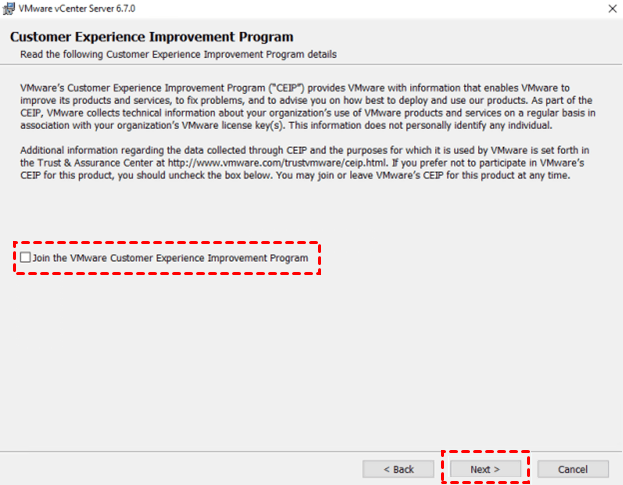
12. On Customer Experience Improvement Program page, read the following details and check Join the VMware Customer Experience Improvement Program. Click Next to continue.
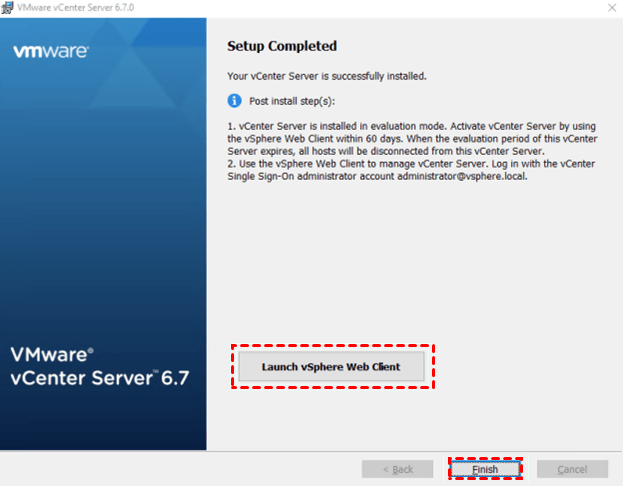
13. Review all the settings and click Install to start. When it completes, you can select to Launch vSphere Web Client immediately, or just click Finish to close the Installer.
Note: By default, you will get a 60-day evaluation period for vCenter Server. After that, you will need to buy a license to continue using it.
Once the setup is complete, configure the vCenter Server through the web interface using the provided URL.
Enhance your vCenter protection with AOMEI Cyber Backup
When managing a VMware environment with vCenter Server, ensuring the protection and security of your virtual machines (VMs) is crucial.
AOMEI Cyber Backup is designed to work directly with your vCenter Server environment. This means you can bind VMs in your vCenter inventory effortlessly, streamlining the backup process for large-scale VM environments. This direct integration ensures that all your virtual machines are covered, reducing the complexity of managing individual backups.
This backup solution ensures that no matter how extensive your virtual environment becomes, AOMEI Cyber Backup can accommodate your needs.
✦ Agentless Backup: Create complete and independent image-level backup for VMware ESXi VMs easily.
✦ Scalable Solutions: Scale with your vCenter environment, providing a flexible solution that can handle both small and large deployments.
✦ Multiple Storage Destinations: Backup VMware to local drive, or network destinations and cloud storage.
✦ Simplified Management: Offer an intuitive interface and automated backup scheduling. This allows you to focus on other critical tasks while ensuring your VM backups are performed consistently and on time.
✦ Efficient Recovery: Quickly restore individual VMs, minimizing downtime and ensuring continuity of operations. This swift recovery capability is vital for maintaining business operations and reducing the impact of unexpected disruptions.
Next, I will show you how to perform virtual machine backup of VMware ESXi via AOMEI Cyber Backup. You can click the following button to download the 30-day free trial.
*You can choose to install this VM backup software on either Windows or Linux system.
3 steps to create a VMware ESXi VM backup task
1. Bind Devices: Access to AOMEI Cyber Backup web client, navigate to Source Device > VMware > + Add VMware Device to Add vCenter or Standalone ESXi host. And then click … > Bind Device.

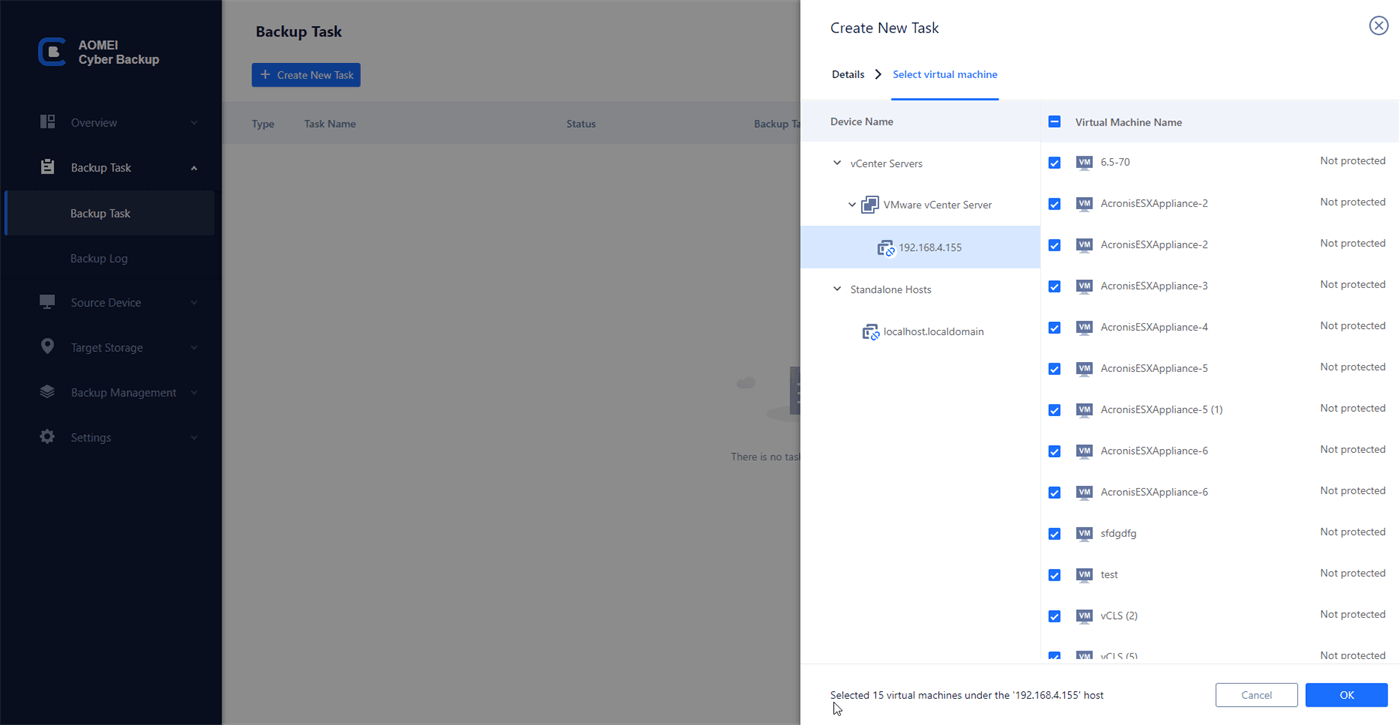
2. Create Backup Task: Navigate to Backup Task > + Create New Task, and then set Task Name, Backup Type, Device, Target, Schedule, and Cleanup.
- Device: Batch select large numbers of VMs managed by vCenter Server for centralized backup.
- Target: Select to back up to a local path, or to a network path.

- Archive: Easily backup VMware to AWS by archiving your backups. And it allows you to scale your backup storage as needed without worrying about running out of space.
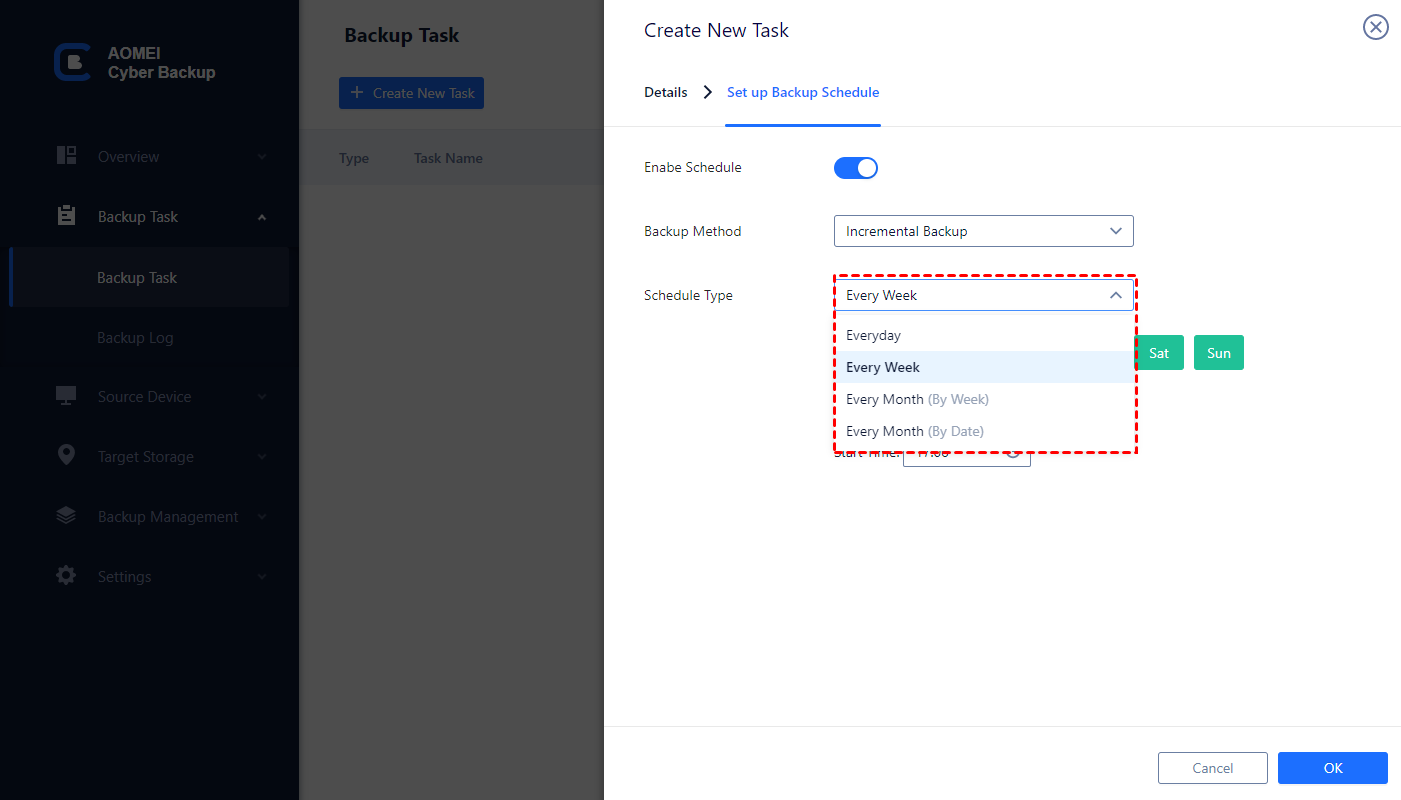
- Schedule (optional): Perform full, differential, or incremental backup, and automate execution according to the frequency you specified.
- Cleanup (optional): Automatically delete the old backup copies that exceed the retention period you specified.
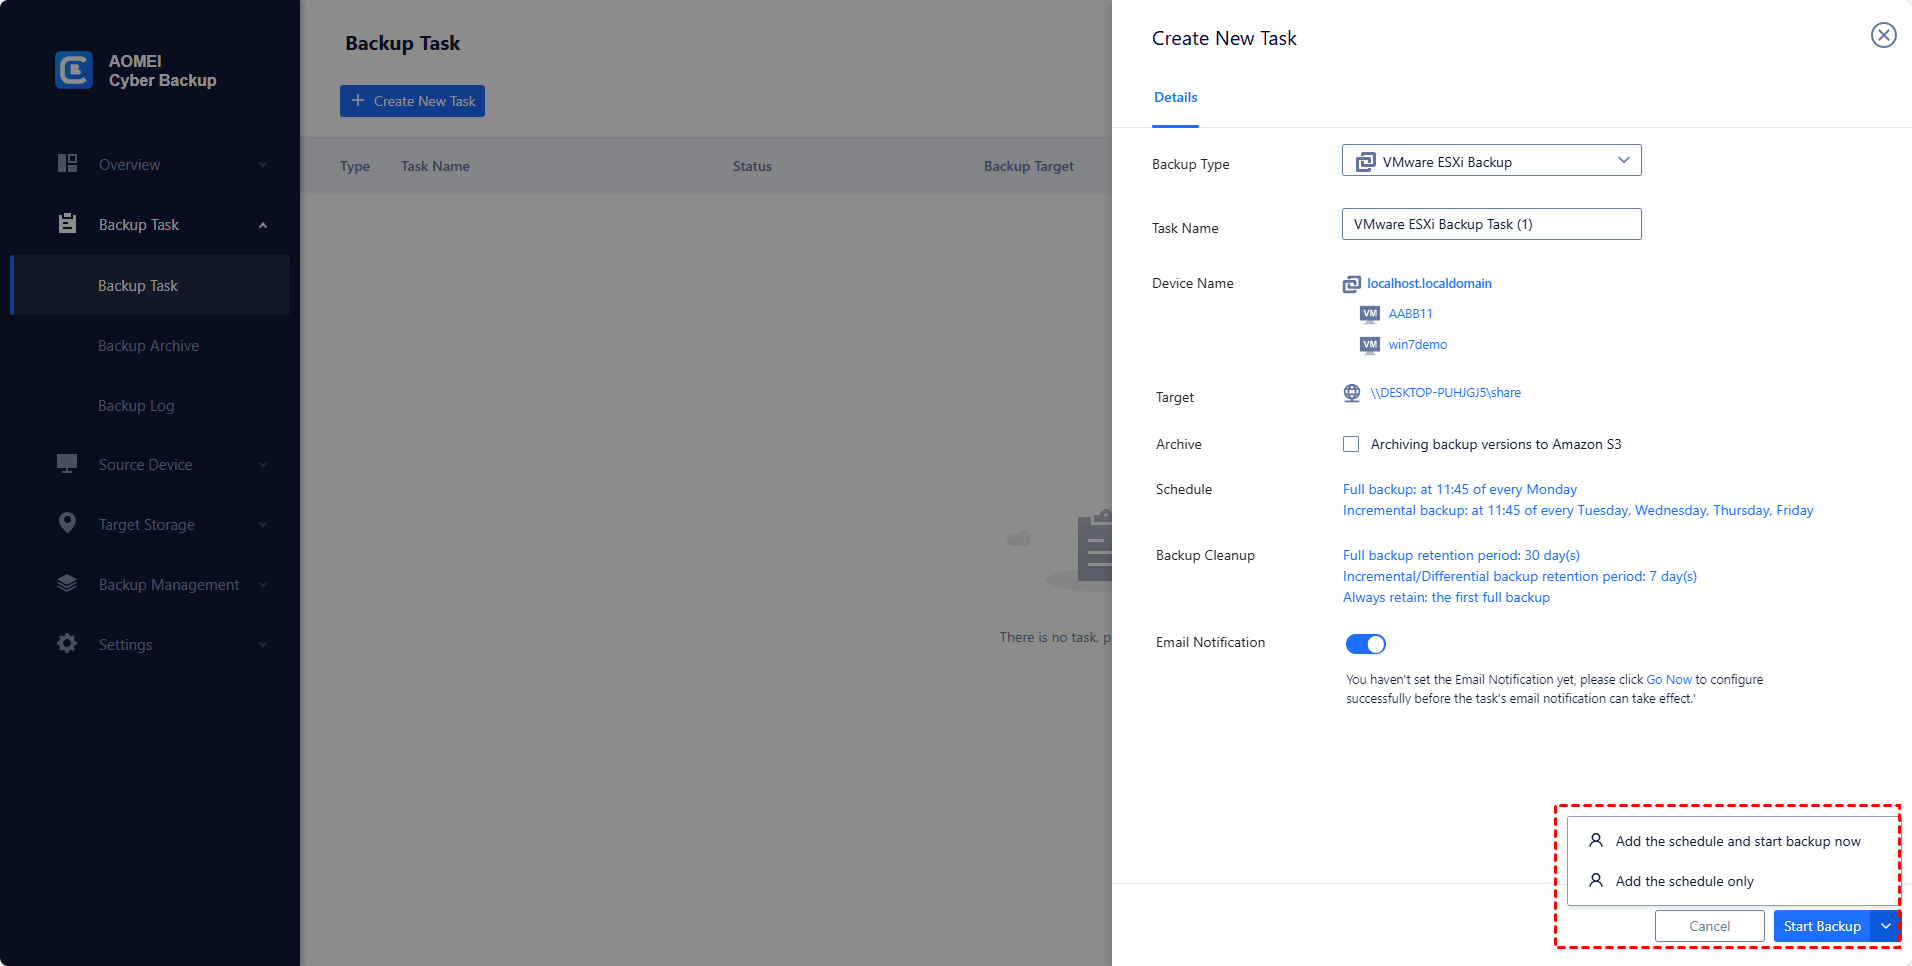
3. Run Backup: Click Start Backup and select Add the schedule and start backup now, or Add the schedule only.
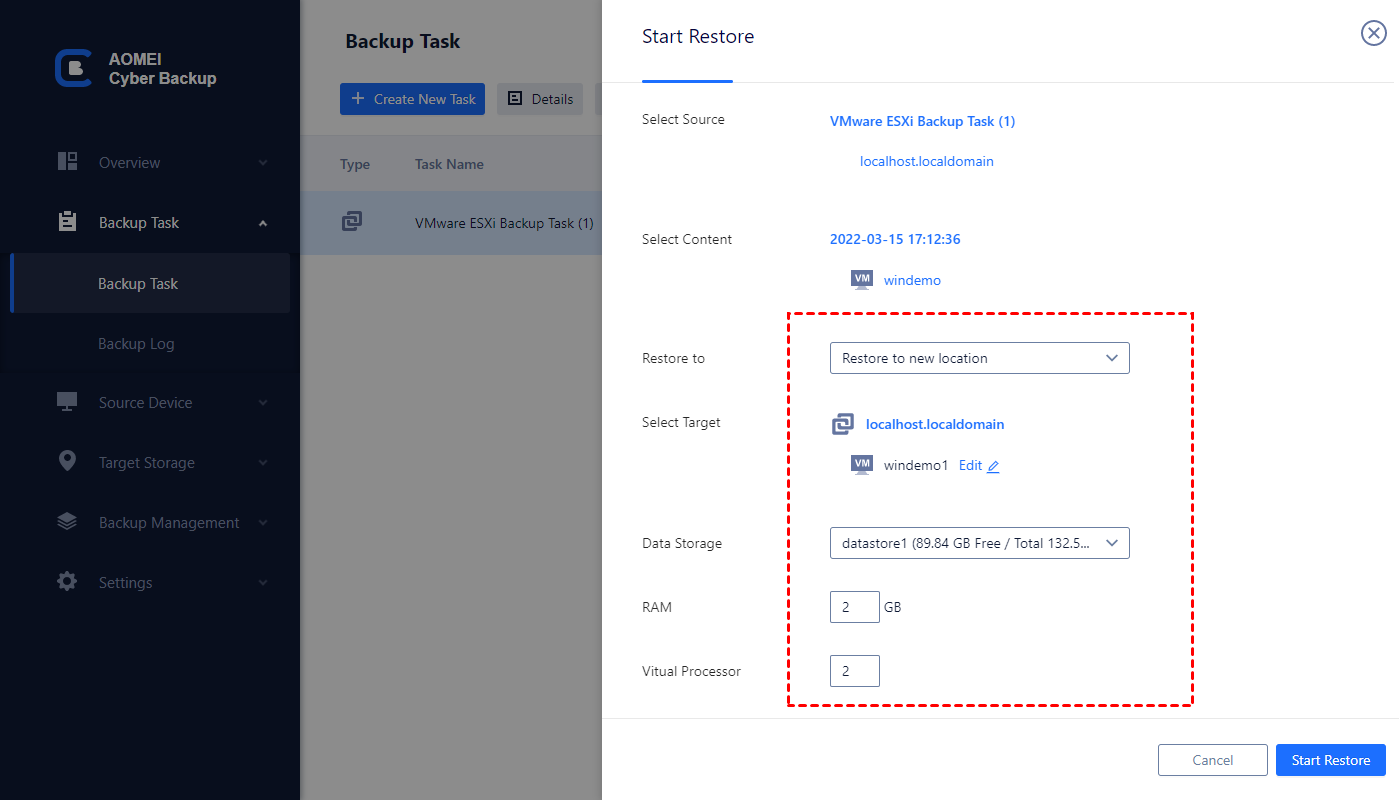
Created backup tasks will be listed and monitored separately, for restoring, progress checking and schedule changing.
When restoring, you can also restore to new location to create a new VM in the same or another datastore/host directly from the backup, saving the trouble of re-configuring the new VM.
By using AOMEI Cyber Backup in your vCenter Server environment, you gain a powerful solution for backup VMware ESXi VMs at a large scale. It's an excellent choice for maintaining the security and integrity of your VM backups.
Summary
VMware ESXi and vCenter Server are 2 key components of VMware vSphere suite. As the scale of the virtual machines you manage grows, you may want to use the official centralized management tool, vCenter Server, to save you a lot of effort and time on management. This article demonstrates how to install vCenter on Windows Server 2019 as an example, and how to deploy vCSA on ESXi. If you want to install vCenter on Linux, you can refer to this guide.
In this way you can install one or multiple vCenter Servers. However, it doesn’t offer the VM backup feature. To complement your vCenter deployment, consider integrating AOMEI Cyber Backup into your backup strategy. This advanced backup solution offers seamless protection on with vCenter environments, making it easier than ever to safeguard your data.

