
Troubleshooting Guide for Mapped Drive Keeps Disappearing
This article offers users a series of troubleshooting methods to fix "mapped drive keeps disappearing", try simple methods at first and then others. Scroll down to learn more.
By Ivy / Updated on March 9, 2026
Help! mapped drive keep disappearing
Mapped drives are playing an increasing role in our careers because mapped drives are ideal for ample file storage, backup, and sharing. What’s more, mapped drives are much faster than browsing the network. However, you may experience the "mapped drive keeps disappearing" issues in in Windows 7, 8,10, 11.
“We’re having issues with mapped network drives disappearing. Only a few users experienced this problem when logging into Windows 7. Thus, I created a batch of files for them to run from their desktop, which worked every time.
But on Windows 10, we got mixed results. I have never lost connection to the driver on my computer, and I have gone from Windows 7 pro to 8 pros, to 8.1 pros, to 10 pros. But not everyone is on the network.
My question is: why does my mapped drive keeps disappearing, and how to fix it? Thanks” – Question from Microsoft Community
It’s tough for non-tech users to fix mapped drives disappearing by themselves. If you’re bothered by this issue, please get an overview of possible reasons and feasible solutions below.
-
Map network drive using script or batch, causing "mapped drive keeps disappearing".
-
Sometimes your computer or tablet is offline.
-
You don't set up a persistent connection.
-
Suspend/Hibernate, UAC, Proxy, SMB, etc., interrupts mapped drives.
-
The mapped drive is hidden.
✨What does "map a drive" mean? Mapping drive is a way to associate a local drive letter (from A to Z) with a shared drive or folder on another computer (often referred to as a File Server) over the network. In brief, a mapped drive seems like a shortcut to a drive or folder that is on another PC. You’re permitted to read and modify files from a local computer.
How to fix mapped drive keeps disappearing
Next, I will show you how to fix mapped drive keeps disappearing in different methods.
▶Fix 1: Try Some Simple Methods
#1: Restart in File Explorer
If your mapped drive randomly disappear from File Explorer, the easiest method is to terminate it and restart File Explorer to see if it works well.
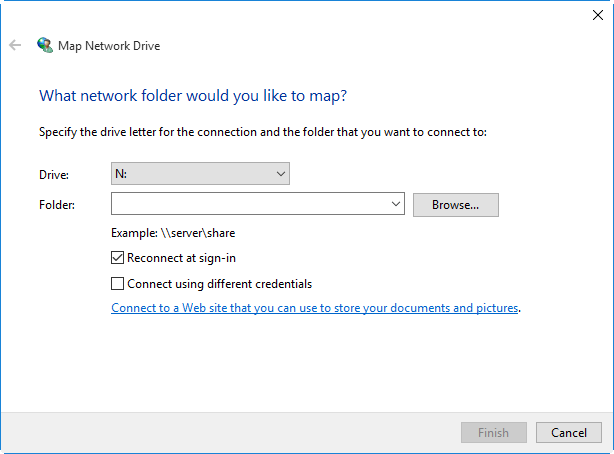
#2: Check "Reconnect at startup"
Sometimes, the option Reconnect at startup is helpful for mapped drive randomly disappearing. You can check it in File Explorer by clicking Map Network Drive and selecting the drive and folder.
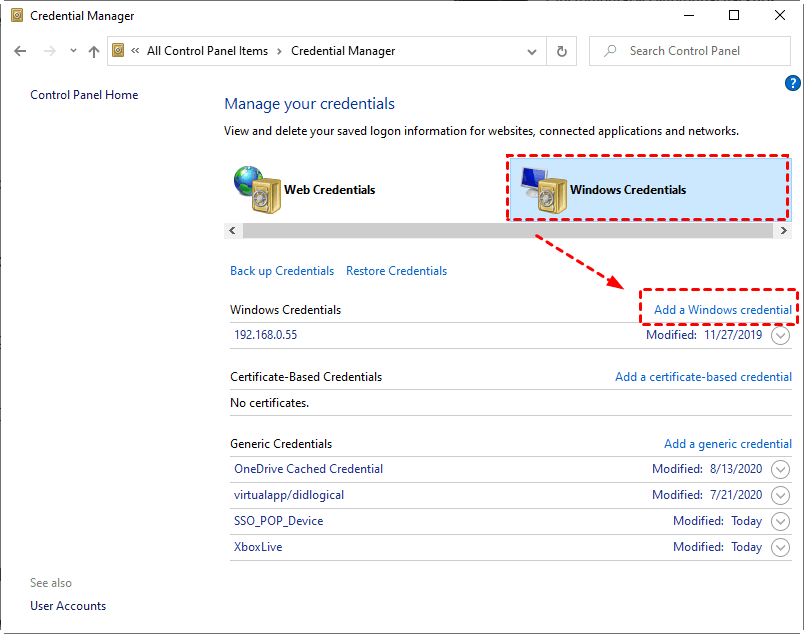
Some users report the "Reconnect at startup" option is not working. At this time, you can attempt to add credentials for this by navigating to Control Panel > Credential Manager and selecting Windows Credential. Then, click Add a Windows Credential, and type the network address, username, and password to apply.
Alternatively, you can check the "Connect using different credentials option to add credentials while mapping the network drive in File Explorer.
#3: Turned off suspend/hibernate
You can also try to turn off the “suspend” or “Hibernate” features, as they cause more trouble than good.
Right-click on the Windows icon and select Power Options. Then, scroll down to click Additional power settings > Choose what the power buttons do > Change settings that are currently unavailable.
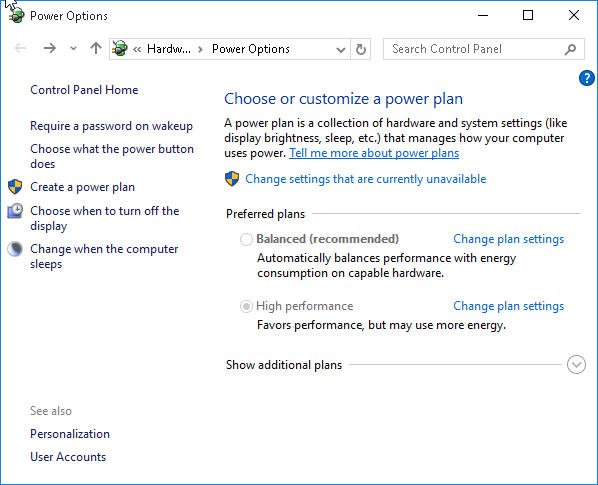
Here you can set "Never" under "Put the computer to sleep" and uncheck the "Hibernate" checkbox under Shutdown settings.
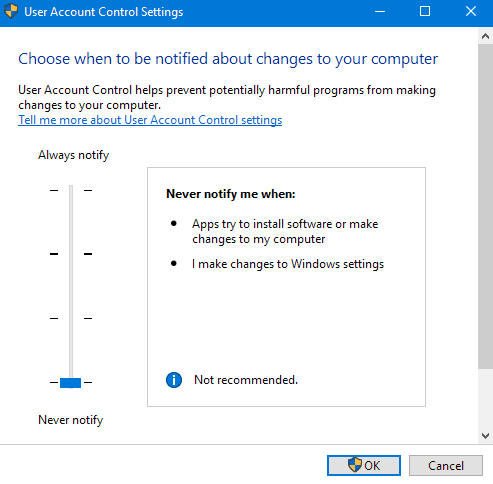
#4: Disable User Account Control
In some cases, activating User Account Control (UAC) could make mapped drives disappear from Windows 10. You can disable it to see if this works.
Type “change user account settings” in the search bar and hit “Enter” to open the User Account Control window. Then, drag the slider to the bottom “Never notify” and click the “OK” button.
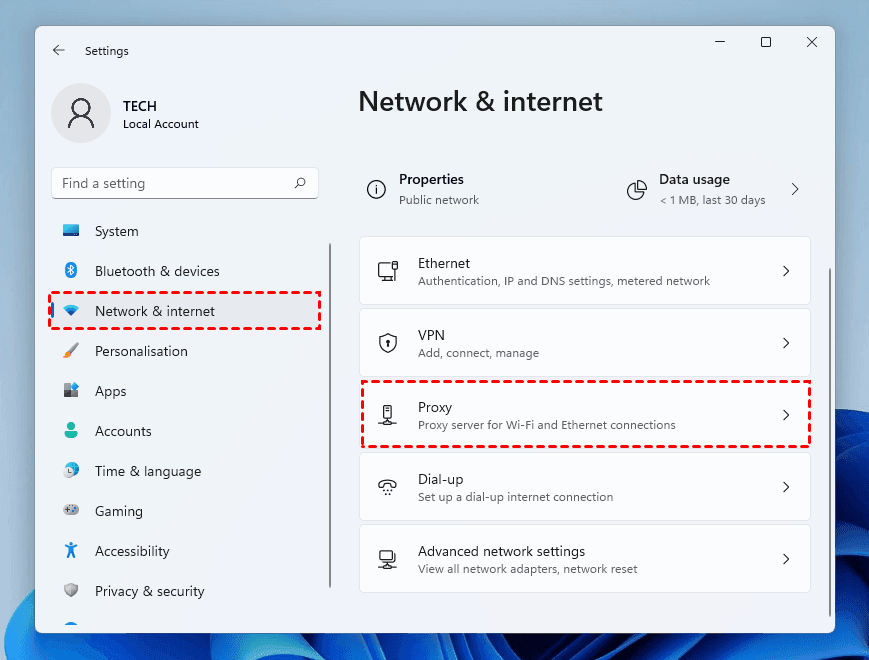
#5: Configure Proxy and SMB
If the mapped drive keeps disconnecting, try to configure Proxy and SMB to make your Windows PC recognize the network drive.
✦Configure the Network Proxy Settings:
Press “Win + I” to open Windows Settings. Under the Network & internet section, click the “Proxy” button. Then, you can add a script to manually configure the proxy.
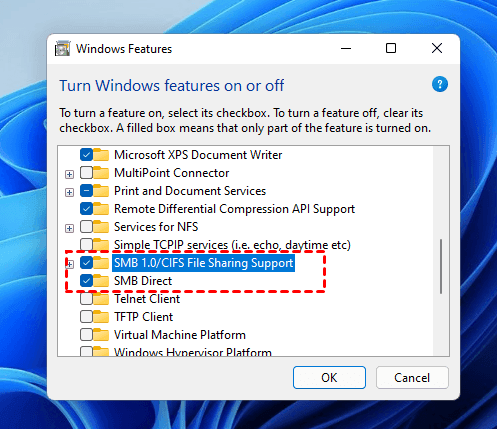
✦Activate the SMB features:
Type “programs and features” in the search box and click “Turn off Windows features on or off” to open the Windows Features window. Then, tick the features with SMB and click the “OK” button.
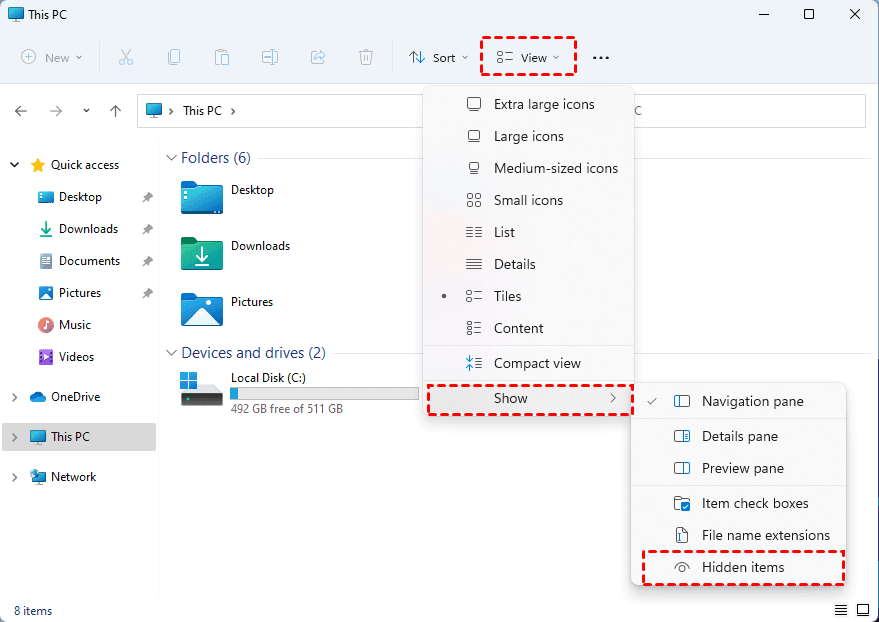
#6: Show hidden mapped drives
Besides Windows 10, sometimes Windows 11 mapped drive doesn’t show upshared files or folders saved on the NAS drives (mapped network drives and network drives) because they’re hidden. You canpress “Win + E” to open Windows File Explorer. Then, click This PC > View > Show > Hidden items.
Reboot your PC to see if these changes have been applied or not.
▶ Fix 2: Create EnableLinkedConnections key in Registry
If the mapped drive keeps disconnecting, you can create EnableLinkedConnections key in the Registry to make your drive always connected.
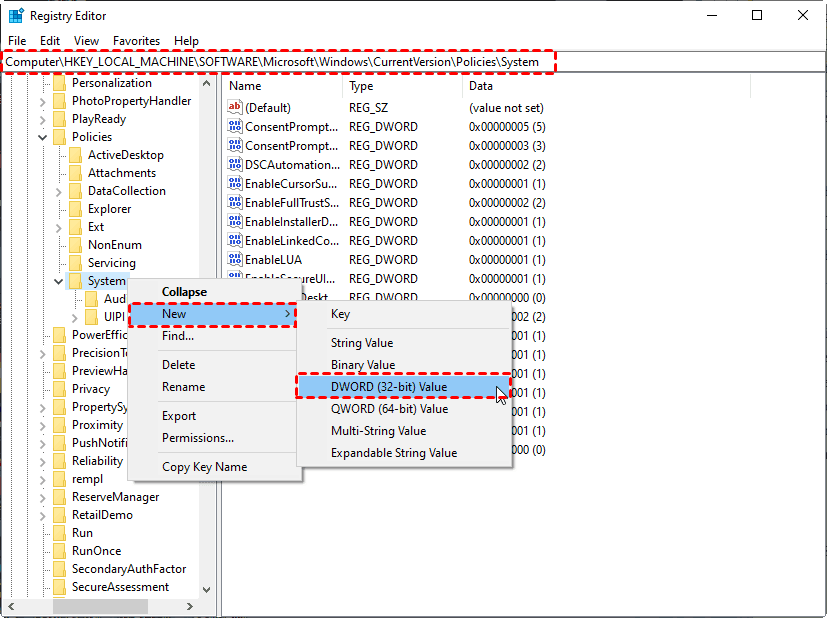
Step 1. Type registry editor in the search box and select the top result.
Step 2. Go to the following path. Right-click the System key and select New > DWORD (32-bit) value.
HKEY_LOCAL_MACHINE/SOFTWARE/Microsoft/Windows/CurrentVersion/Policies/System
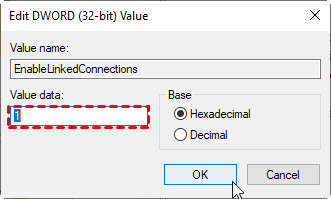
Step 3. Specify the name as EnableLinkedConnections and the value data as 1. Then, click OK. This modification will enable the “administrator in Admin Approval Mode” user type and all other UAC policies.
Alternatively, you can also create a new DWORD named ProviderFlags with a value of 1 to fix this issue.
▶ Fix 3: Re-map the network drive using net use command
If your mapped drive disappeared after logging off your account, try to check the connection status and remap it using the net use cmd.
Step 1. Type cmd in the search box and select Open. Do not use the "Run as Administrator".
Step 2. In the Command Prompt window, type net use to check whether the new connection will be remembered.
Step 3. If not, type the following command to make your drive persistently available and re-map it.
- net use /persistent: yes
- net use r: \\servername\sharename
Please replace r: with * and Window will assign a free drive letter starting at the bottom of the alphabet. The /persistent: yes changes the persistence setting for future mappings.
Alternatively, you can map the network drive using the following commands. If there is already a mapping, type net use r: /delete /y to forcibly remove the existing mapping first. It also helps if the mapped drive keeps disappearing.
✔ Map the drive with persistence in single command line:
✔ Re-map the drive using a specific username and password:
✔ Map the drive without re-entering credentials:
-
/delete: delete the existing mapping drive.
-
/y: deletes the mapping without confirmation prompt.
-
/savecred stores the credentials securely without the need to enter them again.
-
/p: yes saves authentication credentials while /persistent: yes make the drive stay mapped after a restart.
▶ Fix 4: Map network drive using New-SmbMapping cmdlet
In general, users experience this issue due to batch or script mapping drive. Here we recommend you use New-SmbMappingcmdlet. Before using it, you need to learn the syntax and necessary parameters in the following:
The Syntax: New-SmbMapping -LocalPath -RemotePath
- Specify the local drive letter you want to map the SMB share to (e.g. Z: and UNC path of the SMB share (e.g.,\\servername\sharename).
- Optionally, type -Persistent for a persistent connection or -Credential to specify the credentials for the connection.
✔ Map a drive to basic SMB share:
✔ Map a drive with a persistent connection:
✔ Map a drive with specific credentials:
- $cred = Get-Credential
- New-SmbMapping -LocalPath "Z:" -RemotePath "\\servername\sharename" -Credential $cred
▶ Fix 5: Map network drive using GPO
Mapping network drive using GPO is a recommended method to fix the mapped drive disappears after restart or shutdown.
Step 1. Be sure the network drive or folder is shared and accessible.
Right-click the drive or folder and select Properties. Switch to the Sharing tab and click Advanced Sharing. Then, tick Share this folder and specify a name, click OK to apply. If necessary, click permissions to specify the Read, Change, or Full Control.

Step 2. Type gpmc.msc in the search box and select the top result.
Step 3. Expand Group Policy Management > Forrest > Domains, right-click the domain name and select "Create a GPO in this domain and link it here". Please add a new name for it and click OK.

Step 4. Under the Scope tab, scroll down to Security Filtering and click Add to specify the computers/users/groups you want to apply to. The Authenticated Users will be there by default, if needed, please remove this before making any changes to the Group Policy.
Step 5. Right-click your new GPO and select Edit. Then, browse to one of the following and right-click on the blank location on the right and click New > Mapped Drive.
For users (recommended):
For Computers:
Step 6. In the Properties window, you need to specify the Action, Location, Reconnect, Drive Letter, etc., and click OK.
-
Update: It will create if doesn’t exist or update if does already exist.
-
Location: Specify the full path of the shared folder (e.g.\servername\sharedfolder).
-
Reconnect: Tick it to ensure auto connection, even after restart or log off.
-
Drive Letter: Select to use first available, or specific one (if there are multiple people to use)
-
Connect As: Leave it blank unless you want all users to connect with certain credentials.
If there is more than one mapped drive, you need to repeat step 6 and restart your computer for it to take effect.
Bonus tips - How to recover deleted files from mapped drive
What if you deleted files from mapped drives? Can you recover deleted files from mapped drives? Yes, and there’s no better way than using FastRecovery, a professional data recovery tool.

- Use Quick Scan & Deep Scan to detect all deleted or lost files from hard drive, with a high success rate and fast speed.
- Recover deleted or lostimages (JPG, PNG, DNG, TIFF, etc.), videos (MP4, MOV, AVI, etc.), documents, compressed files, websites, etc., more than1000+formats.
- Search or filter data quickly through file name, extension, data type, etc.
- Preview and recover files while scanning.
- Recover specific files or folders instead of all.
- Work perfectly with NTFS, FAT32, exFAT, and ReFS file systems, highly compatible between hard drives, SSDs, SD Cards, USB flash drives, etc.
- Compatible with Windows 11, 10, 8, 7, etc., and Windows Servers.
- Recover a total of 500MB of files for free.
- Deal with data loss caused by accidental deletion, disk formatting, lost partition, virus attacks, or system crashes.
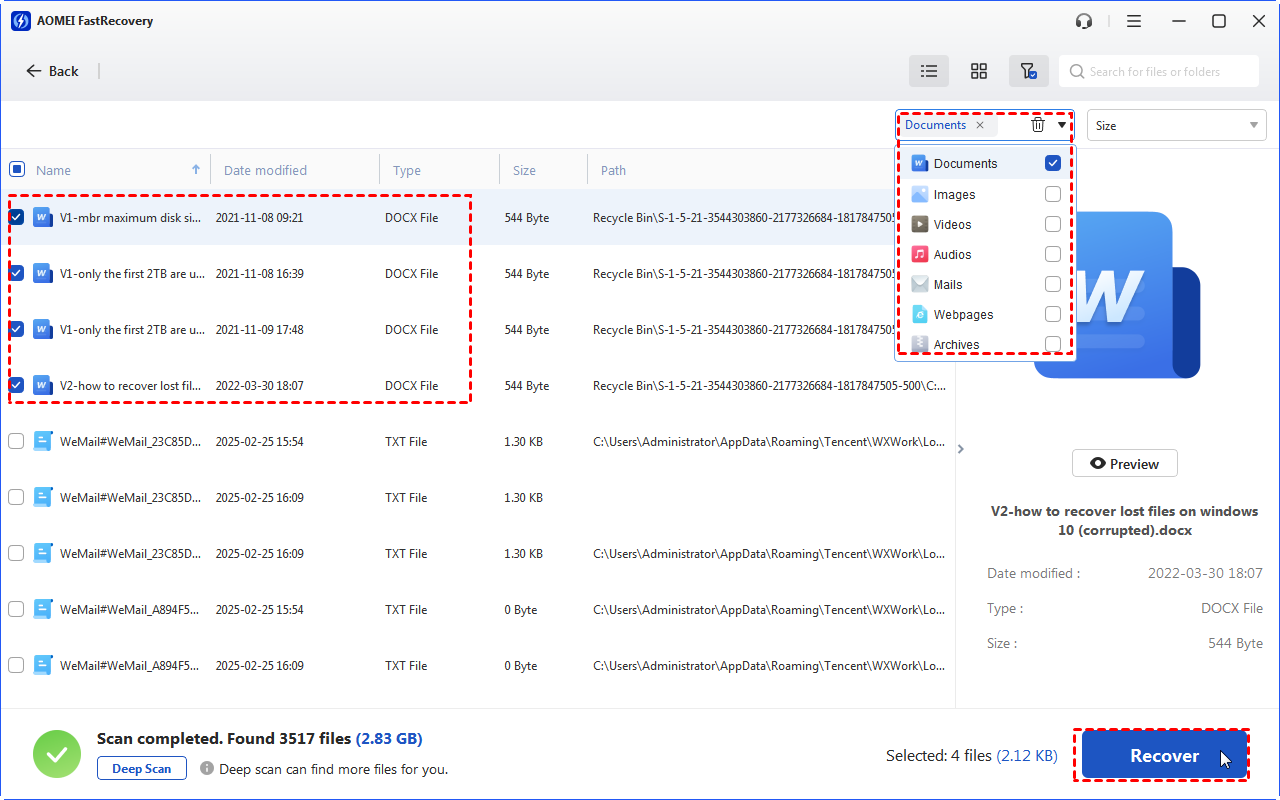
Step 1. Install and run FastRecovery on your Windows PC. Select the drive where deleted files are stored and click Scan.

Step 2. It will scan the drive with Quick Scan to find deleted or lost files. During scanning, you can use the Search box or Filter feature to narrow down or target the scope quickly. If the target file is still not found, click Deep Scan to search for more disappearing files on that drive.
- Name/Extension: Enter the partial or full file name or extension of your needed files to quickly locate them.
- Data type: Specify the data type, such as images, documents, videos, audios, compressed files, etc.
- Size: Set the file size (<128KB, 128KB~1MB, 1MB~512MB, etc.)

Step 3. Select the files you intend to retrieve and click Recover. Please select a new location to save the recovered files to avoid data overwriting.
Related suggestions
"What is meant by mapping a drive? Why does my mapped drive keeps disappearing, and how do I fix it?" Please get the corresponding answers after reading this passage.
Unwilling to suffer data loss again? It’s time for you to make backups using free backup software for Windows, AOMEI Backupper Standard to back up your important files, folders, disks, partitions, or the system to an internal or external hard drive, USB drive, Network, or Cloud drive.

