How Do I Recover Permanently Deleted Folders?
How do I recover permanently deleted folders? Check three ways using the Windows feature and another solution using data recovery software on this page.
By Penny / Updated on March 9, 2026
How do I recover permanently deleted folders in Windows 10?
Hi, everyone! I accidentally deleted my document folders several days ago. What’s worse, I can’t find it in the recycle bin. And I have some important files in this folder. So how do I recover permanently deleted folders? Thanks.
- A user from Linux Mint
As you can see, a folder contains more data than a single document. When it comes to the reasons for data loss, unintentional deletion could be the second biggest factor. If you intentionally empty your Recycle Bin or press the "Shift + Delete" keys, it could be more problematic for you to recover the deleted folder.
How to recover permanently deleted folders in Windows 10?
So "how do i recover permanently recover deleted folders"? You can restore your needed folders from backups if you've used the first three Windows features. That is to say, an available backup is a necessity for the first three methods. For Windows data recovery, data recovery software is also among the following solutions.
Method 1. Recover permanently deleted folders through File History
How to recover permanently deleted folders in Windows 10? File History made its debut in Windows 8.0 operating system. Besides Desktop folders, File History can also save files copies in the Documents, Music, Pictures, and Videos. It's possible for you to restore the original files even if they're deleted, lost, or damaged.
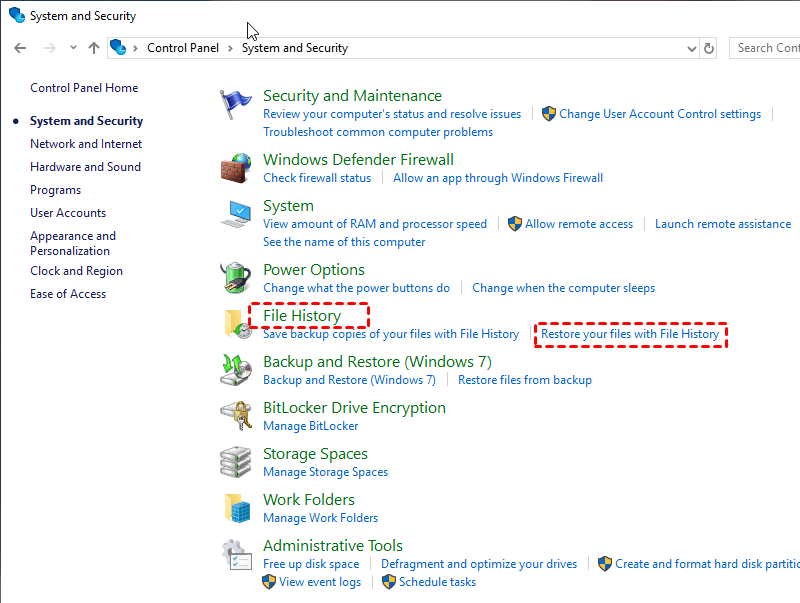
Step 1. Click “File History” first, then click “Restore your files with File History”.
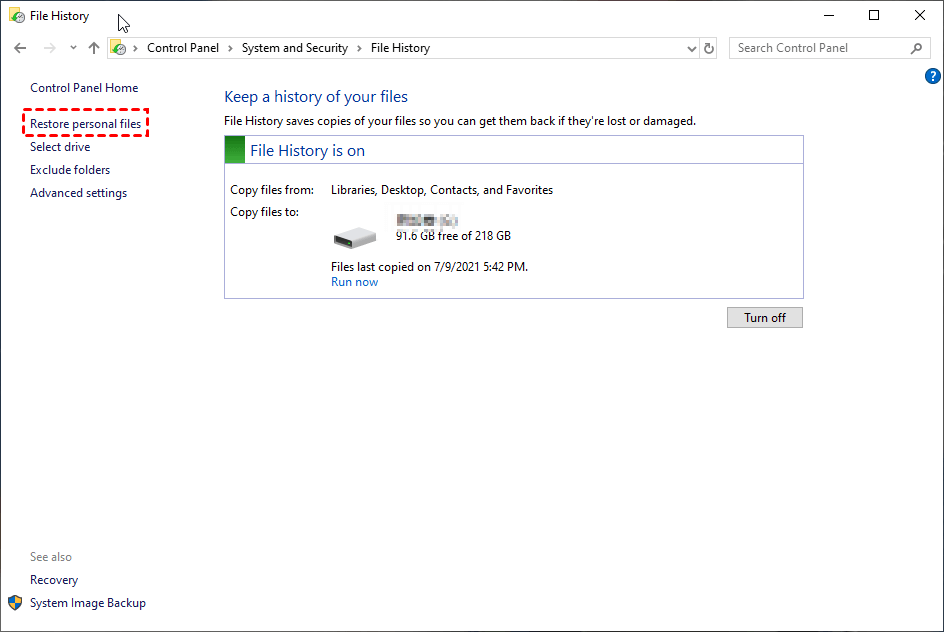
Step 2. Click “Restore personal files”.
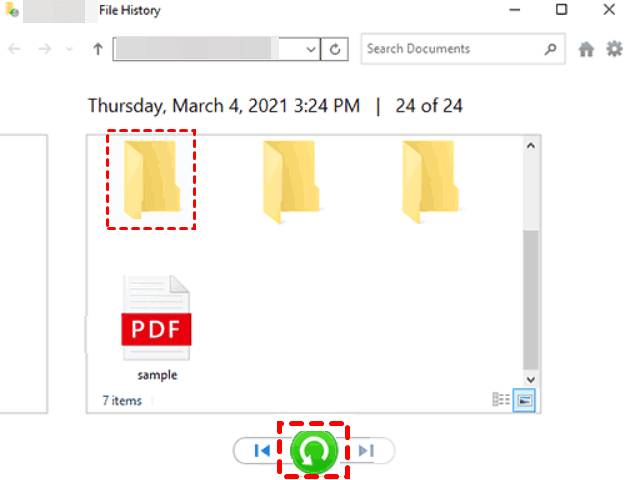
Step 3. Browse all the contents or input the file name of this folder, then you can locate your needed folders.
Step 4. You can restore your desired folders to the original location by clicking the “Restore” button.
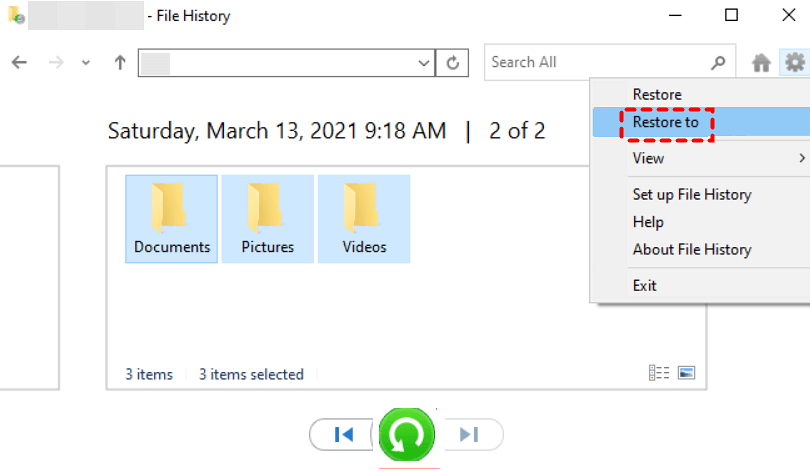
If you want to change your destination location, right-click on the “Restore” button first, and click “Restore to”, then select a new location to save your recovered folders.
Method 2. Recover permanently deleted folders using System Restore Point
System Restore can take your PC to a previous point in time. When installing new software or driver, restore points could be created automatically. But for Win10/11, you need to turn on it manually. Then you can recover the deleted files with System Restore. This method has two parts: Enable your System Restore Point and Restore data from your selected Restore Point.
- ★Tips:
- The restoration process will not affect your personal files such as documents, music, pictures, or videos. But it'll remove newly added applications and drivers after the Restore Point.
- The Restore Point cannot be kept for more than 90 days.
▶Part 1: Enable your System Restore Point
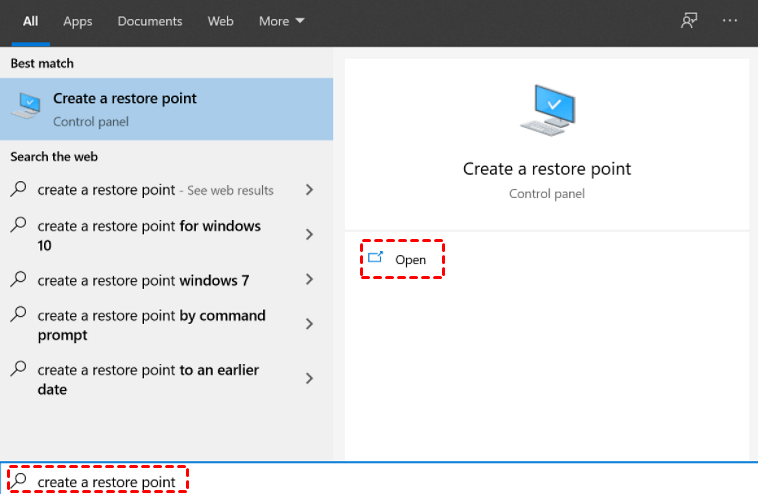
Step 1. Press the “Winkey/Start” key to start, enter “Create a restore point” in the search bar, then click “Open”.
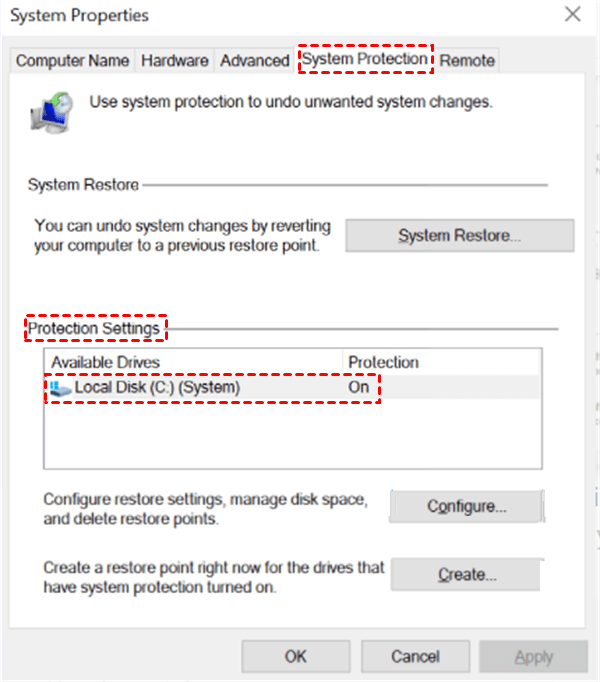
Step 2. Click “System Protection”, under Protection Settings, you can see whether your system drive is enabled or not.
Step 3. If your system drive shows as On, it means your system restore point is activated.
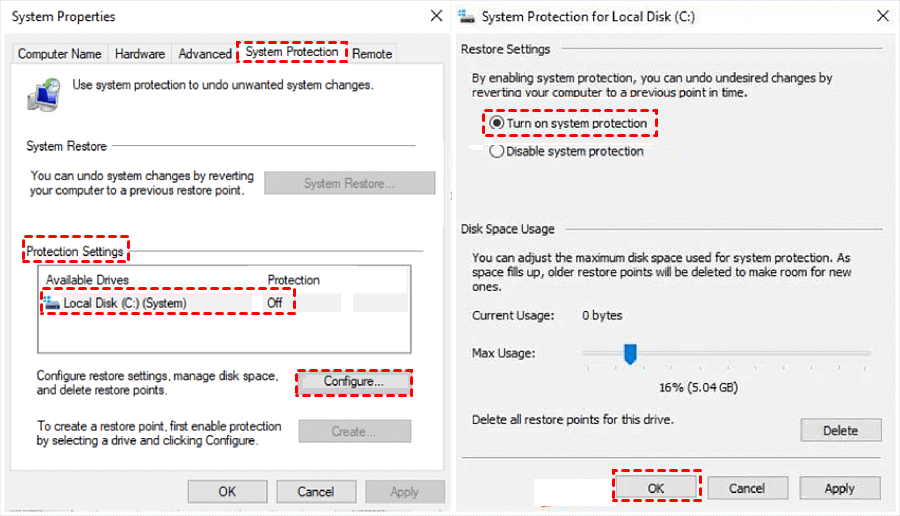
If your system drive shows as Off, it means your system restore point is disabled. Then click your system drive > Configure > Turn on system protection, then set up your Max Usage of your disk space, and click the “OK” button.
▶Part 2: Restore your PC from a Restore Point
Step 1. Press the “Winkey/Start” key, enter “Create a restore point” in the search box, then click “Open”.
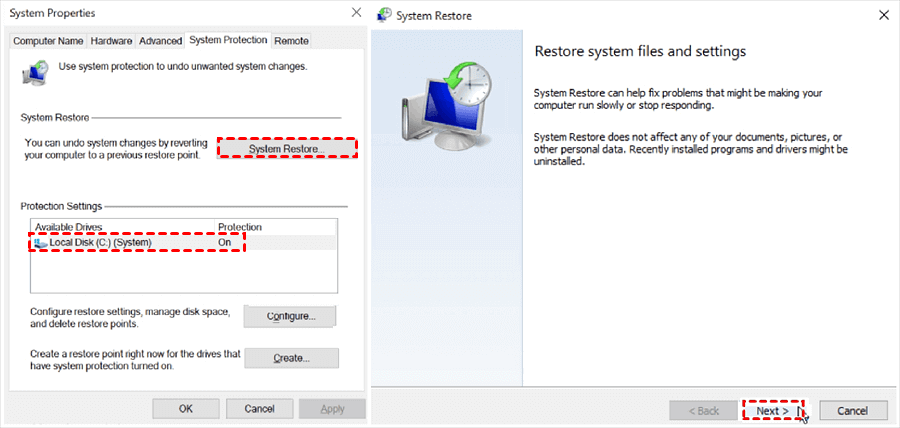
Step 2. Click “System Restore” > “Next”.
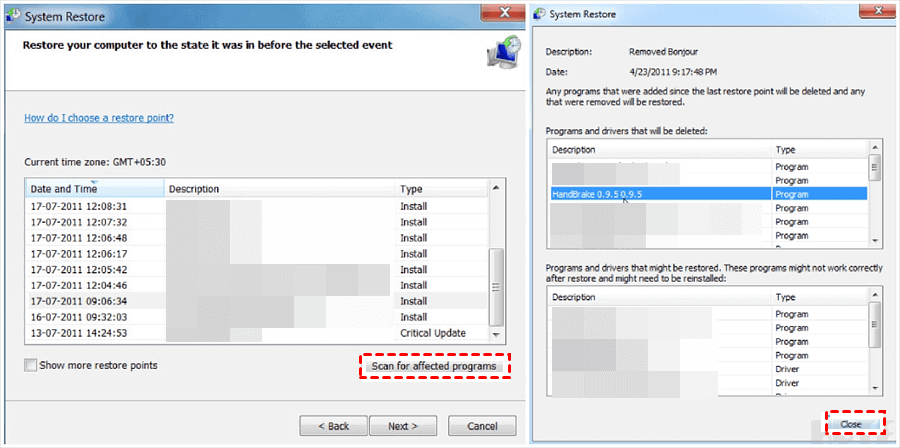
Step 3. Select a restore point you want to restore from the list, and click “Scan for affected programs” to check a list of items that will be deleted if you determine to restore to this point. Then “Close” this window.
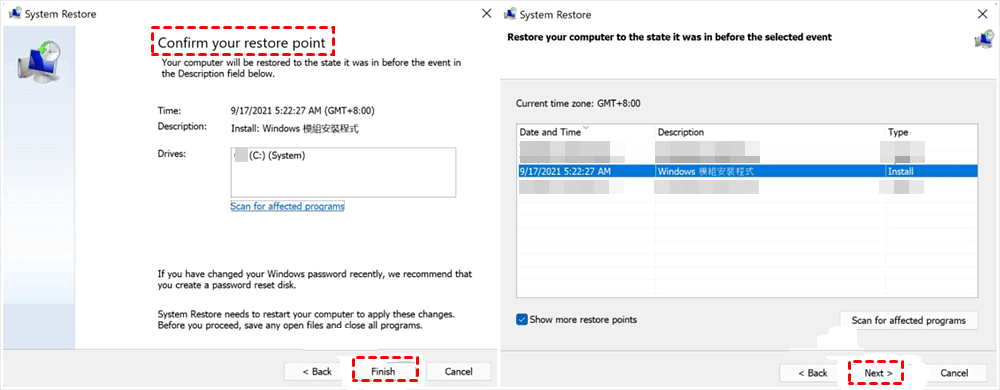
Step 4. Click “Next”. Then confirm your selected restore point again and click “Finish”.
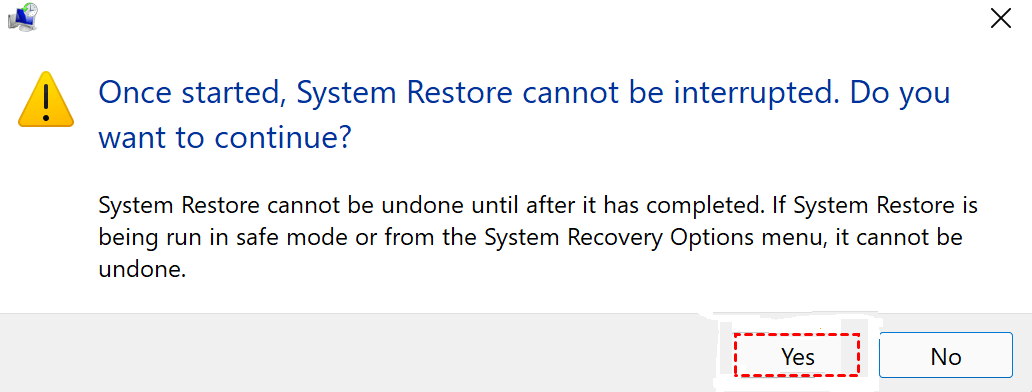
Step 5. Click the “Yes” button to restore your PC from your selected restore point. Then your PC will be rebooted.
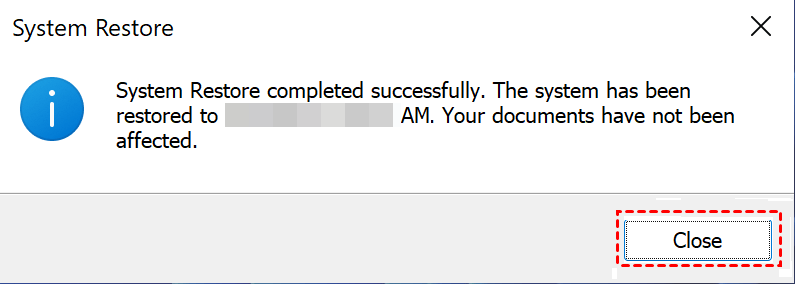
Step 6. System Restore is finished after the computer restarts. Then “Close” it.
Method 3. Recover permanently deleted folders with Windows Backup and Restore
Released in the Win7 operating system, Backup and Restore is a practical feature for you to backup files and folders. Please note that a valuable Windows Backup is essential to recover the deleted folders while you're organizing files.
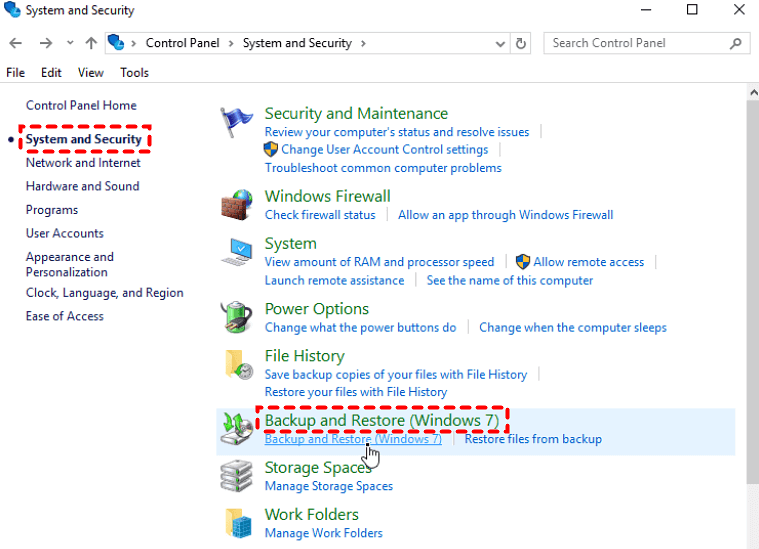
Step 1. Press the “Winkey/Start” button to start, and select Control Panel > System and Security (Windows 7).
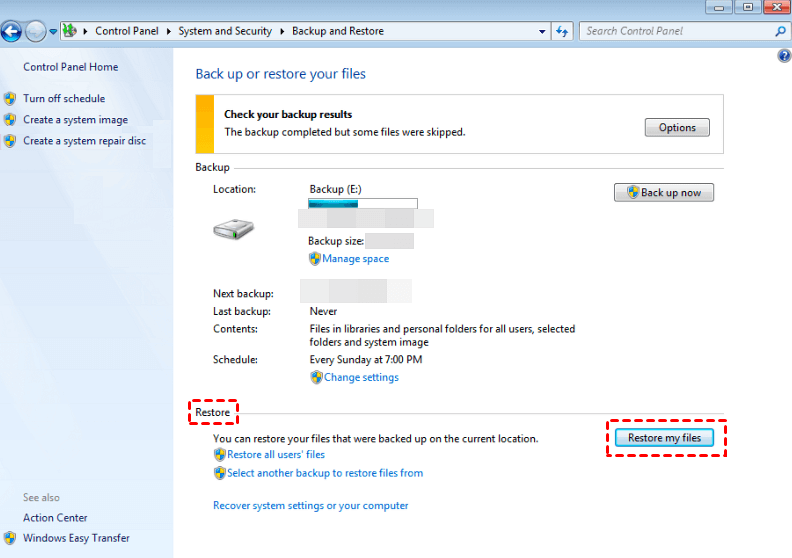
Step 2. Under the Restore tab, click the “Restore my files” button.
Step 3. Please select “Browse for folders” and choose the permanent folder you want to retrieve.
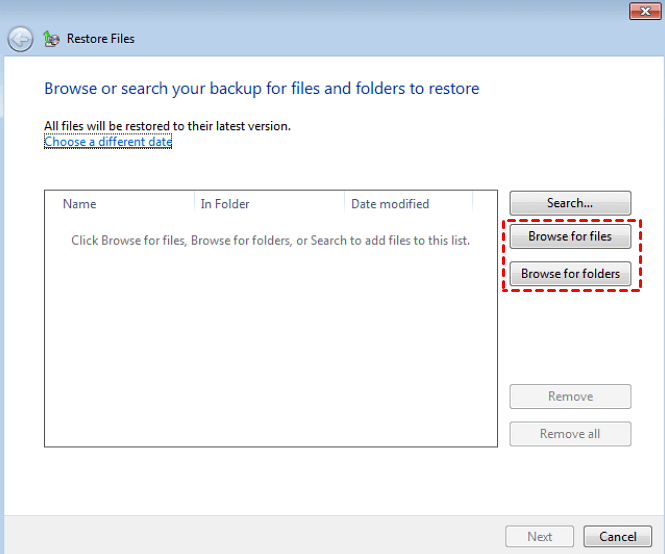
Step 4. After that, you can save your recovered folders in your original location or in your destination place as your preference.
Method 4. Recover permanently deleted folders with Windows File Recovery
As a command-line utility, Windows File Recovery is dedicated to file recovery. It permits you to recover the lost files from local hard disks (HDD), and USB flash drives. To some degree, it also can salvage data from solid-state drives (SSD).
Given that there’s no graphical user interface, it's inevitable for you to recover the deleted files using CMD. To be more precise, you need to modify the basic command format winfr source-drive: destination-drive: [/mode] [/switches] with your selected mode and switches.
- Notes:✎...
- Please stop using your local storage devices and don’t add new data to them after data loss.
- It allows you to recover the lost Word document, PPT, Excel, ZIP, PDF, PNG, MPEG, JPEG, etc.
- Two basic (Extensive and Regular) modes and two advanced (Segment and Signature) modes support NFTS, FAT, exFAT, and ReFS file systems.
- Ensure the source drive (where to store your needed folders before deletion) is different from the destination drive (where to store recovered folders).
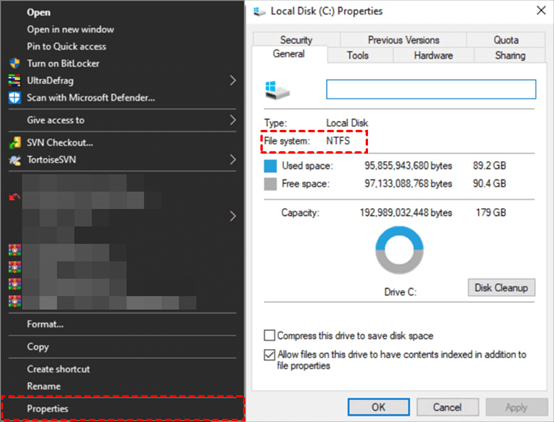
- Click “This PC” > right-click on the USB > click “Properties” to check the file system of your source drive.
Step 1. After checking the file system of your source drive and the data loss scenarios, please select a recommended mode from the following form.
Scenarios for data loss
|
File system |
Circumstances |
Recommended mode |
|
NTFS |
Deleted recently |
Regular |
|
NTFS |
Deleted a while ago |
Extensive |
|
NTFS |
After formatting a disk |
Extensive |
|
NTFS |
A corrupted disk |
Extensive |
|
FAT and exFAT |
Any |
Extensive |
Step 2. Resemble the corresponding command lines with some common switches below. If you need more, please refer to Microsoft official support.
|
Switches |
Meaning |
Supported mode(s) |
|
/n |
Filter the scan range: scans for a specific file with its file name/path/type, etc. |
All |
|
/y: |
Recover specific extension groups. |
Signature |
|
/k |
Recovers system files. |
NTFS Segment |
|
/u |
Recovers undeleted files, for example, from the Recycle Bin. |
NTFS Segment |
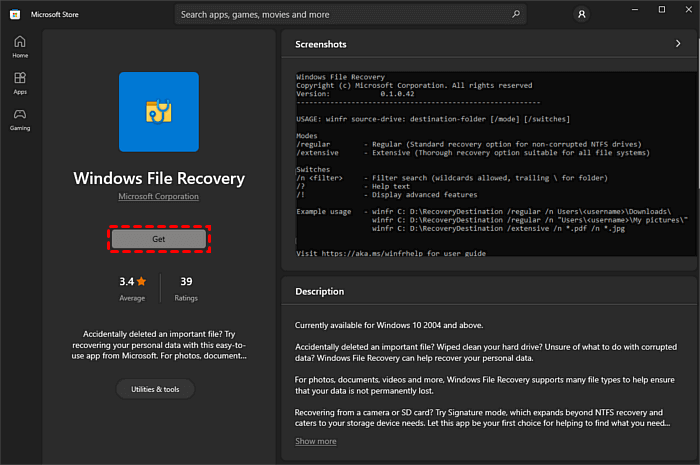
Step 3. Input “Windows File Recovery” in the search bar of the Microsoft Store and click “Get” to download it. Then install and "Open" it on your PC.
Step 4. Let’s perform how to restore the recently deleted folder from the source drive (E drive) to the destination drive (D drive).
the basic command format: winfr source-drive: destination-drive: [/mode] [/switches]
the adjusted command lines: winfr E: D: /regular /n *.ZIP
Please copy the adjusted command lines in the command prompt window.
Step 5. Press “y” to go on. After recovery, you can open the destination drive to locate your retrieved folders. If you need to stop the recovery process, press the “Ctrl + C” keys.
Alternative 100% free software: WinfrGUI
There’s no denying that Windows File Recovery is a powerful tool for Windows data recovery. However, it also renders inconvenience for new hands. But this is a big step where free WinfrGUI (Windows File Recovery GUI) forwards.
As the name suggests, this user-friendly software offers a graphical user interface for users. Moreover, it has invoked all the functions of Windows File Recovery.
Download it now! Then use it to recover the deleted/lost media files, office files, and ZIP files.
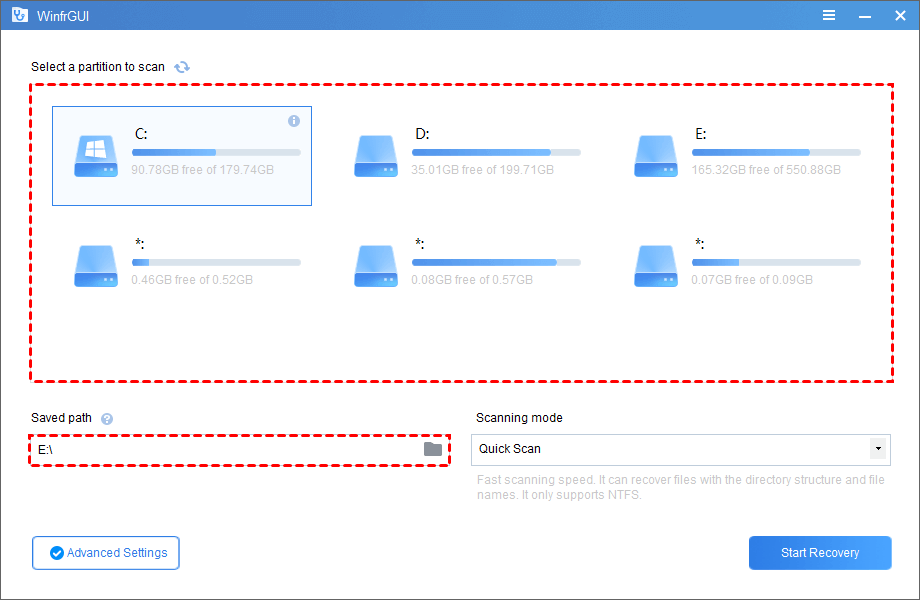
Step 1. Download and install WinfrGUI on your computer. Then select a partition to scan, and select another destination partition to save your recovered folders.
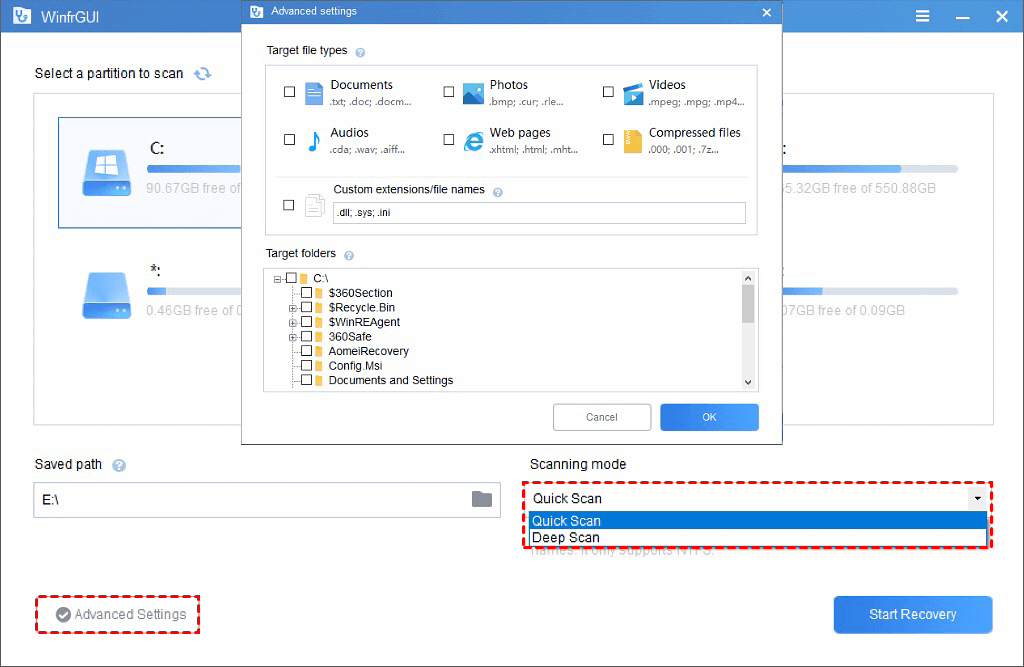
Step 2. Select Quick Scan or Deep Scan. Then click “Advanced Settings” to select your desired folders.
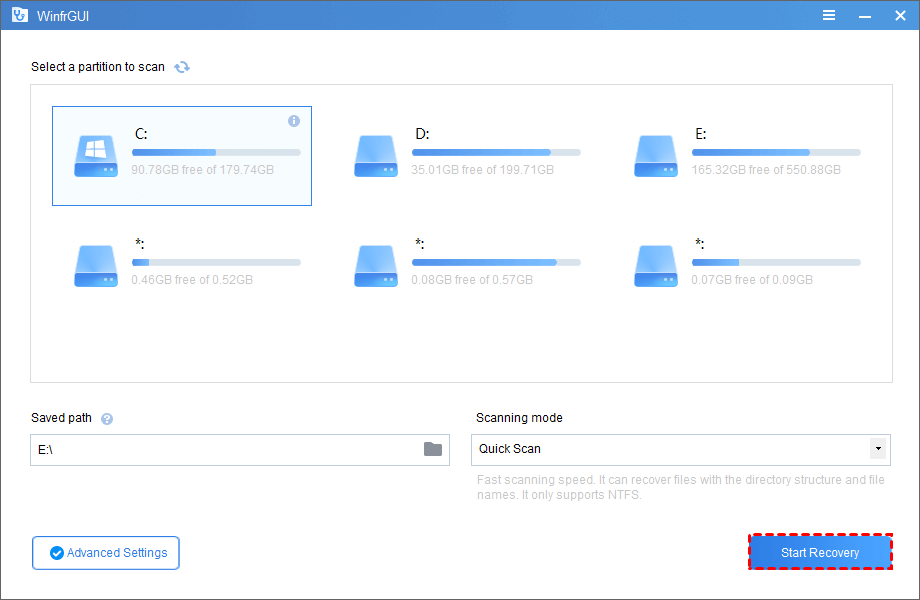
Step 3. Click “Start Recovery”. After scanning, you can get your recovered folders in your destination drive.
Method 5. Recover permanently deleted folders via data recovery software
How to recover permanently deleted folders in Windows 10/11 without backups? Compared with Windows File Recovery, WinfrGUI seems as a better choice for non-tech users to restore folders. However, you'll be prompted to open the recovered folders to check their contents because WInfrGUI cannot retain the original path and filenames.
In this case, there's a better approach. You can keep the original path, filename, and format by using more powerful and user-friendly software like FastRecovery. Please get an overview of its highlights.
- Besides HDD, you can also use it to recover the deleted/lost files from portable devices such as SSD, USB, and other storage devices.
- Recover 200+ types of data: Word, Excel, PPT, Photos, Audios, Videos, Emails, Webpages, and Compressed files.
- Run Quick Scan and Deep Scan automatically to find all the deleted files and other lost files on your computer.
- Deal with deletion, disk formatting, and other data loss scenarios.
- Support NTFS, FAT32, exFAT, and ReFS file systems and be compatible with Windows 11, 10, 8, 7, and Windows Server.
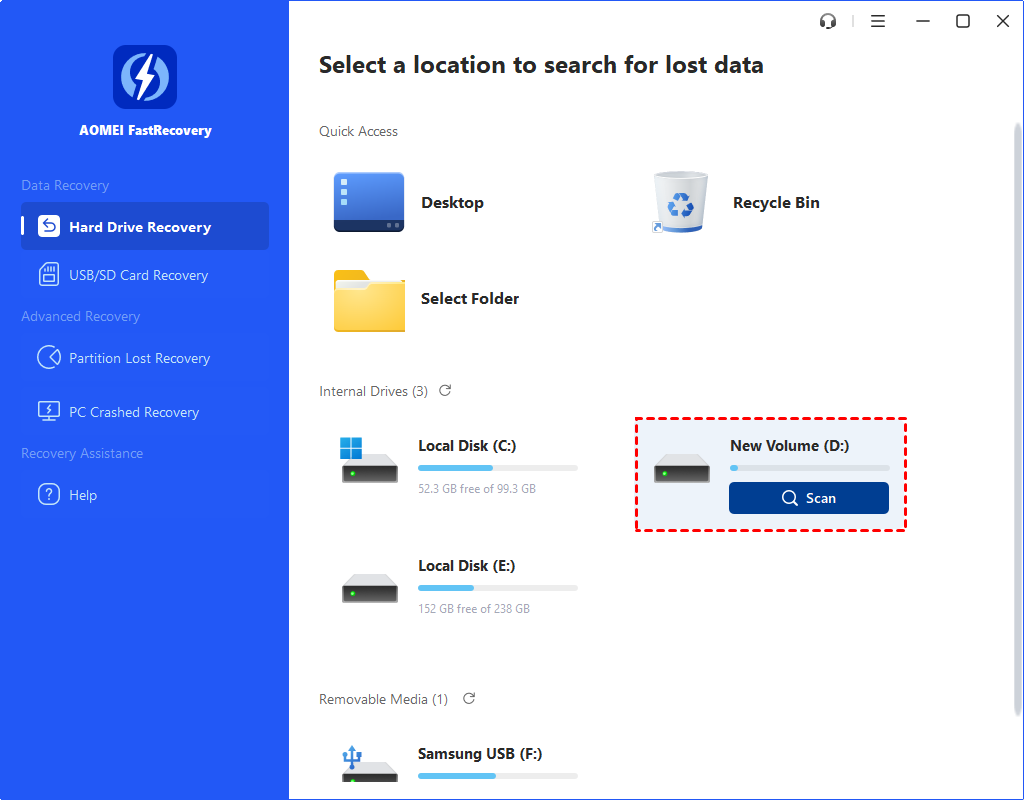
Step 1. Download FastRecovery on the computer.
Step 2. After loading the disk, hover the mouse over the disk/partition that includes your needed folders before permanent deletion. Then click Scan.
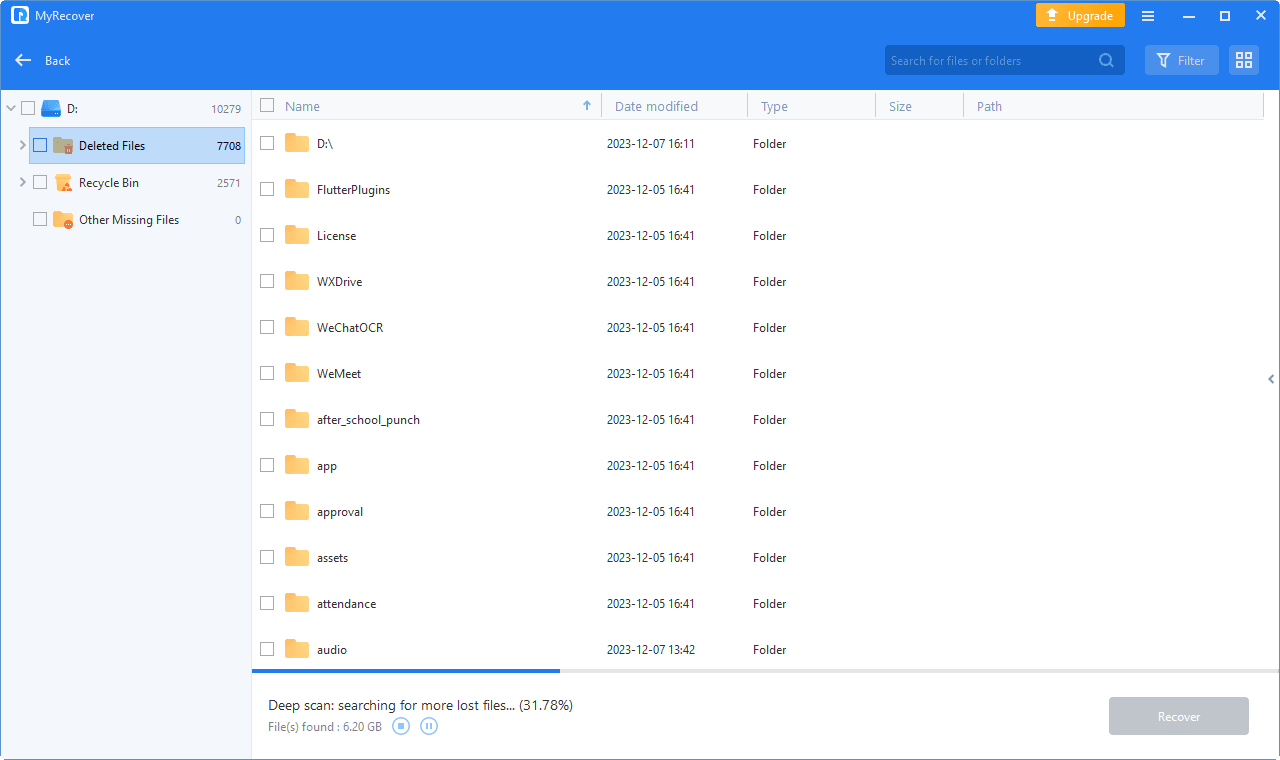
Step 3. During the scanning process, you can search your desired folders by typing the filename in the search box. After scanning automatically, you can see all the deleted files/folders and other missing files.
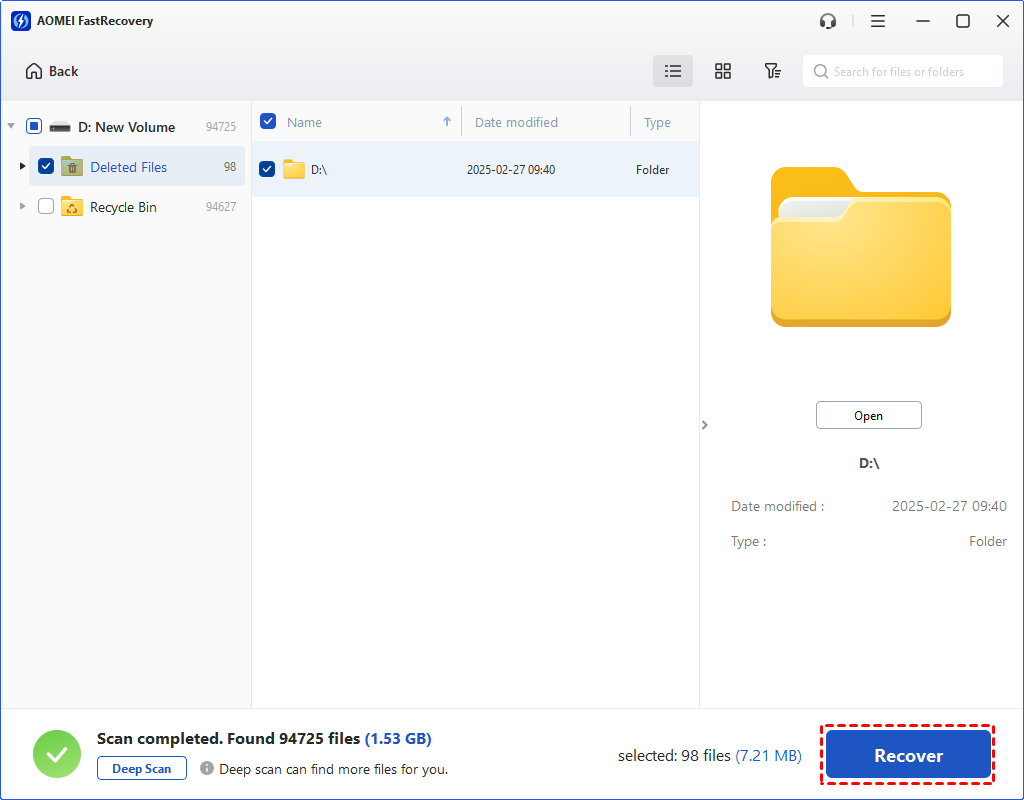
Step 4. Confirm your scanning results and click “Recover x files”. Please store these retrieved folders in a new location instead of your external hard drive.
Wrapping up
“How do I recover permanently deleted folders in Windows 10?” This tutorial shows you five feasible methods. In brief, if you’re willing to avoid previous preparations like backups or complicated command lines, FastRecovery can solve your above concerns. So why not put it into action?
Moreover, you'd better create backups regularly with Windows features or free backup software, AOMEI Backupper. Does this post help you out?