How to Do Surface Pro 9 SSD Upgrade Without Reinstalling
In need of Microsoft Surface Pro 9 SSD Upgrade? Check this page to get useful information and a stepwise guide.
By Lily Updated on March 4, 2024
User Case
Microsoft Surface Pro 9 is the most powerful 2-in-1 laptop from Microsoft Surface for Business. Announced on October 12, 2022, it supersedes the Surface Pro 8 and Surface Pro X, merging both brands. It offers internal storage from 128GB to 1TB. If you bought a Surface Pro 9 with small capacity at the beginning, you may want to upgrade the SSD later. Here is a user case:
“Hey tech wizards! I'm gearing up to upgrade my Surface Pro 9 SSD, and I need some advice. My trusty Surface Pro 9 has been with me through thick and thin, and I want to give it a performance boost. What's the best way to upgrade the SSD without going through the hassle of reinstalling everything? Any recommendations on the type of SSD and tools I need? Thanks a bunch!”
Tools You Need for Microsoft Surface Pro 9 SSD Upgrade
It is a game-changer to upgrade Surface Pro 9 SSD, but before you dive in, make sure you have the right tools:
✅ M.2 2230 SSD
Opt for a smaller SSD type, specifically M.2 2230. Avoid the M.2 2280 SSD as it won't fit in the Pro 9 due to its larger size. Consider options like Corsair MP600 Mini, Yassdwbn SN530, or other compatible SSDs.
✅ M.2 2230 NVMe SSD Enclosure
You need an M.2 NVMe SSD enclosure to connect the target SSD for disk cloning. For example, MAIWO M.2 NVMe SSD enclosure which is applicable to size 2230/2242/2260/2280 solid state drivers.
✅ Torx T3 Screwdriver
This screwdriver is essential for removing the drive from the Surface Pro 9. Grab a set from Amazon, and you're good to go.
✅ SIM Ejection Tool
If you own the Surface Pro 9 5G model, you'll need this tool to open the door under the kickstand, providing access to the SSD for removal.
✅ Professional Disk Cloning Tool
If you're gearing up for Surface Pro 9 SSD upgrade, meet AOMEI Backupper Professional, the go-to software for seamless disk cloning. It is not just your average cloning tool; it's a comprehensive solution packed with features designed to simplify and optimize the cloning process.
- User-Friendly Interface: AOMEI Backupper boasts an intuitive and user-friendly interface, making it accessible to users of all skill levels.
- Disk Cloning Options: AOMEI Backupper provides various cloning options, allowing you to clone an entire disk, specific partitions, or even clone the operating system. This flexibility ensures that you can tailor the cloning process to your specific needs.
- Sector-by-Sector Clone: For a meticulous replication of your disk, AOMEI Backupper offers a sector-by-sector clone option. This ensures that every sector is copied, including unused or bad sectors, providing a true and exact replica of your original disk.
- Intelligent SSD Alignment: Maximizing the performance of your upgraded SSD is a breeze with AOMEI Backupper's intelligent SSD alignment. This feature optimizes partition alignment on the new SSD, ensuring enhanced system responsiveness.
Stepwise Guide to Surface Pro 9 Upgrade SSD
To upgrade Surface Pro 9 SSD without reinstalling Windows and all the apps, follow the guidance below.
Step 1. Connect the New SSD Externally
Connect the new SSD externally with the M.2 NVMe SSD enclosure you prepared.
Step 2. Clone Surface Pro 9 SSD to Another SSD
Here's how to clone your Surface Pro 9 SSD to the new one using AOMEI Backupper:
1. Download and Install AOMEI Backupper
Click the download button to download the software. Install AOMEI Backupper on your Surface Pro 9.
Easiest hard drive clone software for Windows PC.
2. Launch AOMEI Backupper
Open the software and select "Clone" > “Disk Clone” from the main interface.

3. Choose Source and Destination
Pick the source drive (old SSD) and the destination drive (new SSD).

4. Initiate Cloning Process
Check the “SSD Alignment” option to optimize the destination SSD performance. Then, start the cloning process by clicking “Start Clone”.

Step 3. Surface Pro 9 replace SSD
Now, let's physically replace that old SSD. Follow these simple steps:
1. Power off your Surface Pro 9 completely and disconnect it from any power source.
2. Lift up the kickstand on the Surface Pro 9 so it's facing all the way up or at a 90-degree angle.
3. Find the compartment cover for the SSD which looks like a little rectangular-shaped door and open it.
- On the regular Surface Pro 9, you can just press down and lift the door to remove it using your finger. It is magnetic.
- On 5G Surface Pro 9 models only, insert a SIM ejector tool into the small hole you see on the door. This will pop it up and let you release the cover.
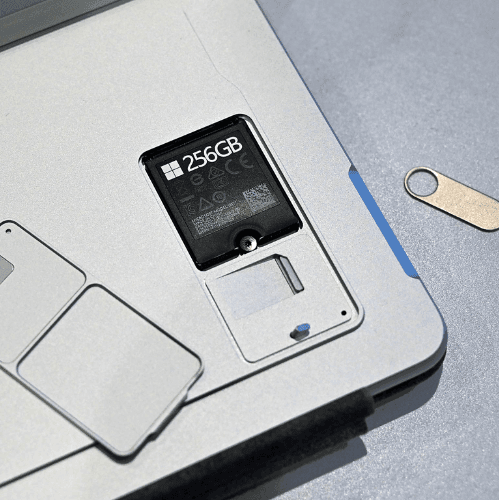
4. Unscrew the original SSD using your Torx screwdriver. It'll pop up. Slowly pull it out to release it.
5. Place your new SSD into the Surface Pro 9 by realigning it with the slot you see. Slide it in at a 45-degree angle and make sure it's fully connected and making contact with all pins.
6. Screw back in the SSD. Put the SSD cover back on.
Conclusion
Performing Surface Pro 9 SSD upgrade without reinstalling is a breeze with the right tools and AOMEI Backupper's cloning prowess. Elevate your Surface Pro 9's performance seamlessly by following our stepwise guide. You're on your way to a faster and more efficient computing experience. Happy upgrading!

