How to Clone Steam Deck SSD: A Full Guide
Do you want to clone Steam Deck SSD? This article provides you with a complete tutorial, including pre-cloning preparation and the exact cloning process!
By Lily Updated on July 2, 2025
Can You Clone Steam Deck Drive?
Many users choose the Steam Deck for portable PC gaming, but concerns about its storage options (64GB, 256GB, or 512GB) are common.
Is it possible to upgrade the storage on the Steam Deck? The answer is yes! You can upgrade the Steam Deck's SSD by cloning the current SSD to a new one and replacing the old drive. Here's what you need to know:
▣Attention
- Warranty Risks: Valve warns that replacing the SSD may cause increased power consumption, thermal issues, electromagnetic interference, and potential electrostatic damage. Any damage from SSD replacement will void the warranty.
- Data Backup: Before replacing the SSD, it's strongly recommended to back up your data to avoid data loss.
Easiest Steam Deck SSD cloning software.
Preparations for Cloning Steam Deck SSD
This section will provide you with some preparation for cloning Steam Deck SSD on Windows, including picking a compatible SSD and removing the original SSD. Please read carefully!
1. Pick a Compatible SSD
Before you start, you must acquire an SSD for the Steam Deck. Typically, a compatible Steam Deck SSD should adhere to the following criteria:
The Steam Deck SSD size should be 2230 M.2, compatible even with the Steam Deck 64GB model.
Note that the Steam Deck 64GB model operates on the PCIe Gen 2 x1 protocol, whereas the Steam Deck 256GB and 512GB models use either the PCIe Gen 3 x4 or PCIe Gen 3 x2 protocol. When possible, ensure that the purchased M.2 SSD aligns with the correct protocol.
2. Remove the Original SSD
To minimize the risk of inadvertently puncturing a Li-Ion battery, it is advisable to discharge the Steam Deck battery below 25% before initiating any modifications. Additionally, we recommend activating battery storage mode before commencing any modding procedures. Now, let's get started.
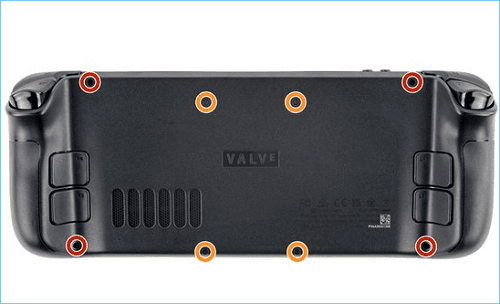
Step 1. Begin by unscrewing and unclipping the back cover to detach and remove it.
Step 2. Locate and uncover the concealed shield screw, then proceed to remove the shield.
Step 3. Disconnect the battery to ensure safety during the modding process.
Step 4. Unscrew the SSD fastening, followed by the removal of the SSD itself.
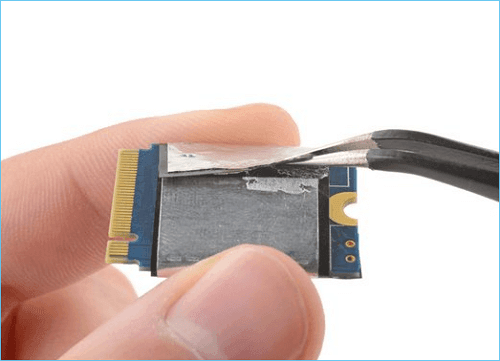
Step 5. Eliminate the SSD shielding and extract the original SSD from the Steam Deck.
Now you have picked a compatible SSD and removed the original SSD. Next, we'll look at how to safely clone Steam SSD using professional cloning software! Please read carefully to perform the Steam Deck SSD upgrade clone!
How to Clone Steam Deck SSD to New SSD Securely
For a seamless and trouble-free cloning process, the utilization of dependable cloning software is essential. AOMEI Backupper Professional offers a user-friendly interface, ensuring simplicity and accessibility throughout the cloning process. It excels in intelligent cloning, specifically copying only the utilized space from the source disk to the target SSD, optimizing storage usage and preventing unnecessary data duplication.

-
Beginner-Friendly Interface: Simple navigation and easy initiation of the cloning process.
-
Intelligent Cloning: Clones only the used space, optimizing storage utilization.
-
Boot Disk Cloning: Retains bootability when cloning Windows SSD to a larger SSD.
-
MBR/GPT Disk Cloning Support: Supports cloning between MBR and GPT partition styles for compatibility.
-
4K Partition Alignment: Properly aligns partitions on the target SSD, optimizing performance.
-
VSS Technology: Operates seamlessly in the background (hot clone) without interrupting computer usage.
Steps to Clone Steam Deck SSD
Step 1. Connect the old Steam Deck SSD to your PC via an M.2 to USB adapter. Then, connect the new SSD to your PC as well. Launch AOMEI Backupper. Then, click Clone > Disk Clone.
Note: Kindly be aware that the target SSD will undergo an overwrite process; hence, it is advisable to back up crucial files beforehand.

Step 2. Select the original Steam Deck SSD as the source disk and then click Next.

Step 3. Choose the larger new SSD as the destination disk, then click Next.

Step 4. Activate SSD Alignment to ensure peak performance, and then proceed to initiate the SSD cloning process by clicking Start Clone.

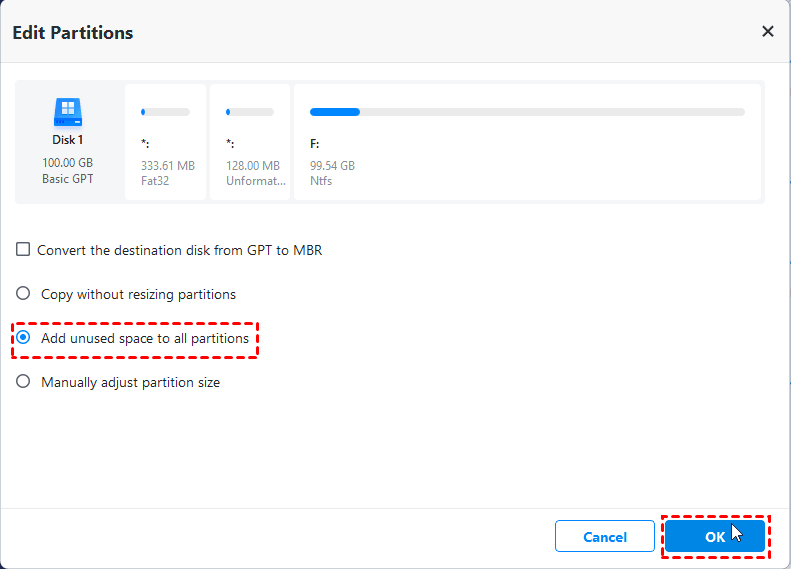
☼Tips: To avoid unallocated space after cloning, employ the "Edit Partitions" feature throughout the cloning process. Opt for "Add unused space to all partitions" or "Manually adjust partition size" to ensure a smooth and effective cloning experience.
After Cloning: Put New SSD in Steam Deck
In this section, we will guide you through the process of inserting the new SSD into the Steam Deck and ensuring it functions seamlessly like the old SSD. Follow these steps:
Step 1. Position the foil shielding removed from the old SSD onto the new SSD.
Step 2. Insert the new SSD into the slot and secure it in place with screws.
Step 3. Reconnect the battery by carefully pushing the connector back into the battery port using the fabric strip. Upon successful connection, the power light will briefly flash white.
Step 4. Reattach the shielding by sliding it back into place, aligning it with the screw holes underneath. Confirm that the fan wires are positioned above the shield.
Step 5. Reconnect and secure the back plate by placing it on top of the Steam Deck and screwing it in place. Double-check to ensure everything is properly aligned and secured.
✍Useful Tips:
- Check Functionality: Verify that all data and settings have been successfully transferred.
- Troubleshoot: If the cloned SSD doesn’t boot, refer to the "Cloned SSD won't boot" guide for troubleshooting.
FAQs about Cloning Steam Deck SSD
1. Can I clone my Steam Deck’s SSD to a larger one?
2. Do I need to remove the SSD from the Steam Deck?
3. Will my games and SteamOS still work after cloning?
Summary
For a foolproof approach, we suggest revisiting the guide from the beginning when disassembling the Steam Deck to ensure adherence to the correct order. This tutorial provides a means to upgrade the Steam Deck SSD without the need for Rufus or the creation of any bootable images.
Opting for SSD cloning with AOMEI Backupper eliminates the need for laborious re-downloads, settings adjustments, and navigating the complexities of the Linux-based SteamOS. AOMEI Backupper is adept at initializing the new SSD and facilitating the seamless cloning of SteamOS and other game data from the old SSD to the new one. Download this software now to clone Steam Deck SSD!

