How to Clone ESXi USB Boot Disk (Bootable)
This article will introduce you to two effective methods to clone ESXi USB boot disk just in case the ESXi USB device fails. If you happen to have this need, read this article patiently.
By Ivy Updated on March 20, 2025
ESXi Boot Disk Cloning Requirements
ESXi (formerly ESX) is a bare-metal hypervisor that has the ability to create and run virtual machines (VMs) efficiently on a physical server. It can directly access the hardware without installing an operating system. This means it can perform better, run faster and be more scalable than other types of hypervisors.

To install ESXi on a disk and use it as a boot drive, you need to be sure of the following requirements:
- A 32 GB persistent storage such as HDD, SSD, or NVMe plus USB or SD devices, only for ESXi boot bank partitions.
- The boot device must not be shared between ESXi hosts.
- The SCSI disk or a local, non-network, RAID LUN with unpartitioned space for the virtual machines.
- Don’t use SATA disk connected through supported SAS controllers or supported on-board SATA controllers as scratch partition. Because these disks are considered remote, not local.
Stepwise Guide to Clone ESXi USB Boot Device
If you happen to have problems with ESXi USB boot devices, you can choose to backup and restore the ESXi host configuration on it. The process requires the following two situations to be satisfied:
- The destination build number of the host matches the build from which the backup was taken.
- The UUID of the host remains the same.
Now you can follow the steps below to clone ESXi USB boot device. The process is divided into two section, namely backup ESXi host configuration data and restore these data.
Section 1: Backup ESXi Host Configuration Data
Here I’ll show you the backup process using ESXi vm-cmd. It is installed at /bin/vim-cmd, and actually, a symbolic link to a host executable as shown in the following.
Step 1. Open ESXi vm-cmd and type the following command to sync the configuration changed with persistent storage.
vim-cmd hostsvc/firmware/sync_config
Step 2. Type the following command to backup the configuration data for the ESXi host. After the backup process completes, this command will output a URL (http:///downloads/123456/configBundle-xx.xx.xx.xx.tgz).
vim-cmd hostsvc/firmware/backup_config
Step 3. Open the backup path in a web browser and download the backup file. The file will be saved in the /downloads directory as configBundle-HostFQDN.tgz.
Section 2: Restore ESXi Host Configuration Data
Before you start to restore the ESXi Host Configuration data, you need to rename the backup file as configBundle.tgz. Then, start the restore process.
Step 1. Type the following command to put this host into maintenance mode.
vim-cmd hostsvc/maintenance_mode_enter
Step 2. Copy the backup files to the ESXi host or an available data store. Then, reboot this host. It ensures the restore workflow can finish completely.
Step 3. After rebooting, type the following command to restore the ESXi host configuration. This command will initiate a reboot.
vim-cmd hostsvc/firmware/restore_config //configBundle.tgz
Notes:
- Replace with the path to the configBundle.tgz
- To avoid UUID mismatch, you can add a 1 to force override of it. Type as follow: vim-cmd hostsvc/firmware/restore_config 1 /tmp/configBundle.tgz
Easier Way to Clone ESXi USB Stick (with GUI Interface)
Except for ESXi command line, you still can use an easy way to clone ESXi USB stick - USB clone tool with GUI interface. AOMEI Backupper is a great choice. It will clone everything on the USB stick to another one in 4 steps.
- It offers a “Disk Clone” feature to clone the entire disk, such as HDD/SSD, USB drive, SD card etc. To clone OS only, try the “System Clone” feature.
- It is able to make full use of disk space with its “Edit Partitions” feature while cloning USB to a larger USB.
- It supports multiple VMware ESXi USB sticks, such as IBM 41Y8296 USB, Lenovo OOML235 USB, IBM 42D0545, etc.
Now download this easy USB clone tool- AOMEI Backupper Professional. Install and launch it.
(PS: The Professional edition of AOMEI Backupper only supports Windows 11, 10, 8, and 7. For ESXi boot disk on server computer, try AOMEI Backupper Server.)
Step 1. On the main page, click the Clone tab and select Disk Clone.

Step 2. Select the ESXi USB boot disk and another drive to receive the ESXi configuration data. It can be a USB drive with 8GB or higher size or HDD/SSD. Don’t mix them up, or the target disk and data on it will be deleted.

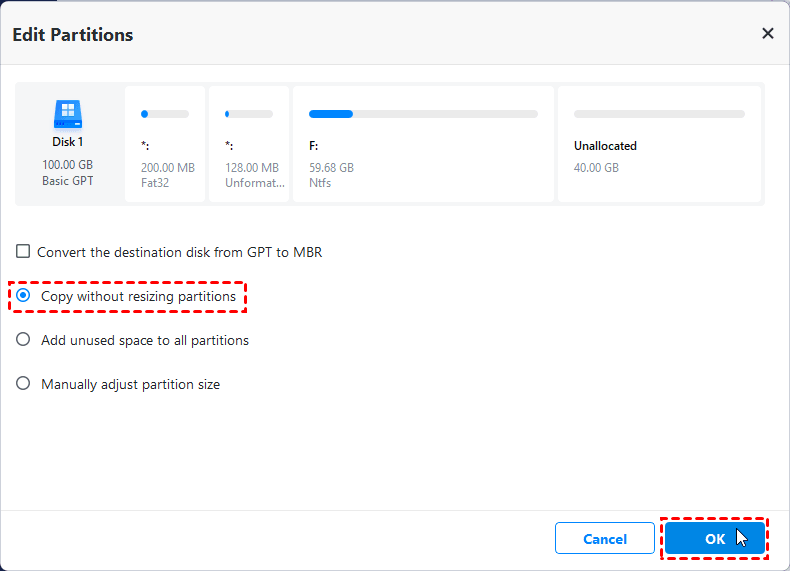
Step 3. On the Operation Summary window, click Edit Partitions and select Add unused space to all partitions or Manually adjust partition size. It also helps to clone MBR disk to GPT disk and vice versa. Then click Start Clone to execute the operation.
Notes:
- Sector by sector clone: It will clone all sectors of a hard drive including the empty and bad sectors. So please don’t check it.
- SSD Alignment: Try this feature if you want to move ESXi OS to new disk. It helps to align SSD disk and further improve the performance. You can get most from the ESXi NVMe boot.
Why Clone ESXi Boot Disk?
Historically, USB sticks are commonly used to free up device bays and reduce the costs of installing ESXi hosts. However, this kind of device has lower endurance and exhibit reliability issue over time. At the same time, it may exhibit performance issues and may not tolerate high-frequency read-write operations.
Worse, these issues are more frequent in ESXi 7.0. Thus, an increasing number of users want to clone ESXi USB boot disk for disaster recovery. At the same time, you need to follow the recommended usage from VMware.
- Don’t use standalone USB drives as boot media to store the ESX-OSData partition.
- The ESXi USB boot device could be 8GB at least plus a local persistent attached storage for ESX-OSData partition. But this is also not recommended.
- Reduce the amount of IO sent to USB drive.
- For more usage, please check the VMware ESXi page.
Summary
You can clone ESXi USB boot disk with two effective methods above and boot from it successfully. The ESXi command line requires you to learn the syntax and corresponding parameters. It is not easy for most users to use it. To make it easily, try USB clone tool - AOMEI Backupper Professional.
It not only allows you to copy USB to USB, but also replace HDD with SSD, clone NVMe to NVMe, migrate OS to NVMe, move files from one SSD to another, etc. Besides, it still include backup and restore feature to achieve the same effect.

