Clone Dell Hard Drive to SSD in Windows 10/11 (Bootable)
With the help of the best Dell hard drive cloning software, you can successfully clone Dell hard drive to SSD in Windows 11, 10, 8, 7 and make it bootable. Get it right now and clone.
By Lily Updated on August 28, 2025
User case: No bootable device after clone
Nowadays, cloning gains a lot of popularity, but there are still problems with cloning Dell hard drive. Below is the most common scenario:
“I tried to switch out the HDD that came with my Inspiron 5570 to an SSD. I first cloned the HDD onto the SSD. When that was done I did the physical switch and when I booted up the laptop I get an error message stating "no bootable devices found'. Strangely enough, if I put the HDD back in and it works fine, but I'd still like to do the switch. Any suggestions? Many thanks in advance.”
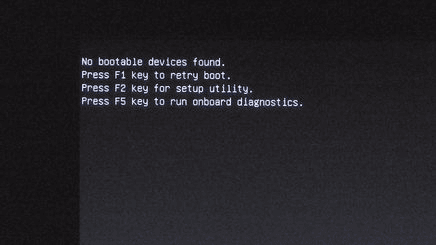
If the cloning process seems to have succeeded, but the cloned SSD won't boot, this may be caused by the following reasons:
- Missing recovery partition or boot-related partition(s). In this case, you need to try another cloning software to clone all sectors of a hard drive to new SSD with larger capacity. If it's smaller, you need to delete some large files or uninstall useless programs to fit on new SSD.
- Encrypted recovery partition. In this case, you cannot clone the hard drive but turn to backup and restore solution. Note that on many older systems with Dell Backup and Recovery installed (pre-Windows 10), the software cannot restore to a physical disc smaller than the one on which the image was delivered. Thus, you need an all-in-one disk cloning software integrated with backup feature.
Don't worry! The problem can be solved if you pick a specialized disk clone tool. Just keep reading.
Download the best Dell hard drive clone software now.
The best Dell hard drive cloning software
When it comes to Dell hard drive cloning, especially when Dell SSD upgrade (Dell clone HDD to SSD), disk cloning software is an essential part. This cloning software should be able to clone the entire HDD completely, including system partition (usually C drive), Recovery partition, OEM partition, data partitions, etc. Besides, cloning Dell laptop hard drive to SSD with secure boot also requires stable hard drive cloning software.
AOMEI Backupper Professional is such a powerful cloning software, specially designed for Windows 11, 10, 8/8.1, 7 and Vista. It allows you to clone Dell hard drive with recovery partition to SSD and make the cloned SSD boot securely. Hence, it’s the best choice to clone Dell HDD to SSD.
Also, this software integrates with backup and restore solutions. If you encounter problems cloning Dell hard drive with "No bootable Devices Found" or "your device needs to be repaired" etc, you can try to backup Dell hard drive and then restore image to new SSD, even to smaller one.
|
Clone features |
|
|
Backup and restore features |
|
In addition, AOMEI Backupper has a user-friendly interface. With its simple and easy-to-use GUI, anyone, even non-technical users, can clone Dell hard drive to SSD in minutes without seeking help from an expert.
No need to elaborate more, just download this all-in-one Dell hard drive cloning software. Learn how to clone a Dell laptop hard drive or use the backup and restore solution below.
How to clone Dell hard drive to SSD with secure boot🔥
In the first place, connect SSD to your computer and make sure it can be recognized by Windows. To mount the SSD in laptops, you’ll need an external enclosure or USB-to-SATA cable if there is only one hard drive bay. Then, follow the instructions below:
1. Launch AOMEI Backupper Professional and Click Clone > Disk Clone in turn.

2. Select the Dell hard drive as the source disk and click Next.

3. Select the SSD as the destination disk and click Next.

4. Tick SSD Alignment to optimize the performance of the destination SSD. Then, click Start Clone to begin Dell clone from HDD to SSD.

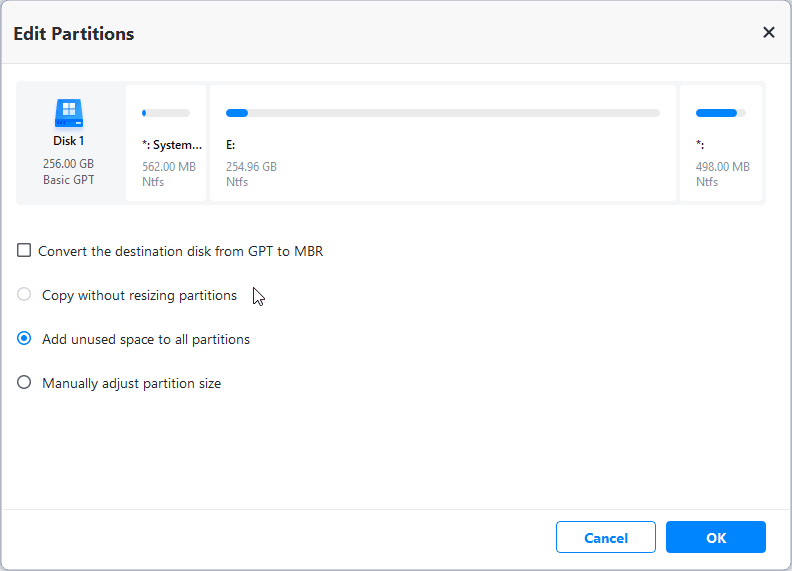
Tick Sector by Sector Clone if your Dell laptop has other hidden partitions or you want to keep partition status the same as the current HDD. The only requirement of this option is the SSD should be equal to or larger than HDD.
If it is larger, you need to edit the partition size on the destination disk with Edit Partitions, otherwise, you may find unallocated space left after cloning. And you can also convert the disk type if it's different from the source disk, clone GPT to MBR, for example.
- Copy without resizing partitions: It will not resize the partition size.
- Add unused space to all partitions: It will reallocate the unallocated space to each partition of the target disk, appropriate for the disk size.
- Manually adjust partition size: It allows you to extend unallocated space to any partition on the destination disk as you want.
- Convert the destination disk from MBR to GPT: It helps to convert the partition style of the destination disk if it is different from the source disk.
5. Remove current HDD and boot Dell off new SSD. Be careful and patient when you replace HDD with SSD in laptops. A Phillips #0 screwdriver could be a handy helper in uninstalling HDD.
Tips:
✍ You may want to wipe HDD and use it as second storage after cloning.
✍ The above steps are also applied to Dell Inspiron SSD upgrade and other computer hard drive replacement, including HP, Lenovo, Asus, Acer, Toshiba, Microsoft, Sony, Compaq, etc.
✍ If you don’t have a tool to connect SSD to Dell laptop for disk cloning, you can try the backup and restore method described in the coming part.
How to backup Dell hard drive with an encrypted recovery partition to SSD🔥
As mentioned earlier, in Windows 10, your recovery partition may be encrypted by Dell. In this case, you can choose to backup Dell hard drive to SSD with "Disk Backup" and "Disk Restore" features. Note that you need to create a bootable media in advance so that you can boot your computer after removing the original HDD. Then, let's go straight to the detailed steps:
Create disk image of Dell hard drive
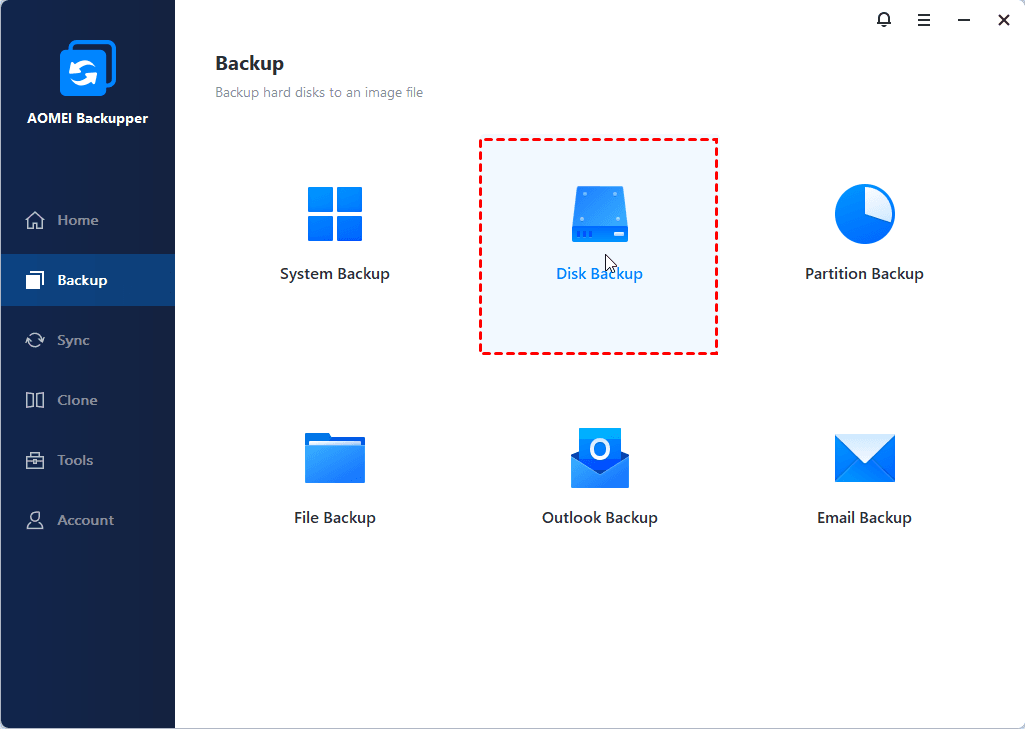
1. Launch AOMEI Backupper Professional again. Then, go to Backup and select Disk Backup.
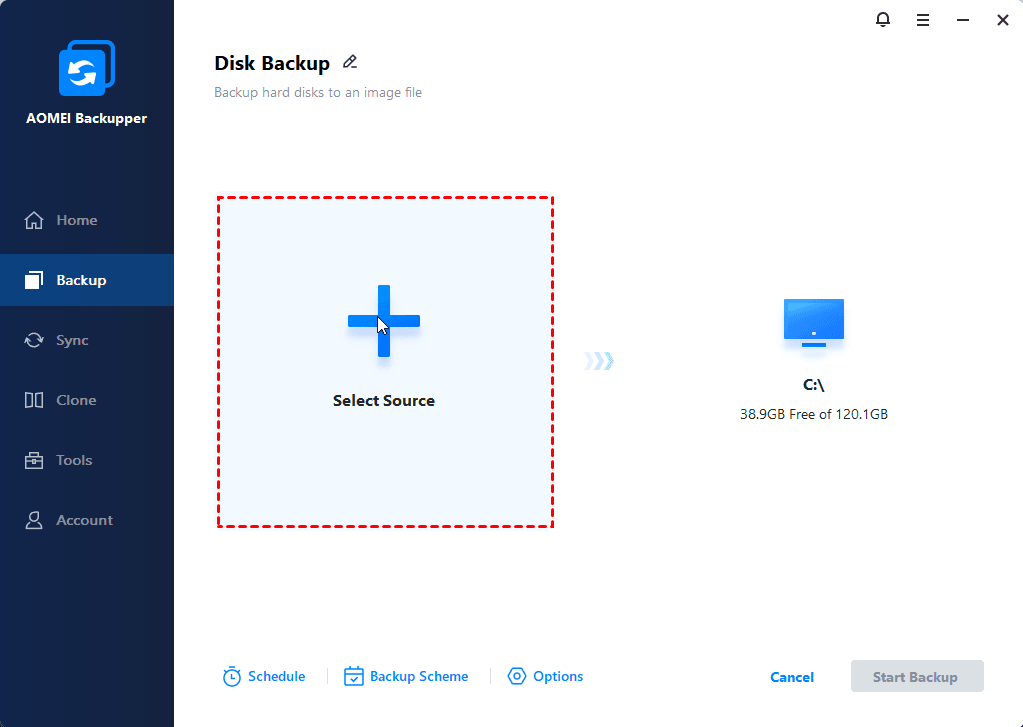
2. Click Select Source and select the Dell hard drive and click OK.
3. Select a destination path to store the backup image. You may save it on an external drive or network location so that it can be accessed after swapping HDD for SSD.
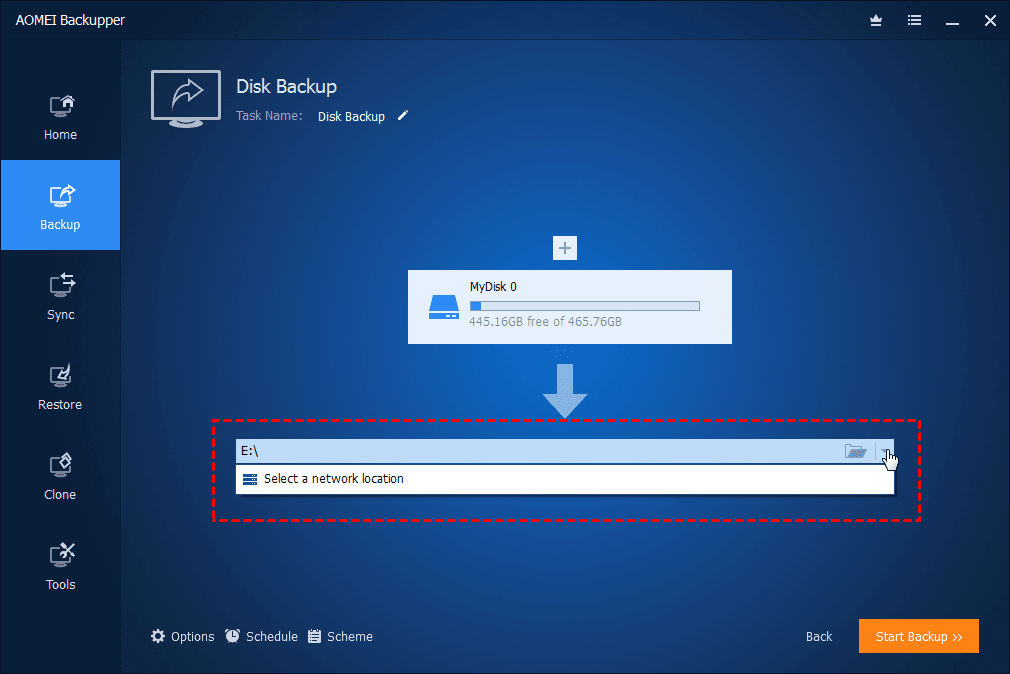
4. Click Options, Schedule, Backup Scheme to customize your backup settings. Then, click Start Backup. Wait patiently until the process completes.
Restore disk image to SSD
With a backup copy of Dell hard drive, you can restore backup image to new SSD as follows:
1. Remove the old HDD and install the new SSD there. Connect the bootable USB to your Dell computer and boot from it. If the disk image is on an external drive, connect it as well.
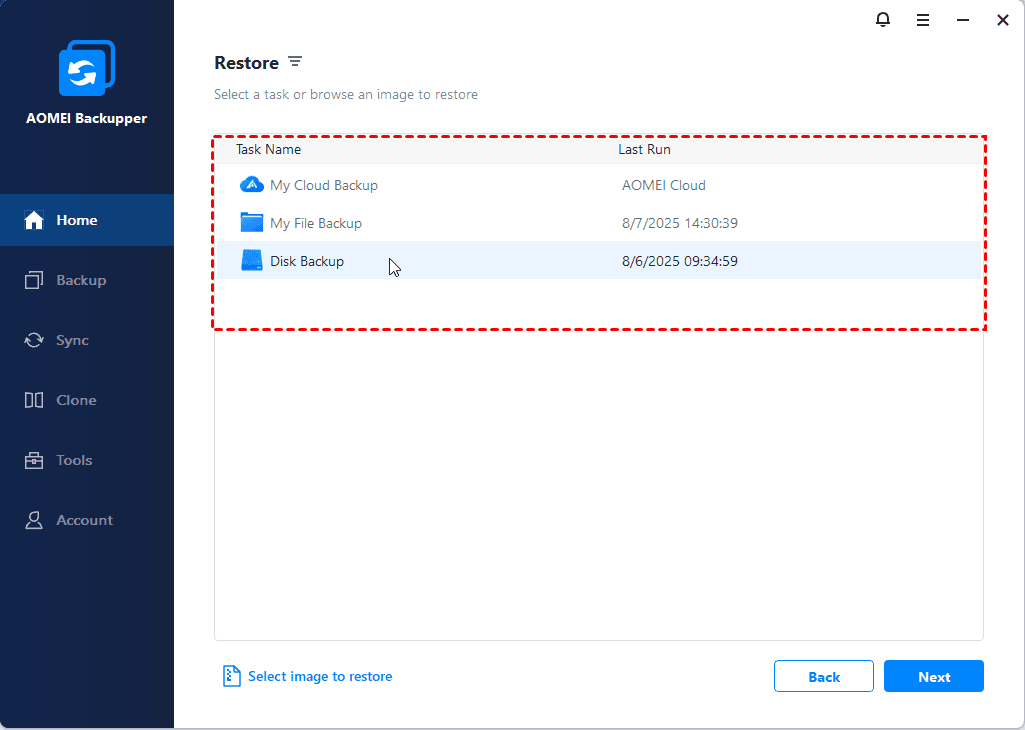
2. AOMEI Backupper loads up automatically. Go to Home > Restore.
3. Select the backup task you want to restore and click Next.
4. Select Restore the entire disk and click Next.
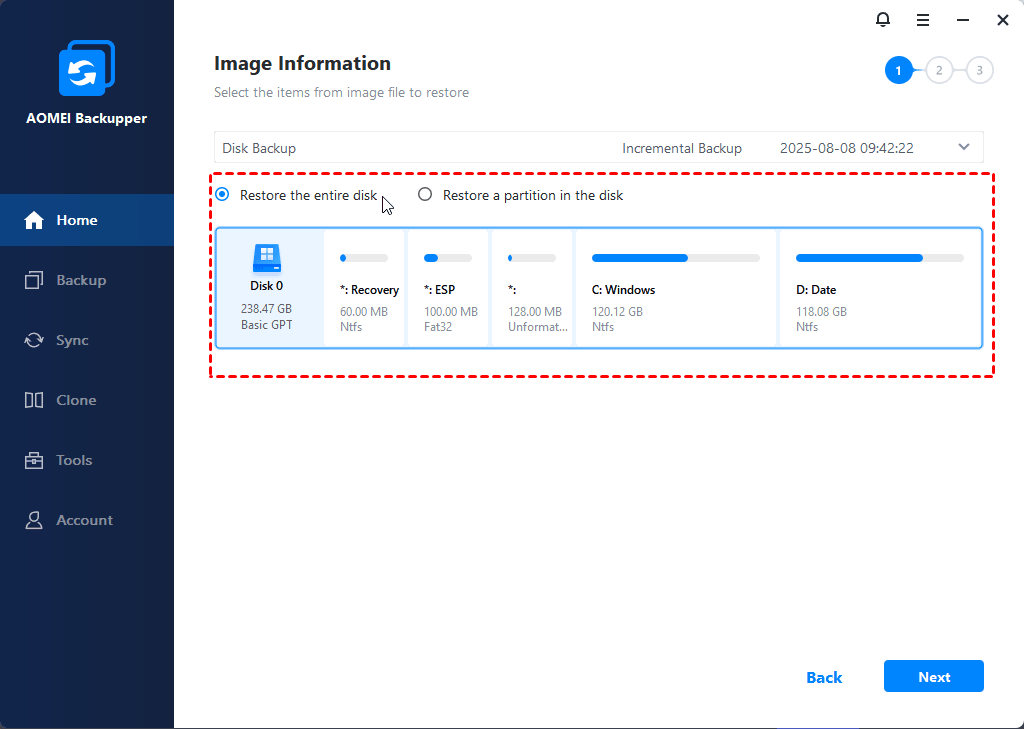
5. Select the new SSD as destination disk and click Next.
6. Tick SSD Alignment to improve the performance of an SSD disk. Then, click Start Restore.

Why clone Dell hard drive to SSD?
The main purpose of cloning HDD to SSD is to upgrade hard drive and get better performance, such as fast running speed, noiseless work environment and disk array for advanced users. It is true for Dell computer users. SSDs are more and more popular among a mass of computer users. Most of them use SSD for OS and HDD for storage, but in laptops say Dell XPS, it is not that easy.
The majority of the laptop is created with only one internal disk bay, and Dell is no exception. From a convenience and security perspective, it is not advised to keep the system disk externally. Therefore, cloning Dell HDD to SSD and moving the SSD inside is the best way to get better performance.
Hard drive failure also can lead to disk upgrade. If you purchased Dell PC a few years ago, it is time to replace Dell computer hard drive with a new one. The process of replacing needs hard drive cloning in most cases.
What’s more, cloning Dell hard drive in Windows 7/8/10 actually provides an intact duplication for you. This backs up your OS and data and you can get the system back to life any time with this copy.
Bonus: How to choose an SSD for your Dell laptop
To clone your Dell hard drive to an SSD, you need to make sure you’re picking the right drive. Choosing the wrong type could mean wasted money or compatibility headaches. Here’s how to make the right choice for your specific Dell laptop.
1. Check Your Laptop’s Interface and Form Factor
Dell laptops support different SSD types depending on the model and age. Here’s how to narrow it down:
🔹 SATA SSD (2.5-inch):
- The most common upgrade for older Dell laptops.
- Easy drop-in replacement for traditional hard drives.
- Slower than NVMe, but still a massive upgrade from HDDs.
🔹 NVMe SSD (M.2 2280):
- Common in newer Dell XPS, Inspiron, Latitude, and Alienware models.
- Blazing-fast speeds (up to 5x faster than SATA).
- Requires an M.2 slot with PCIe interface support.
Tip: Open your Dell laptop’s manual or use Dell’s Support site to confirm whether it supports SATA, NVMe, or both.
2. Choose the Right Capacity
The sweet spot for most users is between 500GB and 1TB. Here's how to decide:
- 256GB: Okay for basic usage or as a boot drive.
- 500GB - 1TB: Ideal for most users—enough space for OS, apps, and files.
- 2TB or more: Great for content creators, gamers, or power users.
Remember, you’ll need enough space to fit everything you plan to clone from your current drive.
3. Pick a Reputable Brand
Stick with trusted SSD brands for better reliability and firmware support:
- Samsung (870 EVO, 980, 990 Pro)
- Crucial (MX500, P3, P5 Plus)
- Western Digital (Blue, SN770, Black SN850)
- Kingston, SK hynix, or SanDisk are also solid choices.
Conclusion
It’s quite easy to clone Dell hard drive to SSD with the help of Dell hard drive cloning software - AOMEI Backupper Professional. The cloning time varies depending on the data capacity on the source hard drive. Normally, sector by sector clone takes up more time but will clone all sectors of a hard drive including recovery partition.
But in Windows 10, this partition may be encrypted by Dell and you are not allowed to clone it at all. At this time, you can choose to backup Dell hard drive and then restore using this software.
Except for Dell SSD upgrade, AOMEI Backupper also supports copy USB to USB, replace hard drive in ASUS laptop, backup Windows 10 to network drive, backup external hard drive to another external hard drive, etc.

