Full Guide: Disk-to-Disk-to-Cloud Backup (D2D2C)
What is disk to disk cloud backup? This article will give you details about this and show you how to do it with the help of reliable third-party backup software.
By Yuka Updated on October 29, 2024
What is Disk-to-Disk-to-Cloud Backup?
Since there are many ways in which data can be lost, be it human error, theft, computer viruses or natural disasters. People are becoming more and more aware of the importance of backing up their data, and various backup methods have emerged.
Disk-to-disk-to-cloud (D2D2C) is a hybrid cloud backup approach where data is stored locally before being backed up on a cloud server via physical means. After backing up in the cloud, the backup data on the local disk may be discarded to make room for the next backup. The last backup is kept for quick data recovery.
There are many benefits to storing data on a network rather than on a physical device, the most obvious being that it is fast and less prone to loss. D2D2C provides a more convenient and faster option when recovering data. When backing up to the cloud, you can greatly reduce the time to create backups by automating the entire process.
Best Free Tool for Disk-to-Disk-to-Cloud Hybrid Backup
“I have a HDD for storage and I want something simple and reliable to copy to an external drive for local archiving and then offsite cloud storage (Google Drive). I need an intermediate link to copy the old data to the external drive and then upload it to G and verify that the data is copied externally and offsite.”
As forum users have mentioned, you may need a tool to help you with disk-to-disk-to-cloud backup. AOMEI Backupper Standard is an all-in-one backup software that supports all Windows systems, such as Windows 11/10/8/7, etc. See what this free software can do for you!
🌼 Multiple backup options. It provides you with System Backup, Disk Backup, File Backup and Partition Backup. You can choose the one that suits you according to your needs.
🌼 Different backup destinations. It supports you to store backups on internal and external disks (HHD or SSD), NAS, network drives, cloud services, SD cards, USB drives, etc. You can use it to backup disk to disk to cloud.
🌼 Backup automation. It supports you to set up automatic backups to avoid duplication of work. You can choose different intervals: daily, weekly, monthly. After upgrade you can also choose Event Triggers and USB Plug In.
🌼 Diverse backup methods. It provides you with full backup, incremental backup and differential backup. The latter two ways can help you save disk space and backup time. You can also enable automatic cleanup of old backups in the backup scheme. Note that Differential Backup and Automatic Cleanup are available only in advanced versions.
After using it to backup, you can quickly restore your system or files from the backup anywhere. If you are new to this software, read on to learn more.
Steps to Perform Disk-to-Disk-to-Cloud-Backup
After understanding the basic information of this software, you can refer to the following methods to perform disk-to-disk-to-cloud backup tasks. The whole process is divided into two steps: first storing the contents of the disk to another disk, and then backing up from the disk to the cloud. Download AOMEI Backupper Standard to your computer.
#1. Backup One Disk to Another
If you want to temporarily store data from your internal disk to an external disk, you will need to connect your external disk first, and you may need a SATA to USB adapter cable.
- Launch AOMEI Backupper Standard. Select Backup in the left panel, and then select Disk Backup on the right side.

- Then click Add Disk to select the hard drive you want to backup to another disk.

- Click the folder-shapped button and select a destination to store the disk image. Choose the disk you connect to create a disk-to-disk backup.

🥯 Helpful Tip: The program has three options in the lower left corner to customize the backup task. You can click on "Options" to write any comment for your task, to distinguish it from other backups, and to set up email notifications.
- Click Start Backup to carry out disk backup and wait until the operation is complete.
#2. Backup Disk to Cloud Service
Next you can use AOMEI Backupper to backup the disk to the cloud.
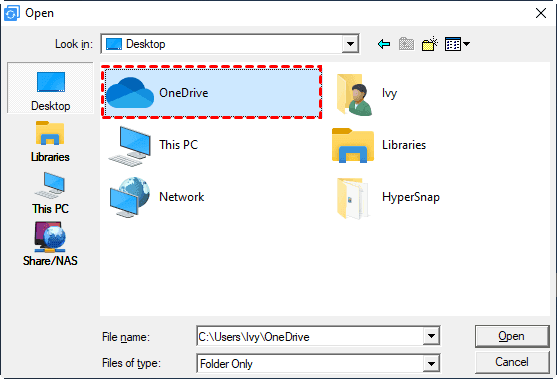
- Still in the software, select Disk Backup. Click Add Disk to select the disk you store the backup above.

- In the select path box, choose your cloud service path to store the disk image. Most cloud service folders are located in the Users\UserName directory on the C: drive by default. Here is an example of backuping disk to OneDrive.
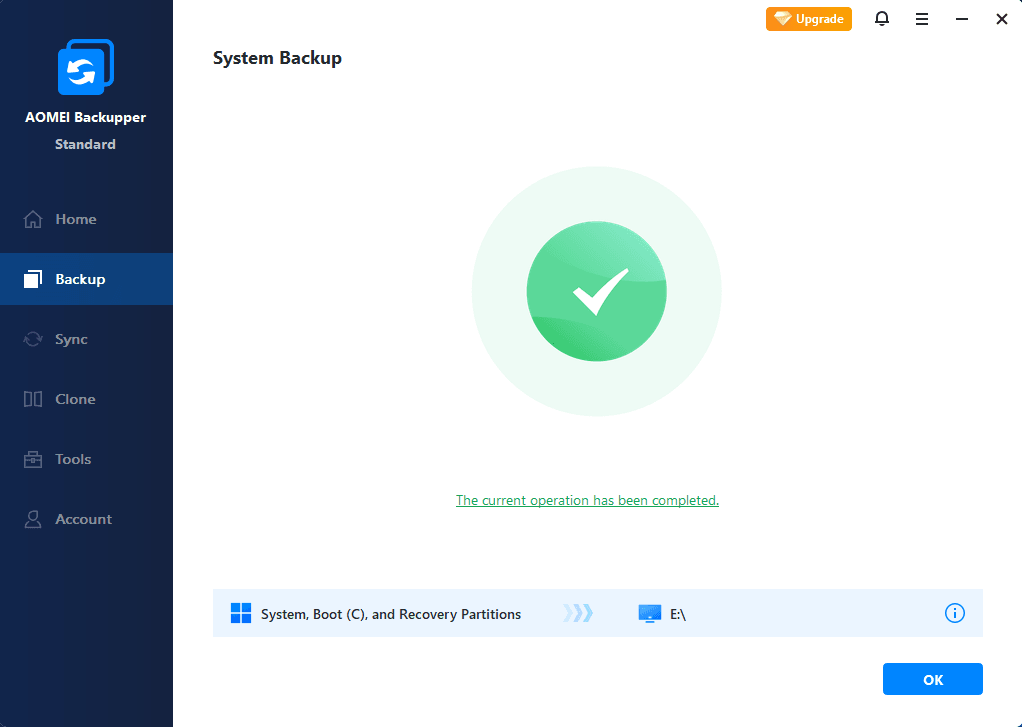
- Then click Start Backup to backup the disk to cloud. Wait until the operation is complete and click Finish.
Wrapping Thing Up
This article asks you in detail how to perform disk-to-disk-to-cloud backup. With the help of AOMEI Backupper Standard you can do this operation quickly and easily. You can also use it to restore from cloud backup with just a few clicks.
As an all-in-one software, it can also help you to clone disks. You can also use it to migrate your system or data when you want to upgrade your computer's hard drive. You can successfully boot from the cloned disk without any boot problems.

