Windows 11 vs Windows 10 Gaming: Which is Better
Learn about the gaming performance gap between Windows 11 and Windows 10, master 7 ways to optimize Windows 11 gaming performance, as well as another way to ensure a great gaming experience.
By Rosie Updated on November 26, 2024
Is Windows 10 or 11 Better for Gaming?
“I became interested in Windows 11 after trying my friend's latest computer with Windows 11. My computer is the latest ROG laptop computer that I just purchased last month and it fully meets all the requirements for the Windows 11 upgrade. However, the main use of my laptop computer is to play games and I am not sure if the upgrade will affect the gaming experience. Which one is better for gaming, Windows 11 or Windows 10? I urgently need to know a result, preferably with detailed Windows 11 vs Windows 10 gaming test results.”
– Anonymous user
Windows 11 has convinced a large number of users with its new design language, which even includes many gamers. But more gamers are still waiting and watching, they are not sure about Windows 11 vs Windows 10 gaming performance which will bring a better experience.
In most cases, Windows 11 offers a small edge in gaming, but the difference is minimal for everyday tasks. For gaming, you'll get features like DirectX 12 Ultimate, Auto HDR, and DirectStorage, which can improve your experience. However, keep in mind that the actual performance will depend on the specs of your hardware.
Windows 11 vs Windows 10 Gaming Performance Comparison
To win over gamers, Microsoft claimed "If you're a gamer, Windows 11 is for you" and set DirectX 12 as a necessary upgrade for Windows 11. However, from the results of Windows 11 vs Windows 10 gaming benchmark tests, Windows 11 is not as that much suitable for gaming as advertised. The results of the Windows 10 vs Windows 11 gaming performance comparison are as follows.
- Entry-level configuration: If your computer is an entry-level configuration, that is, below the following configurations: CPU (Intel Core i5 10400F or R5-3600), memory (8GB DDR4-2400), and graphics card (GTX 1650 or RX 5500XT). Then it is not recommended to upgrade to Windows 11, which may reduce gaming performance and affect the actual gaming experience.
- Mid-range configuration: If your computer is a mid-range configuration, that is, above the entry-level configuration and below the following: CPU (Intel Core i5 11600 or AMD Ryzen R5-5600X), memory (16GB DDR4-3200) and graphics card (GTX 3060 or RX 5700XT). The gaming performance of Windows 11 in this configuration is almost identical to that of Windows 10. Still, it is recommended not to upgrade for now and wait until after the big patch update in spring 2022.
- High-end configuration: If your computer is a high-end configuration, that is, above the mid-range configuration and below the following: CPU (Intel Core i7 11700K, or AMD Ryzen R9-5900X), memory (32GB DDR4-3600) and graphics card (GTX 3080 or RX 6800XT). This configuration performs better for Windows 11 games, and you can upgrade for a better gaming experience.
It is worth mentioning that Windows 11 is not friendly to AMD gamers. Compared to Windows 10, the L3 cache latency of Ryzen CPUs is substantially increased in Windows 11, which may result in a 5%-15% reduction in actual gaming performance. Therefore, if you are using an AMD Ryzen CPU, it is recommended that you don't upgrade to Windows 11 for now.
Backup System to Ensure You Can Always Have a Good Gaming Experience
To ensure your gaming experience, it is recommended that you perform a system backup using AOMEI Backupper Standard before upgrading to Windows 11. If you are not satisfied with your Windows 11 gaming experience, you can use your previous system backup image file to restore to Windows 10 and always maintain the best gaming experience.

-
To better protect your system, you can backup your OS regularly at fixed intervals, such as Daily, Weekly, or Monthly.
-
When you perform the scheduled backup, this software uses the Incremental backup method to help you improve backup efficiency.
-
It allows you to backup your system to an external hard disk, another hard disk, a USB flash drive, etc.
-
This software also provides you with a professional Windows 11 checker tool, which makes it easier for you to upgrade to Windows 11.
First, you need to download this freeware to easily backup the system on Windows. If you are a server user, please use the AOMEI Backupper Server version to quickly backup your system in Windows Server 2003/2008/2011/2012/016/2019 and other Server versions.
Step 1.OpenAOMEI Backupper Standard, and then click Backup> System Backup.

Step 2. It will select the Windows system partition and boot-related partitions automatically. And you just need to select a destination.

Step 3. Click Start Backup to backup Windows 10 before upgrading to Windows 11.

- Notes:✎...
- Options: You can compress or split the backup task, write comments, or set email notifications for your system backup.
- Schedule Backup: It allows you to set different frequencies to the backup system automatically, such as Daily, Weekly, Monthly, Event trigger, and USB plug-in. The last two are available in the Pro version.
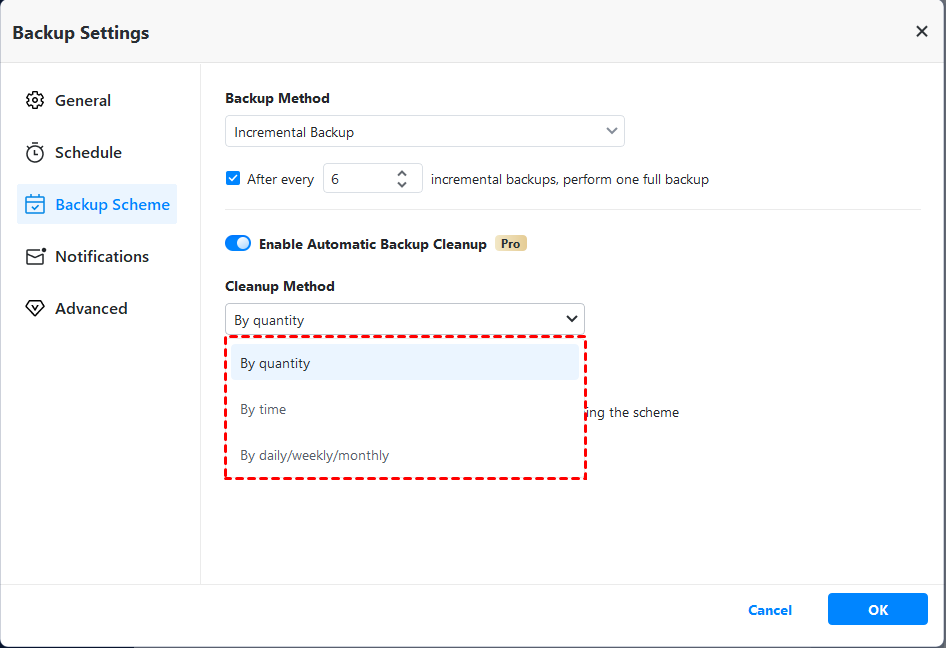
- Backup Scheme: Both of the latter two methods are better for performing scheduled backups, but the incremental backup method is more demanding to restore, and you can upgrade to the Professional version to enjoy differential backup methods. After upgrading, you can also enable an automatic backup cleanup feature to save disk space.
Besides System Backup, AOMEI Backupper has other features that you may be interested in.
- It is recommended that you create bootable media in case you need it to fix system crashes or unbootable problems.
- After backing up Windows 10, you can upgrade your computer to Windows 11. If you are not satisfied with the new system, you can quickly restore your system to Windows 11 with the System Restore feature.
- After upgrading to the Pro version, you can transfer your system to another hard drive completely with the System Clone feature.
How to Optimize Windows 11 to Boost Gaming Performance
After figuring out Windows 10 vs Windows 11 gaming performance which is better, if you insist on upgrading to Windows 11, to ensure a real-world gaming experience, it is recommended that you optimize Windows 11 for better gaming performance with the 7 options below.
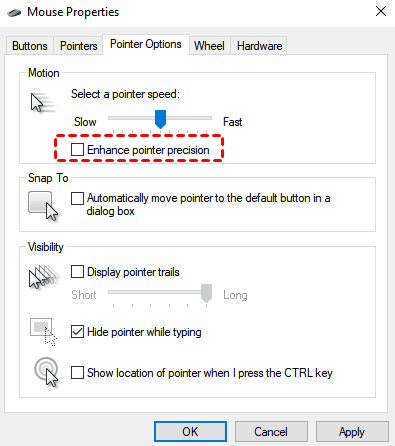
Method 1. Remove the "Enhanced pointer precision" Feature
If you are using a laptop computer, enable the "Enhanced pointer precision" feature in Windows 11 to make the trackpad more usable. If you are using a desktop computer, it is recommended that you disable this feature in Windows 11 to ensure a better gaming experience.
Step 1. Use Windows+S to open the search box, type mouse settings, and click the mouse settings option below the best comparison.
Step 2. Find the Related settings section on the right panel, and click Additional mouse options.
Step 3. At the top of the Mouse Properties window, switch to the Pointer Options tab.
Step 4. In the Motion section, uncheck the Enhance pointer precision checkbox.
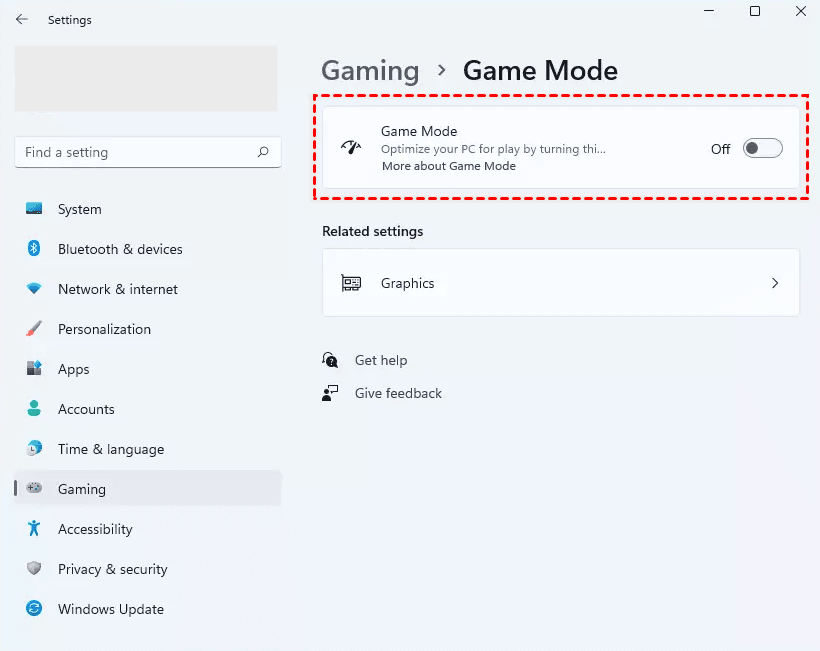
Method 2. Turn on Game Mode
For a long time, the Windows game mode was a feature that didn't help much and could bring negative effects to your computer such as input delays. However, in the last few months, Microsoft started to pay attention to this feature and made some targeted developments, and it has become better in Windows 11.
Without affecting the gaming performance, it is recommended that you turn on this feature to prevent Windows from automatically popping up any notifications, drivers, and updates to maintain a better gaming experience.
Please note: Normally, the game mode is enabled by default, but you may disable this feature due to previous bad performance, so you need to check if this feature is enabled.
Step 1. Use Windows+S to open the search box, type game mode, and click the best comparison.
Step 2. In the game mode setting window, make sure the game mode option in the right panel is turned on.
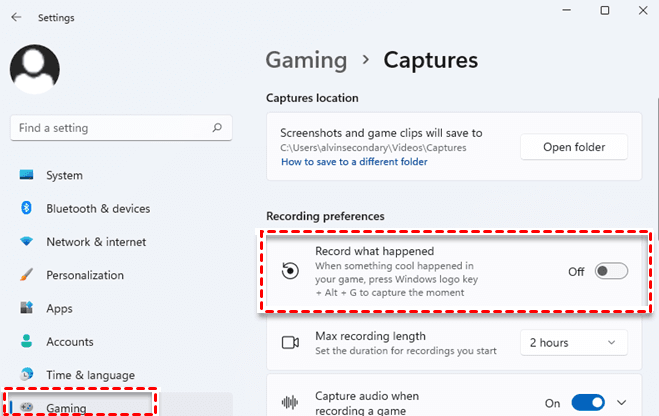
Method 3. Disable the "Record what happened" Option
Nvidia or AMD graphics cards can record the exciting activities happening in the game, so you need to disable similar features built into Windows 11 to prevent conflicts and reduce game performance loss.
Step 1. Open Windows 11 settings, and click Gaming > Captures.
Step 2. In the Captures window, under the Recording preferences section, find and disable the Record What Happened option.
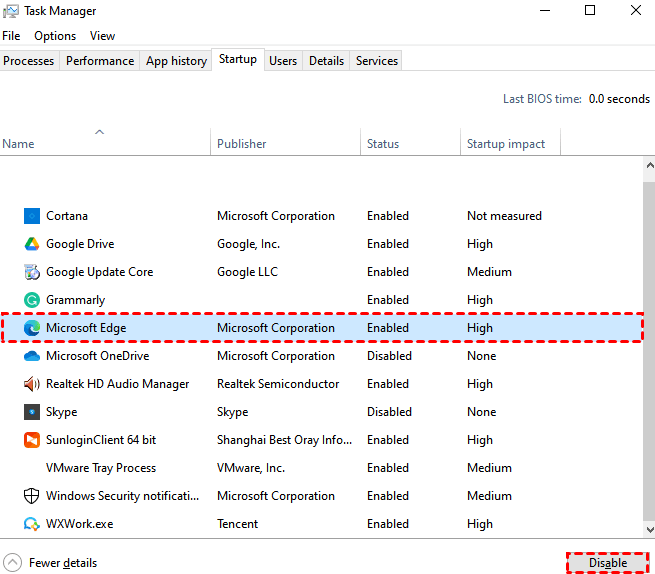
Method 4. Disable Unnecessary Applications in Task Manager
After using your Windows computer for some time, various applications are constantly added to the system and launched secretly at start-up, which will deplete your computer's gaming performance and thus affect the actual gaming experience. For this reason, you need to disable unnecessary applications in the boot.
Step 1. Use ESC+Shift+Ctrl to open Task Manager and switch to the Startup tab at the top.
Step 2. Select the applications unnecessary, click the Disable button in the bottom right corner, and restart your computer.
Method 5. Change the Power Plan
If you are using a laptop computer, be sure to change the power plan, which will effectively improve gaming performance when it is not connected to a power source.
Step 1. Use Windows + S to open the search box, enter the power plan, and click below the settings to select Power Options.
Step 2. Below the Preferred plans, select the power plan you need according to your needs, here we recommend choosing Balanced.

Method 6. Change the GPU Priority for Specific Applications
Desktop computers usually have only one graphics card, so adjusting the GPU priority is not very meaningful. However, most laptop computers have two graphics cards (integrated and discrete), and different graphics cards have a significant impact on gaming performance. Therefore, you need to change the GPU priority for specific applications in Windows 11 to ensure a good gaming experience.
Step 1. Open Windows 11 settings and click System > Display > Graphics.
Step 2. In the list of the graphics window, select the application you want to change the GPU options for, and click the Options button.
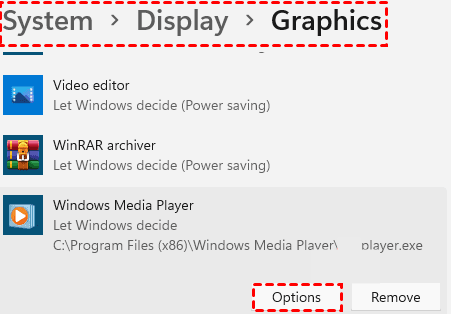
Step 3. In the Graphics preference window, switch to High Performance and click the Save button.
Method 7. Disable VBS
Virtualization-based security (VBS) is a new feature in Windows 10 that enhances system security by virtualizing hardware and software to create an isolated subsystem that can effectively prevent malware from damaging your computer. However, this feature is not friendly to gamers, which will severely impact your gaming performance, reducing the average frame rate of games by up to 28%.
To ensure a good gaming experience, it is recommended that you disable the VBS feature. First, you need to check if VBS is disabled on Windows 11.
Check whether VBS is Disabled or not
Step 1. Use Windows+S to open the search box, type in System Information, and tap the System Information option below the best comparison.
Step 2. In the right panel of the System Information window, find Virtualization-based security to check if VBS is disabled.
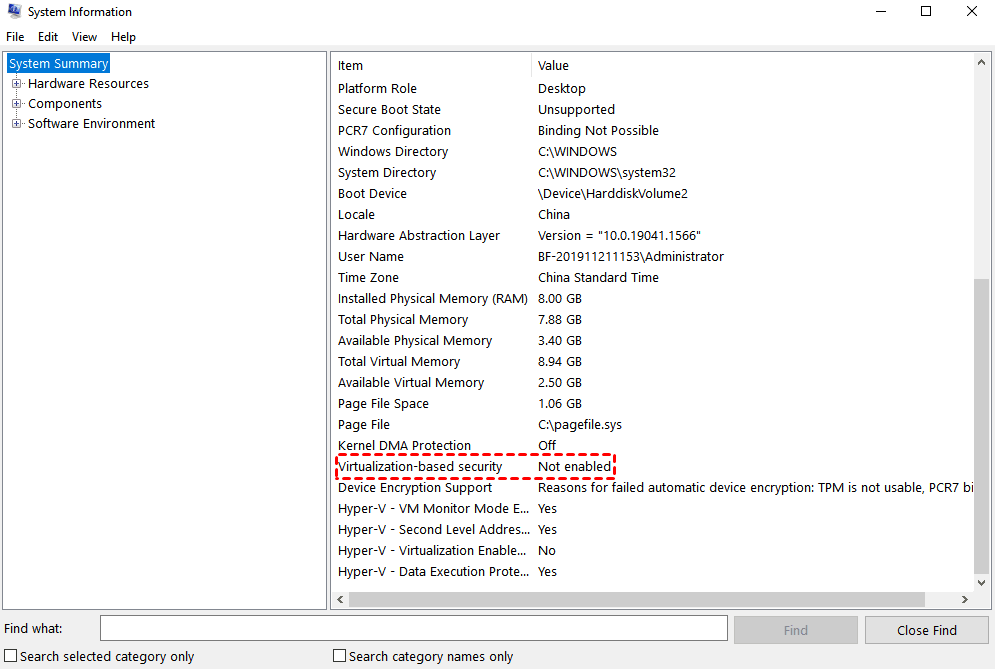
Step 3. If it shows not enabled, you do not need to disable it; if it shows enabled, please click the following two methods to disable it.
Disable VBS from Windows Settings
Step 1. Click on Windows 11 Start Menu button and select Settings from the list of apps. Click on Privacy & Security in the left panel.
Step 2. Click the Windows Security option at the top of the right panel, and select Device Security in the new window that pops up.
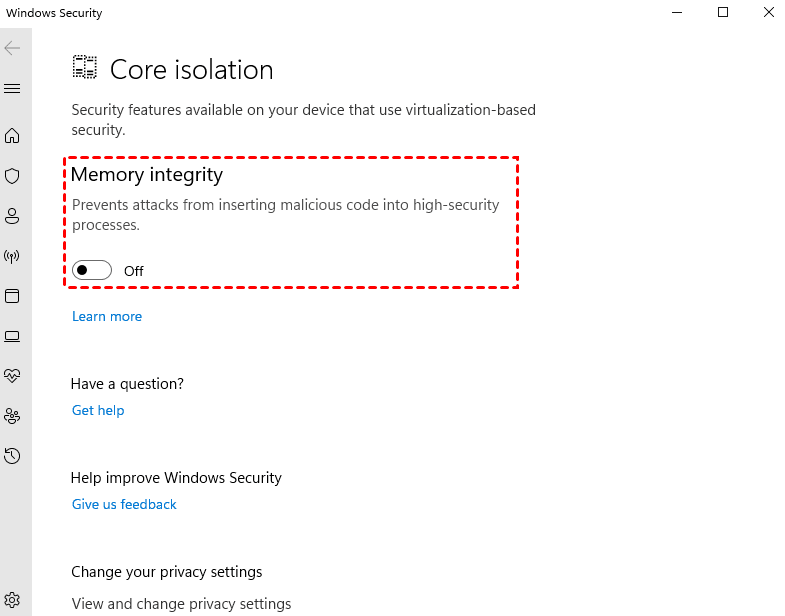
Step 3. In the Device security window, click the Core isolation details button under Core isolation.
Step 4. In the new window that pops up, find the Memory integrity section, you will need to turn this feature off and restart your computer.
Disable VBS from the Registry Editor
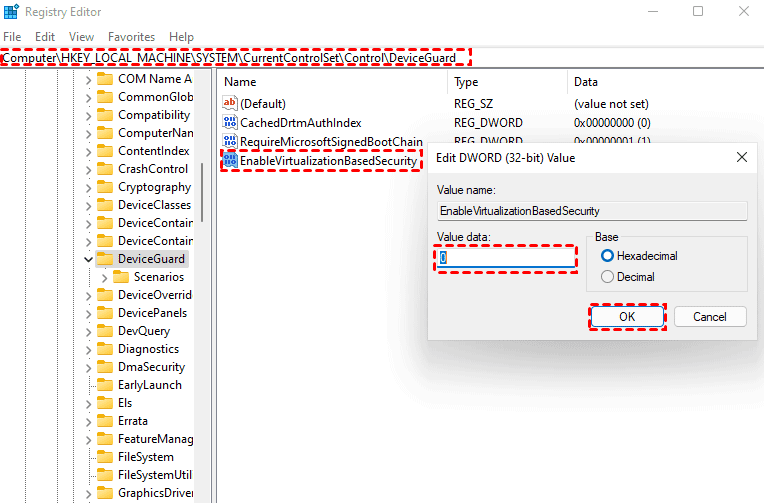
Step 1. Use Windows+R to open the Run window, type regedit, and then click the OK button.
Step 2. Navigate to the following path.
HKEY_LOCAL_MACHINE/System\CurrentControlSet\Control\DeviceGuard
Step 3. In the right panel, find and double-click EnableVirtualizationBasedSecurity to open it, change the value to 0 in the numeric information section, and click the OK button to restart your computer.
Further Reading: Why is Windows 11 Better for Gaming?
Is Windows 11 better than Windows 10 for gaming? Keep in mind that the new Windows 11 brings more performance improvements than Windows 10, including memory management, sleep state recovery, disk footprint, and browser caching. But for gamers, what deserves attention are the 3 new features: Auto HDR, DirectStorage, and Game Pass.
- Auto HDR: Auto HDR (High Dynamic Range Imaging) is simply a feature that is automatically enabled in games that support HDR, which gives a certain degree of visual impact to the game and enhances your gaming experience. However, it also increases the burden on the CPU and graphics card, which will reduce the game frame rate to a certain extent. Overall, the Auto HDR feature is not suitable for all gaming users, especially not for those with relatively low computer configurations.
- DirectStorage: DirectStorage can bypass the CPU to speed up game loading and texture loading, but this feature requires an NVMe SSD. overall, DirectStorage does not make practical sense for gamers with lower computer configurations, but it does serve as a feature to enhance the gaming experience for gamers with higher computer configurations.
- Game Pass: Windows 11 has a built-in Xbox Game Pass, which is a useful feature for console gamers and means you can play more games for cheaper. Overall, Game Pass is only available for console gamers, so if you're an MMO gamer, this feature doesn't make much sense.
Summary
Windows 11 vs Windows 10 gaming, which one is better? It decides on your computer configuration. If you insist on upgrading to Windows 11, this article also provides 7 methods to improve your gaming performance. It is recommended that you use AOMEI Backupper Standard to perform a system backup so that if you are not satisfied with Windows 11, you can always restore to Windows 10 to ensure a better gaming experience.
This software supports running scheduled backups to backup your system regularly, the incremental backup method can improve backup efficiency and save disk space. You can easily backup the system (Windows 11/10/8/7, etc) to different destination locations.
Besides System Backup, AOMEI Backupper Standard will also provide you with features such as File Backup, Disk Backup, and Partition Backup, so that the data on your Windows 10 or Windows 11 computer will be protected in all aspects. If you need to restore backup to multiple computers automatically, you can use AOMEI Image Deploy to help you, which is available in tech and techplus versions.