9 Quick Solutions to “This device is currently in use” Error
This article explores common causes of this error and provides effective solutions for resolving it. Additionally, we will look at tools like AOMEI Backupper for ensuring data safety and security. The article also includes a detailed FAQ section, answering related questions that users may have when encountering this problem.
By Sebastian Updated on August 28, 2025
What caused the error: This device is currently in use
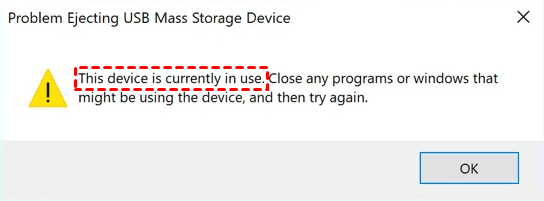
When you want to eject the removable device from the computer, the following error message appears on the computer: This device is currently in use. Close any programs or windows that might be using the device, and then try again.
Normally, this error will appear when you try to eject the device from the computer without completely turning off the removable device, or when you are using some files of the removable device. But sometimes even if we close all devices and files, this error will also appear and you cannot eject the device.
The reasons for this error are as follows:
✿ Some files in removable devices are used by programs on the computer.
✿ Some software or programs are accessing removable devices in the background of the computer, such as Windows security software, antivirus software, etc.
Suggestion: Back up important data on removable devices in advance
When you tried to eject the removable device on the computer, the error message "The device is currently in use" appeared on the screen. You may unplug the removable device from the computer directly. However, the consequences of doing so may cause damage to the removable device or loss of data.
In order to prevent data loss, I suggest you use AOMEI Backupper Standard to back up the data in the device in advance. It is a simple free backup software, take a quick look at its outstanding features.

- Flexible backup types: It provides you with multiple backup methods, such as system backup, disk backup, file backup, and partition backup.
- Various backup modes: You can set up automatic backups in Daily/Weekly/Monthly/ Event-triggers and USB plug-in mode.
- Customized backup methods: It can also back up your computer with Full Backup, Incremental, and Differential Backup.
- High compatibility: It supports Windows 11/10/8/7/Vista. It enables you to back up to different locations, such as local disks, USB flash drives, SSDs, NAS, network locations, etc.
Before performing a backup, please download AOMEI Backupper Standard:
Perform file backup step-by-step
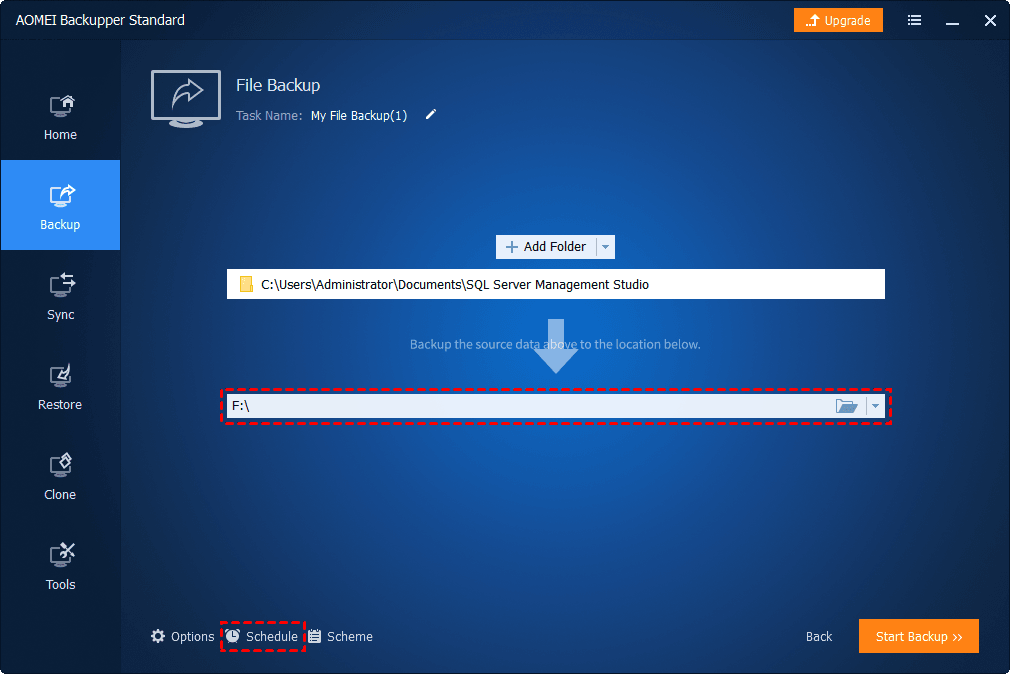
Step 1. Launch AOMEI Backupper. Choose Backup in the left panel, and then select File Backup.

Step 2. Click Select Source > Add Folder or Add File (single or multiple files or folders can be added).

Step 3. Choose a destination path to back up your files. You can click Schedule Backup to set up a scheduled backup and then click Start Backup.
Tips✍:
❀ Options: You can write a note for your backup and check the Email notification option here. If you want to encrypt your backups, please upgrade to higher editions. More advanced features are provided in these higher editions.
❀ Backup Scheme: You can click this button to configure the backup rotation scheme and settings, which can help you save storage space (available after the upgrade).
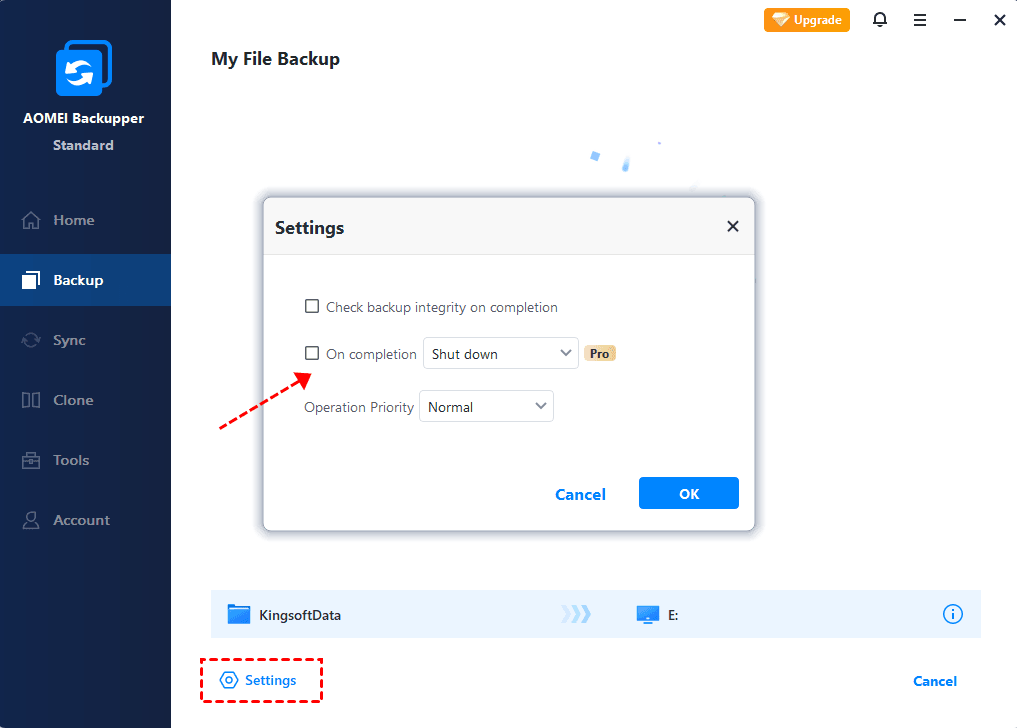
Step 4. When the backup is executed, you can click the icon in the lower left corner to set the computer to Shut down/Restart/Hibernate/Sleep after the backup is complete.
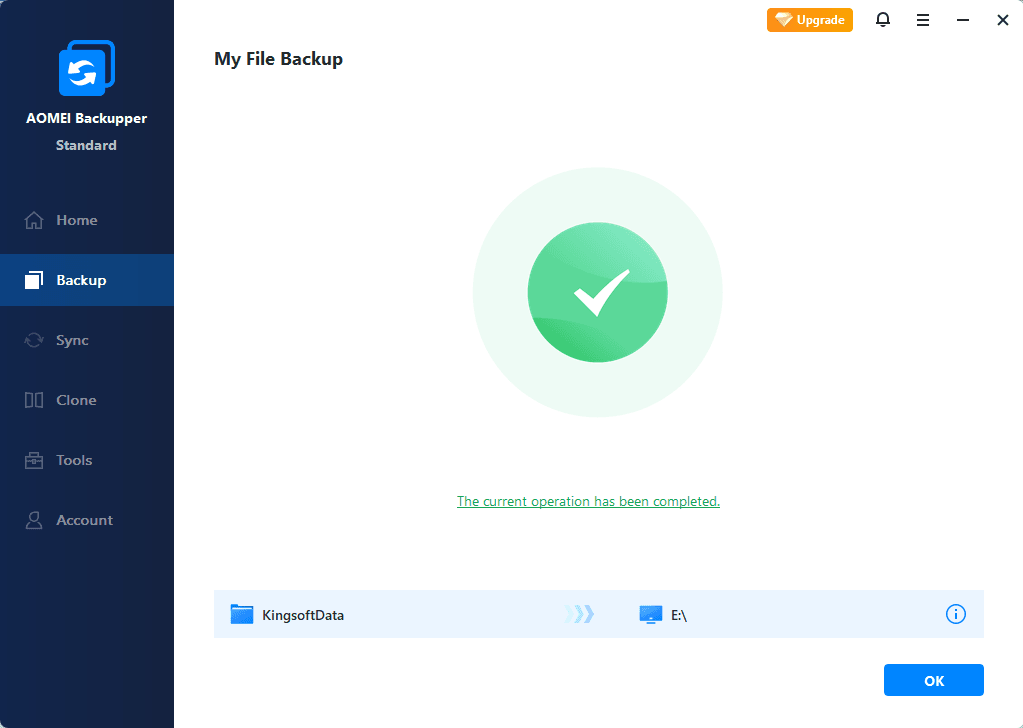
Step 5. Click OK after the operation is done successfully.
Tips:
- This feature works well if you want to backup large files or happen to encounter a file that is too large to copy to an external hard drive error. Its Splitting feature will split backup image to fit on the target disk automatically.
- AOMEI Backupper supports multiple backup destinations. For users who want to backup folders to cloud drives like Google Drive, but with a few GB of cloud storage, you could try AOMEI Cloud. It offers you 1TB free storage from the time you sign up until 15 days.
How to fix the “This device is currently in use” error
As the reasons mentioned above, your computer will pop up an error that the device is currently in use. If you forcibly unplug the removable device from the computer, the device may not be recognized when it is plugged into the computer next time, or may be damaged, or the data on it will be lost, etc.
Therefore, the following 9 solutions can help you with this problem. Before performing the following repair methods, you can use the backup software mentioned in the next section to back up the data on your removable device to prevent data loss during the repair process.
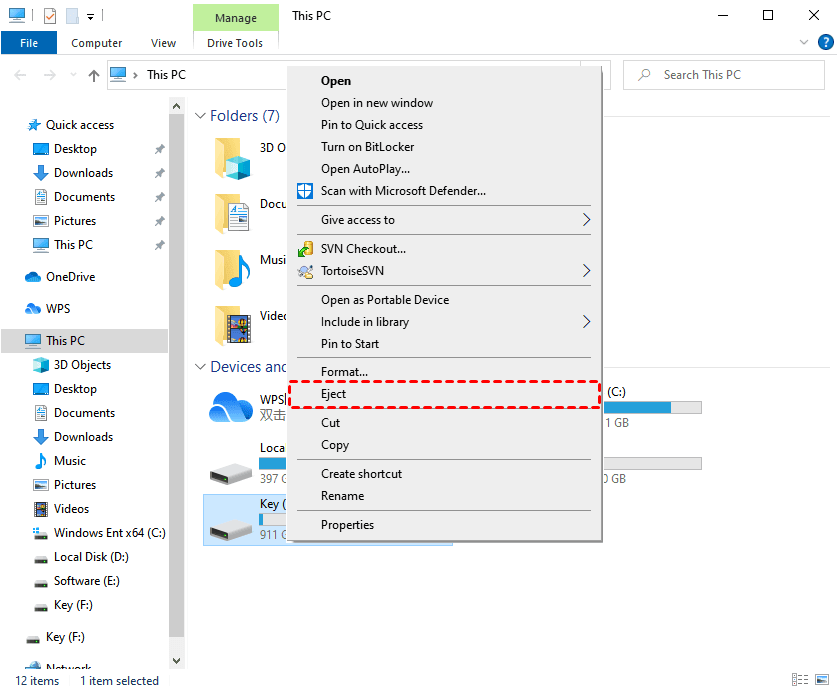
Solution 1: Eject the removable device using “This PC”🔥
Double-click "This PC", and then right-click on your removable device. Select Eject to remove your removable device.
Solution 2: Log off or shut down the computer🔥
Logging off will close all files and applications you're currently using. You can press Ctrl+ Alt+Delete to sign out of your computer.
If all the above methods fail to eject your removable device, you can remove your removable device by shutting down the computer.
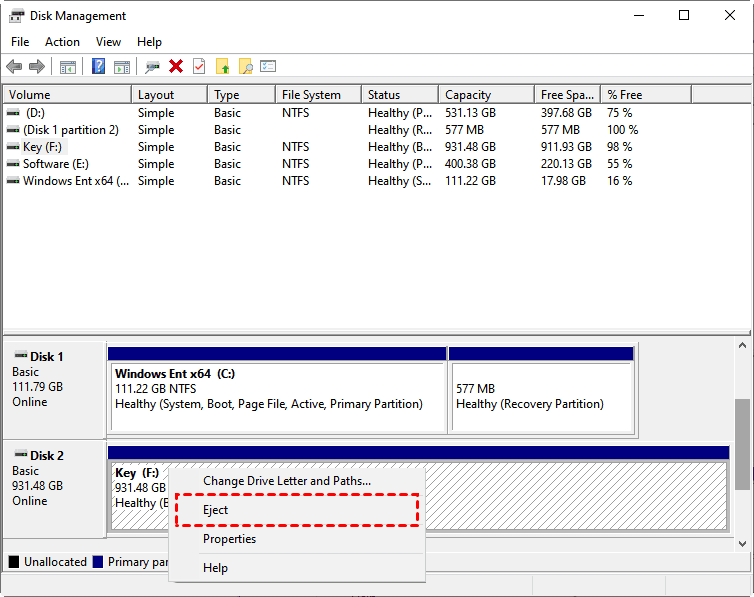
Solution 3: Remove the removable device using Disk Management🔥
- Press Win+R to open the Run window, type diskmgmt.msc and press Enter to open Disk Management.
- Find the removable device that needs to be removed, right-click it, and then click Eject.
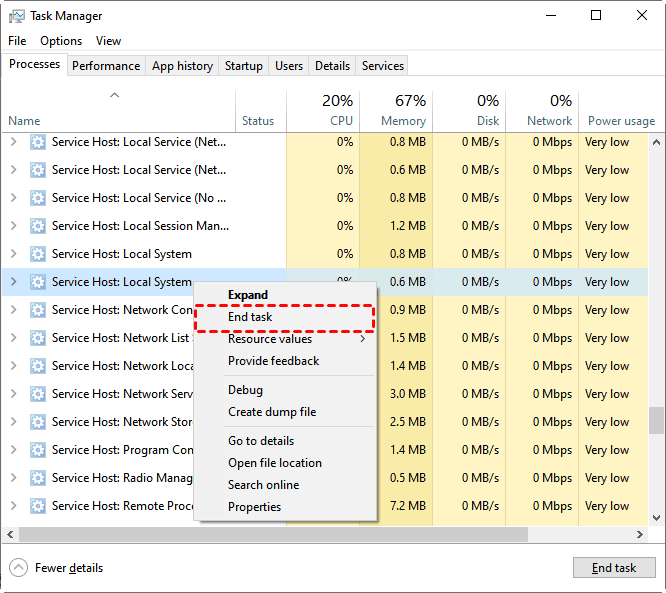
Solution 4: Eject the removable device using Task Manager
Press Ctrl+Shift+Del to pop up the Task Manager, under the Processes tab, find your removable device, right-click, and choose End task.
Solution 5: Close all open files and programs on the computer
If the “This device is currently in use” error appears on your Windows 10 computer, try closing all files and programs on it. Then try to eject the removable device safely from the computer. Or you can refresh the desktop a few more times, and then try to eject the removable device.
Solution 6: Disable computer security software temporarily
Some security software installed on your Windows 10 computer will access your removable device in the background, so you need to disable them temporarily, and then try again to see if you can safely eject the removable device.
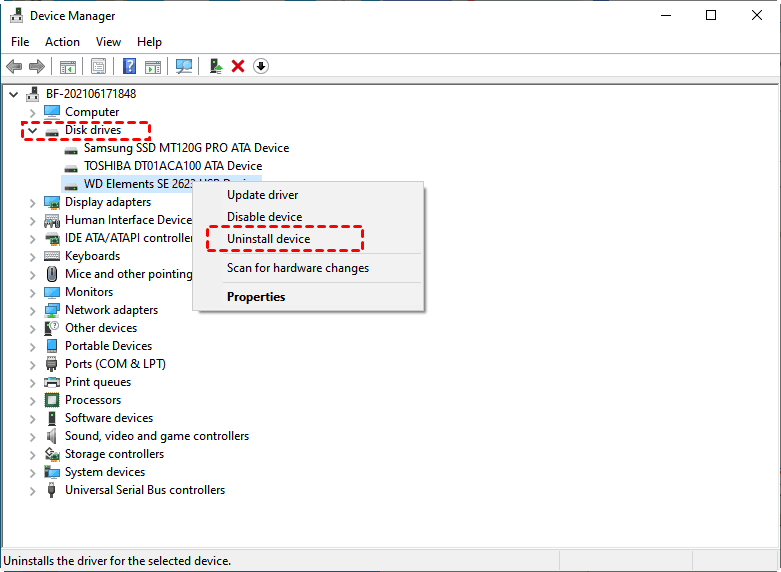
Solution 7: Eject the removable device using Device Manager
- Search for Device Manager in the search box in the lower left corner, and then click to open it.

- In the device list, find the Disk drives category, and click to expand it. Then find the removable device you need to remove, right-click it, and select Uninstall device. After the uninstallation is complete, try again to see if the removable device can be ejected from the computer.
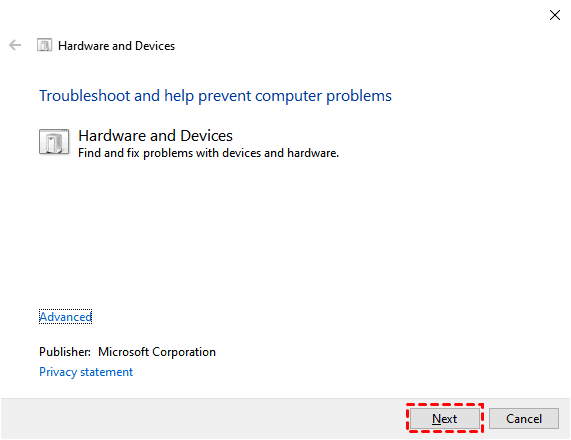
Solution 8: Troubleshoot a removable device via Hardware and Devices
- Press Win+R to open the Run window, type msdt.exe -id DeviceDiagnostic to open Hardware and Devices, and then click Next.
- Select the removable device you need to remove, and the system will automatically perform troubleshooting.
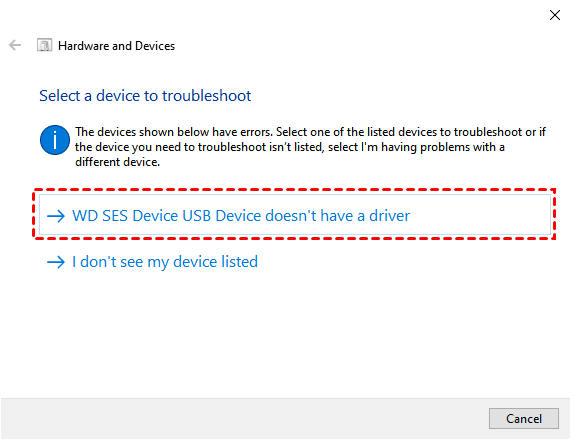
- After the troubleshooting is complete, you can try again to see if the removable device can be ejected.
Solution 9: Remove the removable device using Diskpart
Diskpart is a powerful tool that allows the removable device to enter an offline state, which is equivalent to directly closing all files on the drive.
- Search for CMD in the search box and right-click it to select Run as administrator. Type the command Diskpart in the window, and then press Enter.
- Type list disk and press Enter to open the disk list.
- Type select disk X (“X” should be the removable device you need to go offline), and press Enter.
- Type offline disk to make the selected removable device offline.

- After completing the above operations, try again to see if the removable device can be ejected.
Note✍: This method will directly put the removable device into the offline state. When you reconnect the removable device to the computer, it will still be offline. To change the removable device online, you can press Win+R to open the Run window, type diskmgmt.msc to open Disk Management, and find your removable device. Right-click on the left side of the device and select Online.
Conclusion
As you can see, the above are 9 solutions to help you with the “This device is currently in use” error. Hope these methods can help you get out of trouble. If you haven’t had time to back up the important data in your removable device, I recommend you to use AOMEI Backupper Standard.
In addition to the backup function, it is also flexible software. You can use it to wipe disks, create bootable USB drives, clone hard drives, create a recovery environment, etc. You can use it right now to discover more useful functions!