How to Backup SQL Server Database to NAS
How to backup SQL Server database to NAS directly? This post will offer 3 ways to backup SQL databases to a Synology, Qnap, and other NAS drive.
By Dylan / Updated on June 14, 2024
Can you backup SQL Server database to NAS drive?
I made a maintenance plan before to backup my MS SQL database. But now, I need to backup my database to my NAS drive. But when I made a backup with SSMS, I couldn't find my NAS drive. So can SQL Server Management Studio backup MS SQL database? Or is there another way to perform SQL server backup to NAS drive?
NAS devices enable multiple network-connected clients to store and share files with quick access - no wonder some users want to backup SQL Server database to NAS as a protection strategy. However, when you try to backup SQL in SSMS, you will find no network path in the destination list.
That's because to backup SQL database to network location, first you need to enter the correct UNC path manually. It should contain the server name and folder name, like \\server\sharefolder or \\ip\sharefolder.
If you map a network folder as a drive and use its drive letter as the path, you will most likely receive Operating system error 3 (The system cannot find the path specified).
Don't worry, SSMS can do SQL backup to a NAS or network shared drive. You can follow the steps below to know how to perform it. Also, we will introduce an easier way to backup MS SQL database to a NAS.
Method 1. Make SQL Server backup to NAS with SSMS
SQL Server Management Studio (SSMS) is an integrated environment for managing any SQL infrastructure. It offers a way to create a maintenance plan for SQL server.
Let me give you an example here to show you how it works, but the steps, but the steps are a little bit complicated, if you need an easier way, you can refer to the next part.
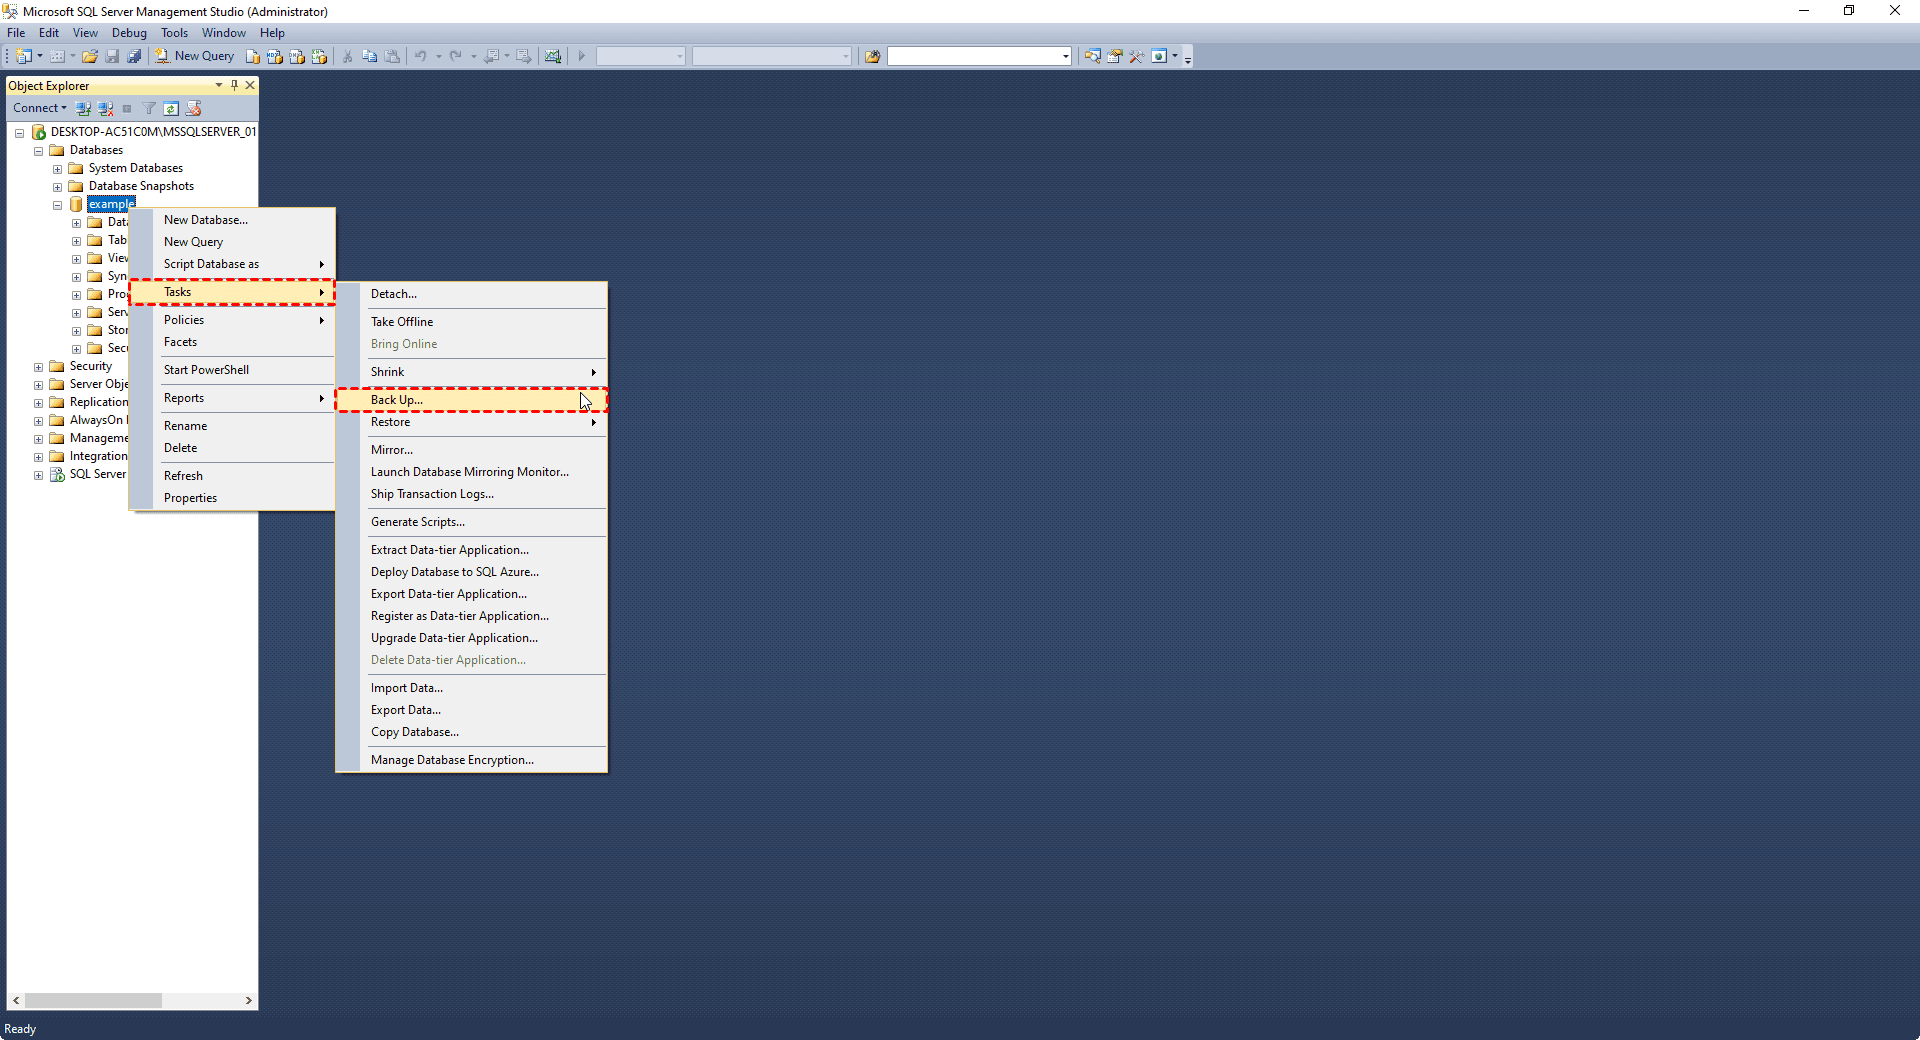
Step 1. Run SSMS, and enter backup program
On Microsoft SQL Server Management Studio, Right-click the database you want to back up and choose Tasks > Back Up.
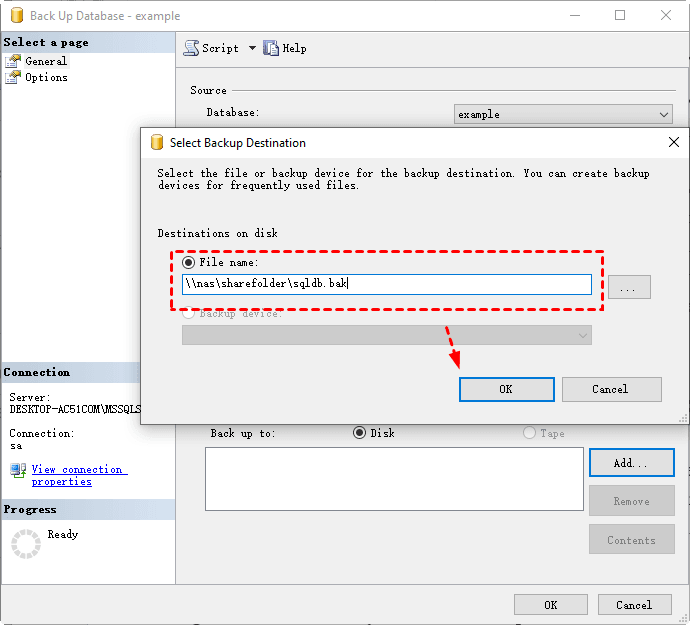
Step 2. Choose a NAS drive as the destination and configure other settings
Now your can configure the backup settings. Remove the default destination to Add a new one.
Please do not click the … icon to select the destination. Instead, type the UNC path plus the backup file name in the popping out window. In my case, the backup destination is "\\nas\sharefolder\sqldb.bak”.
Alternatively, you could replace the nas name with the IP address, like “\\192.168.0.x\sharefolder\sqldb.bak”.
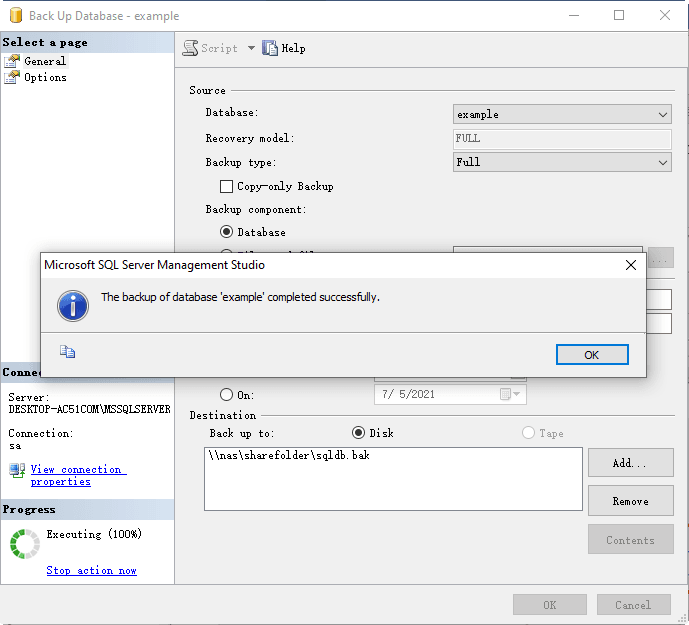
Step 3. Commit backup task
Click OK to run the backup. You can see it completed successfully.
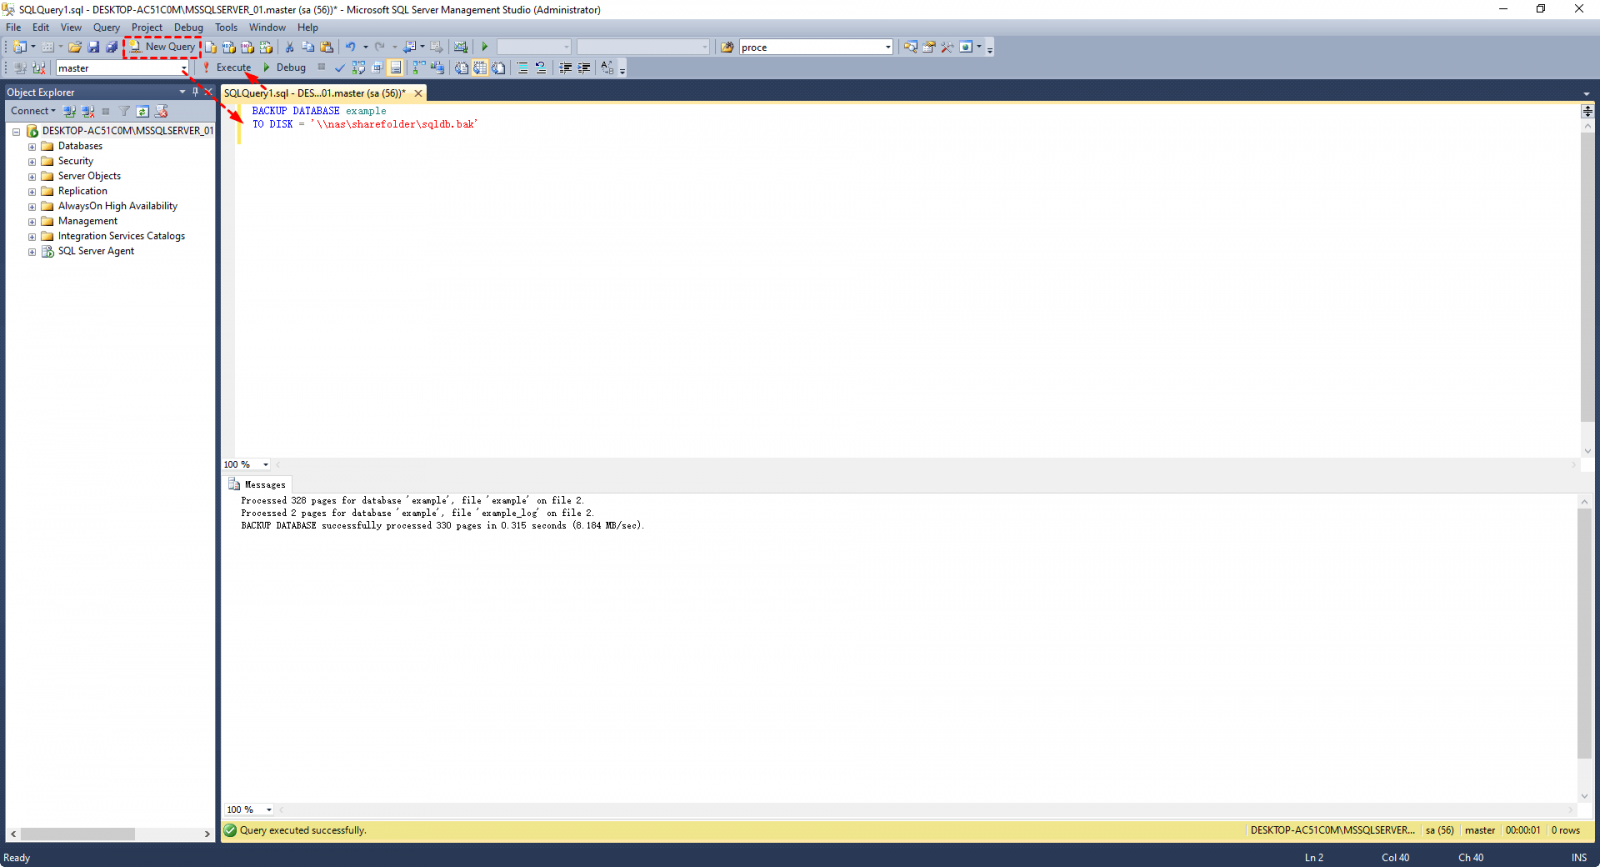
Similarly, you can use T-SQL to perform the SQL backup to NAS. Click New Query > enter the following commands > then Execute it.
TO DISK = '\\nas\sharefolder\sqldb.bak'
*Replace the database name and NAS path with yours.
Related Tips:
✎ If you want to automatically execute SQL Server backup to NAS, you could combine this tip with Maintenance Plans, SQL Server Agent or batch file (please refer to auto backup SQL database). Just remember always use the UNC path of a network location.
✎ To fix Operating system error 5, please refer to SQL Server backup to network share access denied.
Method 2. Backup SQL database to Synology NAS with Active Backup for Businesss
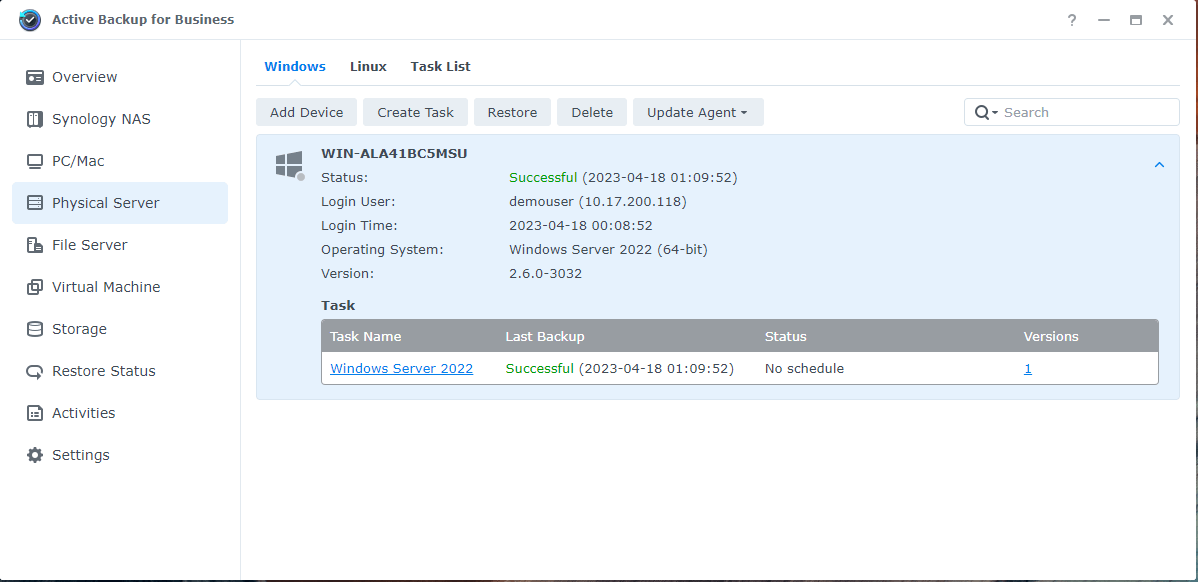
Active Backup for Business is a backup method provided by Synology. It helps you create a backup for physical and virtual machines. So If you are using Synology NAS, you can backup your physical computer or machines, which includes your SQL database.
To backup a Windows physic server running SQL
Step 1. Download Active Backup for Business, install, and run it.
Step 2. Select Physical Server on the left pane > Click Windows > Add Device and download the 32-bit or 64-bit installer for the device.
Step 3. Go to Synology Download Center, select your product model, and download the Synology Active Backup for Business Agent.
Step 4. On the Active Backup for Business, choose the connected Server. Then click Create Task and configure the task settings. > click Create Task > Then follow the instruction to configure your backup task.
To backup a Windows virtual machine running SQL
Step 1. Select Virtual Machine option on Active Backup for Business.
Step 2. Click Manage Hypervisor and add a host.
Step 3. Then select the host > click Create Task. Then follow the backup wizard to create a backup task.

Method 3. Easiest way to backup (multiple) SQL databases to all NAS / network share
The methods mentioned are effective for backing up SQL databases, but SQL Server Management Studio (SSMS) can only back up one database at a time, and sometimes you might run into issues while using SSMS. Additionally, Active Backup for Business is designed for Synology NAS backups.
So, is there a better solution for SQL backups? Yes, there is. We recommend AOMEI Cyber Backup, a centralized SQL backup software that can manage all SQL databases on a local network. It allows you to back up and restore SQL Server databases from versions 2005 to 2022 without errors. With this tool, you can easily back up all Microsoft SQL databases to Synology or other NAS drives.
And it owns many helpful advanced features to meet different backup demands:
📌 Automatic Backup: It allows users to set up a backup schedule to run backup tasks automatically. You can choose to run full, incremental and differential backups.
📌 Role-based management: With an administrator account, you can create more sub-accounts with different permissions. So you can assign other team members as viewers, monitors, and operators.
📌 Backup to all locations: besides backing up to NAS drive, AOMEI Cyber Backup enables users to backup SQL to other remote locations, like network share, mapped drive, local or an external storage. And you an also backup to Amazon S3 bucket.
Have a try on the 30-day free trial:
The steps below guide you through setting up and running backups from SQL Server to a NAS:
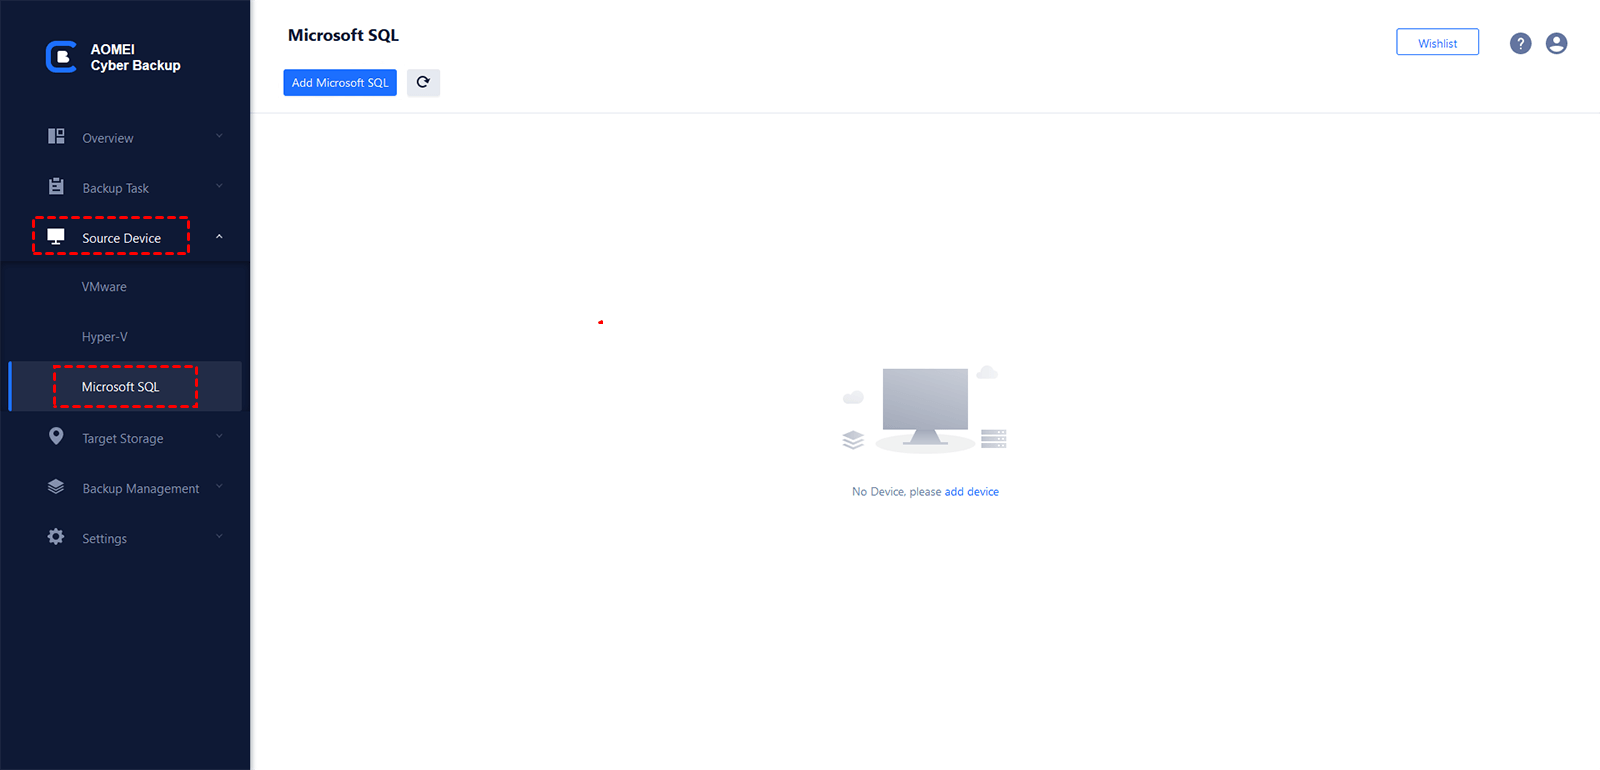
Step 1. Run AOMEI Cyber Backup and add Microsoft SQL.
To set up the SQL backup software: run the installed program and navigate to Source Device -> Microsoft SQL -> Add Microsoft SQL.
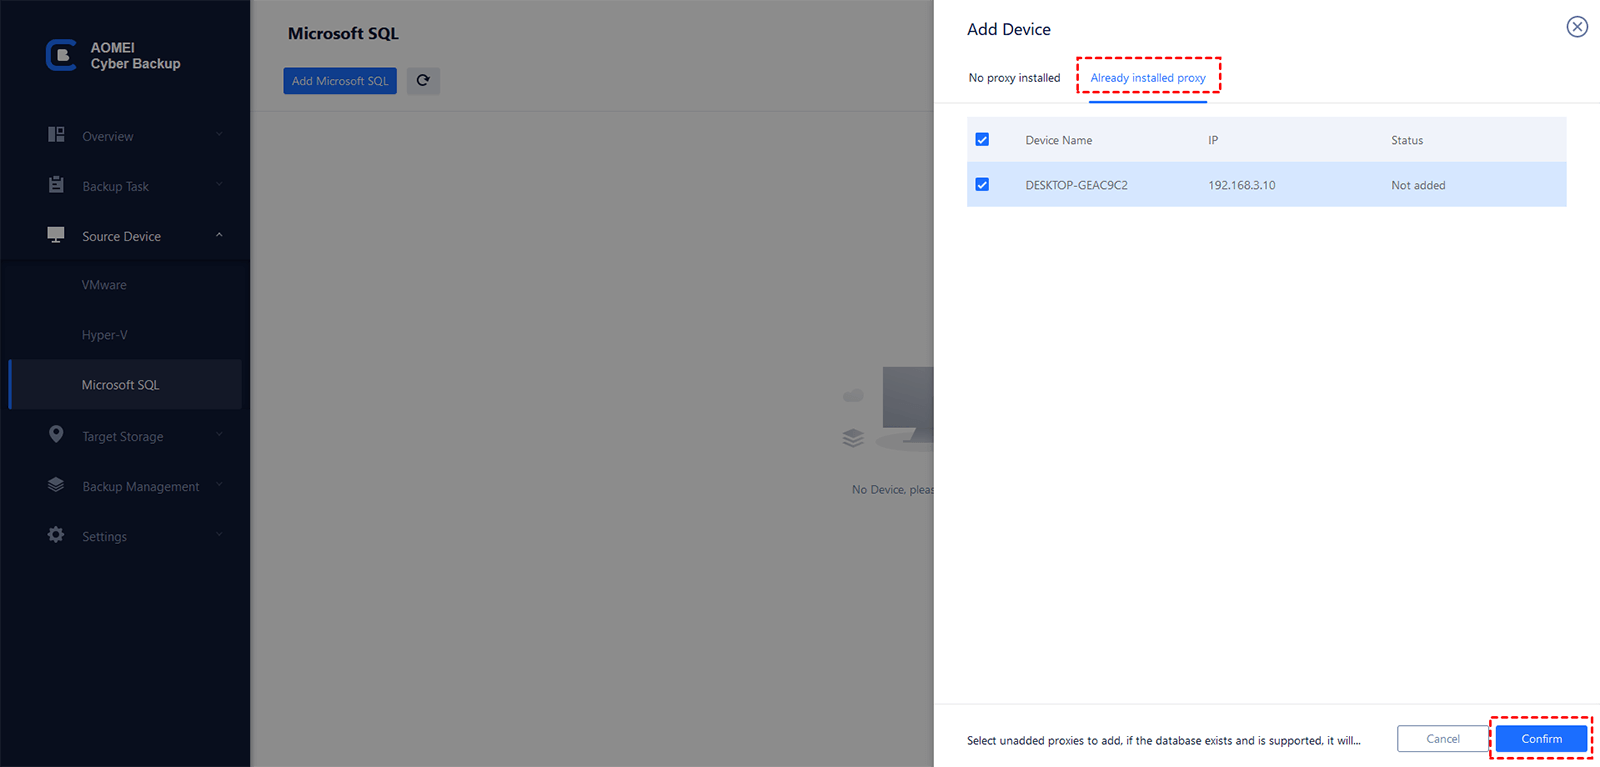
▶Otherwise, you can click Add Microsoft SQL > Download proxy program or Copy link to install the program on the device with SQL Server installed. Then click "Already installed proxy" and select the device and hit Confirm button.
After that, click ![]() -> Authentication to validate the database instance.
-> Authentication to validate the database instance.
Step 2. Run a SQL backup task
Click Backup Task on the left column of the interface, and click Backup Task > Create New Task. When the Create New Task appears, select the Backup Type as Microsoft SQL Backup.
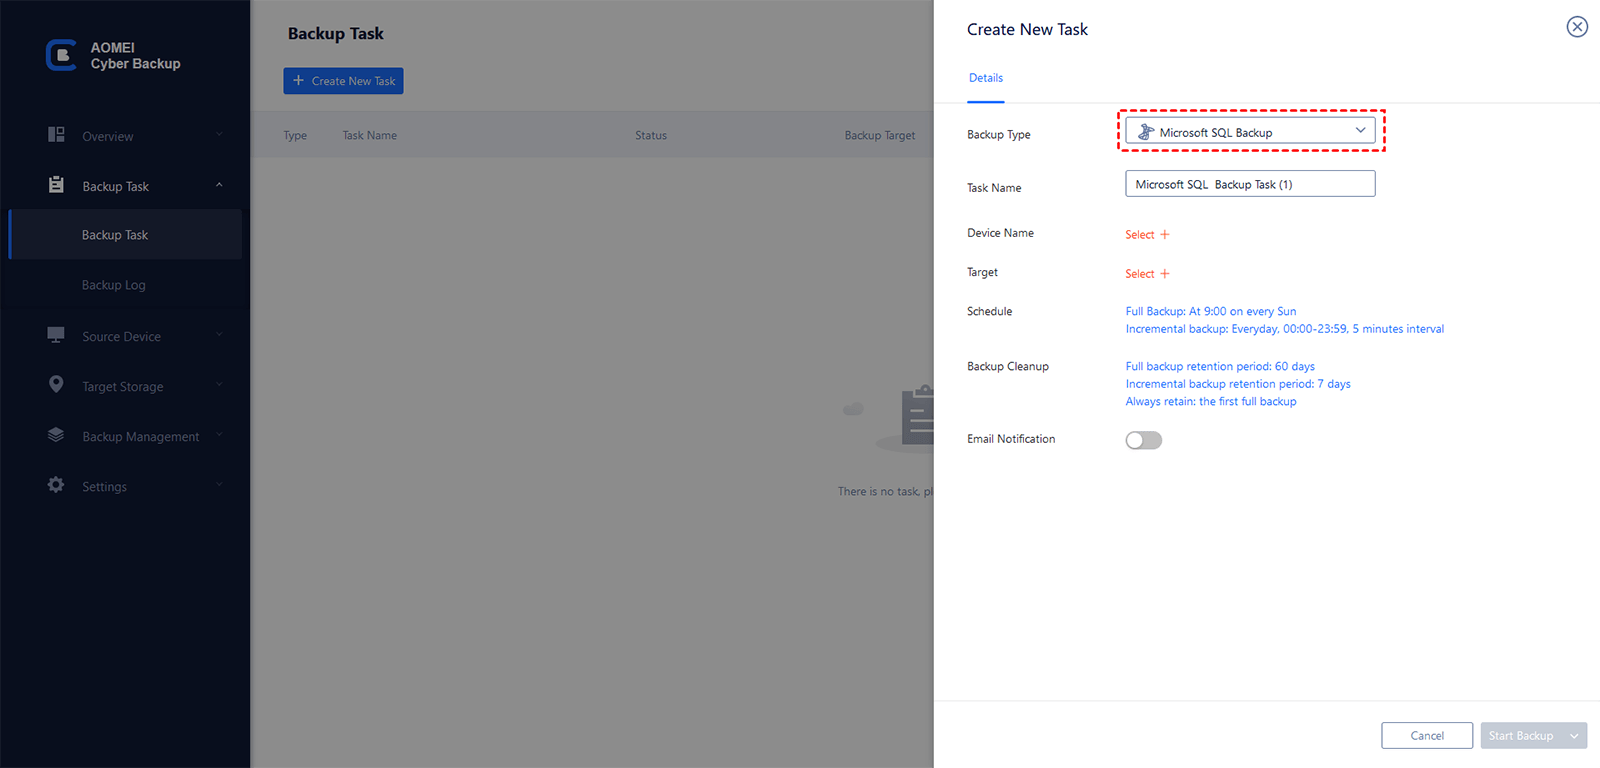
Step 3. Configure the backup settings
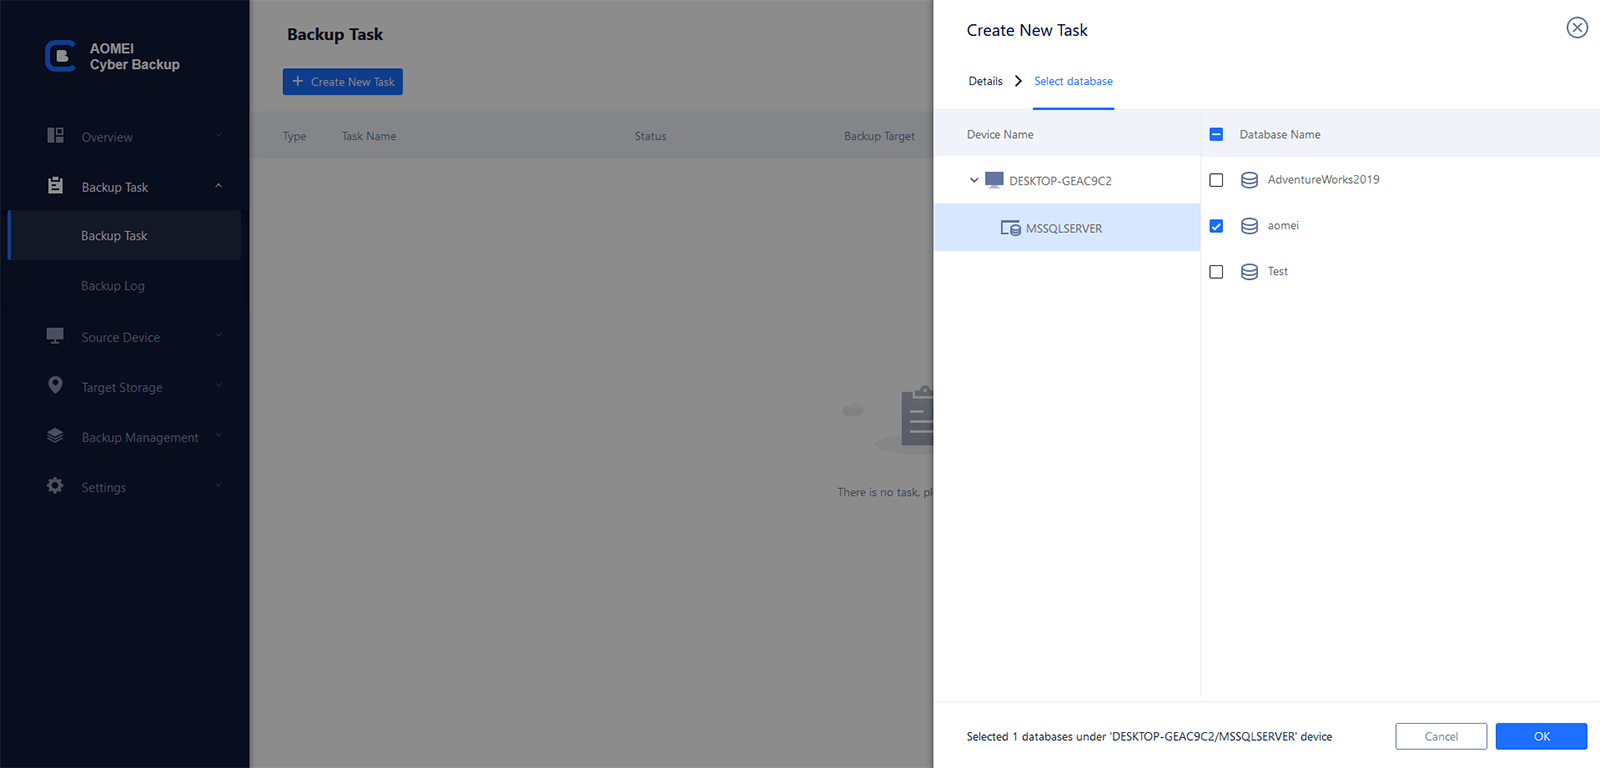
Click on Device Name to select the SQL instance and databases you want to backup. You can select one or multiple databases flexibly.
To back up SQL database to NAS, you could click Add a new network storage to add it. The saved path will be listed in Add storage.

Set up a Schedule (optional) to run the SQL database backup daily/weekly/monthly, and set the backup method as Full/Incremental/Differential.
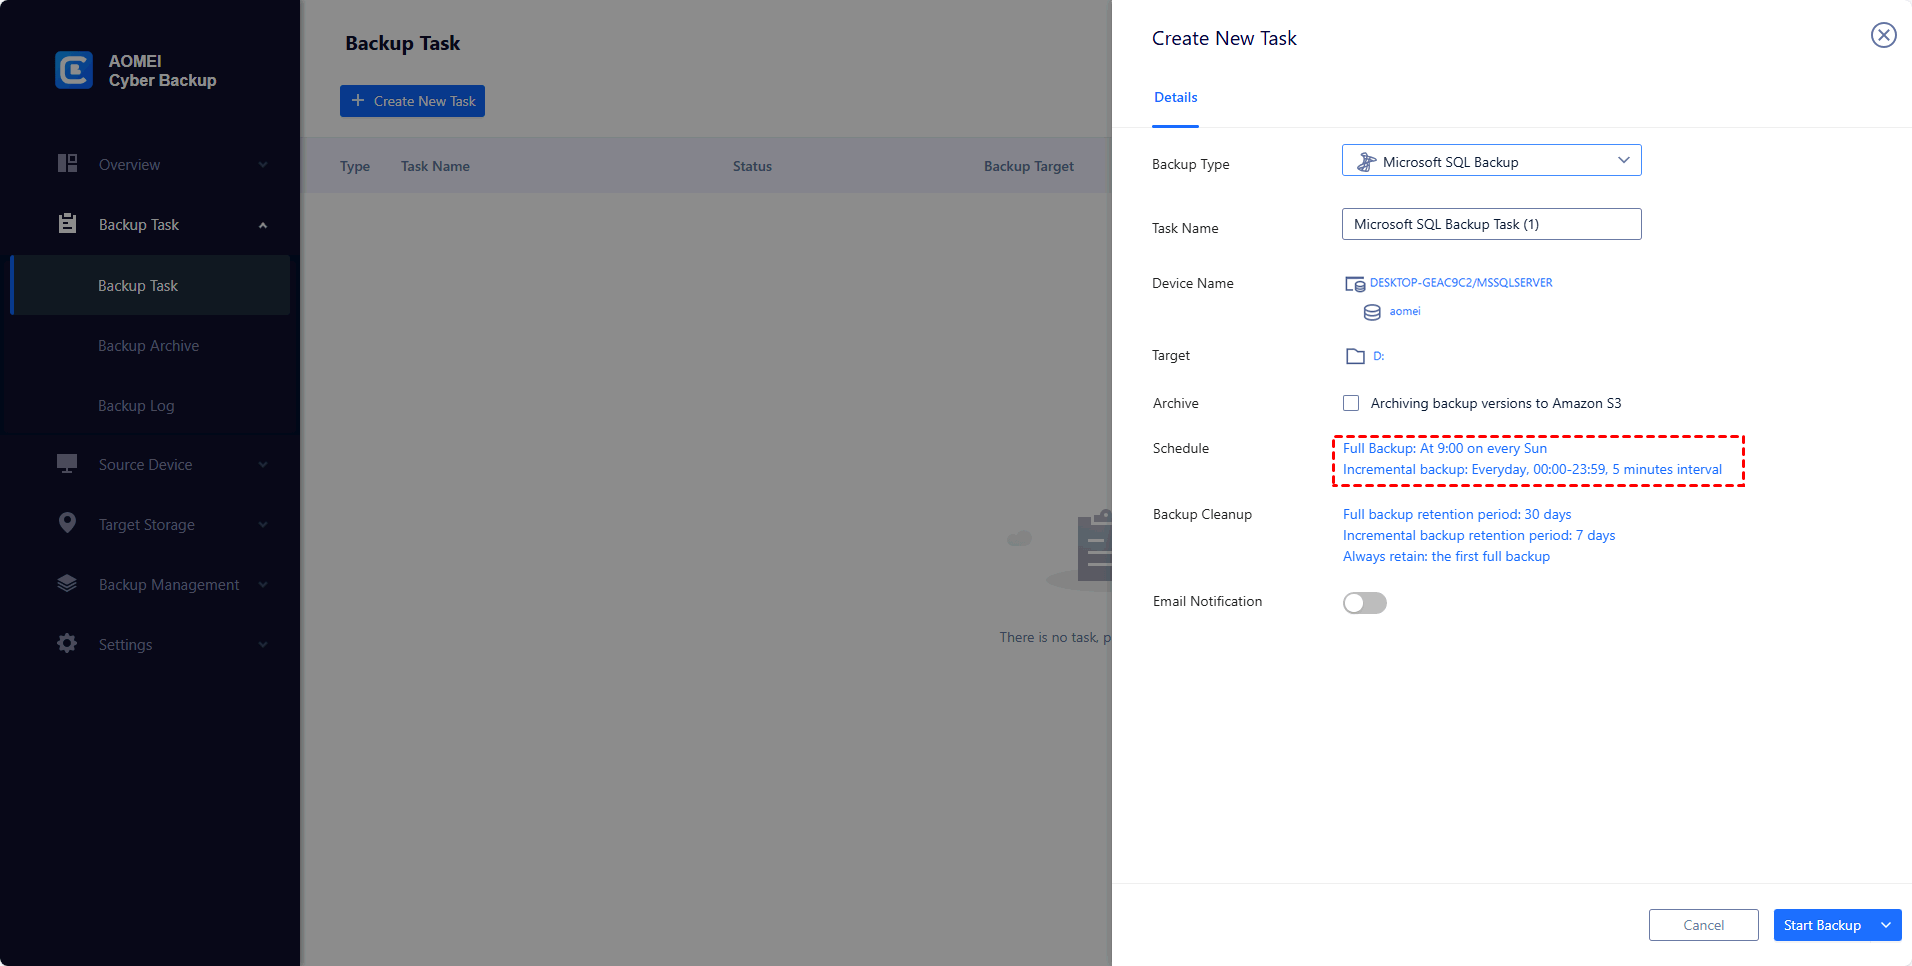
✍More useful features:
- Backup Cleanup helps you to delete older backup version automatically and therefore save storage space.
- Email Notification enables you to receive email notifications when the task is abnormal or successful.
- Archive helps you archive backups to a Cloud storage - Amazon S3 object storage after execute a backup.
Step 4. Commit the SQL backup task
Now you can click Start Backup to create and execute the SQL database backup.
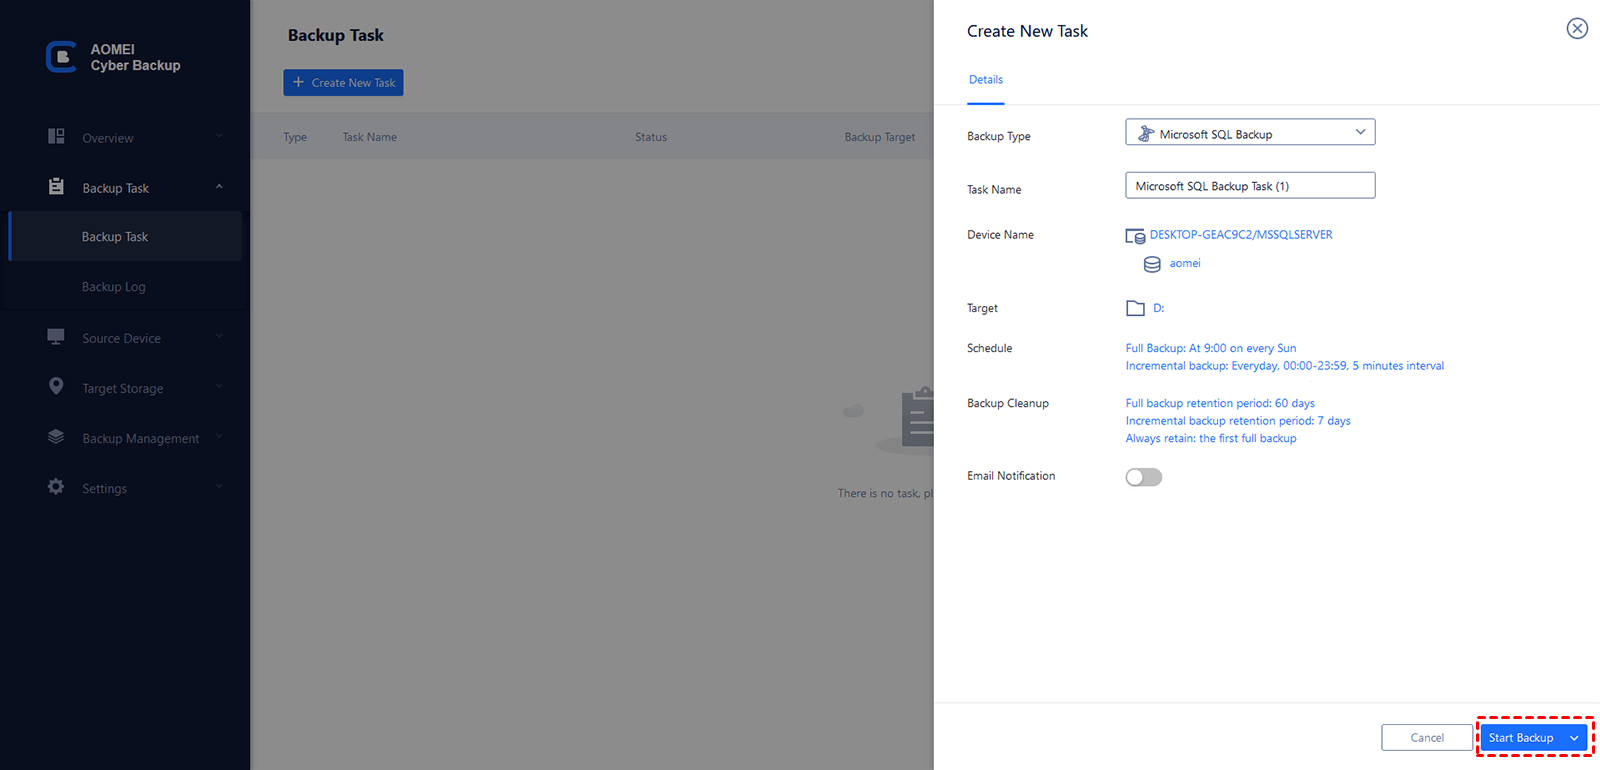
Once the task is created, it will be listed in Backup Task tab. You can edit or restore from it anytime you need. With the centralized backup and restore feature, you can also backup SQL database to another server easily.
FAQ about Backing Up SQL Server to NAS
Q: What are the prerequisites for backing up SQL Server to a NAS?
A: Before backing up to a NAS, ensure that:
-
The NAS is accessible from the SQL Server (via network mapping or UNC path).
-
The SQL Server service account has read/write permissions to the NAS folder.
-
You have sufficient storage space on the NAS for the backups.
Q: What common issues might I encounter when backing up SQL Server to a NAS?
A: Some common issues include:
-
Permission errors: If SQL Server doesn't have the correct permissions, it won't be able to write to the NAS.
-
Network issues: If there's a problem with network connectivity, the backup might fail.
-
Storage space: Ensure the NAS has enough space for your backups.
Q: Is it possible to compress SQL Server backups to save space on the NAS?
A: Yes, AOMEI Cyber Backup offer compressed SQL Server backup to reduce the file size, which helps save space on the NAS.
Conclusion
This is how to perform SQL server backup to NAS drive. You can use SSMS, active backup for business, or AOMEI Cyber Backup to protect your MS SQL database.
By contrast, AOMEI Cyber Backup is better in most conditions. It supports you to backup SQL Server database to NAS drive, and set up a schedule to automate it. What’s more, you can even backup SQL database and restore to another server within several simple steps.