2 Scenarios to Disable Low Disk Space Warnings in Windows 10
You can learn two methods to disable low disk space warning in Windows 10, and provides 7 methods to completely solve the problem as well as the simple method of disk cloning.
By Clytze Updated on September 14, 2024
User Case: Low Disk Space Warning in Windows 10
"I have an old laptop from 6 years ago, after rebooting yesterday, every 10 minutes or so I get a warning message on the local disk (D:): Not enough disk space. I have purchased it on the web I have a new high-capacity hard drive to expand the storage space, but I am afraid it will be a while before it arrives home, can anyone tell me how to disable this annoying warning during this time? It pops up frequently and has seriously affected the normal use of the computer."
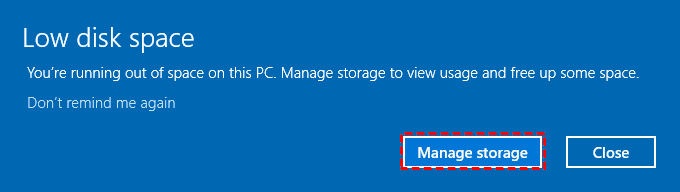
Normally, Windows 10 will check the disk space every 10 minutes, when it detects that your computer disk space is lower than 200MB, you will get a warning from the Windows system: Low Disk Space on Drive or You are running out of disk space on Local Disk. At the same time, the warning can actually be divided into the following 3 cases:
- When the available storage space is lower than 200MB, the user will receive a 10-second pop-up warning: You are running out of disk space, only once per session.
- When the available storage space falls below 80MB, the user will receive a 30-second pop-up warning: You are running very low on disk space, once every four hours, twice per session.
- When the available storage space is lower than 50MB, the user will receive a 30-second pop-up warning: You are running very low on disk space, every 5 minutes until the available storage space exceeds 50MB.
While the warning from Windows 10 is a well-meaning reminder, it can get annoying if you're busy working or gaming. Fortunately, here you provide a tutorial on how to disable the "low disk space" warning in Windows 10, please refer to the following method to do it.
Two Scenarios to Disable "Low Disk Space" Warnings in Windows 10
If you happen to be having a headache with the Windows "insufficient disk space" warning, try the following two methods to disable the warning pop-up so that you can concentrate on using your computer.
- Use the login editor
- Delete drive letter
Method 1. Use the login editor
The login editor is a database of the Windows system that contains important information about system hardware, installation programs and settings, and all user account files on the computer. "warn. Please note that editing the login program incorrectly may cause the system to crash or the computer to not start properly, it is recommended that you make a system backup before proceeding.
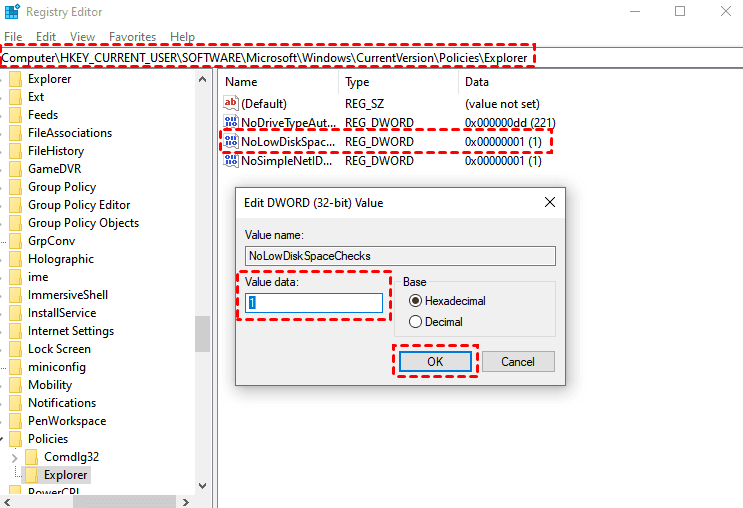
- Use Windows+R to open the execution window, type regedit and press Enter.
- In the Login Editor window, navigate to the following path:
Computer\HKEY_CURRENT_USER\Software\Microsoft\Windows\CurrentVersion\Policies\Explorer
- Right-click on an empty area of the right panel, click Add and select DWORD (32-bit) value from the expanded menu.
- Name the new DWORD value NoLowDiscSpaceChecks and double-tap to open it.
- Change the value data to 1 and click the OK button.
Note: If you do not find the Explorer sub-item in the Policies item, you can directly right-click on the Policies, add a new code, name it Explorer, and then follow the steps above.
Method 2. Delete the drive letter
If your computer has an earlier version of Windows 10 (such as version 1803), you may have encountered a known system bug. This bug will cause hidden partitions to be incorrectly assigned drive letters and cause the "insufficient disk space" issue to pop up frequently. At this point, you can delete the drive letter via CMD or Disk Management for the purpose of disabling the "Insufficient Disk Space" warning in Windows 10.
Remove drive letter from Disk Management
- Use Windows+R to open the execution window, type diskmgmt.msc and press Enter.
- In the Disk Management window, right-click the drive whose letter needs to be deleted, and select Change Drive Letter and Paths.
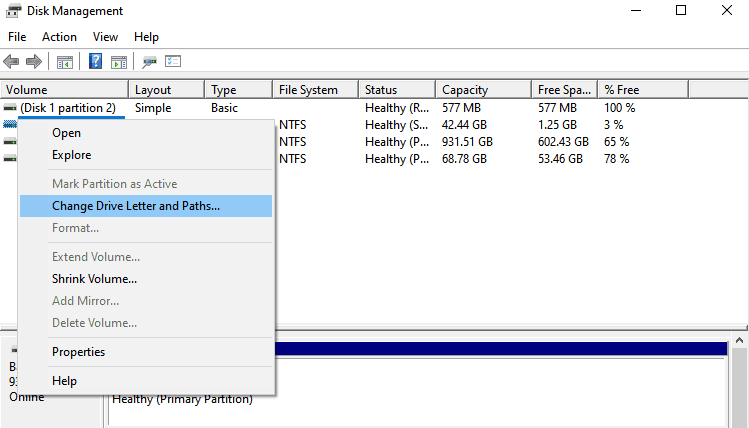
- In the new window, click the Remove button, confirm the operation, and finally click the OK button.
Delete drive letter via CMD
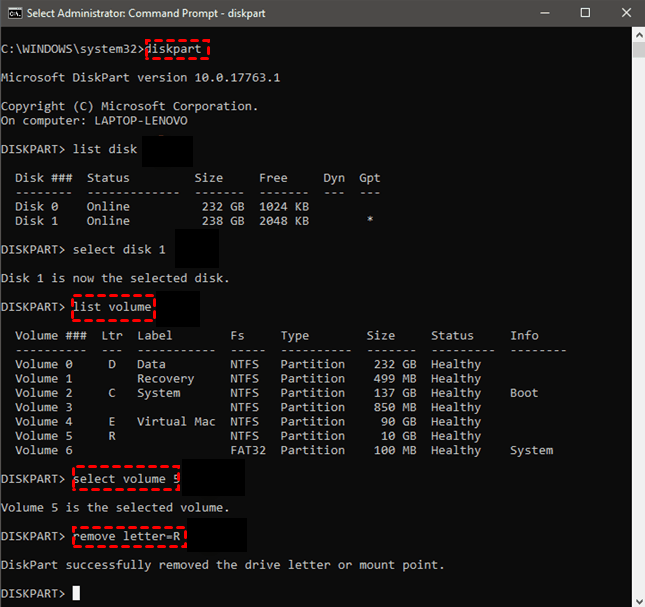
- Use Windows+S to open the search bar, enter cmd and select Run as an administrator.
- At the command prompt, type diskpart and press Enter to open the diskpart utility.
- Type list volume again and press Enter to display all current disk unit letters.
- Type select volume and press Enter. Please replace the command with the letter of the disk unit to be deleted.
- Then enter remove letter= and press Enter, also replace in the command with the disk drive to be deleted.
How to completely solve the "insufficient disk space" problem
Although disabling the "insufficient disk space" warning in Windows 10 can make the pop-up window disappear, the problem of insufficient disk space still exists. It further affects the actual experience of the computer. Therefore, you must find a way to free up disk space to completely solve the above problems. Next, we will introduce 7 effective solutions for you.
- perform disk cleanup
- Empty the Recycle Bin
- Uninstall unwanted apps
- Turn on storage space sensor
- Remove duplicate and temporary files
- Use the optimized disk unit feature
- Upgrade to a larger disk for more space
Method 1. Perform Disk Cleanup
Disk Cleanup is a utility in Windows 10 that allows you to selectively clean up various contents of your local disk, which will help you resolve "low disk space" issues.
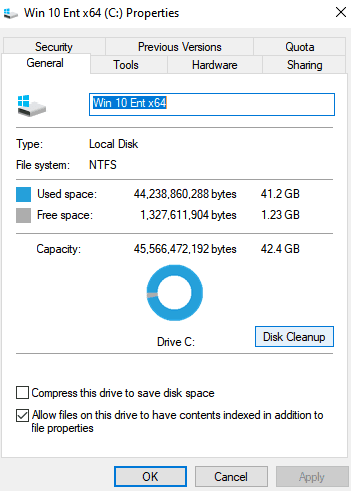
- Use Windows+E to open Windows File Explorer and select Local Disk (C:).
- Select Properties from the expanded menu.
- General tab at the top of the content window, find and click the Disk Cleanup button.
- In the Disk Cleanup window, select the files to delete, such as downloaded program files, Windows Error Reporting and Comments Response and Diagnostics, DirectX Shader Cache, etc, and click the OK button at the bottom.
- Clean up system files button at the bottom left, check the Windows Update cleanup, Windows upgrade log files, etc. check boxes, and click the OK button to clean up these contents.
Note: You can also switch to the More Options tab at the top of the window to clean up system restore and shadow copy related information to save more disk space.
Method 2. Empty the Recycle Bin
Recycle Bin can temporarily help you save deleted files or folders, and allow you to retrieve these deleted contents within a limited time. But in fact, these scratches also take up disk space, so if you want to free up disk space, you can try emptying the Recycle Bin.
- Recycle Bin on the desktop and use Ctrl+A to select all files and folders.
- Right-click on any of the files or folders, and select Delete from the expanded menu.
- Yes in the pop-up confirming permanent deletion.
Method 3. Uninstall unwanted apps
In addition to the above two methods, you can also free up disk space by uninstalling unneeded applications.
- Use Windows+I to open Windows Settings, find and click Apps.
- In the list of applications and functions, select the application you no longer need or use rarely, click the Uninstall button, and click the Uninstall button again in the confirmation pop-up window.
Method 4. Turn on Storage Sensor
Storage Senser is a feature in Windows 10 that can help you quickly clean up Windows Upgrade installation files and temporary files from your disk to free up disk space.
- Use Windows+I to open Windows Settings, find and click System.
- Switch to the Storage tab in the left panel, and click Configure Storage Sense or run it now.
- Turn on Storage Sense and select the most appropriate option from the drop-down menu for Run Storage Sense, Every day, Every week, Every month, During low free disk space.
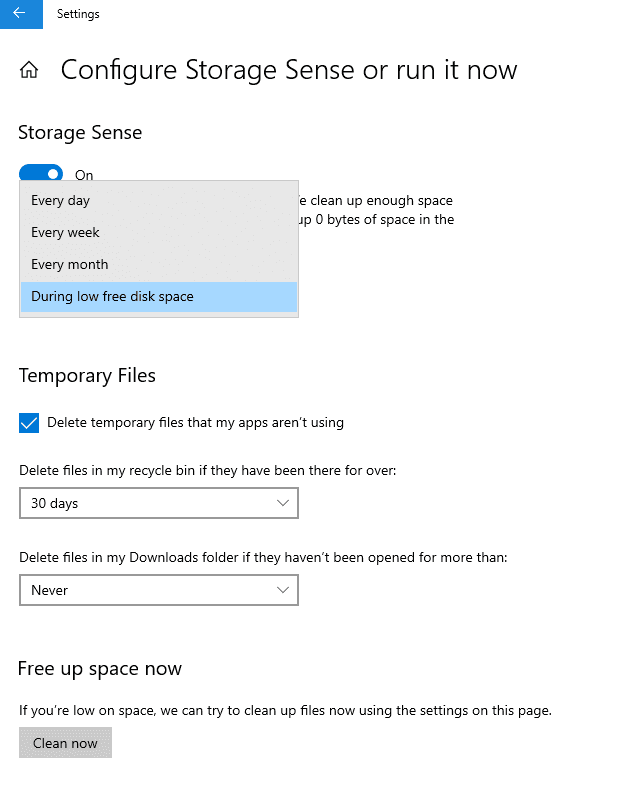
Note: If your computer is running out of storage space, you can click the Clear Now button at the bottom.
Method 5. Delete Duplicate and Temporary Files
In addition to turning on the storage space sensor, you can also manually clean up duplicate files and temporary files, which can also effectively free up disk space.
- Use Windows+R to open the execution window, type Temp and press Enter.
- Use Ctrl + A to select everything in the folder, right-click on one of the files, select Delete, and confirm this action.
Method 6. Use the optimized disk unit feature
When you save, move or delete files on the disk, some fragments will be left, and after a long time of use, many fragments will accumulate, which will occupy the disk storage space. At this point, you can clean up these fragments by optimizing the disk unit functionto free up disk space. Please note that this tool will reduce the lifespan of the hard disk and may affect the performance of the SSD, so it is recommended to use it with caution.
- Open the execution window with Windows+R, type control and press Enter.
- Click System and Security, and under Administrative Tools, select Defragment and optimize your drives.
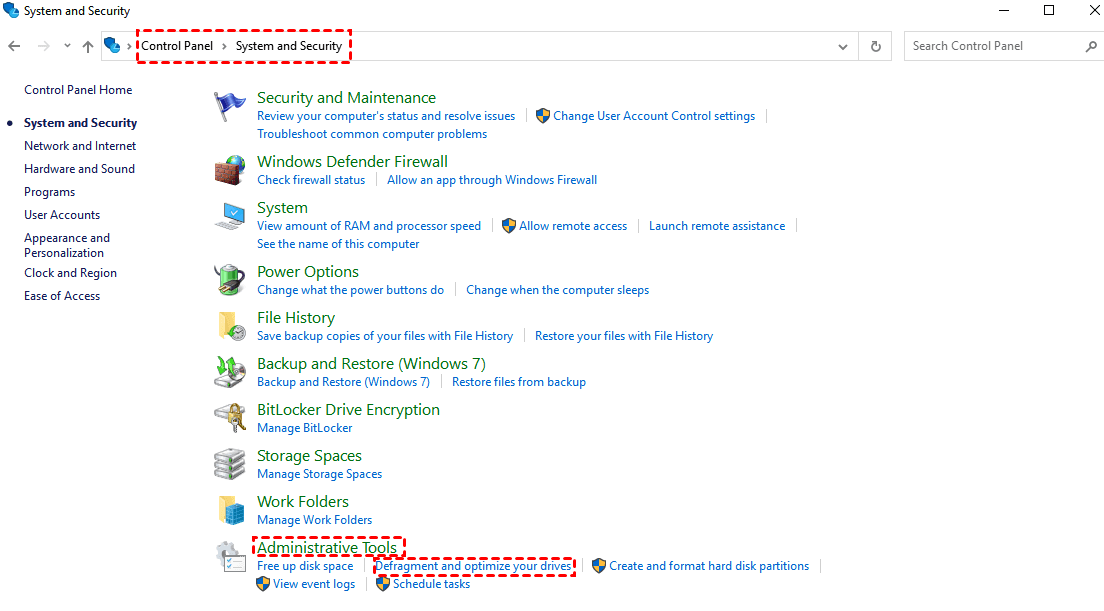
- In the Optimize Drives window, select the disk you want to defragment and click the Optimize button.
Method 7. Upgrade to a larger disk for more space
The above 6 methods mainly solve the problem of "insufficient disk space" by saving the source disk space. But in addition to throttling, you can also solve problems with open source ideas, such as simply upgrading to a larger disk to get more space. After upgrading to a larger disk, you also need to migrate all data from the source disk to the new disk, and the transfer speed of the conventional copy-paste method is too slow, so it is recommended that you use AOMEI Backupper Standard for disk cloning to Speed up data transfer and keep your data safe.
You can execute AOMEI Backupper Standard on multiple system versions like Windows 11/10/8.1/8/7 to clone all applications, files, folders, etc. from the old disk to the new disk if you choose is a system disk and also helps you clone system files. If you are not familiar with the method of disk cloning, please read the following steps in detail. First, please do the following preparations:
- The software uses smart cloning by default, so you need to check the storage space of the two disks participating in disk cloning and make sure that the destination disk is greater than or equal to the used space of the source disk, otherwise the cloning may fail.
- In the disk cloning process, the existing partitions on the destination disk will be overwritten or deleted. Therefore, if there are partitions on your destination disk, it is recommended to backup the partitions first.
- Download and install AOMEI Backupper Standard.
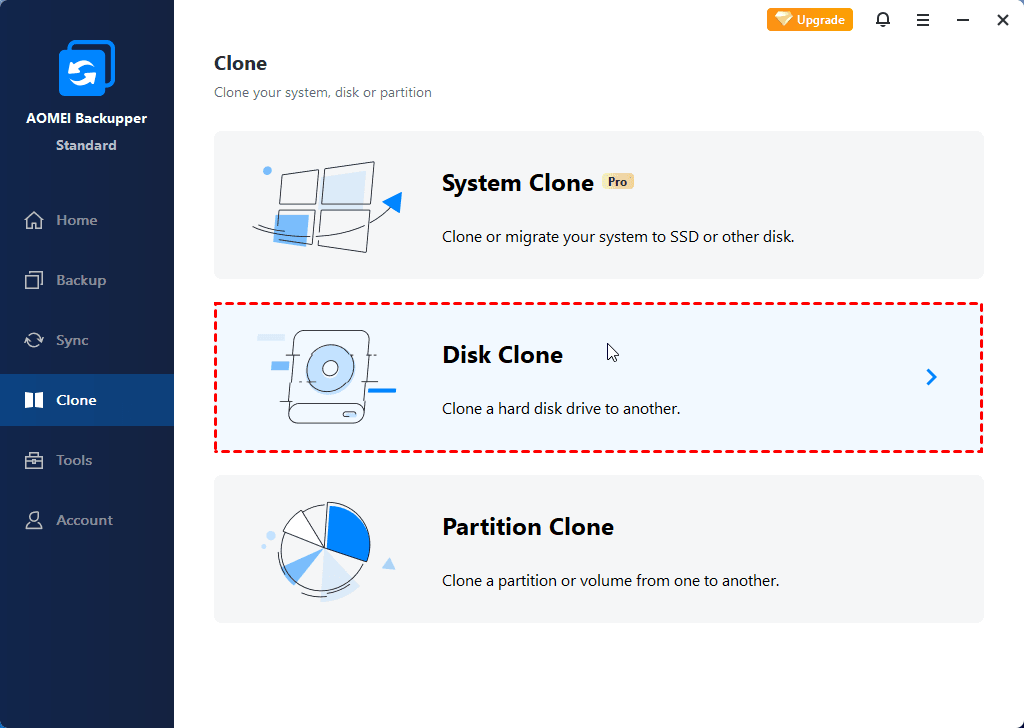
Step 1. Open AOMEI Backupper Standard and click Clone > Disk Clone.
Tip:
If you only want to clone the operating system, you can choose the System Clone feature and you can upgrade to the pro version and use it.
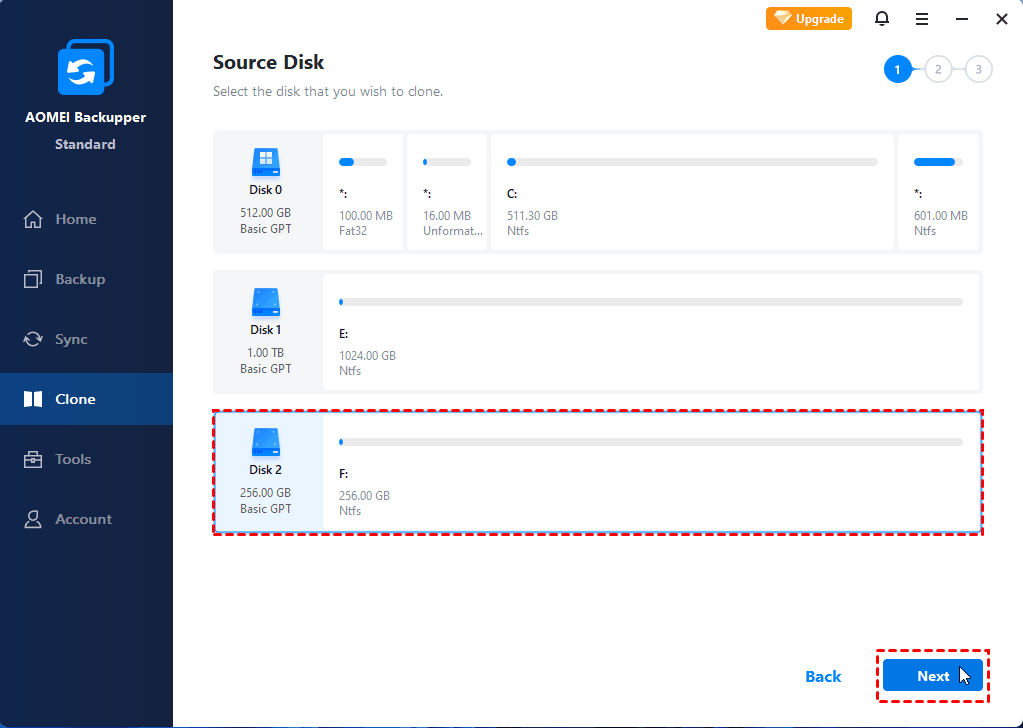
Step 2. Select the hard drive you want to clone as the source disk.
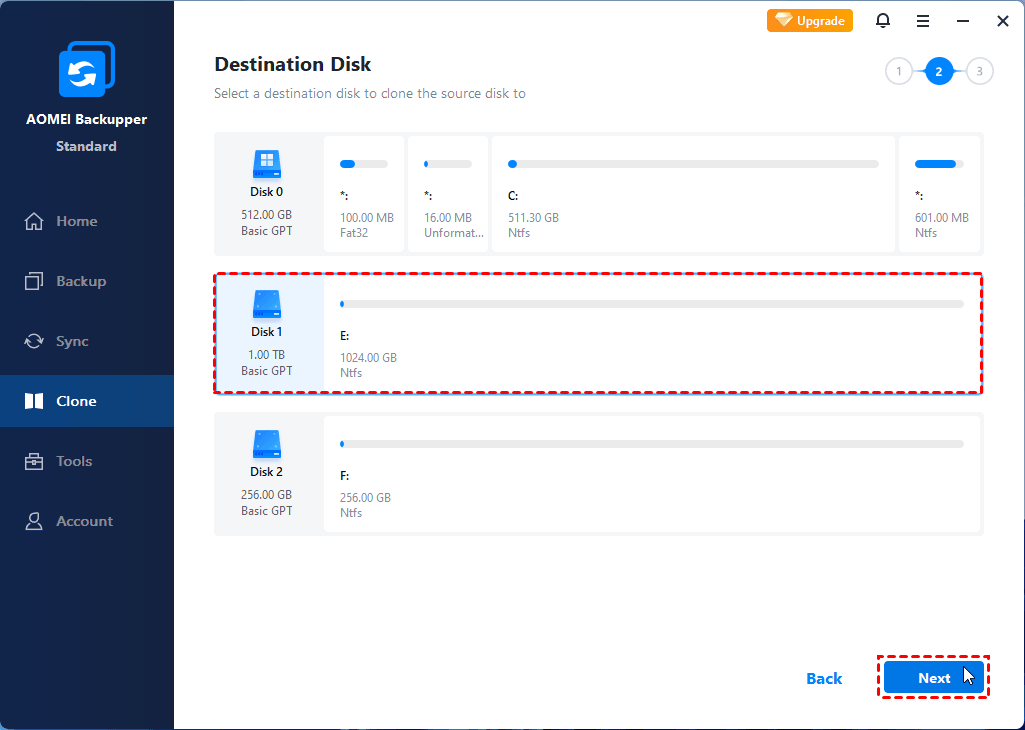
Step 3. Choose a disk as the destination disk.
Step 4. Confirm all your operations. Then click Start Clone.
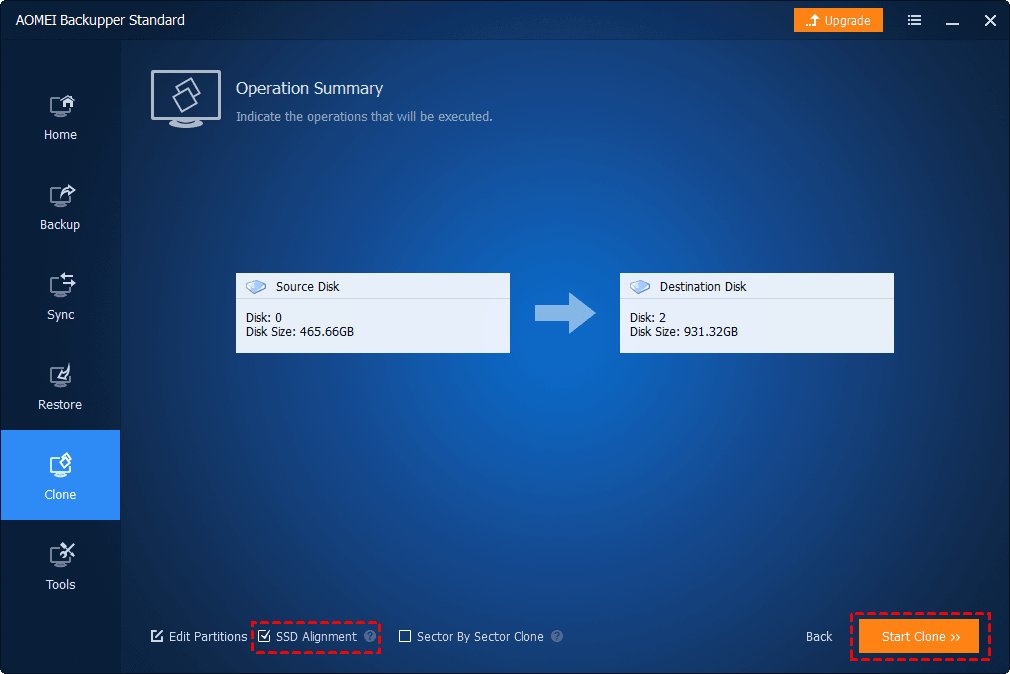
Notes:
- Edit Partitions: This feature can help you to adjust the disk partitions both manually and automatically.
- SSD Alignment: If your disk is an SSD, this feature can help you increase the read and write speed of the SSD.
- Sector By Sector Clone: It will clone the whole sectors of the disk, both used and unused, which will ensure that you do not miss any hidden partitions.
Summary
After reading the above content in detail, you can disable low disk space warning in Windows 10 through the two solutions provided in this article, so as not to affect your concentration on using your computer. If you want to solve the "low disk space" problem completely, follow the 7 methods above to free up more disk space, which will also disable the "low disk space" warning completely.
Please note that although the method of upgrading the disk is very effective, it is a troublesome problem to transfer the data in the old disk. It is recommended that you use AOMEI Backupper Standard for disk cloning, which can effectively speed up the transfer.
It should be noted that AOMEI Backupper Standard itself is a free and professional disk cloning software, you can easily fully clone the disk to any desired location in a clear interface. In addition to this, the software also provides you with file backup, system backup, basic synchronization, and more.