[Solved] Black Screen After Cloning Disk in Windows 11/10
This article will help you solve the problem of Windows 11/10/8/7 black screen after cloning. You won't encounter boot errors if you use the best disk cloning software - AOMEI Backupper.
By Lily Updated on May 23, 2025
Cloned hard drive to SSD but black screen when booted
“Recently, I purchased an SSD and try to replace my old HDD with it. I just cloned my OS drive to the SSD. However, when I tried to boot it from the SSD, all there is a black screen with a cursor that is constantly loading. The most frustrating thing is that I am unable to get into bios or troubleshoot through windows unless I unplug the SSD completely to force it to boot through the old drive, which boots and functions perfectly fine. Any idea on how to get it up and running?”
How to fix black screen after cloning disk
When you encounter black screen after cloning disk, you can follow the steps below to fix it:
Step 1. Connect the new hard drive inside your computer as the boot disk. And connect your original hard drive outside your computer as an external hard drive.
Step 2. Turn on your computer to see whether it can boot from the cloned hard drive. If you are still stuck on black screen, hit Ctrl + Shift + Esc to open Task Manager.
- Find Windows Explorer under the Processes tab, right-click it and select End task.
- Click File at the upper-left corner -> Run new task. Type "explorer.exe", tick "Create this task with administrative privileges" and click OK.
- Go to File -> Run new task again. Type "explorer.exe" and click OK. This should open Windows Explorer.
Step 3. In Windows Explorer, right-click My Computer/This PC from the left panel. Then select Manage -> Storage -> Disk Management.
Step 4. Here you need to check the drive configuration. If there is one drive with system and another drive without system but assigned drive letter C, you need to right-click the C drive and select Change Drive Letter and Paths to give it a new drive letter.
Step 5. After that, you can shut down the computer. Disconnect the old hard drive, restart the computer and it may work normally.
✍ Tips:
1. If your computer still shows black screen, you can reconnect the old hard drive and change the registry value.
- Press Ctrl + Shift + Esc to open Task Manager.
- Click File -> Run new task. Type "regedit", tick "Create this task with administrative privileges" and click OK to open Registry Editor.
- Go to this location HKEY_LOCAL_MACHINE\SYSTEM\MountedDevices and look for \DosDevices\C:.
- Modify this key to any random letter, for example, \DosDevices\C: to \DosDevices\O:.
- Then, shut down your computer, remove the old hard drive and start your computer from the cloned disk successfully.
2. If the problem still exists - your cloned SSD won't boot and show black screen, then you need to consider recloning the hard drive.
Clone disk with the best disk cloning software - AOMEI Backupper
AOMEI Backupper Professional should be the best disk cloning software that can help you clone disk without the problem of black screen after cloning disk. And here are the detailed steps below.
Before cloning, you need to know:
-
If you are planning to change the system disk from MBR to GPT, make sure your computer’s motherboard supports EFI/UEFI. Otherwise, the system won’t boot successfully.
-
If you are cloning a GPT disk with more than 4 partitions to an MBR disk, you need to convert MBR to GPT disk in advance. Otherwise, the cloning process may fail due to partition style limitation.
-
Windows 32 bit doesn’t work on a GPT disk. If your Windows is 32 bit and the destination disk is a GPT disk, please convert GPT disk to MBR disk before cloning.
After knowing those tips, you can start to clone disk with AOMEI Backupper.
Step 1. Connect the new HDD/SSD to your computer. Free download AOMEI Backupper. Then, choose Clone -> Disk Clone.

Step 2. Select your old hard disk as the source disk.

Step 3. Select the new HDD/SSD as the destination disk.

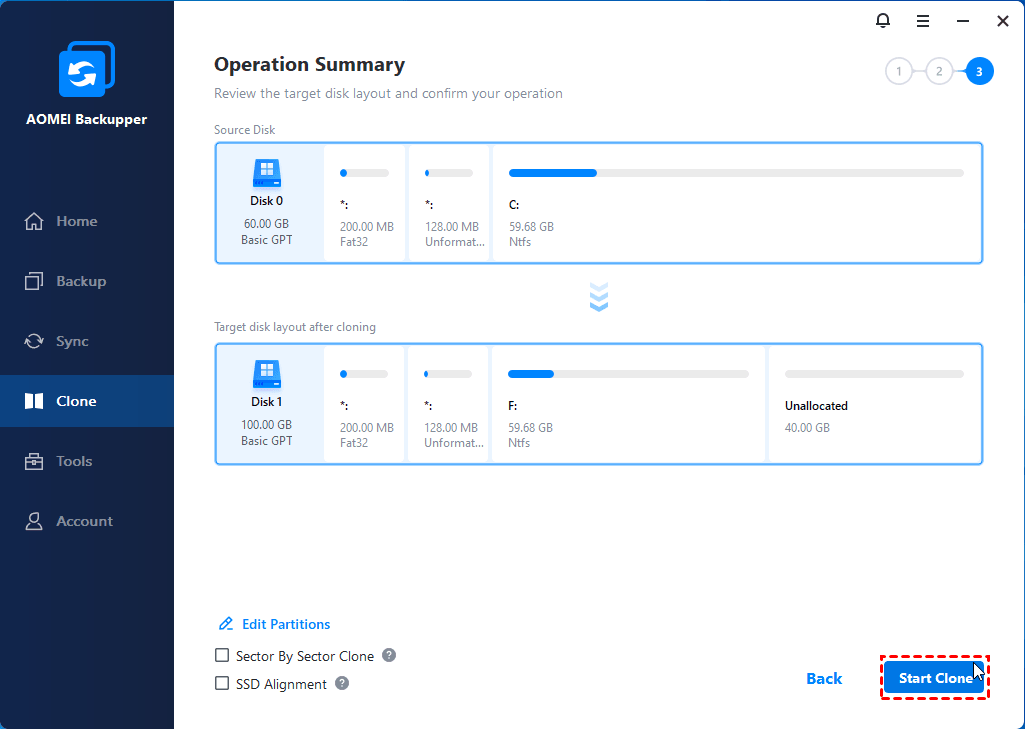
Step 4. When you move to the final window, you need to confirm the whole operation, and then click Start Clone to execute the operation.
Notes:
-
You can use "Edit Partitions" to manually adjust partition size on the destination disk during cloning.
-
"Sector-by-sector clone" requires the cloned disk is no smaller than the source disk.
-
If the cloned disk is SSD, you can check the option “SSD Alignment”, which will optimize the performance of the SSD.
After the cloning process is finished, shut down the computer, replace the old hard drive with the cloned disk, and then start your PC. It would work perfectly. With the help of AOMEI Backupper, you won’t be stuck on black screen after replacing hard drive anymore.
Final words
AOMEI Backupper should be the best disk cloning software. With it, you won’t meet the problem of black screen after cloning disk. If you only want to clone the system and boot files from the old hard drive to the new disk, the "System Clone" feature can do you a favor.
Besides, AOMEI Backupper is a great backup and restore software. You can also transfer Windows OS to dissimilar hardware by creating a system image and then restoring system image to new SSD or HDD.
By the way, AOMEI Backupper Professional is designed for Windows PC users. If you are using Windows Server 2003, 2008, 2012, 2016, etc., AOMEI Backupper Server is suitable for you.

