Create a System Image Backup in Windows 7, 8, 10 Easily (2 Ways)
Creating a system image backup in Windows 7 helps you a lot in case of system crash, virus attack or hardware failure and get your computer back quickly. Also applies to Windows 8 and 10.
By Lily Updated on April 2, 2025
Need of creating a system image backup
In computing, system image refers to an exact copy of the computer system, which includes the system settings, programs, files as well as all the drivers required by Windows. You need to create a system image backup in Windows for following reasons:
-
Get prepared for possible computer errors. You may encounter system crash caused by virus attack, hardware or software failure, and wrong operations now and then. With a system image at hand, you can restore system to a normal state easily and safely.
-
Avoid operating system and application reinstallation. If you restore system from a system image, you can not only get back a working operating system but also all the applications installed on the system partition, which saves you a lot of time to reinstall all of them.
Then, how to create a system image backup in Windows 7/8/10 easily? Get the top two ways from the coming part.
Method 1: Create a system image backup in Windows 7 via a handy freeware
AOMEI Backupper Standard, the best free backup utility for Windows 7/8/10, offers you full backup solutions.
★ There are multiple backup types available: System/Disk/Partition/File Backup. You are able to create a system/disk image or just backup specific folders.
★ You are allowed to create a system image in Windows 7/8/10 on USB, external hard drive, network location, NAS device or cloud service.
★ If you want to run the backup task on a regular basis, you can use the Schedule Backup feature and set backup frequency from daily to monthly.
★ And it still allows you to choose backup methods, either creating a full copy of the system every time or backup only changed files (using Incremental Backup). The latter helps to improve the backup efficiency and save storage space.
Follow the steps below to backup Windows OS via AOMEI Backupper:
Step 1. Download, install and launch AOMEI Backupper. Click “Backup” and select “System Backup”.

Step 2. The required system partition(s) is (are) selected by default. You just need to click the second bar to choose a destination path to store the system image.

Step 3. Confirm the operation and click “Start Backup” to execute system image backup in Windows 7. Also, you can create a system image backup in Windows 10 or other systems.

>> Options: you can enable email notification, choose the compression level for the backup image file and select intelligent sector backup or sector-by-sector backup.
>> Schedule Backup: you can back up data for you automatically and periodically at a regular basis, such as Daily, Weekly, Monthly, Event triggers and USB plug in.
>> Backup Scheme: you can choose backup methods here. Differential backup is preferable to incremental backup because incremental backup requires all backups to be complete before a backup can be restored. This program will delete old image files automatically to save disk space for you. You need to upgrade to AOMEI Backupper Professional to enjoy this feature.
If a major disaster occurs, you can restore your computer with the system image you’ve created as follows:
-
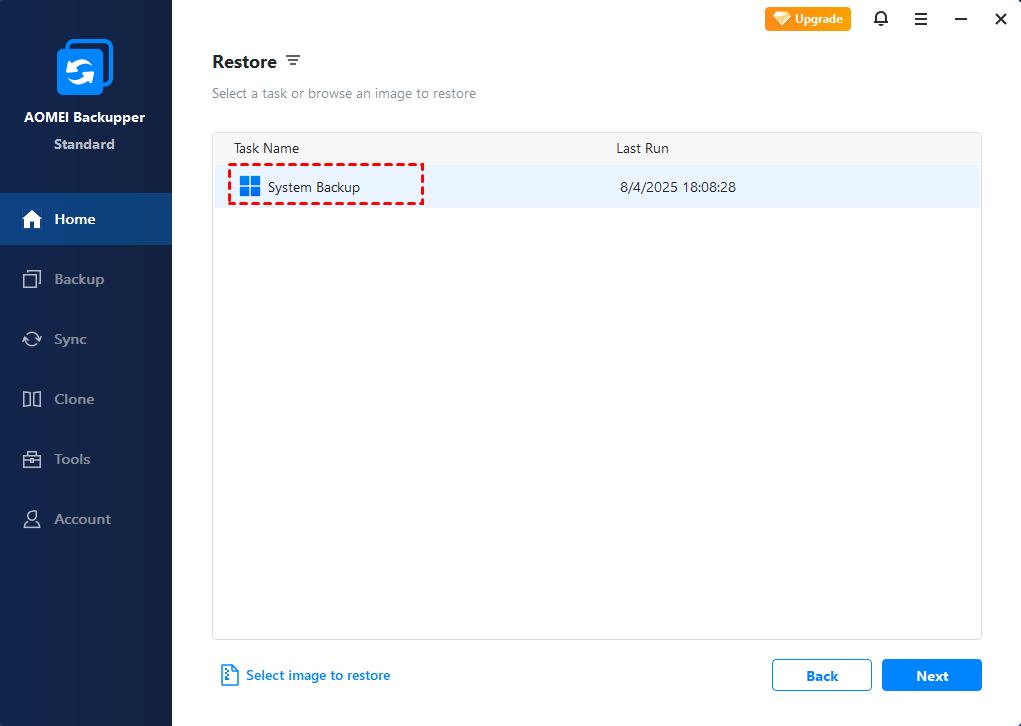
Click Restore > Select Task.
-
Select the system backup task from the list and follow the wizard to complete the restoration process.
Tips:
★ If you cannot find system backup you created, go back to the Restore tab and choose Select Image File to locate image manually.
★ To boot your computer in case of boot failure, you should create bootable media with AOMEI Backupper in advance.
★ To restore an image file without booting Windows, you may create recovery environment with AOMEI Backupper in advance.
★This software is capable of creating system image in Windows for another computer. It applies to Windows 8 and 10 as well.
Method 2: Create a system image backup in Windows 7 with Windows built-in tool
There is a built-in tool in Windows to help users create backups and restore from the backups created earlier. It is called Backup and Restore or Backup and Restore (Windows 7) in Windows 8/10. Then, learn how to use Backup and Restore to create a system image below:
Step 1. Open Backup and Restore. Different systems have different methods.
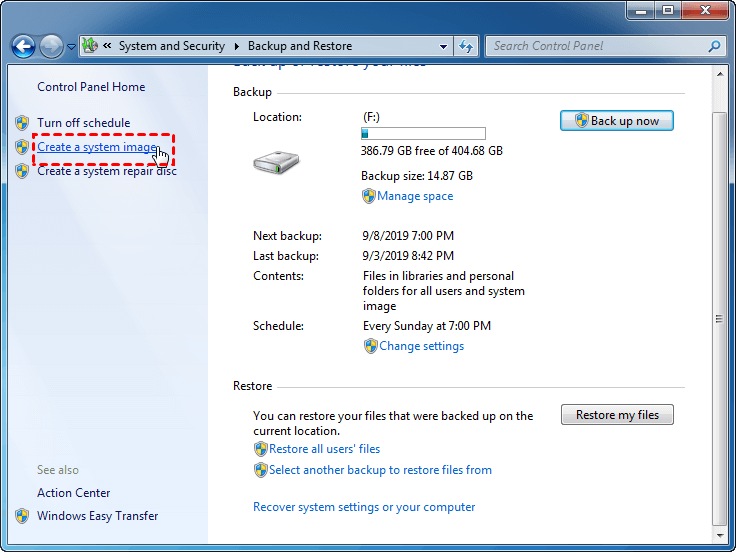
▶ In Windows 7, click Start, and then select Control Panel > System and Security > Backup and Restore.
▶ In Windows 8, search File History and select it, click System Image Backup link at the lower left corner.
▶ In Windows 10, type backup settings and select it, scroll down to Looking for an older backup and click Go to Backup and Restore (Windows 7).
Step 2. In the left pane, choose Create a system image.
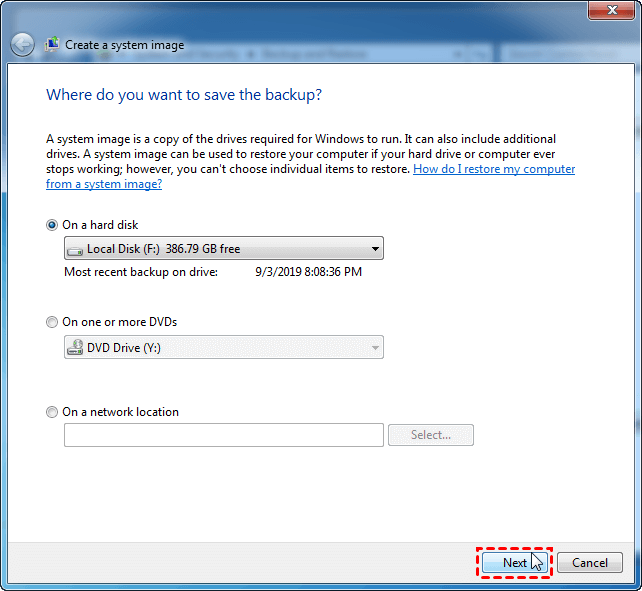
Step 3. Choose the location (eg: USB drive) to save your system image, and then click Next.
Tips:
★ It is recommended not to save the system image to the same physical disk as your system drive, or you may lose the image file if the disk fails.
★ A hard disk must be formatted to NTFS in order to be used as the backup location.
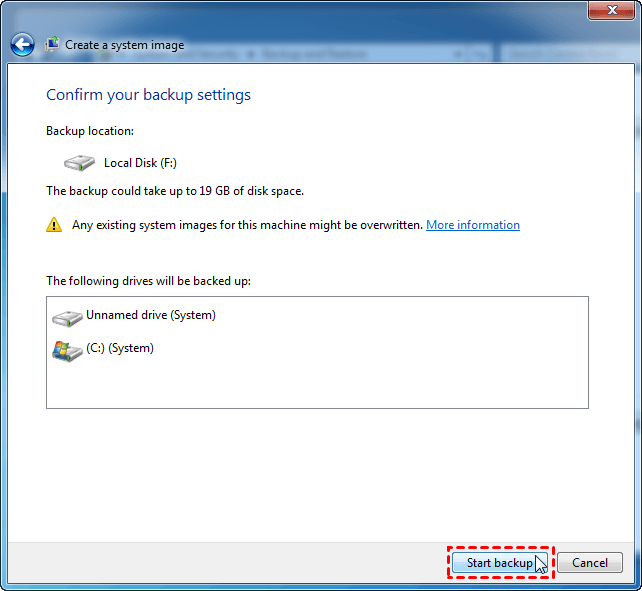
Step 4. The drives that are required for Windows to run are selected by default. You can add other drives to be backed up and click Next.
Step 5. Confirm the backup settings, and then click Start backup to create a system image in Windows 7.
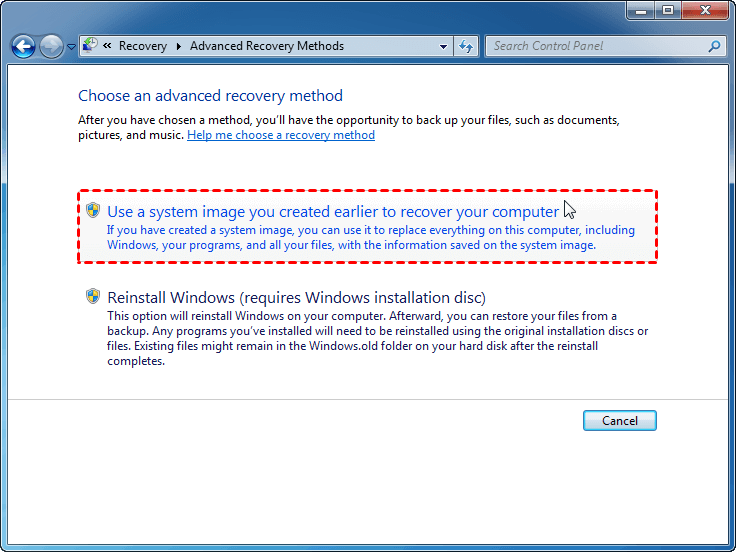
You may want to restore system image if your computer stop working or run into issues. Below are the steps:
-
Open Backup and Restore as mentioned in Method 2.
-
Click Recover system settings or your computer > Advanced recovery methods.
-
Click Use a system image you created earlier to recover your computer and follow the wizard to finish the recovery process.
Tip: To boot your computer in case of boot failure, you should create a system repair disc using Backup and Restore beforehand. Then, you can perform System Image Recovery in Windows 7 from it.
Verdict
Now you know how to create a system image backup in Windows 7/8/10. Both AOMEI Backupper and Backup and Restore can give you a hand. Compared to Backup and Restore, AOMEI Backupper offers you all-around backup solutions and it’s easy to operate due to the intuitive interface. What’s more, it is superb hard drive transfer software that can be used to transfer everything from an HDD to an SSD. Give it a try and discover more!

