Windows 11 Recent Files Disable/Enable/Clear Methods
Don’t you know how to disable recent Windows 11 files? Read this detailed post to learn a step-by-step tutorial to finish this task with ease. On this page, you can find various methods to disable/enable/clear recent files in Windows 11.
By Clytze Updated on August 28, 2025
User case: How do I turn off recent files in Windows 11?
I'm running Windows 11 Pro 64-bit Version: 21H2 (OS Build 22000.527). How can I get rid of the "Recommended" section on the Start Menu of Windows 11? It is driving me crazy and clutters up my Start Menu. How do I clear recent files in Windows 11? I don't want to open a recently opened photo, file, or whatever. Please get rid of it. Cheers.
- Question from ElevenForum

The Windows 11 update makes a number of big changes from previous versions. Some users find these changes to be not so useful and want them back to their former state, such as restoring the Windows 11 taskbar. The biggest change that defines the look of Windows 11 is the new Start menu. Whenever you click the Windows key, it displays the most recently used applications and recent files on the screen.
Recent files are one of the most useful features in Windows 11 because it automatically lists the last 20 files you accessed in the Quick Access Directory. But what if you want to clear recent files in Windows 11 so that others won't see them?
In this article, I will tell you how to enable/disable Windows 11 recent files. It is recommended that you use this feature according to your actual needs.
You can back up your Windows 11 with the best free backup software to protect your computer from system crashes, hacker attacks, and any other error.
Fix 1. Let Windows 11 don't show recent files via Settings
If you don't want to clear recent files on Windows 11 now and then, shutting it seems like a better option. How do I turn off recent files on Windows 11? The most commonly used solution is to disable it from Settings.
1. Press Windows + I together to open Windows Settings.
2. Click on Personalization from the left pane, scroll down the list, and click on Start.

3. Toggle off the option Show recently opened items in Start, Jump Lists, and File Explorer, then exit Settings. The next time you open it, you won’t see recent files in Recommended.
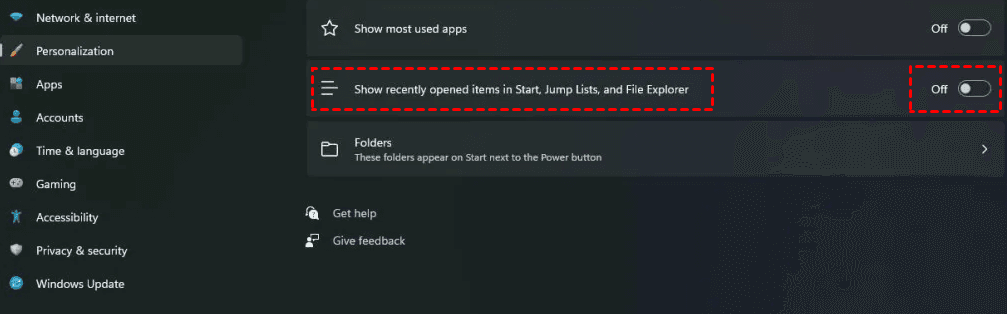
Tip: If you want to reset the view to turn on Recent files on Windows 11, just toggle switch on again, then exit Settings to check if it is shown in the Recommended.
Fix 2. Make Windows 11 disable recent files via Group Policy
1. Open Start and type gpedit.msc. in the search box, click OK to open the Local Group Policy Editor.
2. Browse the following path: Computer Configuration > Administrative Templates > Start Menu and Taskbar.
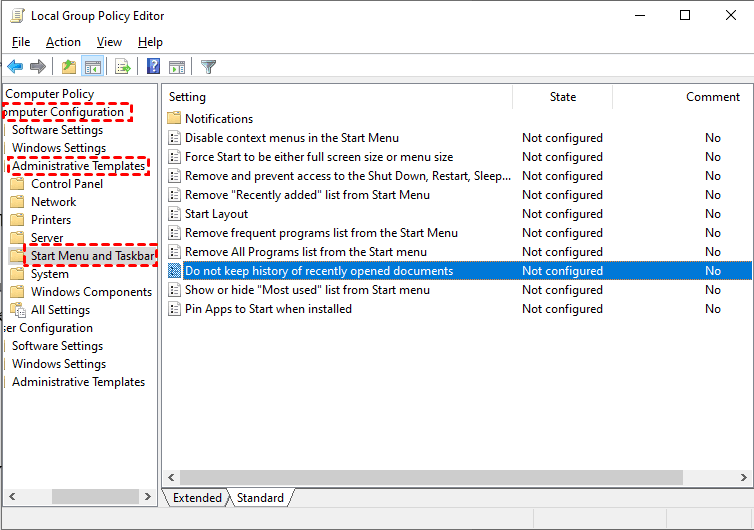
3. On the right side, double-click the Do not keep the history of recently opened documents option. In the pop-up window, click the Enabled button>Apply>OK.

After that, the Windows 11 Jump Lists in the taskbar, Start menu, and File Explorer will no longer display recent items and locations.
Tip: To switch it on again, just click on Disabled in Step 3 to keep the history of recently opened documents.
Fix 3. Clear recent files in Windows 11 in File Explorer
If you just want to clear some of the recent files so that others can not see your records, but said that you do not want to completely turn off this feature, then you can try the following method.
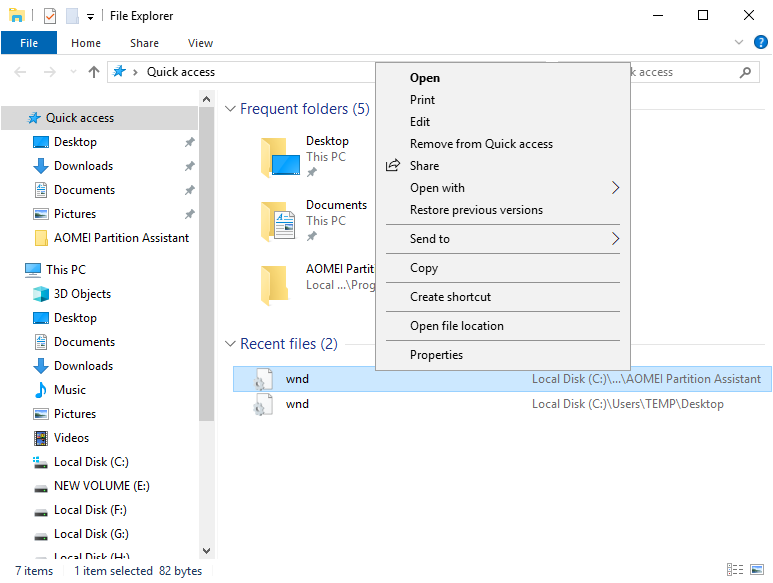
Clear recent files from Quick Access
1. To remove recent files from Quick Access in File Explorer, right-click the file and select “Remove from Quick Access.”
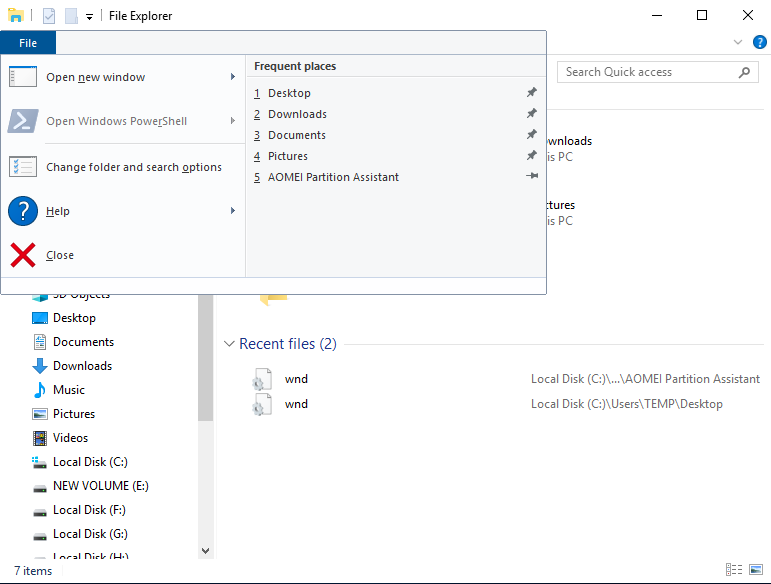
2. Alternatively, you can go to "File" > "Change folder and search options" to adjust the folder settings.
Clear recent files from the folder
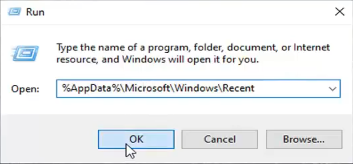
1. Press “Windows” + “R” to open the Run window, type %AppData%\Microsoft\Windows\Recent, and click “OK.”
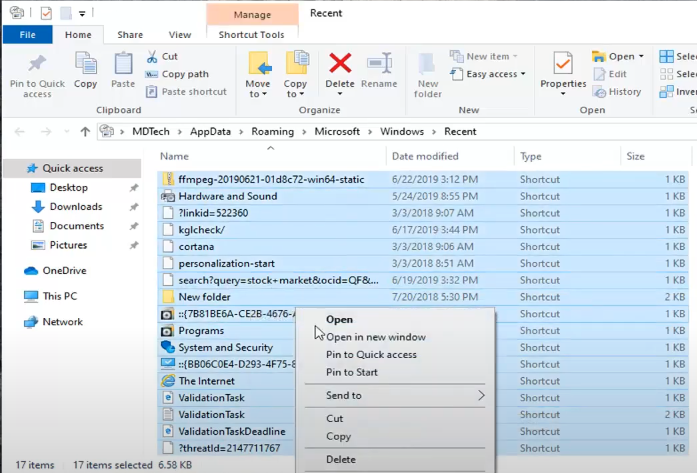
2. In the new window, select all files and delete them.
This will free up some resources and slightly improve your PC's performance. For a deeper cleaning of junk files, more steps are needed.
Bonus tip: Always backup Windows 11 to protect your data
To set up a secure and efficient backup solution on your computer, AOMEI Backupper Standard can be your best assistant. It's a free backup software that supports all Windows OS (Win 11, 10, 8.1/8, 7, Vista, XP) and all detectable devices (internal/external drive, USB flash drive, network share, NAS, cloud, etc).
With AOMEI Backupper, you will save a lot of time and effort for data protection. No need to worry about system crashes, hardware failures, or hacker attacks anymore. If something bad happens to your PC, you can easily restore the system image to let your computer go back to its normal state. It has the following advantages:

- 4 backup solutions: It allows you to do system backup, disk backup, file backup, and partition backup as you need.
- Automatic backup: You can choose to set up backup tasks daily, weekly, or monthly, depending on how often you make changes to your files.
- Various backup destinations: It could backup Windows 11 to the external drive, USB, local disk, network drive, NAS, cloud, etc.
This tool offers you 3 backup types, full backup, incremental and differential backup (in advanced edition), and the last two options only backup the changed files or folders. Now, I'll show you how to create a full backup of your Windows 11 PC for disaster recovery. Just download AOMEI Backupper Standard to have a try.
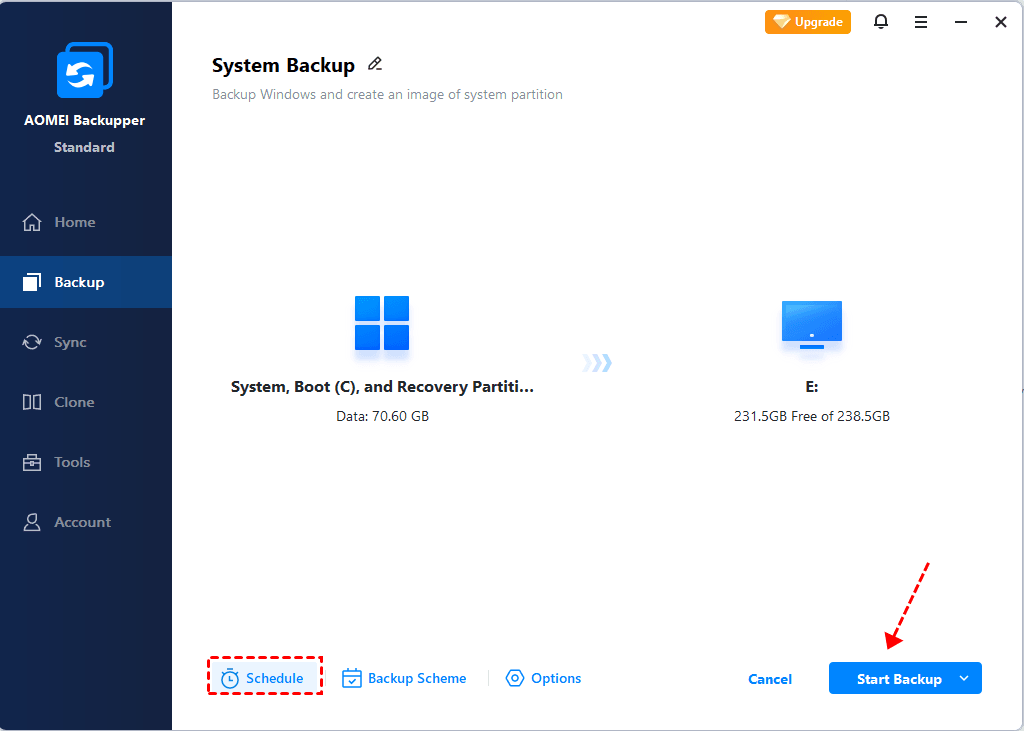
Step 1. Launch AOMEI Backupper Standard, then choose System Backup under the Backup tab.

Step 2. The partitions associated with system files will be selected automatically, you don't have to select them manually. Just choose a destination path to save your backup image.

Step 3. You can set up a Schedule to automate your backup tasks so you won't forget. You could set the system backup task to run Daily (By Interval), Daily, Weekly, Monthly (By Week), Monthly (By Date), One Time, and Event triggers, etc.

Options: you could also comment, split, and encrypt (paid version) your backup image, customize the compression level, enable email notifications, and more.
Backup Scheme: This option allows you to delete old backup images automatically (By quantity, By time, By daily/weekly/monthly) while the backups exceed the backup number you want to keep. You can upgrade to AOMEI Backupper Professional or other editions to enjoy it.
Step 4. Click the Start Backup button to create the system state backup in Windows 11 to protect your data security.
✿ How to restore the system image backup if something goes wrong:
Click Home > Restore > select the backup task to restore or click Select image to restore. Then, follow the wizard to complete the system recovery process.

Where will you see the recent files on Windows 11
In Windows 11, you can see recent files in the following locations:
File Explorer Quick Access: When you open File Explorer, recent files are listed under the Quick Access section. Here is a list of the files you have visited recently and the folders you use frequently. You can clean up unwanted records by right-clicking any file or folder and selecting Remove from quick access.
Start Menu: The Start Menu often shows a list of recently accessed files and applications. Click the Windows Key or Start button to open the start menu. Here, you can quickly find and reopen files and applications you've been using recently. For files that you don't want to display here, you can right-click on them and select Remove from the list.
Taskbar Jump Lists: Right-clicking on applications pinned to the taskbar will display recently accessed files related to that application. Similarly, you can delete unwanted records by right-clicking and selecting Remove from this list.
What will be on the recent files list on Windows 11
In Windows 11, the Recent Files list typically includes:
Documents: Files you have recently created, opened, edited, or saved, such as Word documents, Excel spreadsheets, and PowerPoint presentations.
Images: Recently viewed or edited images, including photos and graphics files.
Videos: Recently played or edited video files.
Audio Files: Recently played or edited audio files, such as music tracks and recordings.
Downloads: Files that have been recently downloaded from the internet.
Compressed Files: Recently opened ZIP or RAR files.
Application-Specific Files: Files that were recently accessed through specific applications, like project files in design software or recent edits in video editing software.
FAQs about Disabling Recent Files on Windows 11
#1. How to hide Recent files in File Explorer?
To hide Recent files in File Explorer on Windows 11, open File Explorer > tap on the See more (3 dots) button in the command bar, and click Options to open the Folder Options windows. Under the General tab, uncheck Show recently used files under Privacy, and click OK to save the change.
#2. How to recent all recent files from Quick Access in Windows 11?
To clear recent files on Windows 11 from Quick Access, you can right-click a file in the Quick Access section and choose “Remove from Quick Access”. It helps maintain privacy and frees up system resources for other tasks.
- Open File Explorer, select the View tab, then click Options.
- Select the Change folder and search options.
- Under the General tab, uncheck Show recently used files in Quick Access.
- Click Clear to clear the list, and click OK.
#3. Why are Windows 11 Recent files not showing?
If your recent files on Windows 11 not showing, you may have disabled them, you can turn them on again by referring to the steps above.
Another reason is that the files that aren't appearing are too old. The Recent files list on Windows 11 typically only shows files that you've opened within the last month or so. Or, the files are being excluded from the list for some reason.
#4. Does removing from Quick Access delete files?
No, Quick Access is simply a shortcut section that links to folders and files stored elsewhere. Any items you delete from Quick Access will remain intact in their original location.
Wrapping up
Now you know how to let Windows 11 Recent files disable or enable follow the steps shown above. You can select to clear recent files in Windows 11. Also, there is a bonus tip for you to back up your Windows 11 with the best free backup software – AOMEI Backupper, if there’s something bad occurs, you can use the created system backup image to recover your PC to the previous date.
Moreover, AOMEI Backupper can safeguard your data security by offering you numerous powerful features such as Disk wipe, which allows you to wipe free space on Windows 11. You can tackle Surface Pro 7 Windows 11 issues without effort as well. Download and try it now!