[Fixed] System Restore Failed Windows 11
With 6 effective methods, you can easily fix “System Restore failed”on Windows 11, along with step by step instructions. Creating a system backup before attempting any repairs to avoid unexpected system failure.
By Ivy Updated on December 15, 2025
What Does “System Restore Failed” Mean in Windows 11?
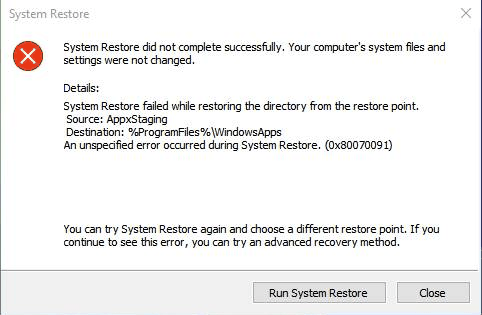
The message “System Restore failed” in Windows 11 means Windows tried to restore your system to an earlier point but could not finish the process. No changes were made, and your system stays the same as before.
The error only indicates a problem with system files, settings, or services needed to complete the restore, without affecting your personal files. You may receive a message like “System Restore did not complete successfully”, and error codes, such as 0x80070005, 0x80070091, or 0x80042302.
Note that System Restore is designed for minor problems, such as bad drivers or recent system changes. It may not work if Windows is badly damaged, updates are broken, or important system files are missing. In such cases, try other recovery options.
Immediate Backup of Windows 11 to Avoid Unexpected System Failure
Before fixing “System Restore not working Windows 11” error, it’s strongly recommended to backup the entire system to avoid unexpected failure due to DISM repairs, system restore retries, resetting Windows, etc., which can modify system files and settings.
For this purpose, you need a powerful Windows backup and restore software - AOMEI Backupper Standard. Compared to built-in backup options, it’s faster, smarter, and more reliable, making it ideal for long-term protection.

- Full Backup Solutions: Include System Backup, Disk Backup, File Backup, and Partition Backup.
- Set-and-Forget Backup: Set up continuous backup based on daily, weekly, monthly, or event triggers.
- Multiple Versioning: Perform a full backup initially, then save time and space with faster incremental backup - save multiple backup versions.
- Hand-Off Options: Automatically enable compression, splitting, intelligent sector backup, VSS, etc., to minimize image file size and avoid any interruptions.
- Flexible Destination: Backup Windows 11 to HDDs/SSDs, external hard drives, USB drives, network drives, etc.
- Bootable Media Creator: Create a Windows 11 bootable USB, CD/DVD, or ISO to start Windows, especially when it fails.
Step 1. Open AOMEI Backupper Standard. Click Backup on the left panel, then choose System Backup.

Step 2. The software auto-selects all required boot partitions. Click the PC icon > Local Drive/Network Drive/NAS to add a new destination. Or select the current location (if it exists).

Step 3. Click Schedule and enable it. Select Daily, Weekly, Monthly (By week), Event triggers, etc., from the drop-down menu. At last, click Start Backup. It will automatically compress images, split image files, back up only used sectors of the file system, etc., making it faster and significantly smaller.

How to Fix “System Restore Failed” on Windows 11
Here are some useful methods to fix “System Restore did not complete successfully”, just for reference.
Fix 1:Run SFC and DISM to Repair System Files
System Restore often fails when Windows system files or the system image are corrupted. DISM repairs the Windows image, while SFC fixes protected system files that depend on it.
Step 1. Right-click the Start menu, type cmd and select Run as administrator.
Step 2. In the Command Prompt window, run the DISM command and wait for the process to complete. This may take several minutes.
DISM /Online /Cleanup-Image /RestoreHealth
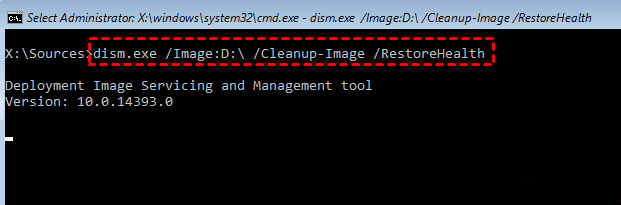
Step 3. After DISM finishes, run sfc /scannow and press Enter. Then, restart your computer to save changes.
Fix 2:Enable Volume Shadow Copy and Related Services
System Restore relies on the Volume Shadow Copy Service (VSS) and related services. If they’re disabled or stopped, restore points cannot be applied.
Step 1. Press Win + R, type services.msc, and press Enter.
Step 2. Locate Volume Shadow Copy, double-click it, then set Startup type to Automatic. Click Start if the service is not running.
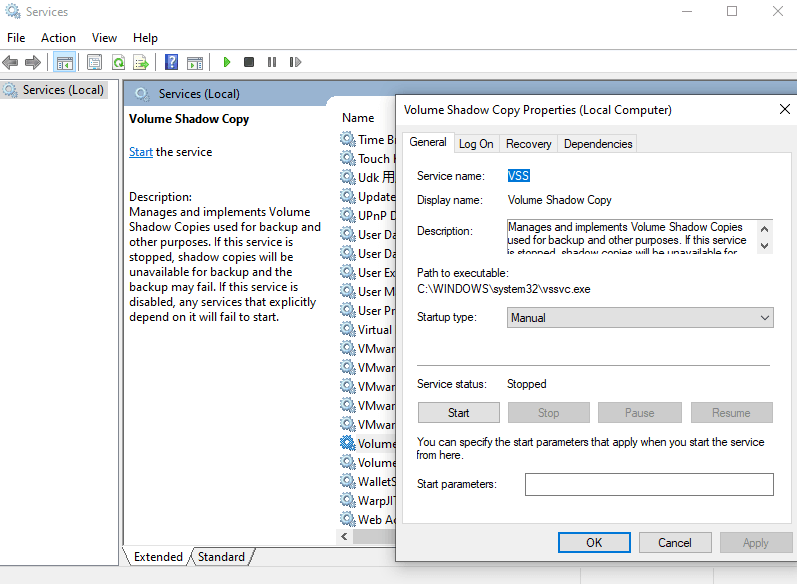
Step 3. Repeat Step 2 for Microsoft Software Shadow Copy Provider and Windows Backup services. Then, restart your computer.
Fix 3:Temporarily Disable Antivirus Software
Antivirus software can block System Restore by locking critical system files. Temporarily disabling it, usually Real-time protection, removes this interference during the restore process.
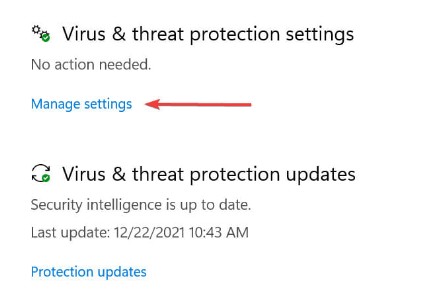
Step 1. Type Windows Security in the Start menu and select it. Click Virus & threat protection.
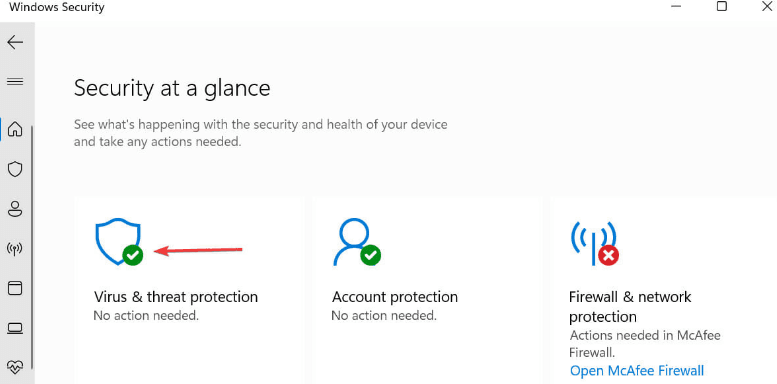
Step 2. Under the Virus & threat protection settings, click Manage settings.
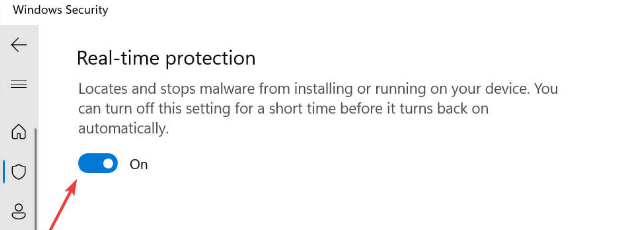
Step 3. Scroll down to Real-time protection and click the toggle switch below to turn it off.
Step 4. Try System Restore again. Then, re-enable antivirus protection after completion.
Fix 4:Use a Different Restore Point
Use an older restore point if the latest one is corrupted. Or directly restore from the Windows Recovery Environment (WinRE), which can avoid interference from running programs.
Step 1. Search for Create a restore point and open it.
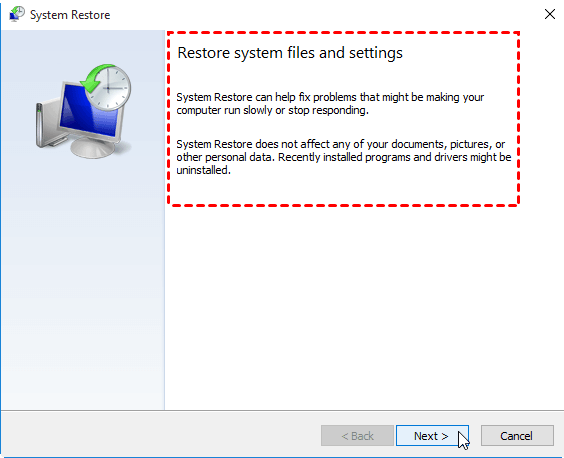
Step 2. Click System Restore and then Next.
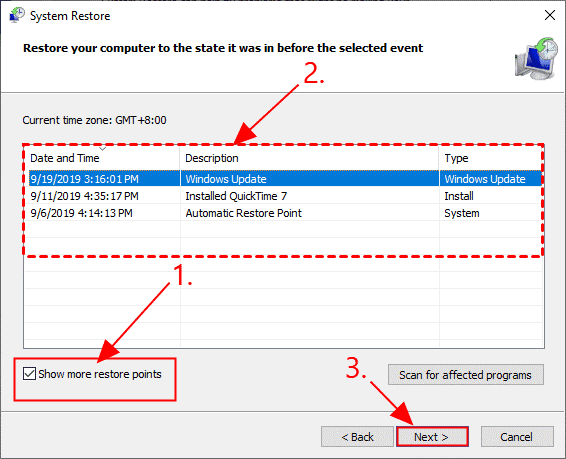
Step 3. Check Show more restore points and select an older restore point. Then, follow the prompts.
Fix 5:Restore Windows 11 from System Image Backup
A system image backup restores the entire operating system, including system files, installed apps, and settings. It’s far more reliable than System Restore when corruption is severe.
Note: ⚠️ This process overwrites current system changes made after the backup.
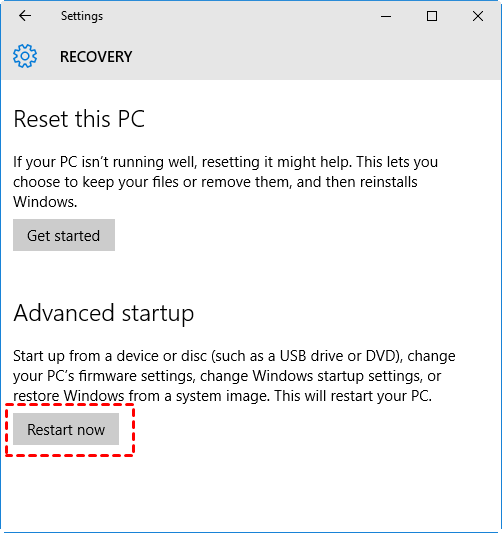
Step 1. Go to Settings >System >Recovery and click Restart now under Advanced startup.
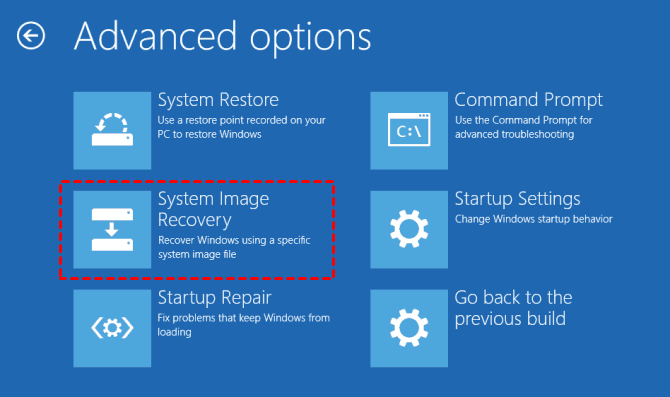
Step 2. Select Troubleshoot >Advanced options >System Image Recovery.
Step 3. Choose your Windows 11 system image backup. Follow the on-screen instructions to complete the recovery.
Fix 6:Reset Windows 11 without Removing Personal Files
Resetting Windows reinstalls all system components while keeping your personal files. This fixes deep system corruption when System Restore no longer works.
Step 1. Open Settings >System >Recovery and click Reset PC under Reset this PC.
Step 2. Choose Keep my files.

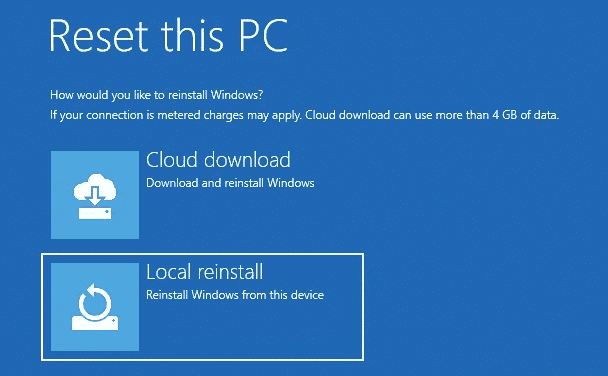
Step 3. Select Local reinstall or Cloud download. Follow the prompts and wait for Windows to reset.
Why System Restore Failed in Windows 11?
System Restore can fail for several technical or configuration-related reasons. The most common causes include:
- Corrupted system files: Damaged Windows files or file system errors prevent restore point data from being applied correctly.
- Antivirus or Windows Security interference: Real-time protection may block access to critical system files during the restore process.
- Misconfigured Volume Shadow Copy Service (VSS): System Restore cannot work if the service responsible for managing restore point snapshots is not running.
- Damaged restore points: Restore points may be unusable due to interrupted updates, power loss, or insufficient disk space.
- UEFI, Secure Boot, or recent Windows update conflicts: Firmware changes or newer updates can make existing restore points incompatible with the current system state.
Final Thoughts
You can easily fix System Restore failed in Windows 11, which is usually caused by corrupted system files, disabled services, damaged restore point, etc. If the situation is more difficult, you can choose to restore from system backup or reset Windows 11 while keeping your personal files.
Please don’t depend on System Restore alone, as it may not work, and the repair process may modify system files and settings, causing boot failure. It’s suggested to create regular backups in Windows 11 to protect the OS and data safely. Try powerful backup and restore software - AOMEI Backupper Standard if needed.

