


How to Schedule and Perform Virtual Machine Backup on Azure
Unlike VMware, Microsoft Azure provide a built-in backup feature, allowing you to protect your VM data by creating standalone VM backups. In this article, I will introduce how to schedule azure vm backup policy, and perform virtual machine backup on Azure.
By Crystal / Updated on March 8, 2023
Overview of virtual machine backup on azure
Azure is Microsoft's public cloud computing platform, offers a range of cloud services, including computing, analytics, storage and networking.
Once subscribed to Azure, you can access and use the services included in Azure Portal to create cloud-based resources, for example, virtual machines (VM).
![]()
Azure virtual machine backup options
With Azure's built-in backup feature, you can create independent backups in almost any language, on any operating system, and from any location. By default, the initial backup is always a full backup, you can choose to create differential or incremental backups later.
In addition, you can schedule your backup policy with different frequency, such as daily, weekly, monthly, and yearly, and enable backup compression and encryption according to your needs.
Backups will be stored in Recovery Services vault as recovery points. You can create up to 500 recovery vaults, per supported region of Azure Backup, per subscription, and each vault can protect up to 2000 datasources/items across all workloads (such as IaaS VM, SQL, AFS) and 200 policies. When restoring, you can choose to restore entire VM or specific files.
![]()
In this article, I will introduce how to perform virtual machine backup on Azure immediately, and schedule a backup policy.
Tip: Backup costs are separate from a VM's costs. You should calculate the price based on the amount of data backed up on the instance and the storage, to minimize unnecessary costs.
How to perform Azure virtual machine backup using Azure Backup
A suitable backup policy can better protect your VM data from data lost, and minimize the unnecessary costs spent on Azure. Azure's built-in backup feature allows you to create virtual machine backup immediatly, or schedule an Azure vm backup policy according to your needs.
In this section, I will introduce how to perform immediate and periodic virtual machine backup on Azure.
How to run a virtual machine backup immediately
1. Access to Azure portal. Select All services and search for Virtual Machines. Select the VM you want to back up from the list.
2. In the left inventory, select Backup option under Operations. And click Backup now button on the right page.
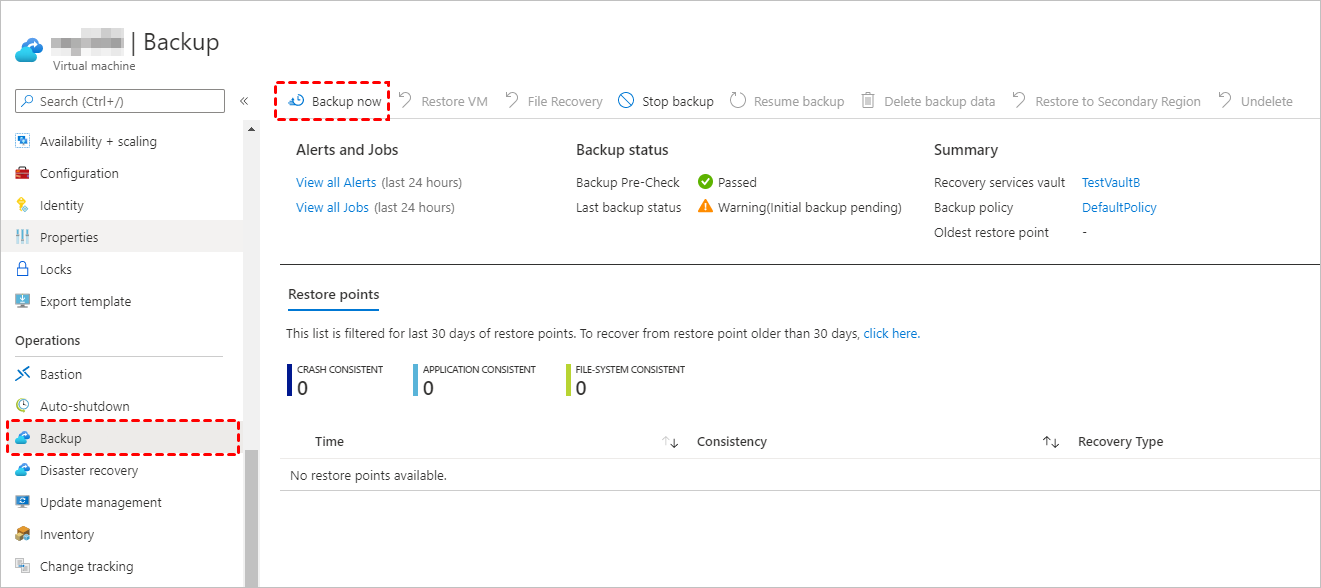
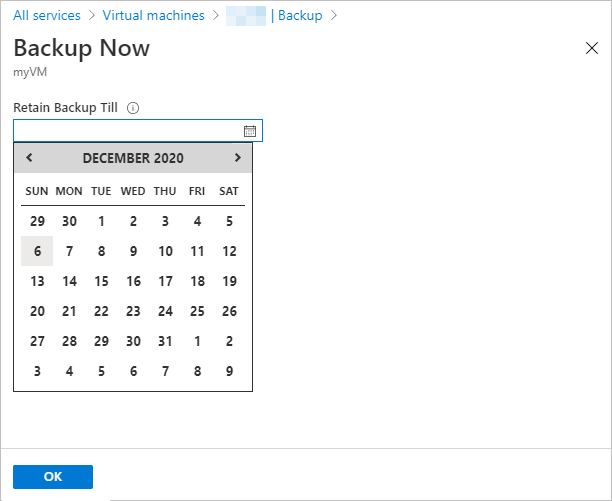
3. In Backup Now, select a date on the calendar for the Retain Backup Till option (until when the recovery point will be retained). Then click OK to start backup.
You can monitor the backup progress in View all jobs.
How to schedule virtual machine backup policy on Azure
1. Access to Azure portal. Select All services and search for Virtual Machines. Select the VM you want to back up from the list.
2. In the left inventory, select Backup option under Operations.
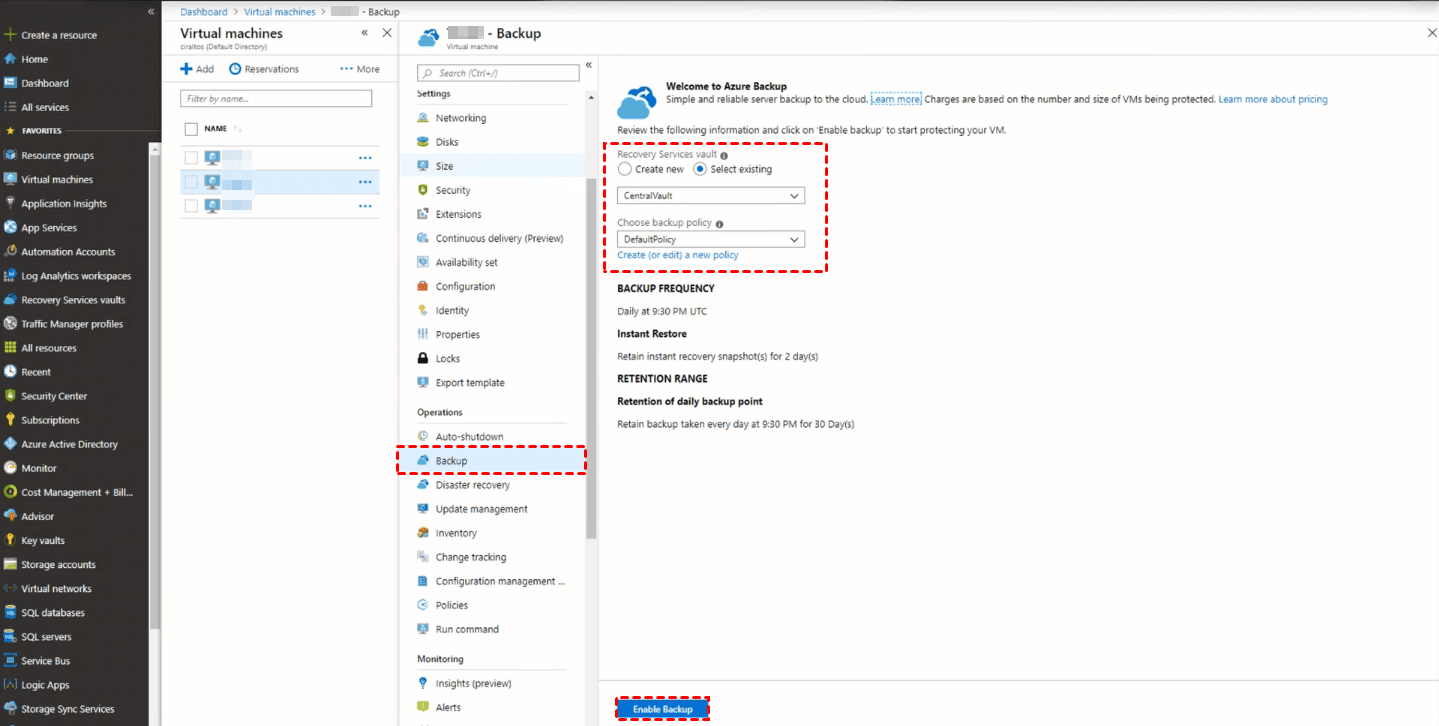
3. Select a Recovery Services vault.
- If you have a vault with the same resource group and location as the VM, Select existing.
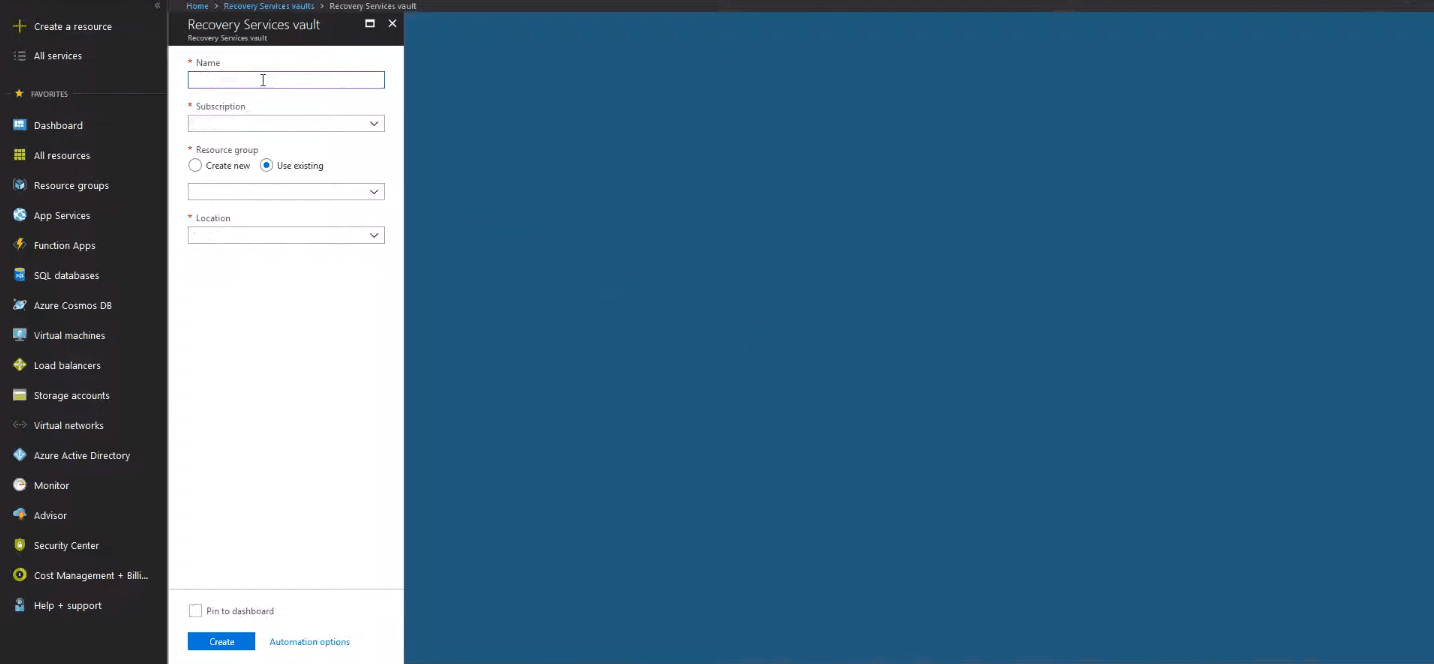
- If you don’t have a vault, click Create new, provide a Name, Subscription, the same Resource group and Location as the VM, to create a new vault.
4. Choose backup policy.
- If you already have a backup policy, you can select it in the dropping menu.
- If you leave the default policy, the VM will be backed up once a day at the time specified, and retains backups in the vault for 30 days.
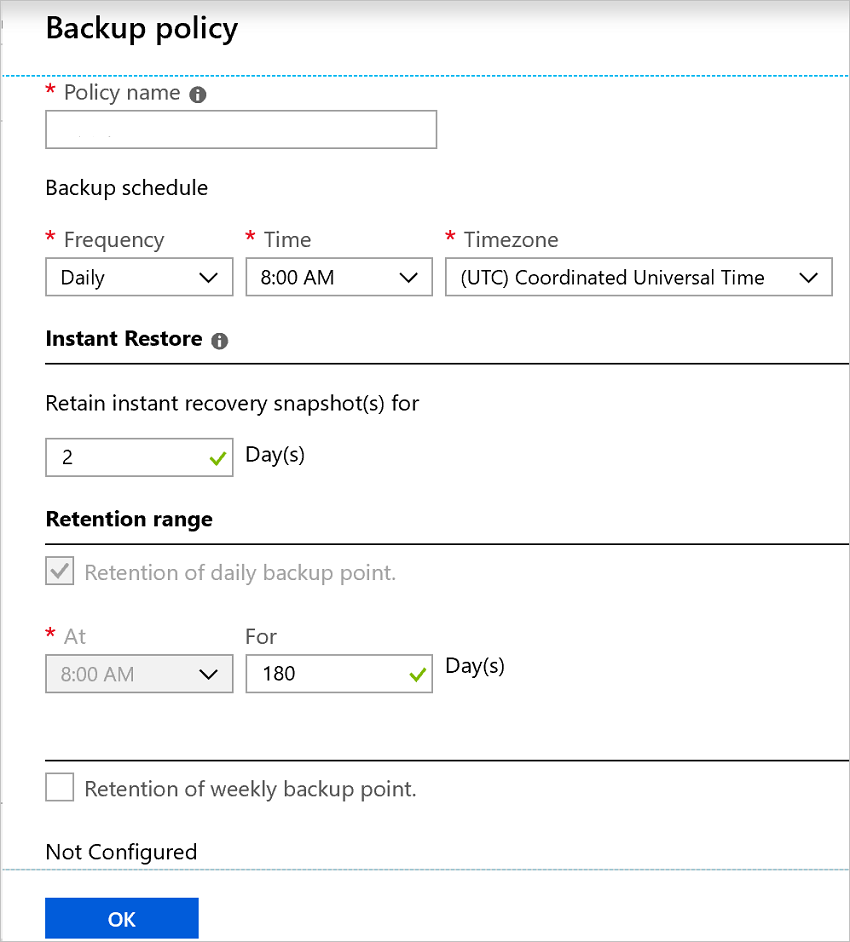
- If you want to create a new backup policy, click Create (or edit) a new policy. Provide a Policy name, Frequency, Time and Timezone, Retention range for this policy.
5. Click Enable Backup to associate this policy to the VM.
How to backup Hyper-V VMs with Azure Backup Server
In addition to backing up Azure virtual machines, Azure also allows you to back up Hyper-V or VMware VMs through Microsoft Azure Backup Server (MABS). But unlike the simple process of backing up Azure VMs, the process of backing up local VMs is much more complex. Here is a brief summary of the steps to backup Hyper-V VMs as an example.
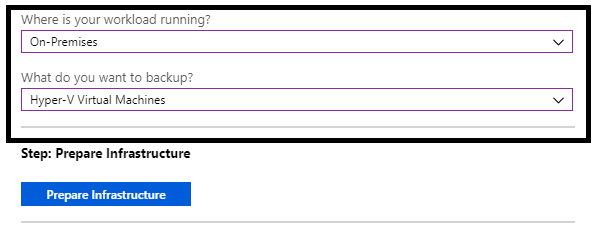
1. First of all, you need to prepare the additional components of Recovery Service vault and Microsoft Azure Backup Server.
Creating a Recovery Service vault, and then you need to configure On-Premises workload and select Hyper-V as desired source.
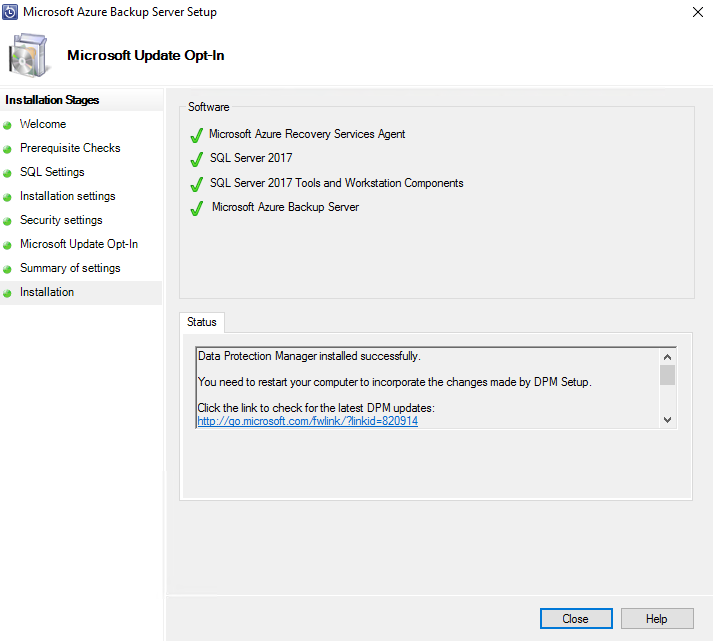
2. Install MABS and setup according to the wizard.
3. Configure the MABS storage. Here are the Microsoft’s official storage capacity guidelines:
- Average virtual machine size - 100 GB
- Number of virtual machines per MABS server - 800
- Total size of 800 VMs - 80 TB
- Required space for backup storage - 80 TB
Set up the MABS protection agent on the Hyper-V server or Hyper-V cluster nodes.
4. In the MABS Administrator console, select Protection > Create protection group to open the Create New Protection Group wizard.
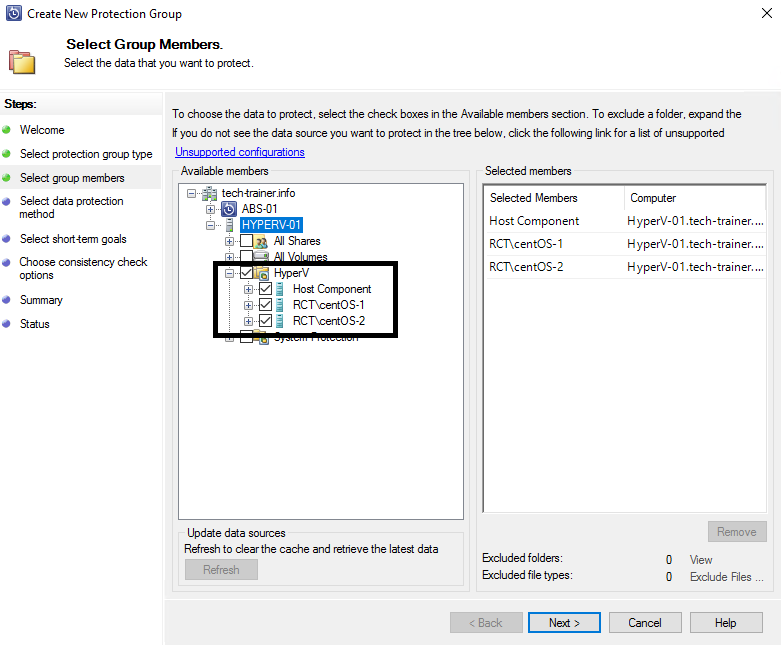
5. On the Select group members page, select the VMs you want to backup, and enable colocation to locate data from different protection groups on the same storage.
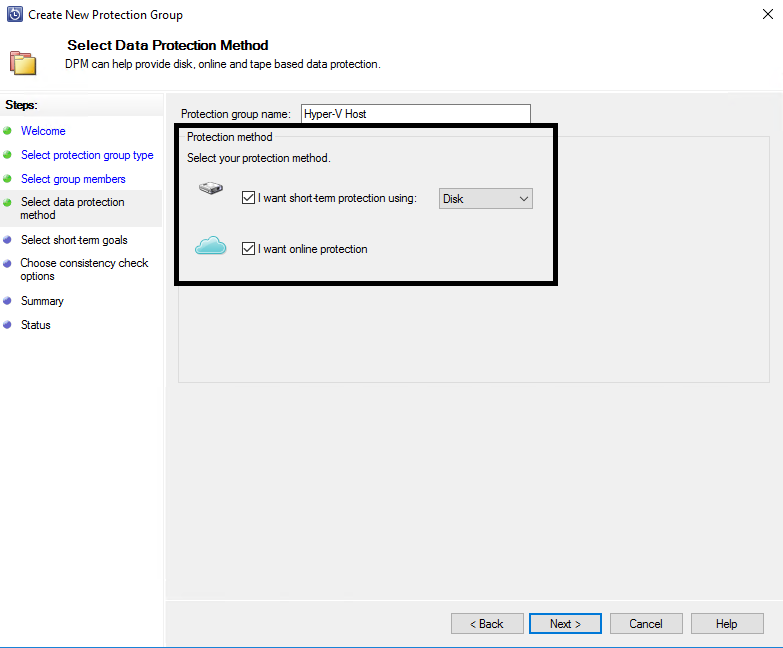
6. On Select data protection method page, provide a protection group name, check I want short-term protection using option and select Disk, and check I want online protection.
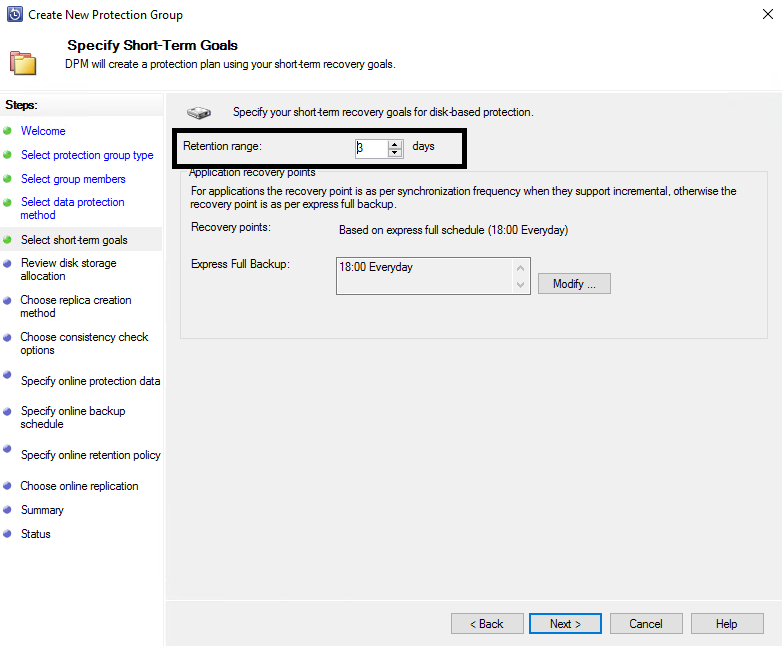
7. On Select short-term goals page, specify a Retention range, and how often the incremental backups should run, or MABS will run express full backup and creates recovery points according to the express schedule.
8. On Choose replica creation method page, select to Automatically or Manually create a replica of data.

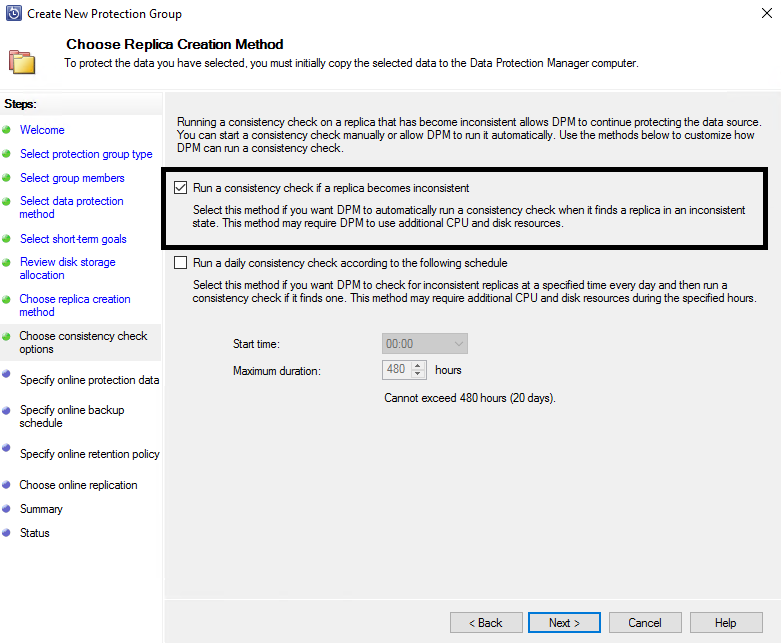
9. On Consistency check options page, select to Run a consistency check if a replica becomes inconsistent, or Run a daily consistency check according to the following schedule.
10. On Specify online backup schedule page, define the Azure virtual machine backup schedule as you need.

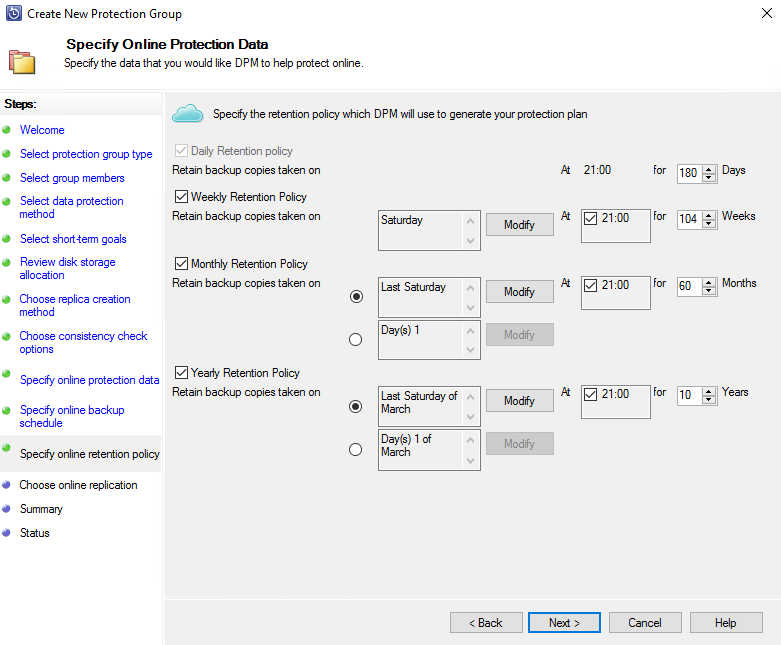
11. On Specify online retention policy page, specify the retention policy which DPM will use to generate your protection plan.
12. On Summary page, review all the settings and click Create Group. After you create the protection group, initial replication of the data occurs in accordance with the method you selected. After initial replication, each backup takes place in line with the protection group settings.
Microsoft’s official introduction: Back up Hyper-V virtual machines with Azure Backup Server
One easy alternative to backup Hyper-V & VMware ESXi VMs (Free)
As you can see, the process of backing up Hyper-V or VMware VMs to Azure is quite complex. Therefore, I introduce you to a free virtual machine backup software -- AOMEI Cyber Backup, which simplifies the process into 3 simple steps. In addition, it offers you the following benefits.
✦ Agentless Backup: create complete and independent image-level backup for VMware ESXi and Hyper-V VMs.
✦ Multiple Storage Destinations: backup to local or network share destinations.
✦ Automated Execution: create backup schedules to automate virtual machine protection.
✦ Restore Entire VM: restore immediately available VMs from any selected restore points.
✦ Perpetual Free: you can use AOMEI Cyber Backup Free Edition with no time limit.
AOMEI Cyber Backup supports both paid and free versions of VMware ESXi 6.0 and later versions, as well as Hyper-V in Windows 8/8.1/10/11, Windows Server/Microsoft Hyper-V Server 2012 R2 and later versions.
In next section I will demonstrate how to create an automatic backup task of multiple Hyper-V VMs. You can click the following button to download the freeware.
*You can choose to install this VM backup software on either Windows or Linux system.
3 simple steps to backup multiple Hyper-V VMs
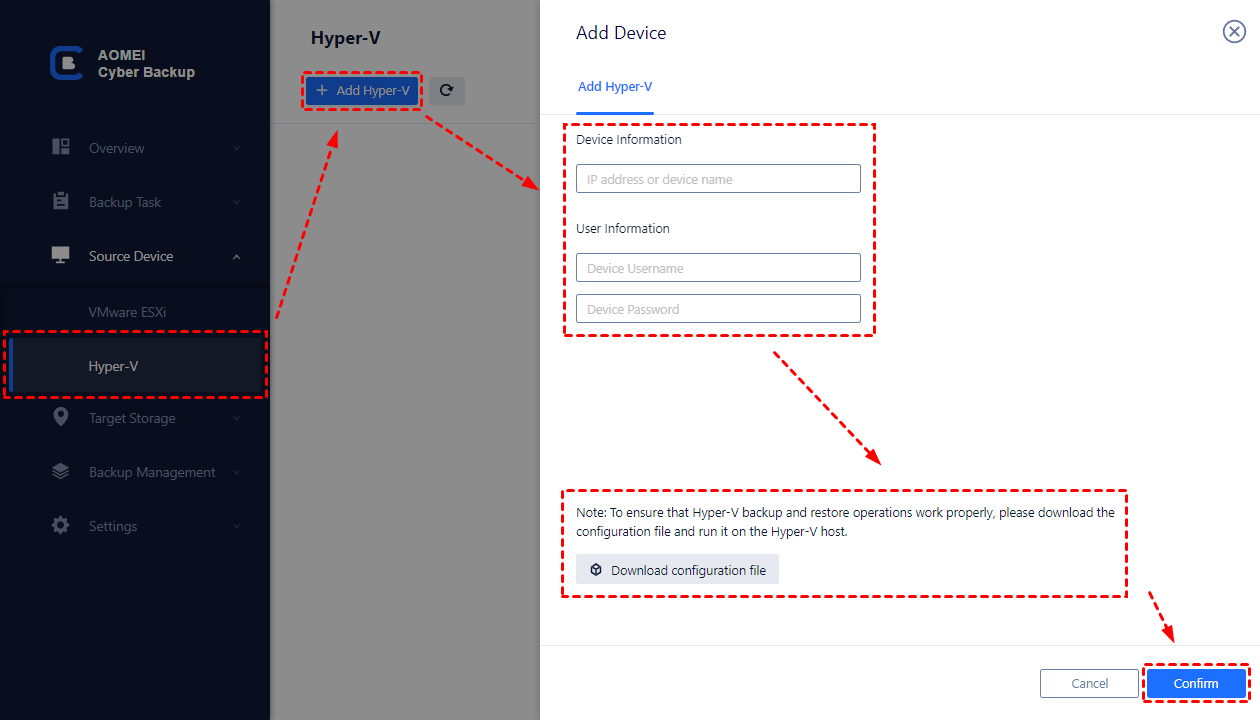
1. Bind Devices: Access to AOMEI Cyber Backup web client, navigate to Source Device > Hyper-V > + Add Hyper-V to add a host. And then click … > Bind Device.
2. Create Backup Task: Navigate to Backup Task > + Create New Task, and then set Task Name, Backup Type, Device, Target, and Schedule.
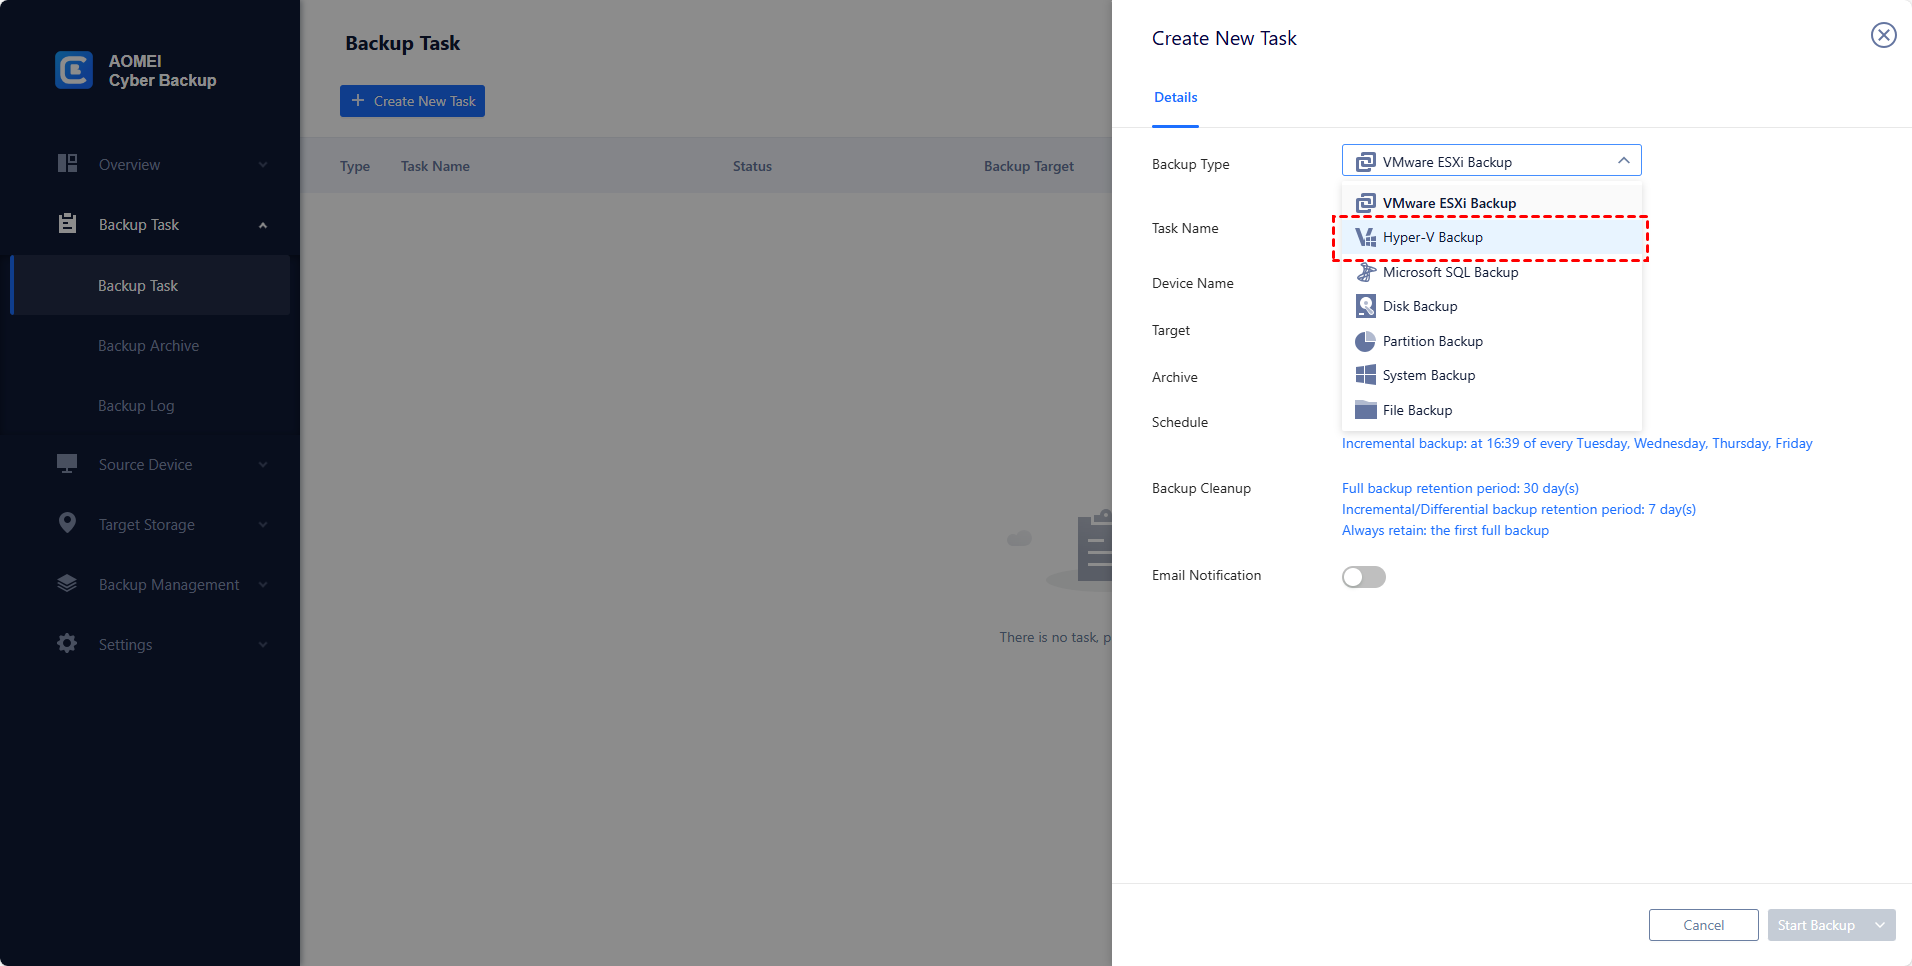
- Device: Select multiple VMs on the host to backup at once.
- Target: You can select to back up to a local path, or to a network path. Used paths will be saved in Favorite Storage for handy selection.
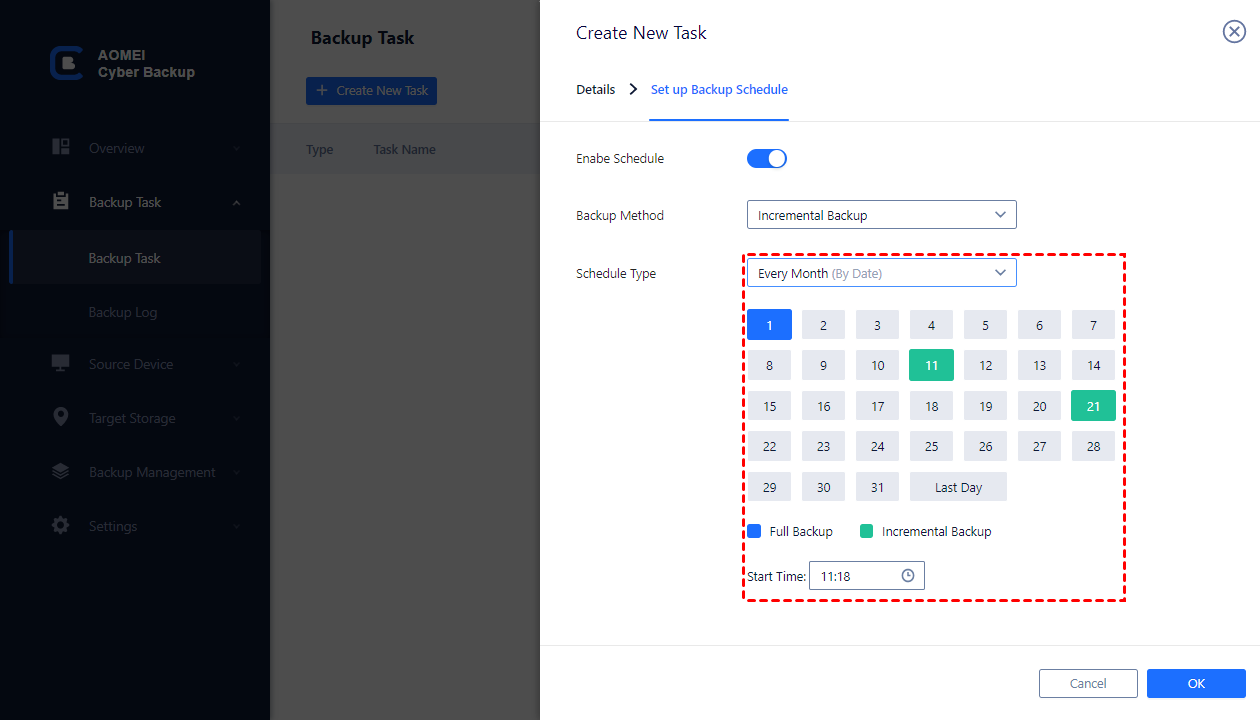
- Schedule: You can choose to perform full or incremental backup, and automate execution daily, weekly or monthly according to the frequency you specified.
3. Start Backup: Click Start Backup and you can select Add the schedule and start backup now, or Add the schedule only.
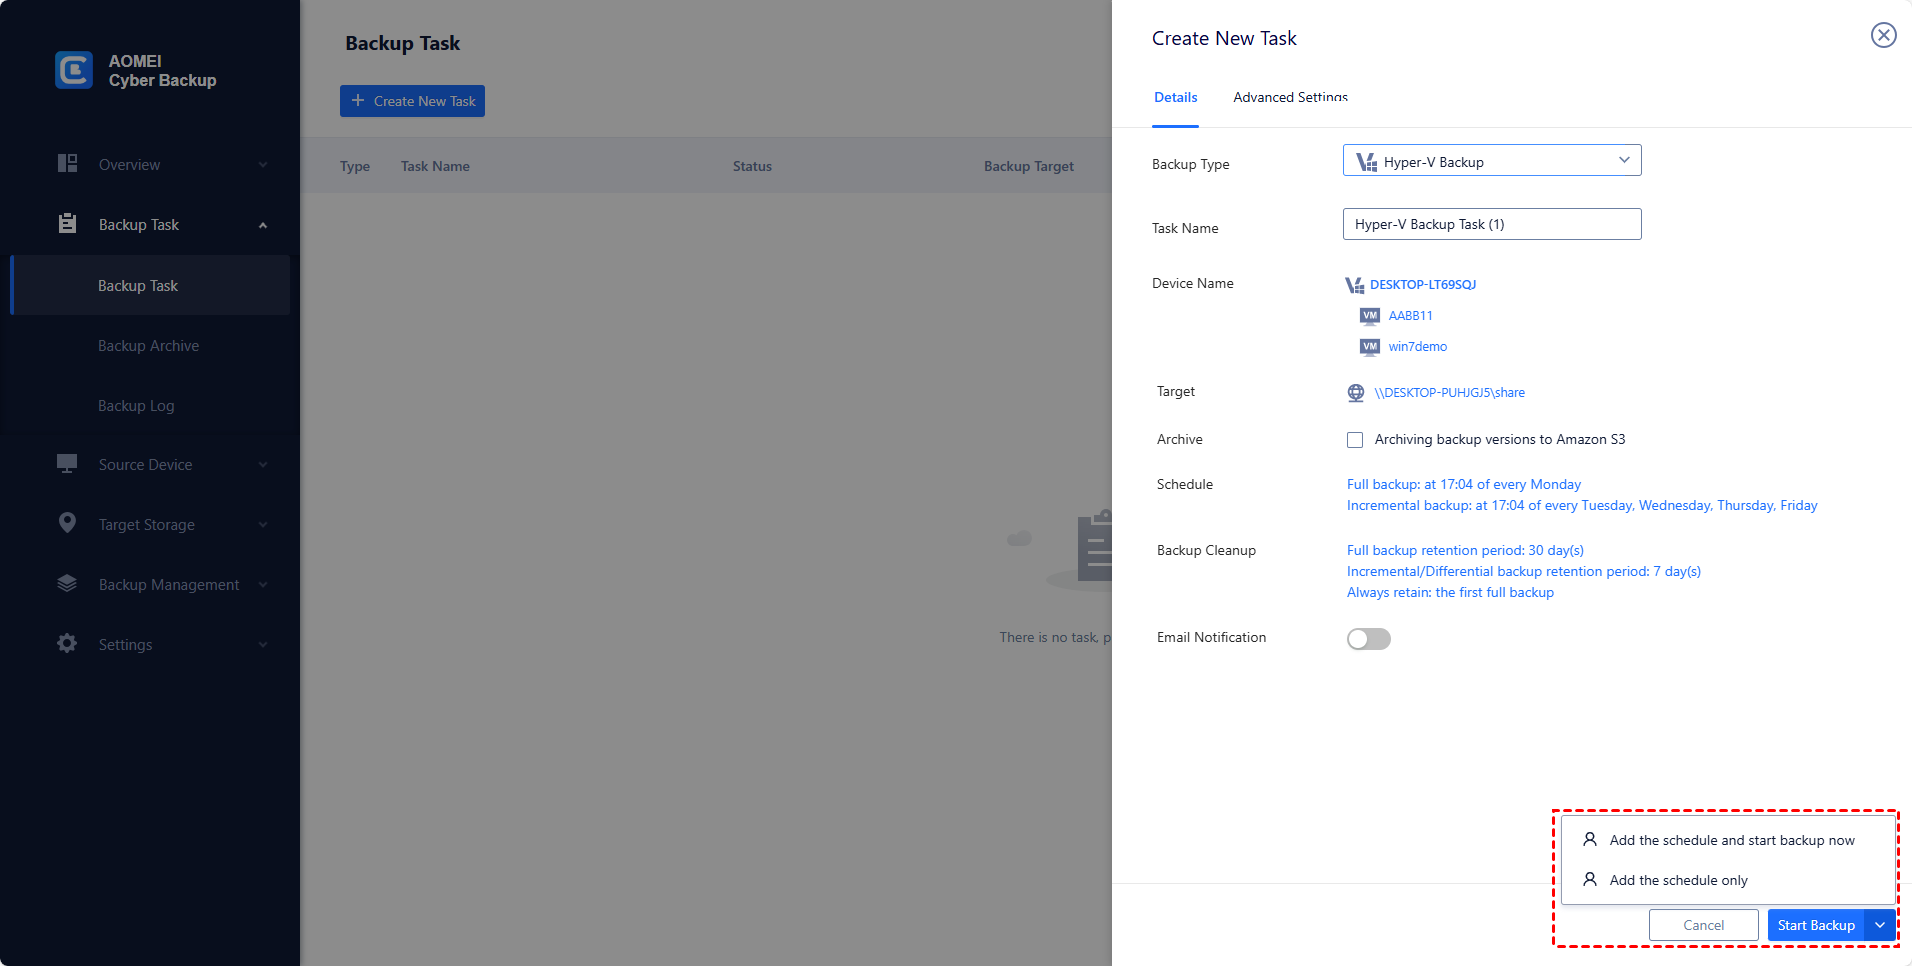
Created backup tasks will be listed and monitored separately, for progress checking, schedule changing and restoring.
While the Free Edition covers most of VM backup needs, you can also upgrade to enjoy:
▶ Backup cleanup: Configure a retention policy to auto delete old backup files and save storage space.
▶ Restore to new location: Create a new VM in the same or another datastore/host directly from the backup, saves the trouble of re-configuring the new VM.

Summary
If you want to create virtual machine backup on Azure, there's a built-in backup option that allows you to create independent backups of your VMs with extra backup costs. You can also use Azure Backup Server to backup local Hyper-V or VMware VMs, but it is much more complex.
Therefore, I recommend you AOMEI Cyber Backup, a dedicated backup tool that simplifies the process of backing up your Hyper-V or VMware ESXi VMs into 3 easy steps, greatly boosts your work efficiency.

