How to Recover Deleted Files from Synology NAS | Full Guide
How to recover deleted files from Synology NAS drive? This detailed guide will show you 4 methods to Synology recover deleted files and help you backup your data.
By Lori / Updated on March 25, 2025
Synology NAS is a network-attached storage solution that lets you store and access your files over a local network or the internet. It’s widely used by businesses and home users alike for its ability to store large volumes of data in a centralized, easily accessible location.
But what happens when you accidentally delete a file or folder from Synology NAS? Don’t panic! There are 4 ways to Synology recover deleted files and restore your data. and even some preventative measures to make sure you don’t end up in a data loss situation again. Ready to dive in? Let’s go!
Can You Recover Deleted Files in Synology NAS?
Yes, it is possible to recover deleted files from Synology NAS drive! Your chances of recovery depend on whether:
- The Recycle Bin feature was enabled.
- You have a backup using Hyper Backup, Shared Folder Sync, or Synology Drive Server.
- You use third-party software like AOMEI Cyber Backup.
If none of these were set up, file recovery becomes more challenging, but you can still try data recovery software. Let’s explore each method step by step.
How to Recover Deleted Files from Synology NAS
If you accidentally delete a file, don't worry, Synology offers several built-in data recovery features. In addition, if they don't work, you can rely on third-party tools. Let's explore these options.
Way 1. Synology Recover Deleted Files from Recycle Bin
If the Recycle Bin feature was enabled before the file was deleted, you can easily restore lost files. The Recycle Bin temporarily stores deleted files, allowing you to recover them without additional tools.
Step 1. Open DSM and go to Control Panel > Shared Folder. Select the shared folder and click Edit to check if Recycle Bin is enabled.
Step 2. If it’s not enabled, check Enable Recycle Bin and click Save. You can also restrict access to administrators only.
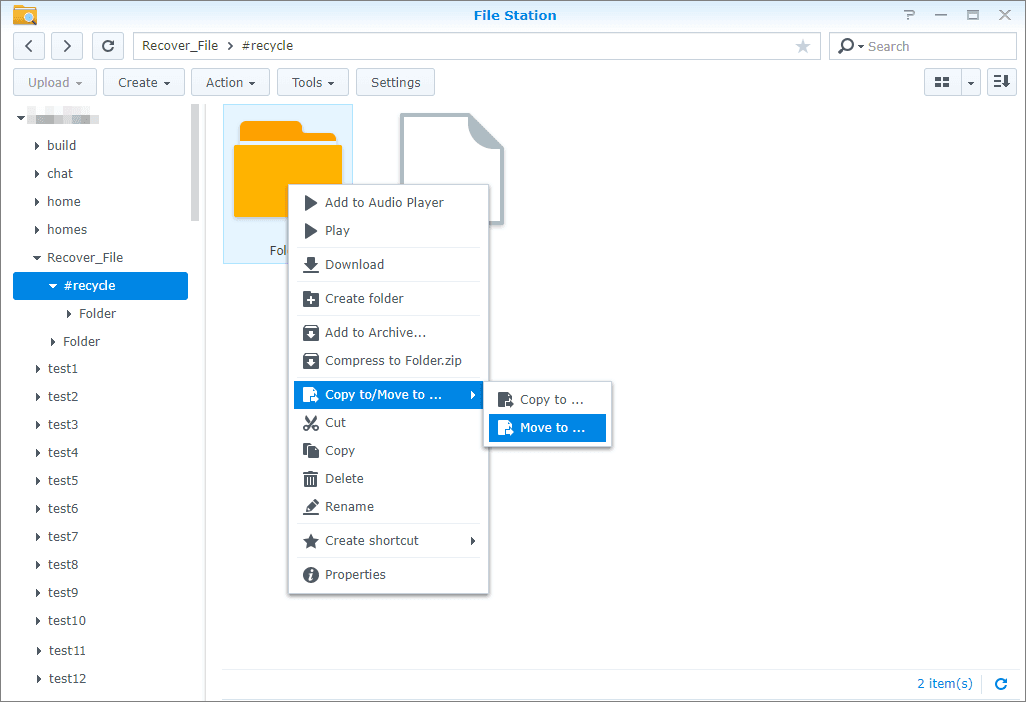
Step 3. Open File Station, navigate to the shared folder, and locate the #recycle subfolder.
Step 4. Find the deleted file, right-click it, and choose Restore to recover it to its original location.
Step 5. If using DSM 7.0 or earlier, select Move to… instead and choose the target folder for recovery.
Way 2. Recover Deleted Files Using Hyper Backup
How to Synology restore deleted files without Recycle Bin? Hyper Backup creates scheduled backups of your files, making it a reliable way to restore deleted data. If you previously set up a backup task, you can retrieve lost files from a backup version.
Step 1. Open Hyper Backup in DSM and locate the backup task that contains the deleted files.
Step 2. Click Version Explorer to browse different backup versions and find the one that includes your missing files.
Step 3. Select the backup version, click Restore, and choose whether to restore all files or only selected ones.
Step 4. If restoring individual files, navigate to the folder structure, select the files, and click Restore to Original Location.
Step 5. Verify that the restored files have returned to their original folder in File Station.
Way 3. Recover Deleted Files via Synology Drive Server
If you had Synology Drive Server enabled, you can recover deleted files from its version history or Recycle Bin. This is useful for retrieving files that were accidentally removed from shared folders.
Step 1. Open Synology Drive Admin Console and navigate to the Recycle Bin section to check for deleted files.
Step 2. Locate the missing file or folder and review its version history to find the correct version.
Step 3. Right-click the file and select Restore to recover it to its original folder.
Step 4. If you need an earlier version, open Version Explorer, select the desired version, and restore it.
Step 5. Confirm that the restored file appears in the original folder in File Station.
Way 4. Recover Deleted Files Using Shared Folder Sync
Shared Folder Sync can help restore deleted files if they were previously synced to another Synology NAS. You can access the backup device to retrieve lost data.
Step 1. Open File Station and connect to the backup NAS or synced storage location.
Step 2. Navigate to the shared folder and check if the missing file is still available in the synced directory.
Step 3. Right-click the file and select Copy to… or Move to… to restore it back to your primary Synology NAS.
Step 4. If the file isn’t visible, check sync logs to determine when it was last backed up.
Step 5. Once restored, verify the file’s integrity by opening it to ensure it works properly.
How to Backup Synology to Recover Deleted Files without Recycle Bin
AOMEI Cyber Backup is designed for businesses and home users to protect their data. It offers a range of backup options, including full backup, incremental backup, and differential backup. The software also supports recovery of files from Synology NAS devices.
- ★Key features of AOMEI Cyber Backup:
- Centralized Backup Functions: Besides physical machine backup, it also supports VM backup and SQL database backup.
- Automated Execution: You can schedule an automatic backup task to back up your Windows system for settled periods.
- Multiple Storage Destinations: Easily backup to local or network destinations according to your needs.
-
Restore Entire System: Restore instant entire system from any selected restore points to an original or new location.
Both free and paid version of AOMEI Cyber Backup support Windows Server 2016/2019/2022/11,10,8,7. Download the free version and try it today!
Step 1. Add Agent: Please ensure you have installed AOMEI Cyber Backup Agent to your computer for the backup.

Step 2. Bind Device: Navigate to Source Device >> Windows. Your device will automatically appear if it is compatible and online. Otherwise, you just need click +Add Windows Device to enter your Device Information and User Information.
Step 3. Create Backup Task: Click Backup Task >> + Create New Task, and choose backup type as System Backup. Then specify the Task Name, Device Name, Target, and Schedule according to your need.
- Task Name: Change the task name or use the default name with an ordinal.
- Device Name: If you are using the free version, you can choose to backup 1 Windows Server or 3 PC-based Windows systems.
- Target: Select to back up to a new local storage, or to a new network storage. Used paths will be saved in Favorite Storage for handy selection.
- Schedule: Choose to perform full, differential or incremental backup, and automate execution daily, weekly or monthly according to the frequency you specified.
Step 4. Start Backup: Once you set up your backup task, it will automatically do the Windows server backup. You can select Add the schedule and start backup now, or Add the schedule only.
Step 5. Start Restore: From the created backup tasks, locate the backup task you want to restore and click … >> Restore. Choose to Restore to original location to create the same data directly from the backup.
Bonus Tips to Prevent Future Data Loss
While recovering deleted files is possible, the best defense is always prevention. Here are a few steps you can take to protect your files:
- Enable Versioning: Keep multiple versions of files to easily revert to previous ones.
- Use Snapshots: Regularly schedule snapshots of your Synology NAS to roll back changes when needed.
- Automate Backups: Use tools like AOMEI Cyber Backup to schedule regular backups of your data.
- Store Data in the Cloud: Keep an additional copy of important files in the cloud for added security.
Conclusion
In this post, you have multiple options for Synology recover deleted files. Built-in tools like Recycle Bin, Hyper Backup, and Synology Drive Server. If you haven’t enabled these, Shared Folder Sync or third-party tools like AOMEI Cyber Backup can help.
If you want to prevent future data loss, take proactive steps like enabling versioning and scheduling regular backups. Data loss is unfortunate, but with the right tools and practices in place, you’ll always have a way out.
FAQs on Synology Recovery
1. Can Synology restore deleted files without Recycle Bin?
Yes, you can use Synology’s built-in recovery tools like the Built-in tools like Hyper Backup, and Synology Drive Server. If you haven’t enabled these, Shared Folder Sync or third-party tools like AOMEI Cyber Backup.
2. How can I prevent accidental file deletion on Synology NAS?
Enable versioning, create regular snapshots, and automate backups to protect against accidental deletions.
3. What is the best third-party software for recovering deleted files from Synology NAS?
AOMEI Cyber Backup is highly recommended, as it offers a comprehensive backup and restore solution for Synology NAS.
4. How often should I back up my Synology NAS?
It’s best to schedule regular backups, ideally once a day or once a week, depending on how frequently your data changes.