How to Create MySQL Incremental Backup on Windows? (2 Ways)
Want to create MySQL incremental backup to improve backup efficiency and save storage space? This page offers two solutions for your reference.
By Dylan / Updated on October 23, 2024
Why perform MySQL incremental backup?
Making backups is always needed for disaster recovery. If there are a small number of databases, we can make a full backup every day because it won't take much time. However, when the databases grow large, making a full backup may involve high server load and plenty of storage space. What should we do then?
Incremental backup helps a lot under this condition. An incremental backup only contains information that has changed after the previous backup was created, thus reducing the size of backups greatly and allowing you to make such backups very often. What’s more, you are able to perform point-in-time recovery from MySQL incremental backup. Want to know how to make an incremental backup for MySQL databases? Please read on.
How to run MySQL incremental backup using binary log?
The binary log is a set of log files that contain information about data modifications made to a MySQL server instance. All transactions applied to the MySQL Server are sequentially written to binary log files. Hence, you can create MySQL incremental backup through a backup of binary log files. Follow the instructions below:
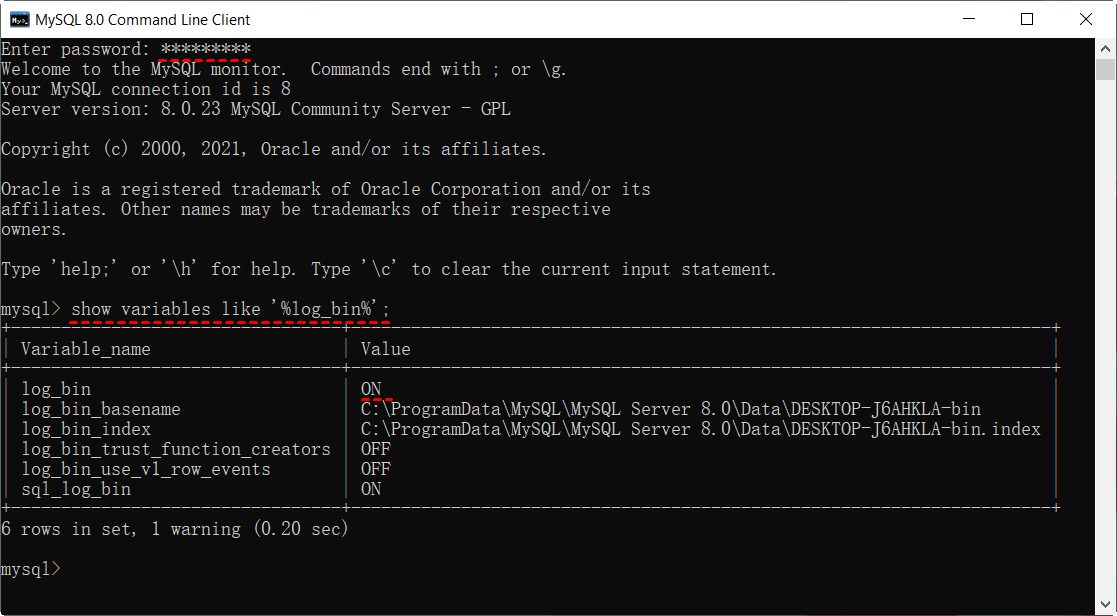
1. Check if binary log is enabled
1.1. Run the show variables like '%log_bin%'; command in MySQL Command Line Client.
1.2. If the value of log_bin is ON, then directly go to step 2; if the value is OFF, then edit the MySQL Server configuration file to enable binary log.
★ How to enable binary log?
① Find the MySQL Server configuration file. It is “my.cnf” on Linux and “my.ini” on Windows. For me, the “my.ini” file is located in C:\ProgramData\MySQL\MySQL Server 8.0, so I show the hidden C:\ProgramData directory first.
② Copy “my.ini” to desktop and open it with Notepad. Inside the [mysqld] section, add the following lines and save the changes:
-
server_id=1
-
log_bin=“computername-bin”
-
max_binlog_size=100M
③ Replace the original “my.ini” file with the modified one. You’ll be asked to provide administrator permission.
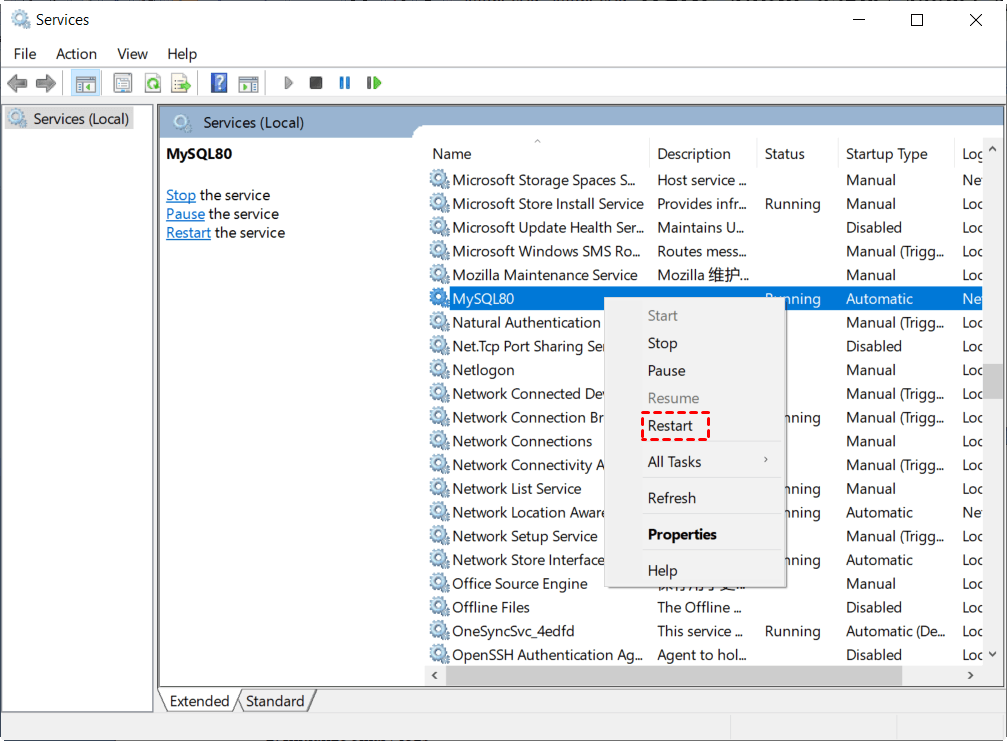
④ Restart MySQL database server in the Services window. You can press Win + R keys and type services.msc in the Run window to get to the window.
2. Initialize binary logs
An incremental backup should start with a full backup. Run the following commands in an elevated Command Prompt to initialize binary logs:
-
mysqldump -u root -p --flush-logs --delete-master-logs --lock-all-tables --all-databases > D:\MySQLBackup\all_databases.sql (you can specify another backup location to replace D:\MySQLBackup)
-
[password]
-
exit
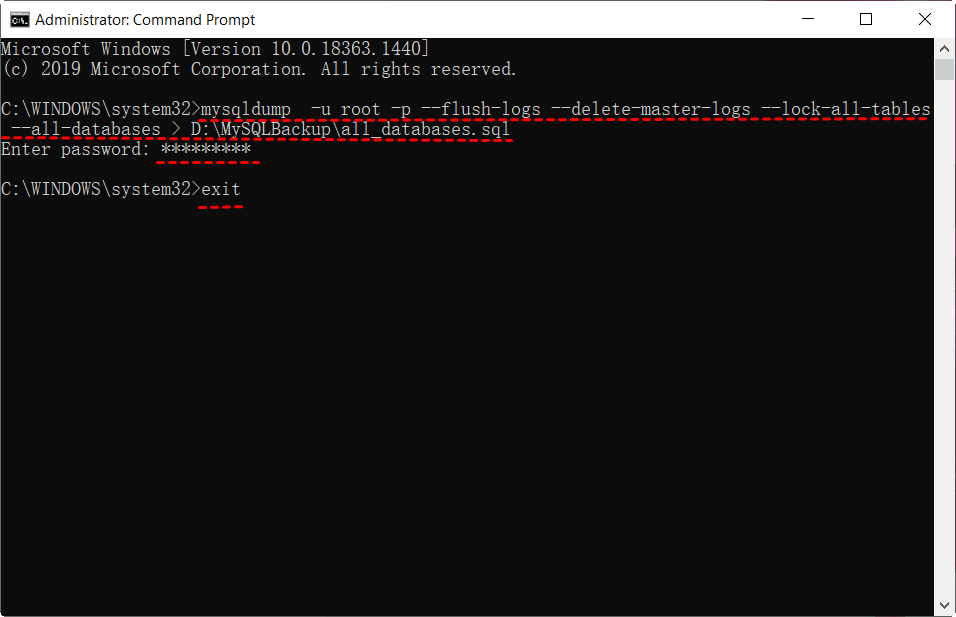
Notes:
● --flush-logs: initialize writing a new binary log file
● --delete-master-logs: delete old binary log files
● --lock-all-tables: lock all tables across all databases
3. Backup binary log files
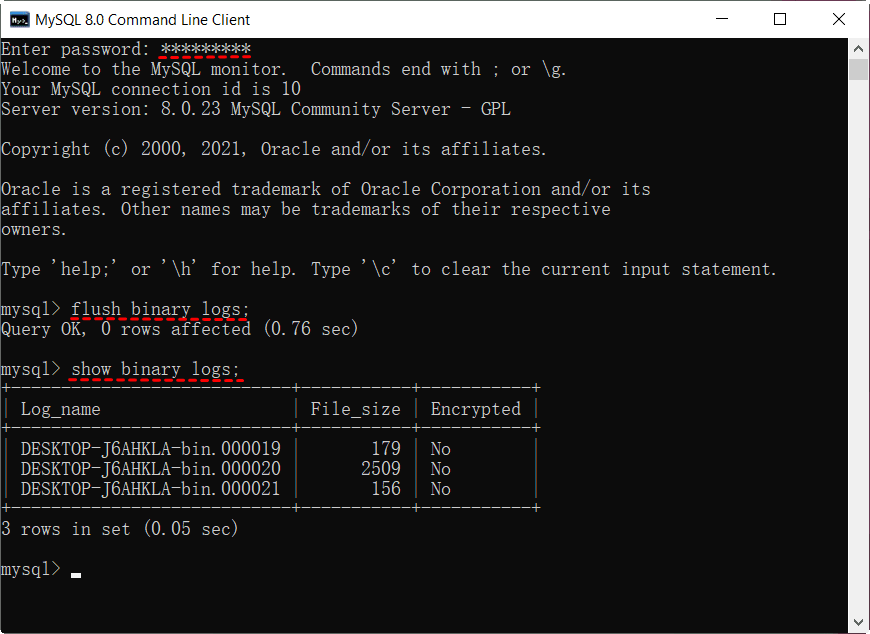
After you have modified your data in MySQL database since the last full backup, you can follow the steps below to run an incremental backup:
3.1. Execute the following commands in MySQL Command Line Client. Don’t close MySQL Command Line Client so that you can continue using it in step 3.3.
-
[password]
-
flush binary logs;
-
show binary logs;
3.2. Copy all binary logs which range from the one of the moment of the last full or incremental backup to the last but one to the backup location. You can run the following commands in an elevated Command Prompt.
-
cd C:\ProgramData\MySQL\MySQL Server 8.0\Data (specify the directory location of binary logs)
-
copy DESKTOP-J6AHKLA-bin.000019 D:\MySQLBackup (specify the file to copy and the destination path)
-
copy DESKTOP-J6AHKLA-bin.000020 D:\MySQLBackup
-
exit
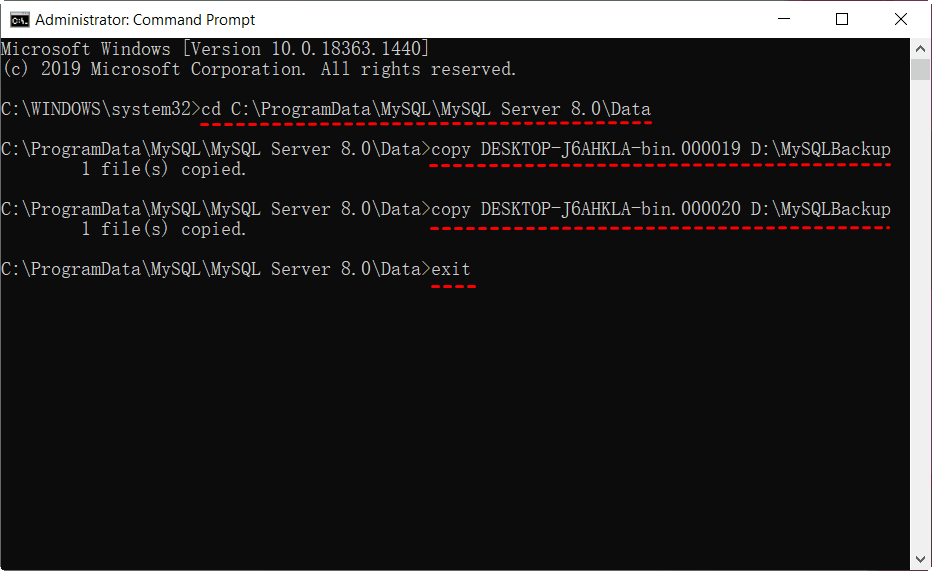
Note: You can’t specify multiple file names in one copy command.
3.3. After copying the binary log files, they must be deleted so that during the next copying they do not duplicate the already backed up data. Execute the following commands to delete old binary logs and exit MySQL Command Line Client.
-
purge binary logs to ‘DESKTOP-J6AHKLA-bin.000021’; (all binary logs before DESKTOP-J6AHKLA-bin.000021 will be deleted)
-
exit

Till now you have finished MySQL incremental backup.
How to restore from MySQL incremental backup?
When you encounter data loss or corruption with your MySQL database, you can follow the steps below to restore it:
1. Turn off binary log. If you do not do this, then all restored data will land in binary log files.
1.1. Add the skip-log-bin line behind the log_bin=“computername-bin” line in the [mysqld] section of the “my.ini” file.
1.2. Restart MySQL database server in the Services window as mentioned above.
1.3. Run the show variables like '%log_bin%'; command in MySQL Command Line Client to check if the value of log_bin is OFF now.
2. Restore your corrupted database from the full backup and incremental backup sequentially.
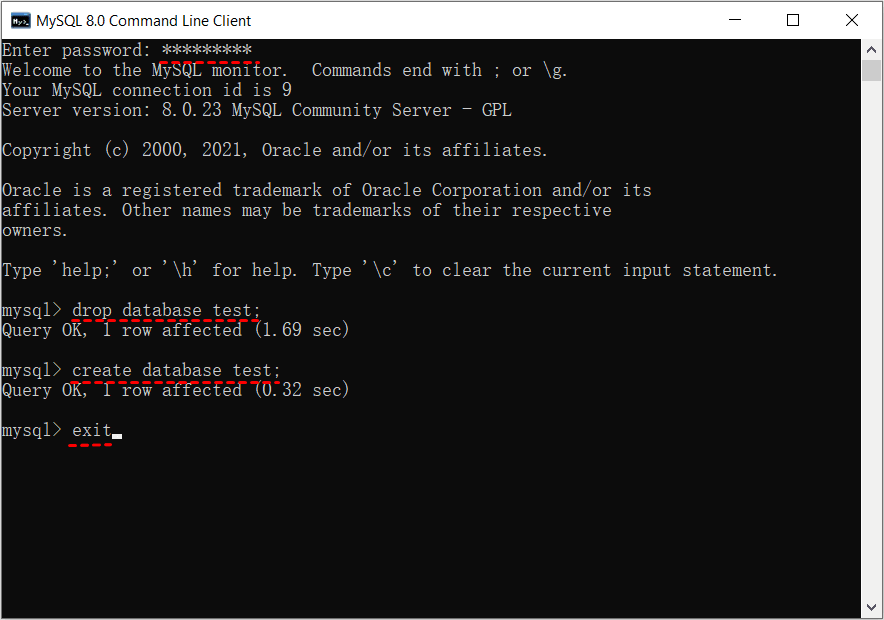
2.1. Execute the following commands to drop the original database and recreate an empty one.
-
drop database test; (“test” is the name of the database I want to restore)
-
create database test;
-
exit
2.2. Run Command Prompt as administrator and type the following commands to restore data in the “test” database and close Command Prompt.
-
mysql -u root -p -o test (“-o” allows you to specify one database to restore)
-
[password]
-
mysqlbinlog D:\MySQLBackup\DESKTOP-J6AHKLA-bin.000020 | mysql -u root -p (specify the binary log to be imported)
-
[password]
-
exit

Note: To import multiple binary log files, you should indicate them in ascending order.
3. Turn on binary log again by deleting skip-log-bin in the [mysqld] section of the “my.ini” file and restart MySQL database server.
Easier way to create MySQL incremental/differential backup
As you see, the whole process to perform MySQL incremental backup and restore using binary logs is complicated and time-consuming. As they are command-line operations, there is no chance for you to go back if you made mistakes during the backup and restore process.
Luckily, powerful MySQL backup software - AOMEI Cyber Backup offers a user-friendly interface that makes things easier. What’s more, you can modify your settings and execute operations after confirmation. The following are its main features:
✦ You are able to do system backup, disk/partition backup or file backup as per your need.
✦ You can create MySQL full backup to backup all data or run incremental/differential backup to backup only changed data.
✦ You are allowed to schedule MySQL backups to run automatically and enable smart deletion mechanism to delete obsolete backups.
✦ It supports all Windows Server & PC operating systems, including Windows Server 2019/2016/2012/2008 and Windows 10/8/7.
To backup MySQL databases with AOMEI Cyber Backup, you just need to backup the data directory. If it is hidden, show hidden items first. Learn how to do MySQL incremental backup step by step below. Please note the very first backup must be a full backup.
Step 1. Download AOMEI Cyber Backup free trial. Install and launch it.
Step 2. Click Source Device > Agents. Then download agent to the computer that installed MySQL and install the agent.

Step 2. After the agent is installed, the computer will be listed on the interface. Click Backup Task > Backup Task > Create New Task. Choose the File Backup as the backup type.
Step 4. Choose the whole MYSQL folder as the backup content. Choose a backup target to save the backup files. And configure other settings according to your needs.
Step 5. Click Start Backup to commit and execute the backup task.
Wrapping things up
If you want to perform MySQL incremental backup on Windows, you can resort to the two methods offered on this page. Compared to binary logs, AOMEI Cyber Backup is simpler and more powerful. Other than backup MySQL, it also helps you backup VMware, Hyper-V, Windows computers, MS SQL database, and other critical business data.