How to Copy Recovery Partition to USB in Windows 11, 10, 8, 7
How to copy recovery partition to USB in Windows 10/8/7? This guide shows the detailed steps to copy Dell, HP, ASUS, Lenovo, etc. recovery partition to USB or another hard drive.
By Delia Updated on May 29, 2025
About the recovery partition on your PC
Recovery Partition, also known as factory restore partition, is a part of disk drive that set aside by the manufacturer to keep an image of the system. Many laptops come with a recovery partition allowing you set the computer back to original state using specialized utilities, such as Acer eRecovery Management, ASUS Recovery Partition, Dell Factory Image Restore, Gateway Recovery Management, HP PC System Recovery, or Sony VAIO Recovery Wizard.
It is not hard to access this kind of built-in recovery partition. Normally, pressing Ctrl+F11 at boot time will initiate the recovery procedure. However, some users may want to clone the recovery partition to a USB drive, and use it as a portable backup or recovery solution for your computer.
Let's talk about it in detail.

Why clone recovery partition to USB drive?
"I’d like to clone HP Recovery Partition to USB drive and upgrade this slow HDD to fast SSD. So how can I move the recovery partition from the HDD to the USB drive I’m using?"
This is one of the scenarios where people want to copy recovery partitions. In this case, you can place the partition on USB drive, replace the HDD with new disk, insert the USB as bootable media, then boot the PC and perform recovery from USB flash drive, which is almost the same as clean install.
If fact, this is not the only application of copying recovery partition, you may consider doing it for these reasons:
🔹Free up space on your hard drive. A Recovery Partition holds a image of original PC state, so it usually varies from MBs to GBs. But for disks with small capacity, several GBs space is also valuable. Moving Recovery Partition to flash drive and then deleting it will generate an unallocated space, you can then extend other partitions, or move unallocated space to C drive to enlarge system space.
🔹Creating bootable USB from recovery partition can help you perform system restore when system crashes or you want to replace the hard drive, just like in the case above.
🔹Cloning the partition as a duplication of the recovery drive. For instance, copying Acer Recovery Partition to USB drive and putting it aside, thus you will always have a backup drive even if the computer hard drive fails and the built-in recovery partition won't work.
📑Tips:
- If you have the habit of backing up system and data regularly, then you can delete the Recovery Partition on the hard drive because you already have a disaster recovery strategy in place.
- But if you do not back up often, then the Recovery Partition may be the last resort in case your computer fails, and it's also a good idea to copy it to other devices.
How to clone recovery partition to USB in all the Windows systems
To clone recovery partition to USB, you can make it with Windows built-in tool or via third-party cloning tool named AOMEI Backupper Professional. But it’s not that easy to copy recovery partition to USB with the built-in tool. If you prefer an easy and quick way to copy Dell, HP, ASUS or Lenovo recovery partition to USB or to another hard drive, AOMEI Backupper is recommended.
Clone recovery partition to USB with AOMEI Backupper
Some users cannot clone recovery partition to USB drive with Windows built-in tool because the partition contains system programs. There are chances that you will get “the drive is not a valid backup location” warning.
Luckily, AOMEI Backupper Professional will solve this problem for you. With Disk Clone feature, you can clone ASUS, Dell, HP, ASUS, Lenovo...recovery partition or even copy hidden Recovery Partition to USB drive, another hard drive or SSD. Also, it supports cloning between NTFS and FAT32 file systems.
The operation is very simple in a user-friendly interface. You can download it on Windows 11/10/8/7/Vista/XP and follow these steps to copy Recovery Partition along with the disk. Clone features in the trial can only be demonstrated. Please upgrade for full functionality.
Step 1. Install and start AOMEI Backupper. Plug in the USB drive and make sure it can be detected by Windows. Click Disk Clone under Clone tab.

Step 2. Select the source disk containing the Recovery Partition.

Step 3. Select the USB drive as the destination disk. Please note that all data on this USB drive will be overwritten, so backup files you care most beforehand.

Step 4. Tick Sector By Sector Clone to copy all the sectors and create an intact copy of the disk. This ensures the cloned Recovery Partition can work normally. Then click Start Clone to execute the operation.

📑Tips:
-
When cloning Recovery Partition to SSD, you can check SSD Alignment to improve the reading and writing speed.
-
The Professional Edition supports cloning system disk from MBR to MBR, GPT system disk to MBR, migrate MBR system disk to GPT, or move GPT system disk to GPT.
-
The Professional edition also supports you to resize partitions or modify drive letters on the destination disk via the Edit Partitions feature.
How to create recovery USB drive for portable use
Creating a recovery USB allows you to attain a bootable drive that can help you troubleshoot and recover your computer in case of system issues or failures, which is basically what a recovery partition can do, only with more flexibility. Here I will introduce 2 ways to do so.
Create Windows 10 recovery USB with AOMEI Backupper
The recovery USB created by built-in tools will not work on computers running different systems (or non-system computers). If you want a more flexible way, you can choose to create recovery drive using AOMEI Backupper.
- With it, you can not only create Windows 10/11 recovery USB for the current computer but also another PC.
- It can be applied to all Windows PCs, including Windows 11/10/8/7 (both 32 bit and 64 bit).
- It enables you to create bootable DVD/CD or USB that can be used to start a crashed computer of HP, Lenovo, Acer, ASUS, Dell, etc.
- And the created media is able to boot in both BIOS and UEFI mode.
- As a complete data protection solution, it allows you to create scheduled system backup, disk backup, file backup and partition backup to various locations, such as local disk, external drive or network share, cloud, etc.
Step 1. Prepare a USB drive with sufficient capacity, and connect it to your computer. Then launch AOMEI Backupper.
Step 2. To recover Windows via this tool, you can create a regular system backup in advance (go to "Backup" tab).
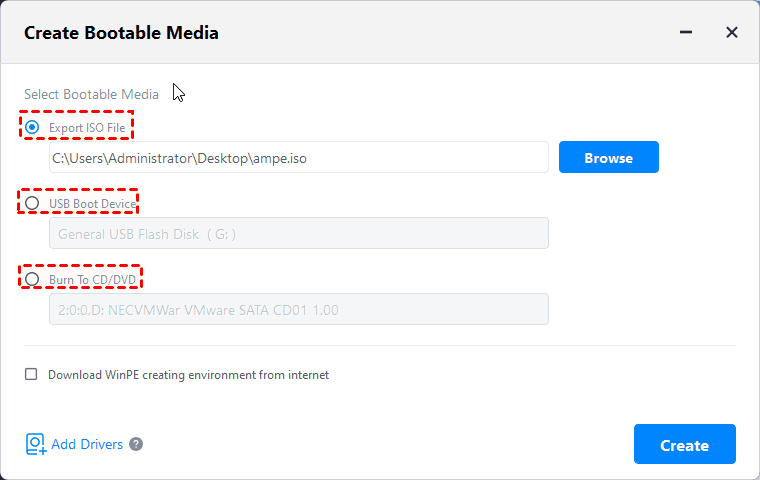
Then click “Tools” from the left panel and then select “Create Bootable Media”.

Step 3. Select bootable disc type from Linux based or Windows PE based, and click “Next”. Linux based bootable media only allows you to use basic functions of AOMEI Backupper, while Windows PE allows you to access full functions.

Step 4. Then you can select a "CD/DVD" or "USB drive" to create this Windows 10/11 bootable recovery media and then click “Next” to run this process.
With AOMEI Backupper, you could create Windows recovery USB to boot the current computer or another PC into WinPE, and then perform system restore from a created system image.
📑Tips:
- If you haven't made any system backup before the failure, you can also create system image on another working computer, and restore it to the problematic one via the Universal Restore feature.
- If you don't have any USB or CD/DVD , you can simply enable the AOMEI recovery environment for the same effect.
Copy recovery partition to USB with Windows built-in tool
Step 1. Click Start menu to access search box.
Step 2. Type recovery drive in the search box and select Create a recovery drive.
Step 3. When the recovery drive tool opens, select Copy the recovery partition from the PC to the recovery drive and then select Next.
Step 4. Plug in your USB flash drive/external hard drive and select it and choose Next.
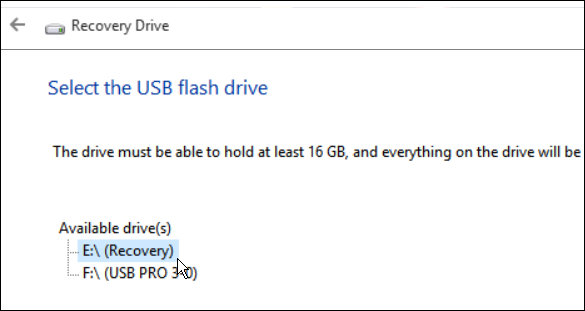
Step 5. Choose Create and then it will start to copy recovery partition.
Summary
It won’t be long before the process to be completed. You can create a bootable media (USB or CD/DVD) using this software in case the system refuses to boot.
AOMEI Backupper also allows you to clone bootable USB drive to hard drive in Windows as well as clone hard drive with bad sectors. It is still reliable backup solution that brings system backup, disk backup, partition backup, and file backup features for you.

