How to Backup VMware Virtual Machine While Running | 4 Ways
Nowadays, virtual machines are used widely by people especially enterprise users. As a result, backing up VMware virtual machine becomes more and more important. Learn how to backup VMware virtual machine while running with the best four solutions from this page.
By Lily Updated on October 29, 2024
Why should you backup VMware virtual machine?
A virtual machine is an emulation of a computer system and provides functionality of a physical computer. Nowadays, it is becoming more and more popular especially among enterprise users. It allows users to do many dangerous operations without worrying the safety of a physical computer.
Among all virtual machine software, VMware stands out. It offers very comprehensive virtualization products, including Fusion for the Apple Mac and Workstation Player for the PC. With VMware, you are able to run Windows on a Mac or run Linux on a Windows PC.
People would like to backup VMware virtual machine for different reasons. Here are some common reasons:
-
Convert virtual machine to physical computer by restoring a virtual machine to a physical computer from backup.
-
Take a backup before making big changes to your VMware virtual machine.
-
Backup for testing purposes or make a compressed data archive.
No matter what your purpose is, creating a backup at the first place is always a wise decision for data protection. Think about this: if you have hundreds of virtual machines and you didn’t backup them in time, once the system crashes or other accidents happen, then your losses would be incalculable.
Best 4 VMware virtual machine backup solutions
To backup the operating system, application files, settings, and user data of a virtual machine, you need to make a copy of the folder where the virtual machine is stored and paste it to another location, like a USB flash drive or an external hard drive. Ensure that the virtual machine is not running or suspended while you are backing up the virtual machine.
If you want to backup VMware virtual machine while running, you can turn to the following four solutions:
Solution 1: Use Windows Backup and Restore
Windows Backup and Restore is a great built-in backup utility. You can use it to backup important data or create a system image to a local or network location. Let’s see how to backup VMware virtual machine with Windows built-in tool.
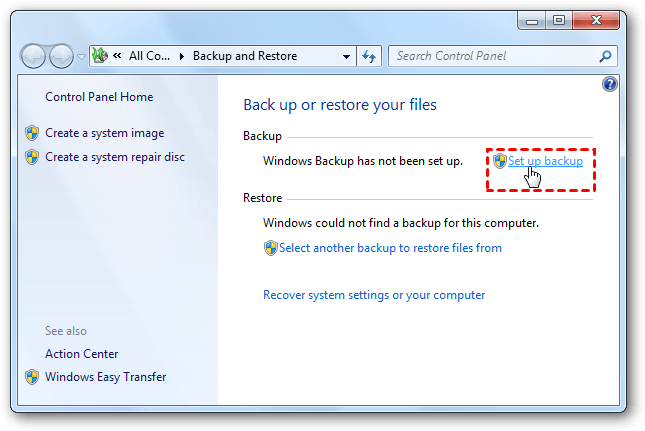
Step 1. On your VM running Windows 7, click Start > Control Panel > Back up your computer under System and Security. Or you can click Start and input "backup and restore" in the Search box. Here you come to the main interface of Backup and Restore. Click Set up backup.
Tip: On VM running Windows 10, you can go to Start > Settings > Update & Security > Backup, and then click on Go to Backup and Restore (Windows 7).
Step 2. Select where you want to save the backup and click Next. It is recommended to keep the backup image on an external hard drive or a network location.
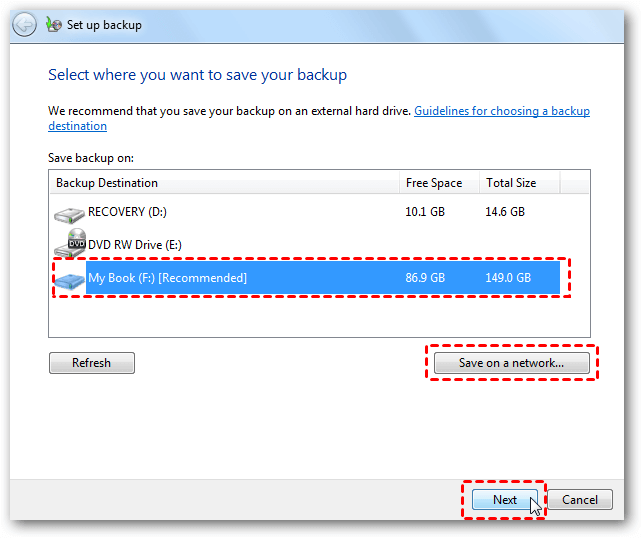
Tip: If you want to backup to USB drive, the USB drive must be large enough. And you are not allowed to save a system image on a USB drive, or you will receive an error message: The drive is not a valid backup location.
Step 3. At the next Window, select Let me choose.
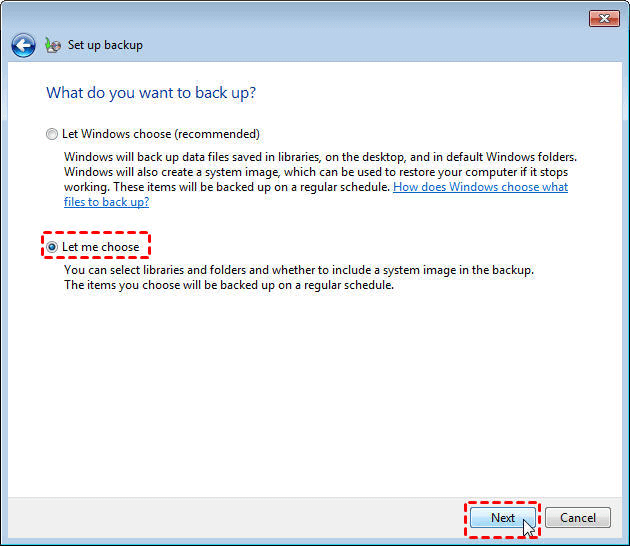
Step 4. Select the items you want to backup and then click Next. You can choose whether to include a system image of your virtual machine here.
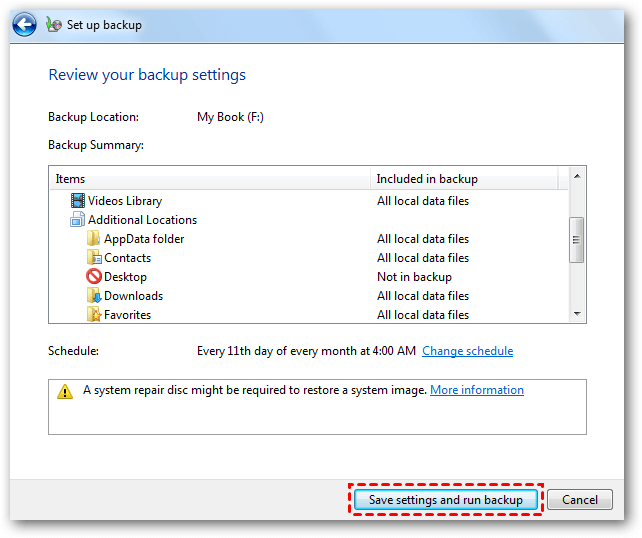
Step 5. Review your backup settings, confirm it and click Save settings and run backup.
Solution 2: Create a snapshot for VM
Creating a snapshot is a useful and fast way to backup VM. The snapshot can capture state, data, and hardware configuration of the running virtual machine. By using the snapshot, you can quickly restore virtual machine to its previous state. Let's see how to create a snapshot.
Step 1. In VMware Workstation, choose VM > Snapshot > Take Snapshot.
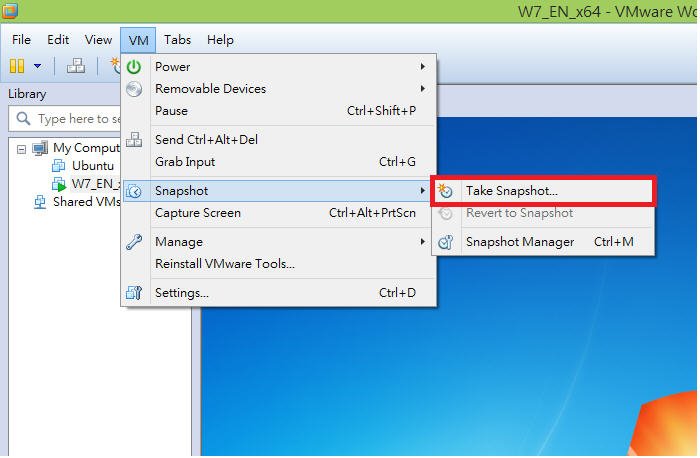
Step 2. Enter a name for the snapshot. A description for the snapshot is optional. Click Take Snapshot and wait for the process to be done.
Note: This method has a limitation - snapshots are not useful for restoring individual files because they only bring a whole VM image back to the previous state.
Solution 3: Use reliable tool AOMEI Backupper
AOMEI Backupper Professional is powerful VM backup software you can rely on.
-
It offers the features of System Backup, Disk Backup, Partition Backup, and File backup, which can help you backup all kinds of data on your virtual machine.
-
It supports backing up to local disks, external hard drives, networks, DVD, and CD easily. You are also allowed to backup Windows to NAS in simple steps.
-
Even if Microsoft VSS does not work, you can still use AOMEI’s built-in technique to backup VMware virtual machine while running without interrupting.
Here come the detailed steps. Take system backup as an example.
Step 1. Download the free trial of AOMEI Backupper, install and launch it on your virtual machine. Then, click System Backup under the Backup tab. To backup important files and folders on your VM, you may choose File Backup.

Step 2. System related partitions are selected by default as the backup source. Choose a destination path to store the backup image. An external hard drive or a network location is recommended.

Step 3. Confirm the operation and click Start Backup.

Note: Before clicking Start Backup, you can click Options, Schedule and Scheme to set up more advanced settings. For example, you can click “Schedule” to set automatic incremental and differential backup.
Solution 4: Try agentless VM backup tool AOMEI Cyber Backup
If you have a bunch of VMs that need to be backed up, the easiest way to perform the backup task is to use AOMEI Cyber Backup.
- It enables you to create complete and independent image-level backup for VMware ESXi and Hyper-V VMs from a central console.
- You are allowed to save backup images on a local drive, NAS or network share.
- You can run unattended backup tasks daily, weekly, or monthly and get notified by email.
- It allows you to create VM backup while VMs are running or at shutdown, and the operations are all the same.
Learn how to backup VMware virtual machines using AOMEI Cyber Backup as follows:
Step 1. Download, install and run AOMEI Cyber Backup. Log in with AOMEI Cyber Backup account or Windows account.
Step 2. Click Source Device > VMware > Add VMware Device to add the vCenter or Standalone ESXi host. You need to enter the IP address, username and password of it.
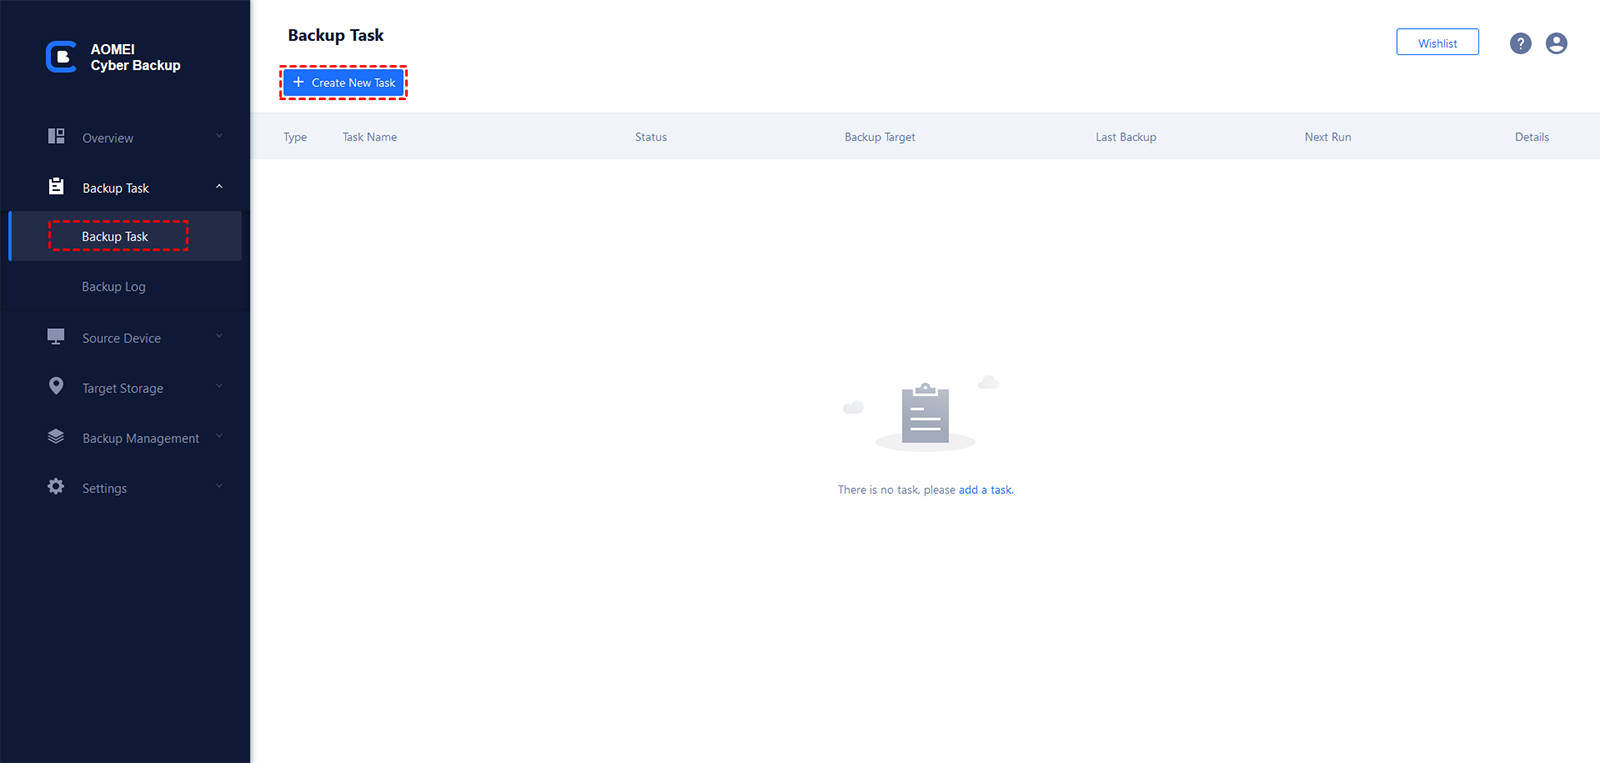
Step 3. Create a new backup task.
- Click Backup Task on the left menu bar and select Backup Task > Create New Task.
- Choose VMware ESXi Backup as the Backup Type.
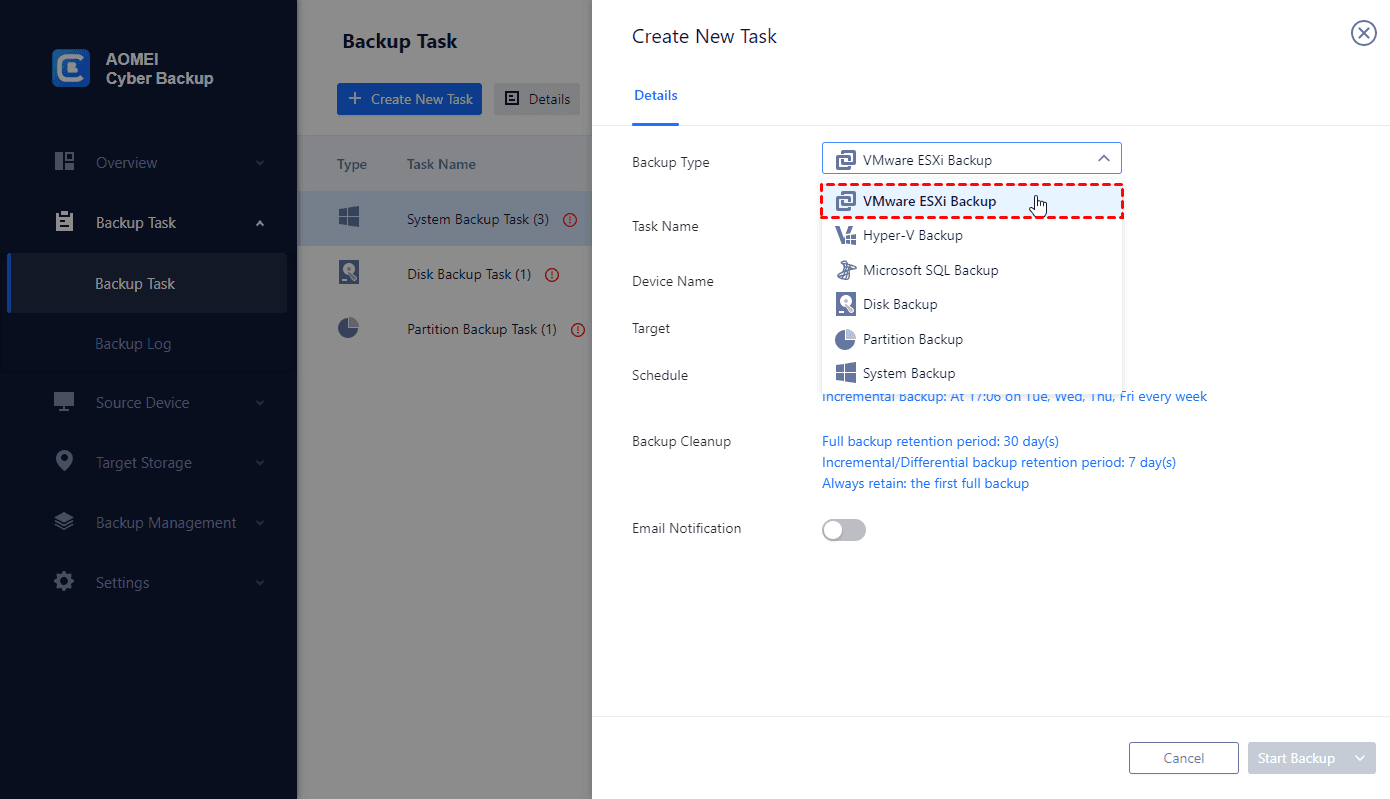
- Edit Task Name based on your need.
- In the Device Name field, click Select + to select one or multiple virtual machines under the host for backup.
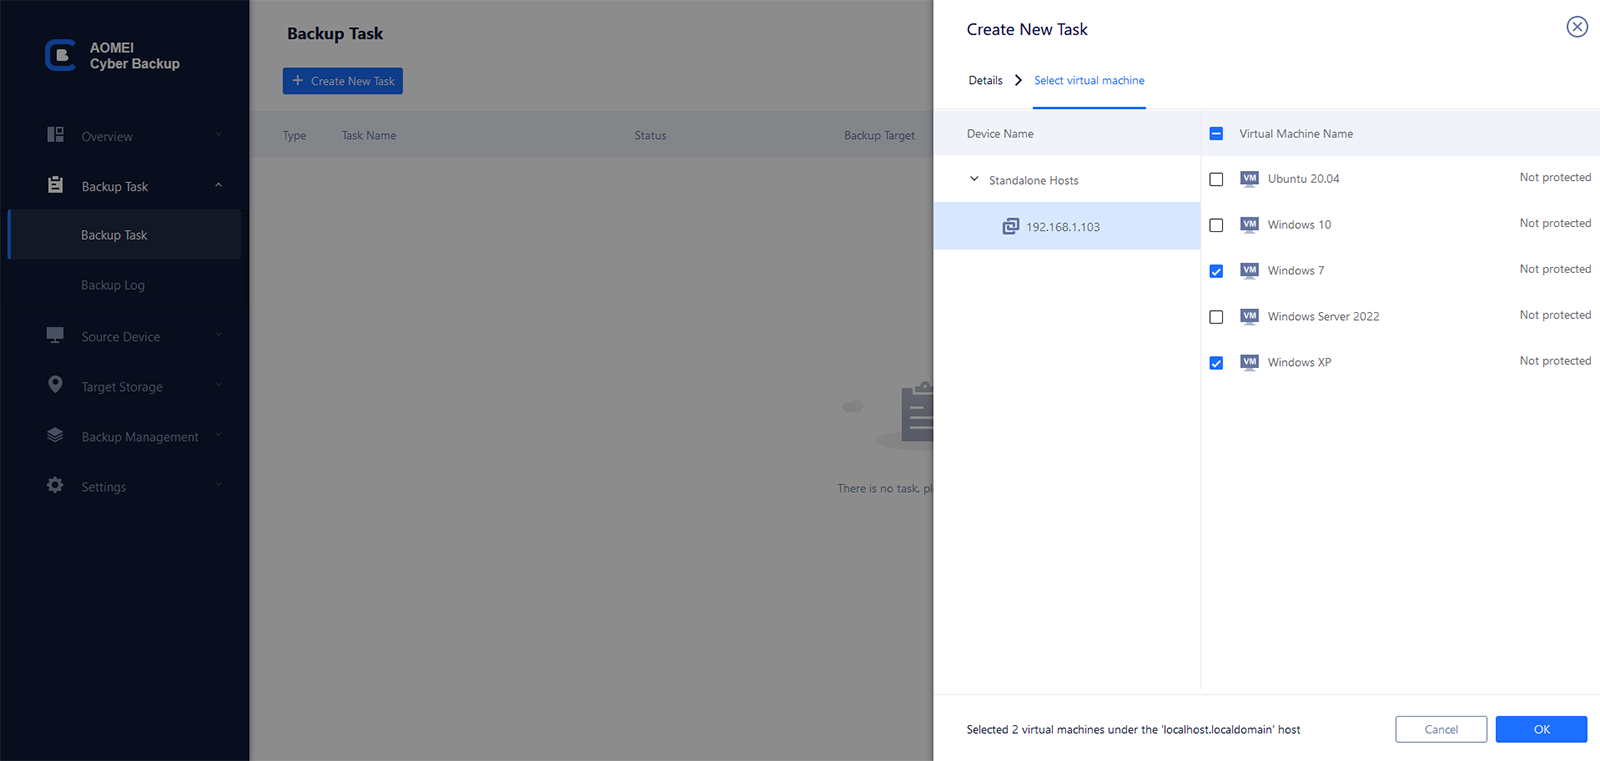
- In the Target field, click Select + to add a local or network storage.
- Change the default schedule settings in the Schedule field as per your need.
- Click Start Backup > Add the schedule and start backup now to begin backing up VMware VMs.
Tips on restoring VMware virtual machine from backup
After creating a backup of your virtual machine, you can restore it with the corresponding backup tool whenever you need. If you want to convert virtual machine to physical machine by restoring the backup image to another physical computer, you may restore to dissimilar hardware with Universal Restore feature provided by AOMEI Backupper. This feature ensures secure boot after recovery.

Conclusion
To summarize, there are 4 easy ways to backup VMware virtual machine while running. AOMEI Backupper is highly recommended because it has some features that Windows Backup and Restore does not have, like restoring the virtual machine to another computer and creating incremental and differential backup.
Actually, AOMEI Backupper is not only reliable backup and restore software but also perfect disk clone software. You can use it to migrate OS from HDD to SSD. Besides, dynamic disk clone is an easy operation with the help of AOMEI Backupper. Don’t hesitate to try it out!

