How to Setup PXE Boot Server in Windows Easily and Securely
This guide provides a walkthrough on configuring a PXE boot server on Windows, exploring its benefits, and detailed solutions to common issues. Additionally, it answers frequently asked questions and provides practical tips for optimizing your PXE boot setup.
Case: setup PXE boot server in Windows to boot another PC
I want to try and set up a PXE boot server for a laptop that has a damaged hard drive. I have a custom-built desktop with Windows 7 Ultimate x64 and I want to make it my server so I can use my laptop to boot from an image. Can someone point me in the direction I need to go?
When a computer has aging hardware or system errors, it may be difficult to boot it by normal means. In this case, you can set up a PXE server to boot another computer(s) within the LAN.
PXE, short for Preboot Execution Environment, is a standard client-server environment that boots client computers remotely by an administrator via a network server. There are many significant advantages of PXE boot, for example:
- The administrator can boot and maintain multiple PXE-enabled client computers.
- Installation disc or USB (along with a CD drive or USB port) is unnecessary for client computers.
- The administrator can solve problems and breakdowns on client computers remotely.
- It’s easy to centrally manage installation, updating, etc., and add new computers to the network.
If you think it’s worth a try, keep reading and find out how to set up a PXE network boot server in Windows.
👉 Prerequisites to PXE network boot
👉 How to deploy the PXE boot server in Windows?
👉 Easier way to setup PXE boot server in Windows🔥
Prerequisites to PXE network boot
Before setting up the PXE boot server, each client computer you want to boot should meet the following conditions:
1. Ensure Network Infrastructure: Have a DHCP server to assign IP addresses automatically. It sets up a TFTP server to deliver the boot image and configures network switches and routers to allow PXE boot traffic.
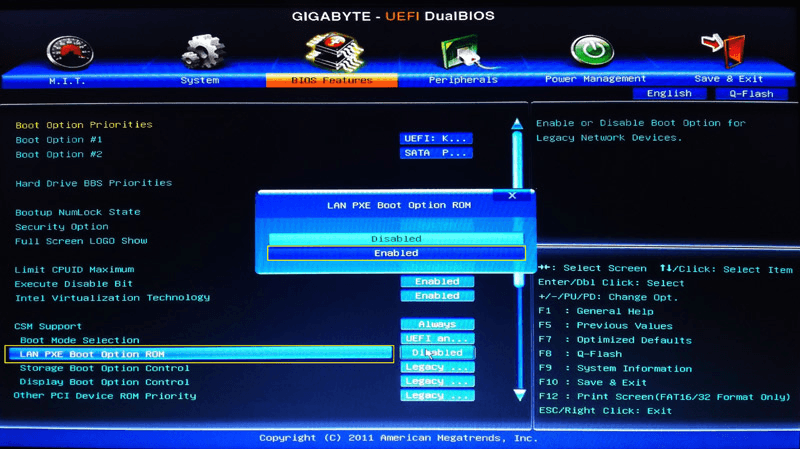
2. Enable PXE on Network Interface: Make sure the client’s Network Interface Card (NIC) supports PXE. Enable network boot in the BIOS/UEFI settings and prioritize network booting.
3. Prepare Boot Images and Bootloader: Create a boot image (e.g., Linux kernel or Windows PE) for the client to download. Configure a network bootloader like iPXE or PXELINUX on the TFTP server.
4. Configure PXE Boot Server: Set up a server with necessary PXE services: DHCP, TFTP, and optionally HTTP or FTP. Ensure the server is accessible and configured correctly to deliver boot images.
5. Adjust Network Security Settings: Update firewall rules to allow DHCP and TFTP traffic. Consider network segmentation to isolate the PXE boot environment for enhanced security.
How to deploy the PXE boot server in Windows
Windows PXE boot setup basically consists of two parts - DHCP configuration and PXE boot configuration, which takes more effort than it looks. The working process is roughly like this:
-
The client connects to the network and sends out a DHCP broadcast. The DHCP server picks up the broadcast
-
The server replies with a suggested IP address, the client uses the provided address.
-
The client sends out a DHCP broadcast and states it needs to PXE boot, then the DHCP server replies to it with the IP address to use.
-
The client contacts the PXE boot server to request and receive the boot file.
-
The boot file is then loaded on the client machines.
As you can see, the operation is relatively complicated. It’s not recommended to set up a PXE boot server on your own if you are not computer savvy or simply afraid of trouble. After all, there are plenty of tools on the market that can simplify the process.
But if you insist on doing it without any third-party utility, here’s a more detailed tutorial for your reference.
Easier way to setup PXE boot server in Windows
Among all the PXE boot utilities, the AOMEI PXE Boot Tool is a good choice with its strong compatibility and easy interaction.
It’s integrated into the AOMEI Backupper Workstation, which is a powerful and cost-effective data backup & disaster recovery solution for Windows 11/10/8.1/8/7.
AOMEI PXE Boot Tool is specially designed to safely boot and maintain multiple client computers within LAN through the network. With it, you can directly create a Linux bootable ISO or Windows PE bootable ISO image file, and you don’t have to spend that much time setting up a PXE boot server.
Steps:
1. Download and install AOMEI Backupper Workstation. Go to the Tools tab and choose AOMEI PXE Boot Tool.
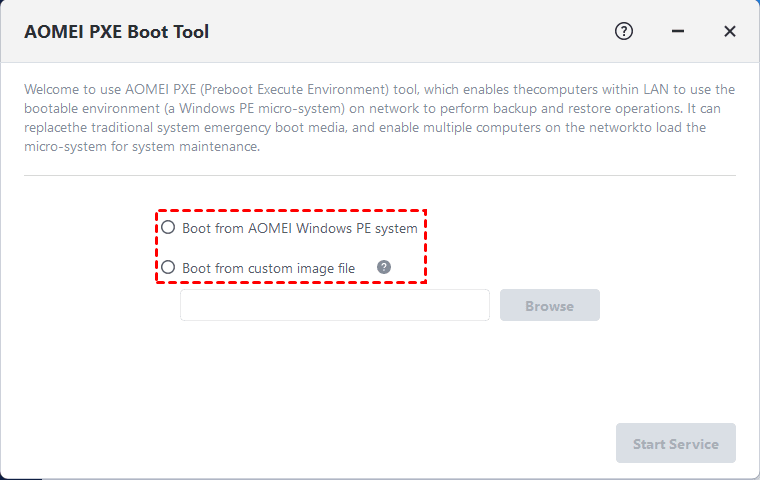
2. Select AOMEI Windows PE System and click Start Service. It will directly create a Windows PE system image for network boot.
◉ Boot from custom image file allows you to load the special micro-system created by AOMEI PE Builder or Bart PE.
◉ Alternatively, you can create a bootable file by Create Bootable Media in the Tools tab.
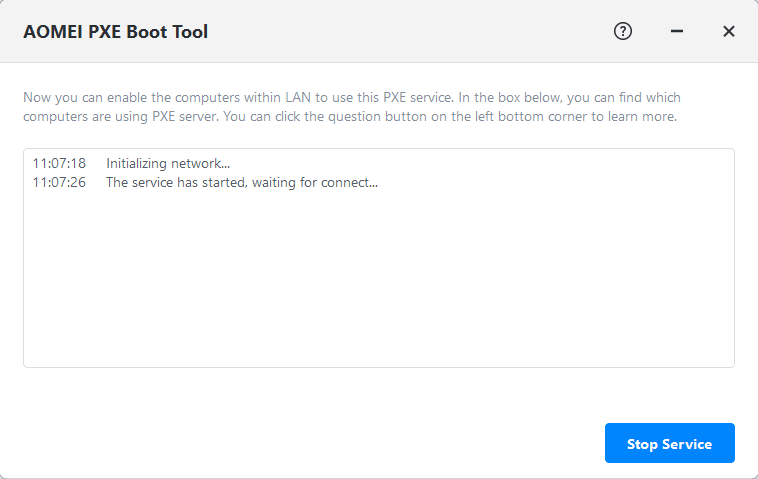
3. Now you can enable the computers within LAN to use the PXE service. Turn on the client computers and press the required key to enter BIOS settings.
◉ The required key might be F2, F10, Del, etc., which depends on the specific brand and model of the device. You can search for it on the Internet or refer to the user manual.
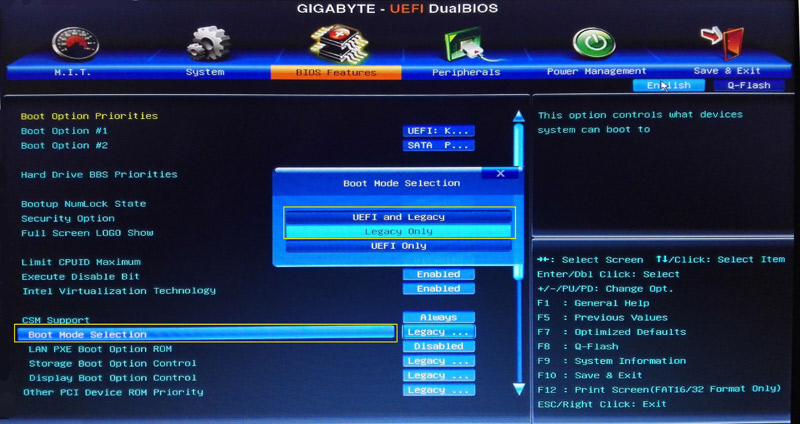
4. Find the Boot mode selection and make your choice.
◉ In general, UEFI mode includes more security features than the legacy BIOS mode. But if you're booting from a network that only supports BIOS, you'll need to boot to legacy mode.
5. Then find and enable the PXE boot option.
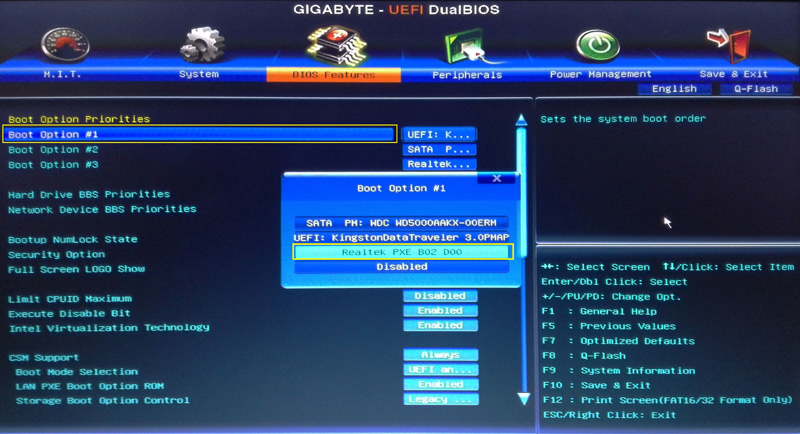
6. Set the PXE option as the first boot device in Boot Option Priorities.
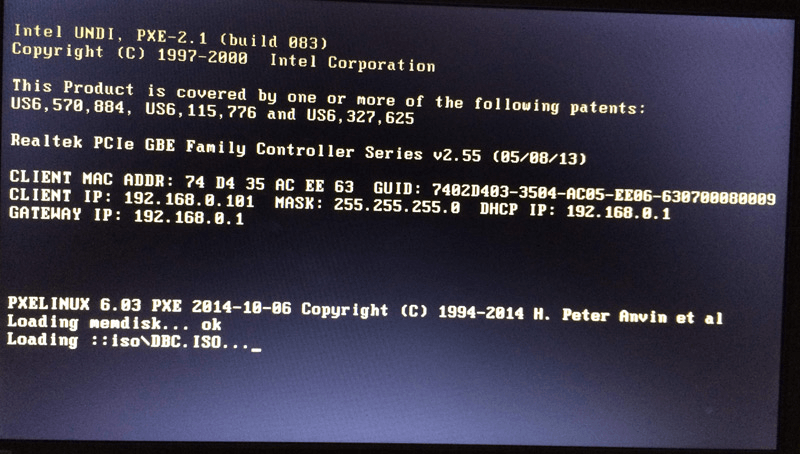
7. It will take some time to boot from the PXE boot server, specifically depending on your network speed and the size of the image file.
Related tips:
📌AOMEI PXE Boot Tool does support booting UEFI machines but currently, only the WIM file can be used for UEFI (not the ISO file). If the file is an ISO file, you better change the boot mode to Legacy Boot Mode.
📌The network speed may be impacted if there are many computers using PXE boot. Thus you can try dividing PXE boot clients into smaller groups to boost the speed.
📌AOMEI PXE Tool contains a DHCP server that can be used if an existing DHCP server is not available. DHCP is usually offered by the LAN router.
FAQs about Setting Up PXE Boot Server on Windows
Q 1: How do I configure DHCP for PXE booting?
A 1: Configure DHCP to include option 66 (Boot Server Host Name) and option 67 (Bootfile Name) to direct clients to the PXE server.
Q 2: How do I create a custom boot image for PXE booting?
A 2: Use the Windows ADK to create a custom boot image. Include necessary drivers and configurations for your environment.
Q 3: What are common PXE boot errors and how do I resolve them?
A 3: Common errors include network configuration issues, incorrect DHCP settings, and firewall blocks. Verify settings and logs to troubleshoot.
Conclusion
PXE boot is a feasible way to boot multiple computers within LAN for system maintenance even when you don’t have any installation media. But to easily set up the PXE boot server in Windows 10/8/7, you need the help of a reliable tool, like the AOMEI Backupper Workstation. It not only has a powerful built-in PXE Boot Tool but also a Create Bootable Media tool that can be used in cooperation.
Moreover, you can deploy the system image created on one computer to others with the Image Deploy tool, which is integrated into AOMEI Backupper Technician and Technician Plus.
