Fixed: No Bootable Device Insert Boot Disk and Press Any Key
You can learn the top 4 ways to solve no bootable device insert boot disk and press any key. And you will know the best way to prevent the error from occurring again. Please read on.
By Lily Updated on September 2, 2025
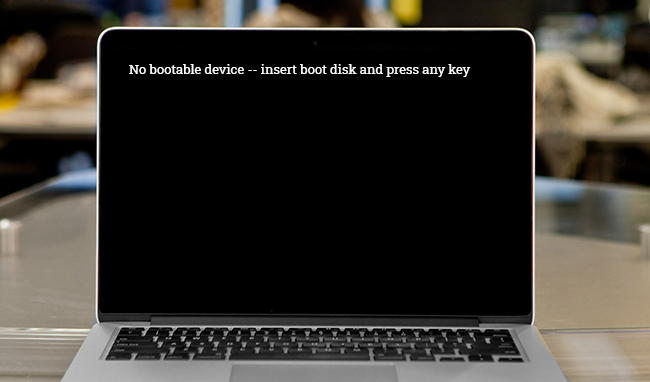
Error: No Bootable Device
“When I turn on my computer, I received this error message “No bootable device insert boot disk and press any key". I have a mostly brand new hp notebook (windows 10) I don't know what to do from here and I really need to gain my files on my computer because I have some important work files on there. I just want to know how to fix no bootable device insert boot disk and press any key HP. Thanks a lot.”
Usually, this error message is caused by physical hardware damage or software problems. If it is physical damage, we recommended that you replace the drive with a new one or call a professional technician. If it is a software problem, you can use the 4 methods in the article to fix no bootable device insert boot disk and press any key windows 10 or in other OS. You can continue reading to know the detailed tutorial.
To protect system from failing to boot again, make a backup now.
How to Fix No Bootable Device Insert Boot Disk and Press Any Key
Next, this article will introduce 4 methods to fix this error “No bootable device insert boot disk and press any key” in turn. You can choose any of the methods according to your needs. After that, the article will provide you with the best way to prevent this error.
Fix 1. Change the Boot Mode to UEFI
The first method is to change the boot mode to UEFI to fix this error. And many users have solved the problem by this method. You can follow the specific steps below.
Step 1. Shut down the computer and restart it. When you see the BIOS key during the restart process, press F1/F2/F8/F11/DEL (the BIOS key may vary from different laptop/PC) to enter BIOS.
Step 2. After entering the BIOS menu, find the Boot option, then find the boot mode and set it to UEFI.
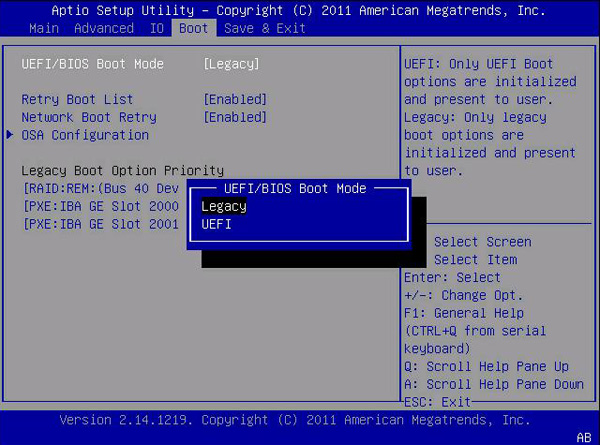
Step 3. Press F10 to save the change and exit. Restart the computer to see if this error is fixed.
Fix 2. Take Out CMOS Battery to Make the Device Back to Factory Settings
If the first method does not solve the problem or if you accidentally changed any BIOS settings by mistake, you can try the second method which is to fix the error by unplugging CMOS Battery to push the device back to factory settings. Here are the specific steps.
Step 1. To take out the CMOS battery, if you use a desktop computer, you need to open the computer case to find the battery and pull it out. If you use a laptop, open the back panel of the laptop and look for a small coin cell battery on the motherboard, then pull it out.
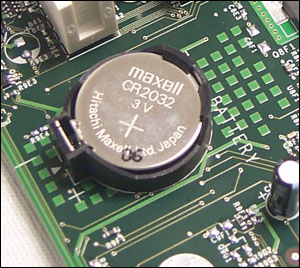
Step 2. Let it stay removed for 10-15 minutes.
Step 3. Then insert the battery again and try to boot into BIOS by following the steps in method 1. If the error was caused due to BIOS settings, it is most likely to be gone at this point.
Fix 3. Reset the Boot Manager via Command Prompt
If neither of the previous two methods helps you solve the problem, you can reset the Boot Manager using the Command Prompt. Since you can't boot your system, you need to launch the command prompt by going to the Advanced Repair window.
First, you need Windows installation media (a bootable USB drive or DVD). If you don't have one, you can download the Media Creation Tool from the official Microsoft website to create an installation media. Then, you can follow the graphic tutorial below.
Step 1. Connect the Installation media and use it to boot your computer.
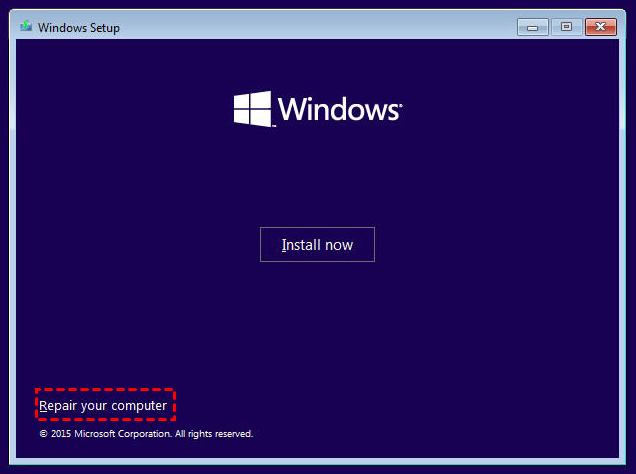
Step 2. You will enter the Windows setup wizard. Select the language and other preferences. Then click Next.
Step 3. Click Repair Your Computer in the bottom-left corner.
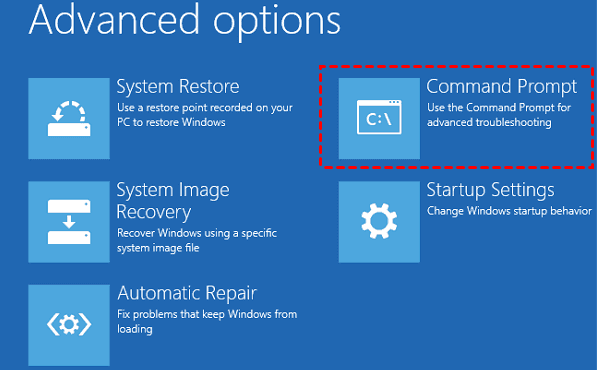
Step 4. Then select Troubleshoot > Advanced Options.
Step 5. On this page, click Command Prompt.
Step 6. Type the following commands and click Enter.
bootrec.exe /fixmbr
bootrec.exe /fixboot
bootrec.exe /rebuildbcd

Step 7. Wait for the command to execute, then restart your computer to see if the problem is fixed.
Fix 4. Undertake Startup Repair
If the previous three methods don't fix the error, you can use the Windows Automatic Repair feature to let the system automatically diagnose the problem and troubleshoot it. This method is usually used to help users repair the system when they are unable to fix it manually.
It also requires the use of the Windows installation media created before. Here are the specific steps.
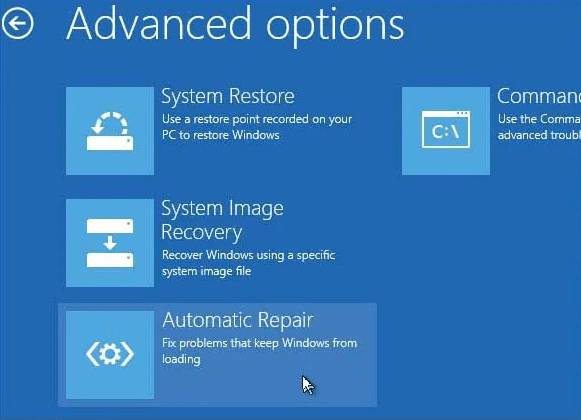
Step 1. Boot your computer from the installation media and select the language and other preferences in the Windows Setup page. Then, click Repair Your Computer and select Troubleshoot > Advanced Options.
Step 2. On the Advanced Options page, click Automatic Repair.
Step 3. Wait for the system to automatically troubleshoot the error. When the process has been done, restart your computer to check whether the error has been fixed.
Best Way to Protect System from Failing to Boot Again
This error will make your system fail to boot. To better protect your system and prevent it from failing to boot again, we recommend that you backup your system regularly. Even if anything goes wrong with your system, you can use this system backup to restore it and then use your computer normally.
You can choose a free and reliable backup software to help you. AOMEI Backupper Standard is a good choice. It has the following advantages.

-
Multiple backup types: It offers System Backup, Disk Backup, Partition Backup and File Backup so that you can backup anything you want and ensure their security.
-
Schedule backup: It allows you to set the fixed interval (daily/weekly/monthly) to backup your system automatically. Therefore, you can choose the version you need most when you restore it.
-
Various locations: You can backup your system to different locations, such as local disk, external disk, HDD, SSD, USB drive, cloud, network, etc. You can keep backups in different places so that you can enhance the security of your system.
Now, you can follow the graphic tutorial below to backup your system with just a few simple clicks.
Step 1. Install and open AOMEI Backupper Standard. Then click Backup > System Backup.

Step 2. The boot-related partitions will be selected automatically. And you just need to select a destination for your backup.

Step 3. Confirm all your operations and click Start Backup to backup your system.

Notes:
- Options: You can choose different backup modes (intelligent sector backup or exact backup), compression levels (high/normal/low) and write comments or set the email notifications for your backup.
- Schedule: You can set the frequency of your system backup, such as daily, weekly, monthly, event triggers, etc.
- Backup Scheme: It will delete older backups to save your disk space. And you can choose different backup methods based on your own needs. Upgrade to AOMEI Backupper Professional to enjoy some advanced features.
Summary
When you encounter this error “No bootable device insert boot disk and press any key", you can use the 4 methods provided in this article to fix it. Also, to avoid data loss caused by this error, we recommend you backup your system regularly.
AOMEI Backupper Standard is a free and safe backup software that can help you easily backup your system and prevent this error from happening again. If your system encounters any problem, you can use this system backup to restore it and then use your computer normally.
Besides, it is an excellent cloning software as well. It can help you to clone systems, partitions and disks. Even if you want to clone a larger drive to a smaller one, it can do it for you easily. You can download this software to explore more features.

