Lenovo to Lenovo Data Transfer - 4 Ways
Are you looking to transfer all data to a new Lenovo laptop? This page shows you how to perform Lenovo to Lenovo data transfer in 4 solutions. Follow this guide to migrate your data to a new laptop simply.
By Jonna Updated on June 17, 2025
Scenario: How Do I Transfer Data from Old Lenovo to New Lenovo?
Hello guys, I just got a new LOQ, and I have my old Lenovo IdeaPad. I have about 1TB of data that needs to be transferred from that laptop to the new one. Do you recommend using the Migration Assistant? Or should I use other Lenovo to Lenovo data transfer software?
When switching from an old laptop to a new laptop, transferring everything to new laptop seamlessly is a top priority. Fortunately, Lenovo to Lenovo data transfer doesn't have to be complicated. This guide dives deep into 4 reliable methods to move your data efficiently, from Lenovo's own migration tool Lenovo Migration Assistant, to powerful free transfer third-party software. Let's get done to business now.
Way 1. Lenovo to Lenovo Data Transfer Using Lenovo Migration Assistant
Lenovo offers its own tool, Lenovo Migration Assistant (LMA), designed specifically to transfer data from Lenovo to Lenovo laptop smoothly and hassle-free. This tool allows you to move files, user profiles, and settings from your old Lenovo device to your new one. It's ideal for users who prefer a native solution developed by the manufacturer itself.
Lenovo Migration Assistant is available for Windows 11, 10, 7 (32-bit, 64-bit), and offers 2 options for data transfer - using Wi-Fi or USB. Here are the steps for how to let Lenovo transfer data to new laptop using LMA:
Option 1. Use the Same Local Network
If two computers are connected to the same local network, you can complete the data transfer by following the steps below:
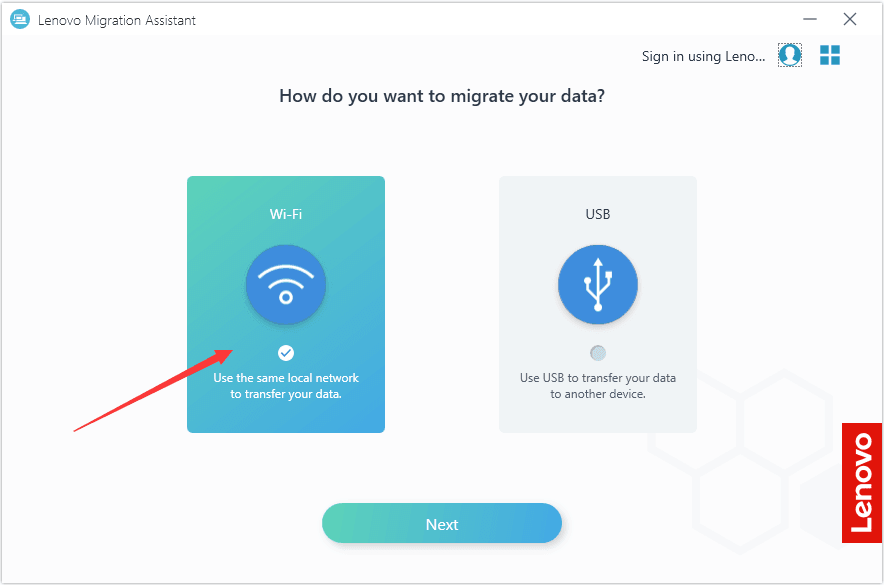
Step 1. Get Lenovo Migration Assistant downloaded and installed on your two computers, run this tool on both devices, and select Wi-Fi to click Next.
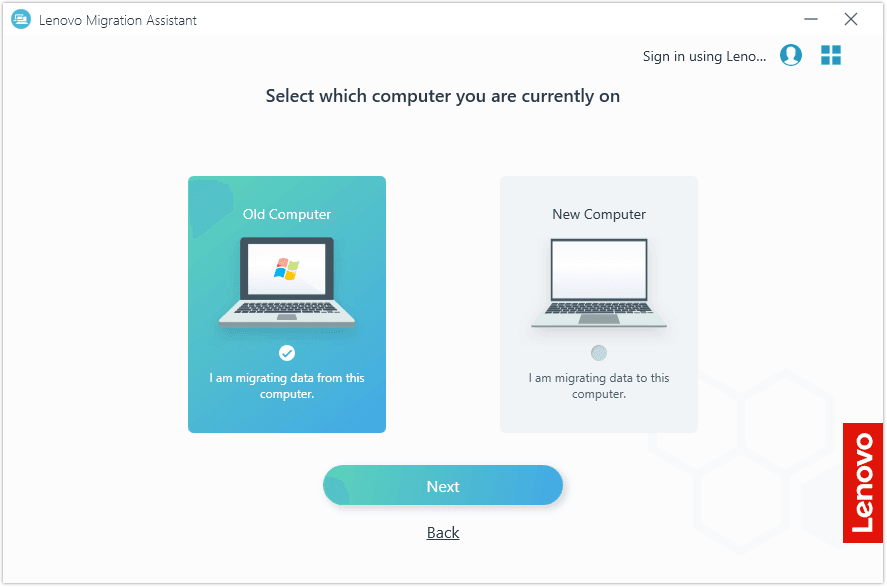
Step 2. Select the computer you are currently on and click Next. On the source computer where you wish to migrate data from, select Old Computer; and for the traget computer where you wish to transfer data to, select New Computer.
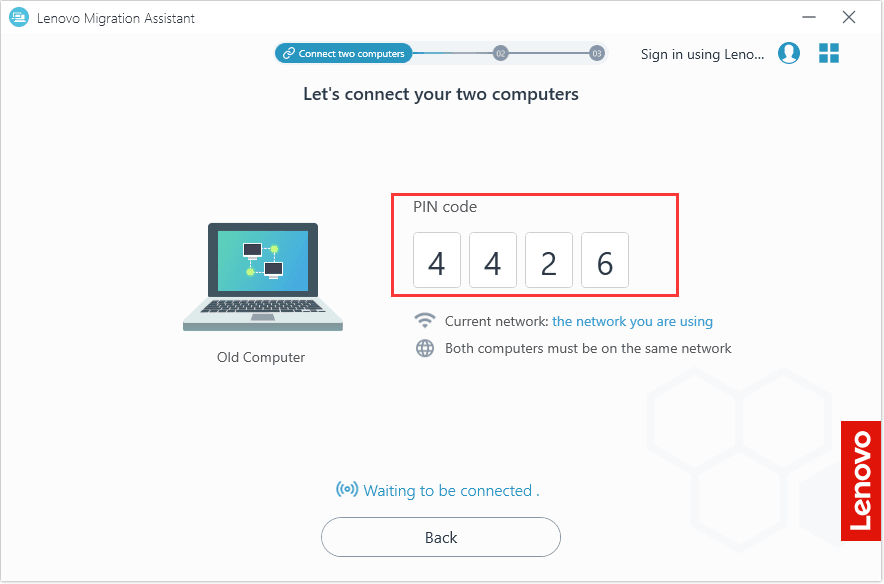
Step 3. Then, a PIN code will be displayed on the screen of the old computer. Please input this code on the target computer to establish a connection.
Step 4. When the two devices are connected, you can now select the items you want to transfer on the source laptop, like system settings, individual files, and so on, and click Migrate to start the process.

Step 5. When the migration is done, you can also click Migrate more to transfer other wanted files.
Option 2. USB USB Drive
If your laptops are not on the same local network, you can also choose to use a USB flash drive to transfer data. This method mainly accomplishes data transfer by backing up and restoring data. How to transfer data from Lenovo laptop to Lenovo laptop with USB:
Step 1. Connect the USB drive to your source computer, and click USB > Next.
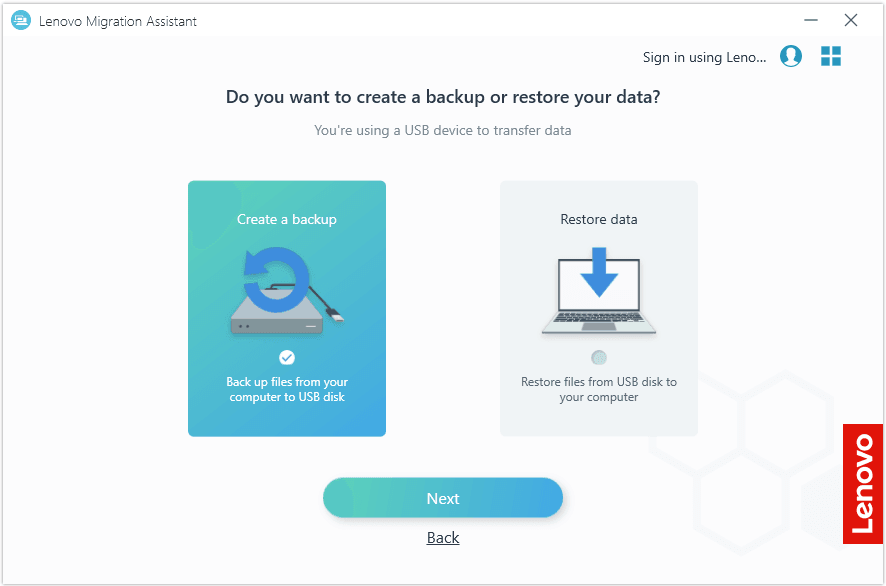
Step 2. Then, select Create a backup and click Next.
Step 3. The Lenovo Migration Assistant software will start to detect the USB drive, and you can choose the files that need to be migrated to create a backup.
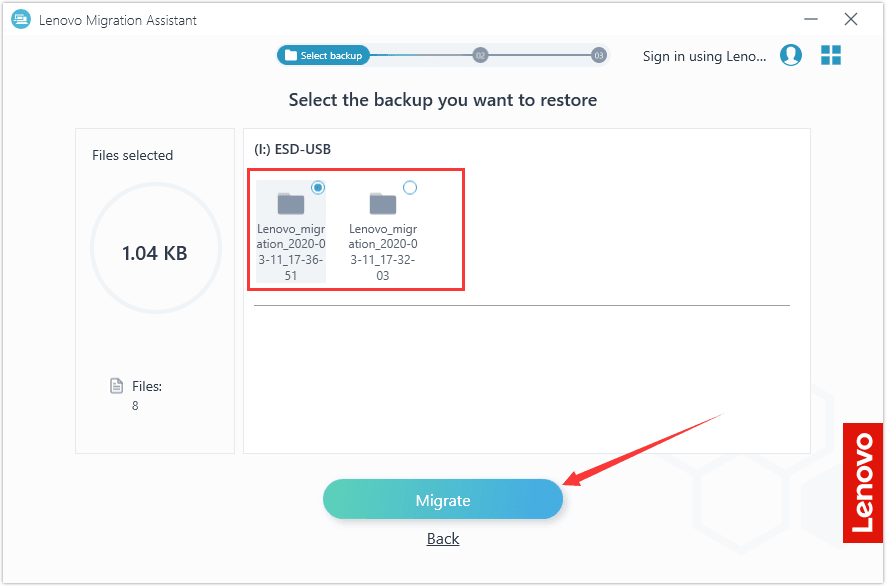
Step 4. When it’s done, connect the USB to the target computer, run Lenovo Migration Assistant, choose USB > Restore data to select the backed-up files from the USB drive > click Migrate to restore them to your new computer.
Option 2. Migrate Data from Lenovo to Lenovo with Free Transfer Software
If you're looking for a more robust and flexible solution, AOMEI Backupper Standard is a free file transfer software for those who want more control over their data transfer from Lenovo to Lenovo. This software offers Sync as well as Clone functions for data migration:

- Sync - It allows you to transfer specific files and folders from one computer to another automatically, like daily, weekly, monthly, etc.
- Clone - It helps you clone entire computer to a new one with one click. Here, it offers Disk Clone and Partition Clone according to different needs.
Here is how to transfer files from Lenovo laptop to Lenovo laptop using AOMEI Backupper Standard:
Way 1. Lenovo to Lenovo Data Transfer via Syncing
Notes:
👉The free version of AOMEI Backupper only provides Basic Sync, which performs one-way sync from the source directory to the destination directory.
👉3 other sync modes are provided in the Professional version:
▶▶Real-Time Sync: It will sync files right now when you make any changes. This is the fastest way for automatic sync.
▶▶Mirror Sync: It helps a lot to avoid any unwanted changes in the destination directory while syncing files from one folder to another.
▶▶Two-Way Sync: Unlike the previous 3 methods, it syncs files and changes between source and destination directories, especially useful for team collaboration.
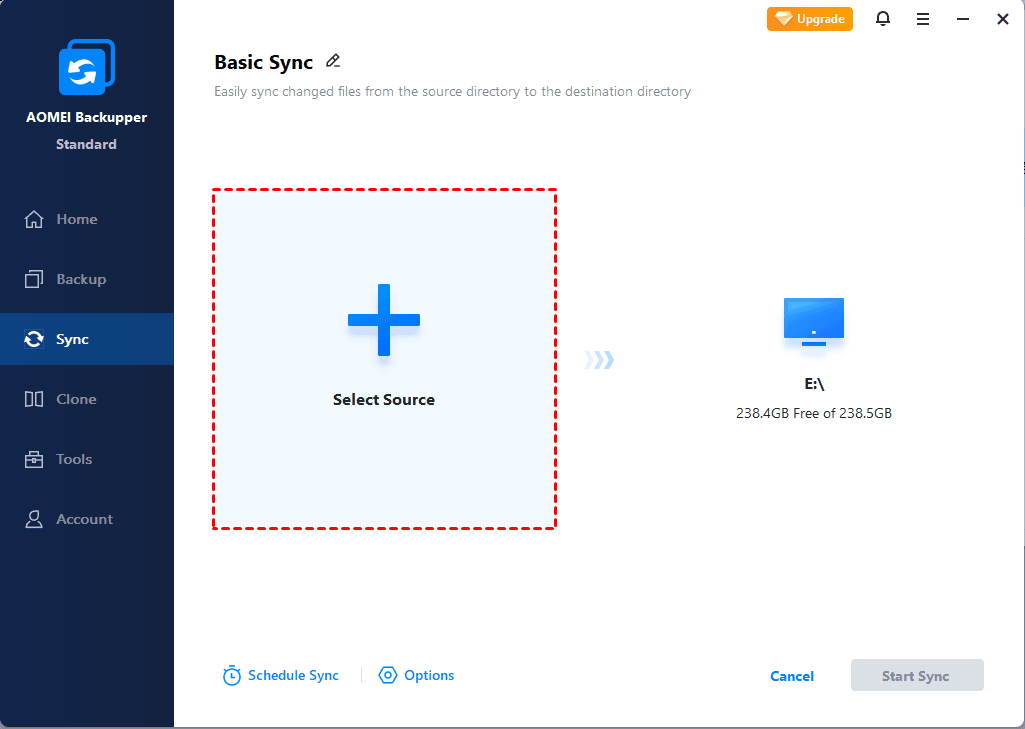
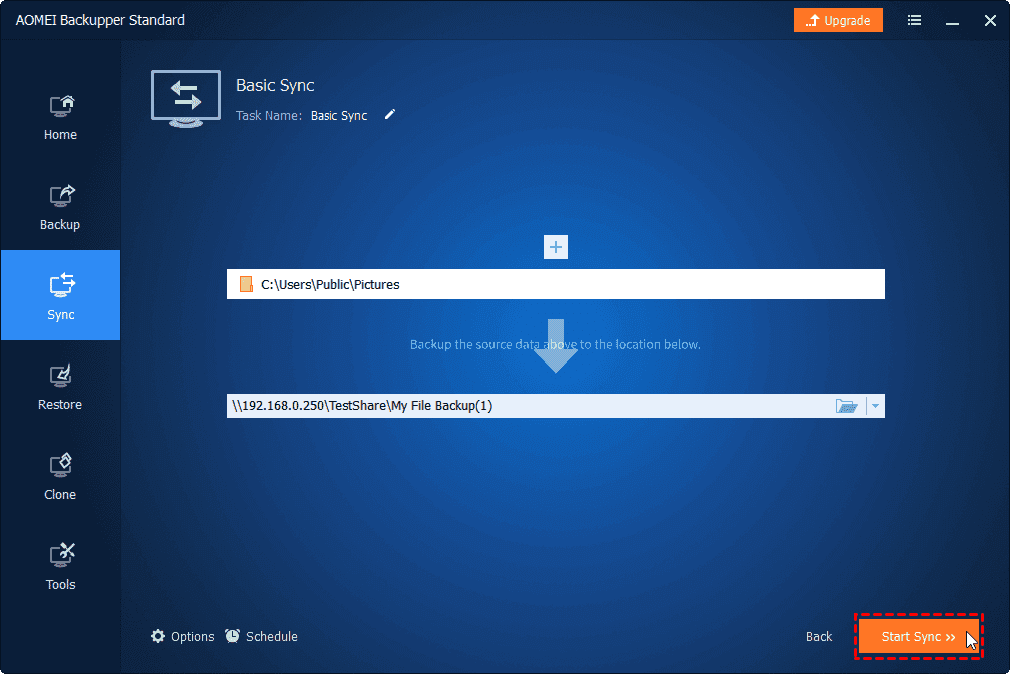
Step 1. Download and run AOMEI Backupper on your old computer, choose Sync on the left and click Basic Sync or another sync option as needed.

Step 2. Click Add Folder to select the folders and files you want to transfer.
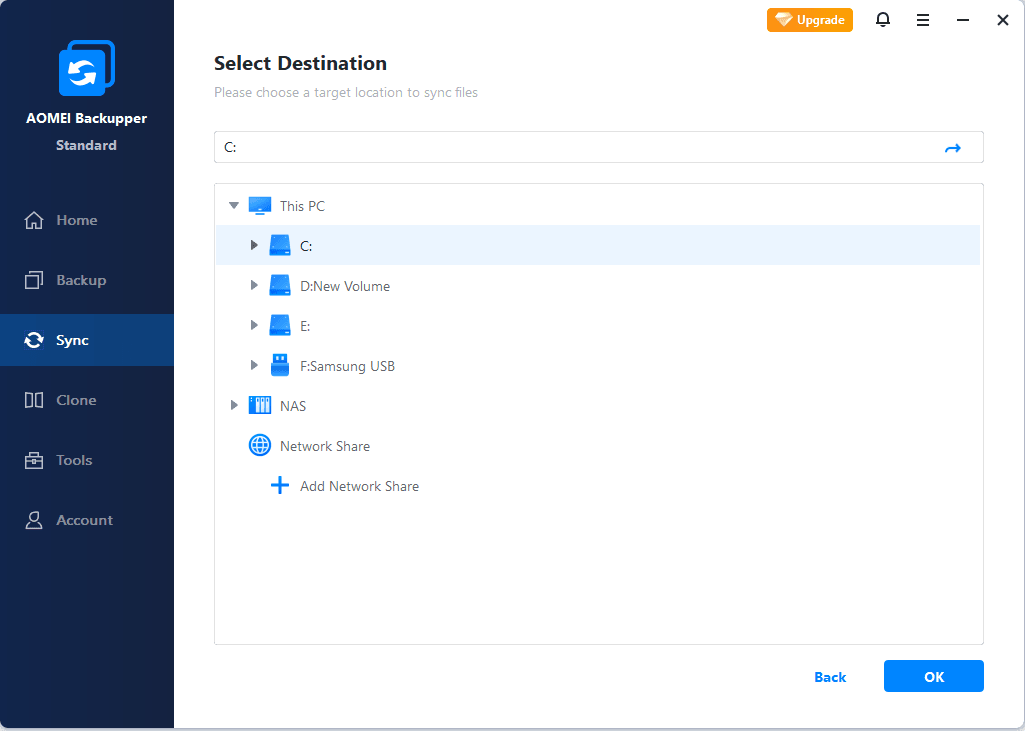
Step 3. Click on the destination bar, choose Add Share or NAS Devices to select a shared folder on the new PC. Then, input the required information on the prompt screen.
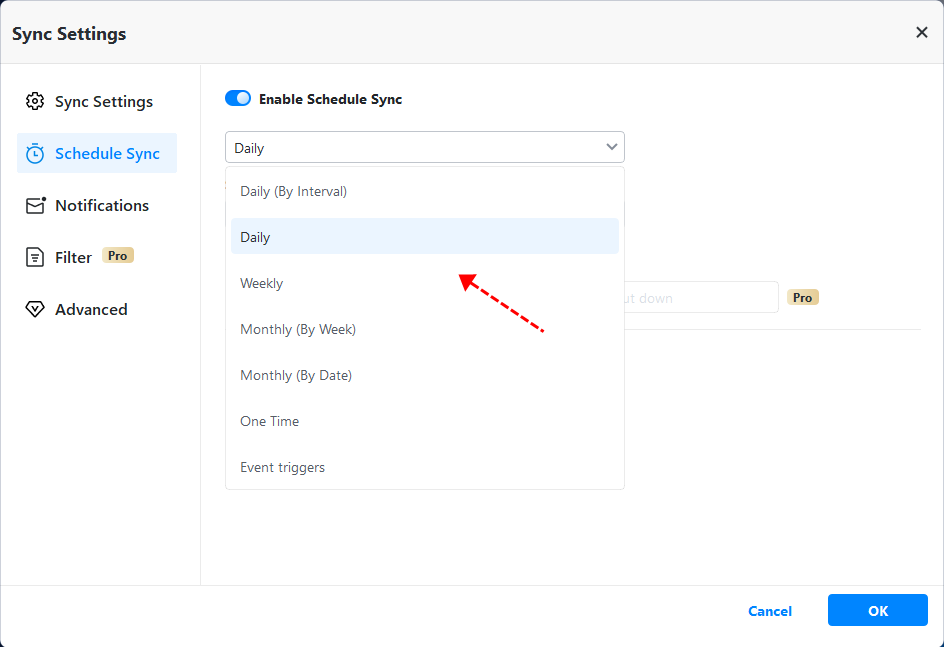
Step 4. To ensure automatic synchronization from the old computer to the new one, click on Schedule Sync to set up the sync frequency.
Step 5. Finally, click on Start Sync to transfer files from Lenovo laptop to Lenovo laptop.
Way 2. Lenovo to Lenovo Data Transfer via Cloning
Notes:
👉On AOMEI Backupper Standard, its Disk Clone is only supported for non-system drive clone. So, if you need to clone a system drive, please upgrade to its Professional edition. In this edition, you can also use its System Clone to migrate only Windows OS from one drive to another.
👉Remove the hard disk from the new Lenovo and connect it to the old Lenovo via the SATA cable in advance for data migration.
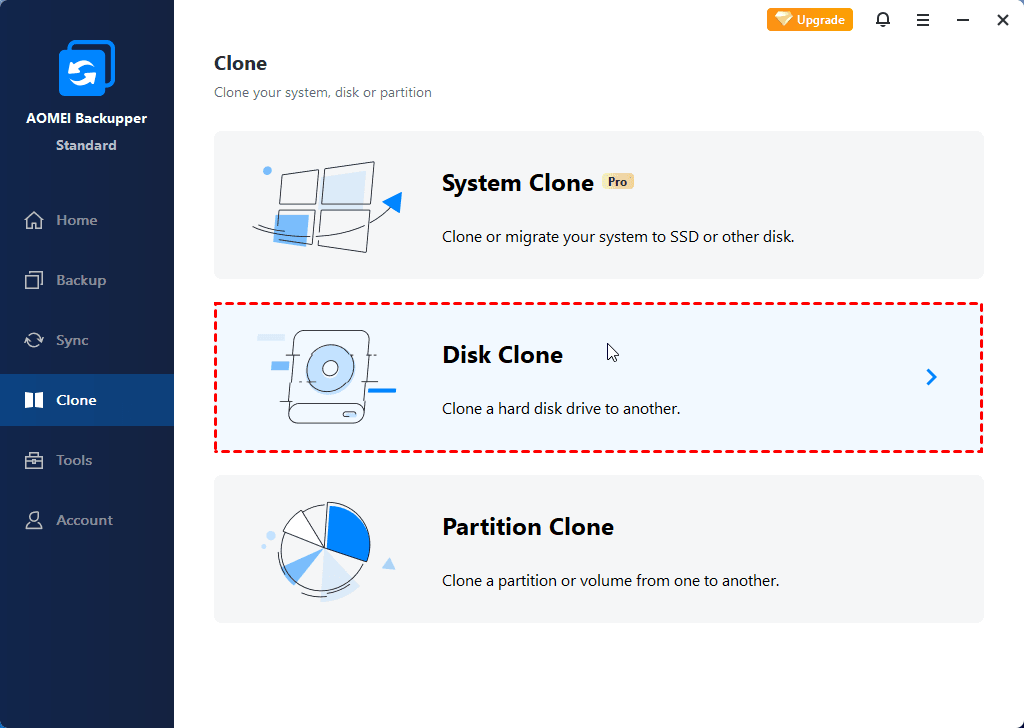
Step 1. Launch the software on the Lenovo computer after the installation. Click Clone > Disk Clone.
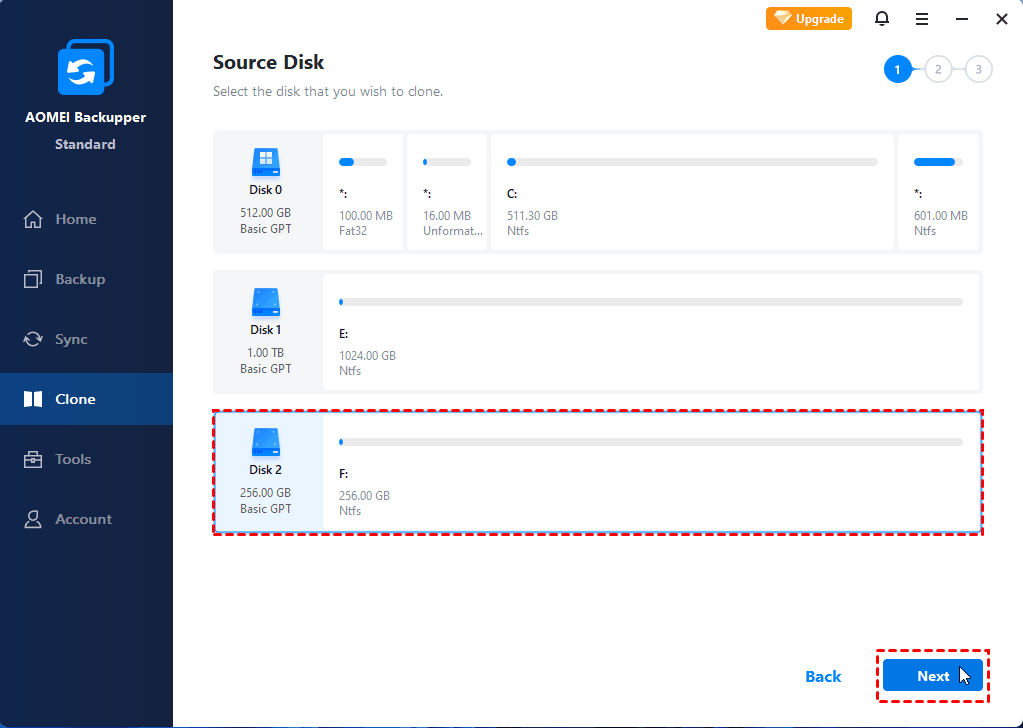
Step 2. Select the source disk you want to copy and hit Next.
Step 3. Then, choose your new HDD/SSD as the destination drive and click Next.
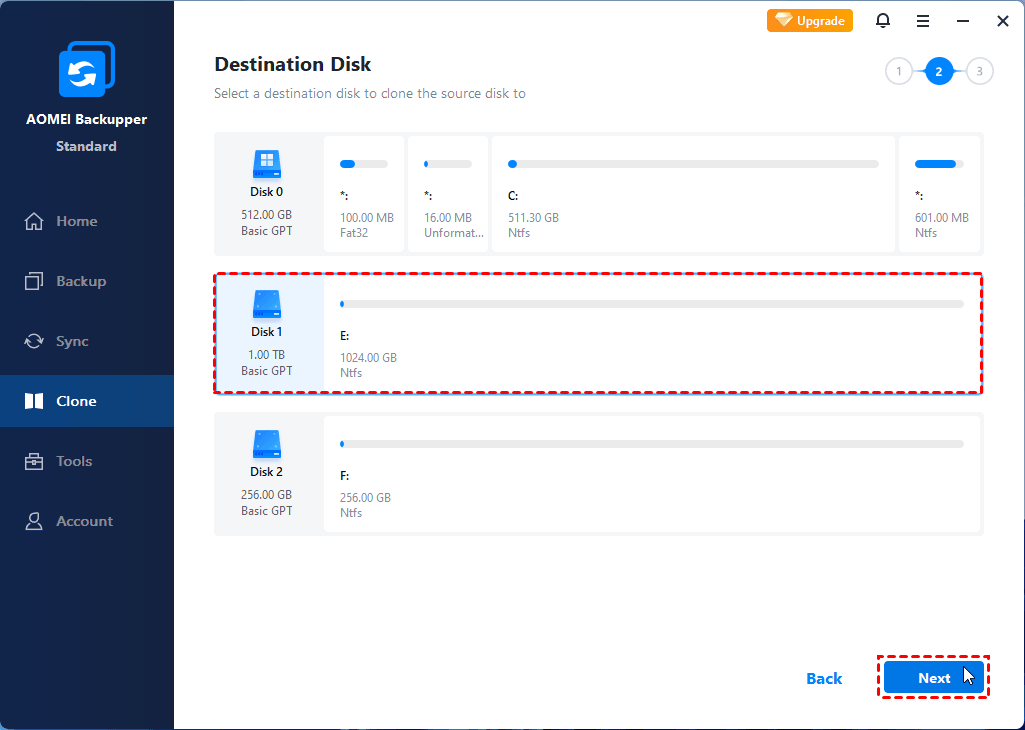
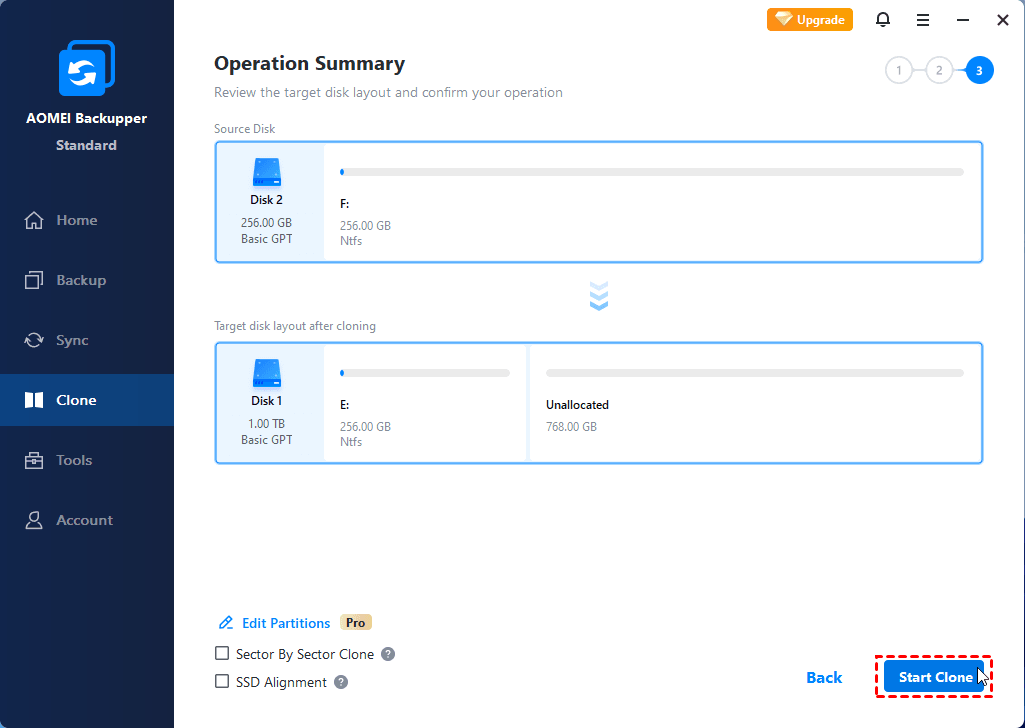
Step 4. Tick SSD Alignment to improve the SSD performance if you are cloning to an SSD. Then, click Start Clone to transfer everything from old Lenovo to new Lenovo.
FAQs about File Transfer from Lenovo Laptop to Lenovo Laptop
Q1: Is the Lenovo Migration Assistant free?
Yes, Lenovo Migration Assistant is completely free to use. It’s available for download directly from Lenovo’s official support page. It’s designed to simplify the Lenovo to Lenovo data transfer process for everyday users without the need for additional purchases or subscriptions.
Q2: Does the Lenovo Migration Assistant move or copy files?
Lenovo Migration Assistant copies your data rather than moving it. This means the original files remain on the old Lenovo device even after the transfer. It’s a safer approach, ensuring nothing is lost during the transition.
Q3: Does Lenovo Migration Assistant move programs?
No, Lenovo Migration Assistant only transfers your files and selected settings, not installed programs or applications.
Q4: How to transfer data from laptop to laptop wirelessly?
You can use Lenovo Migration Assistant or transfer software like AOMEI Backupper that supports network sharing. Both options allow you to transfer data from Lenovo to Lenovo laptop over the network without the need for physical drives.
Q5: Does Lenovo Migration Assistant transfer everything from Windows?
Lenovo Migration Assistant does not transfer everything from Windows, including the installed apps, and the operating system. It primarily focuses on transferring files, folders, and user settings from one PC to another.
Concluding Words
Lenovo to Lenovo data transfer can be quick, safe, and hassle-free with the right tool. Whether you prefer the simplicity of Lenovo Migration Assistant or the power and versatility of AOMEI Backupper, you can get the right data migration method that caters to different needs.

