How to Create Gateway System Recovery Disk (4 Free Tools)
If you are looking for a way to create Gateway recovery disk in Windows 11/10/8/7, read this article patiently.
By Lily Updated on October 11, 2024
About Gateway recovery disk
Gateway computers enjoy great popularity among users, including Ultra Slim notebook, Elite notebook and all-in-one desktop. Despite the great performance they provide, you can still suffer from computer errors, such as system crash and hard drive failure. Some of the errors may cause big damage. In order to rescue your computer from serious errors, you need to prepare a Gateway recovery disk.

A recovery disk is also known as repair disc, boot disc, rescue disk or restore disc. When your system cannot boot normally, you can access system recovery options from a recovery disk and restore computer to an earlier date. Wanna know how to create system recovery disk for Gateway? Just keep reading.
Create Gateway recovery disk with Gateway Recovery Management
Gateway computer is equipped with Gateway Recovery Management to help users create a set of recovery disks.
In Windows 7
1. Go to Start > All Programs to find a Gateway folder.
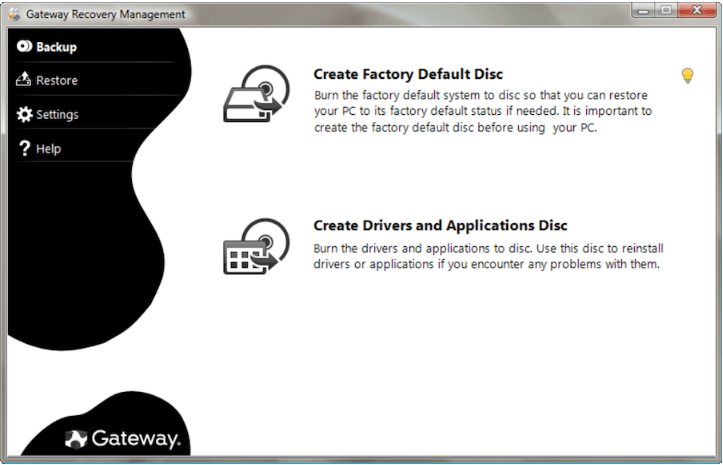
2. Click on Gateway Recovery Management. When it opens, select Create factory default disc.

3. At the Create Backup Disc screen, insert your first blank CD or DVD and make sure the optical drive is selected at the “Burn to” item. The software will let you know how many CDs and DVDs you need if you plan to use either a CD or a DVD.
4. Click Start.
5. The software will prompt you to insert the next blank CD or DVD to continue the process. Insert a new blank media and click OK.
6. When the process is complete, click OK to exit Gateway Recovery Management.
In Windows 8
1. Press Win + Q keys and type “recovery” when the search field appears.
2. When the first search result appears, click on Gateway Recovery Management.
3. Select Create Factory Default Disc.
4. Select Copy content from the recovery partition to the recovery drive and click Next.
5. Select the USB flash drive to use as a recovery media from the list and click Next. You can also use a DVD as a recovery media.
6. Click Create. If you are being asked to delete the recovery partition from your computer, click No.
Create Gateway recovery disk with Windows built-in tools
In Windows 7, you can use Backup and Restore to create system recovery disk with a CD/DVD. In Windows 8/10/11, you can use the Create a recovery drive feature to create a recovery USB drive.
In Windows 7
1. Insert the disc to your computer and make sure it is a writable empty disk.
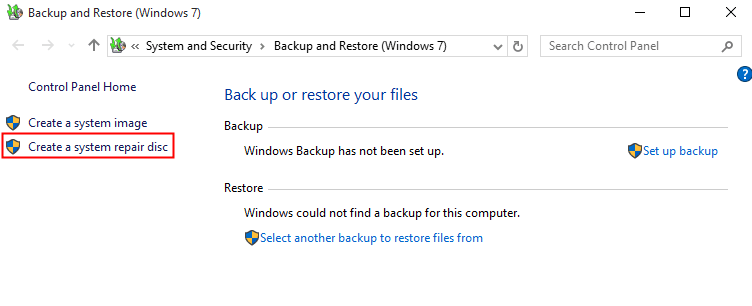
2. Go to Start Menu, type “backup” in the search box and choose Backup and Restore.
3. Click Create system repair disk in the left pane, and follow the instructions to finish the task.
In Windows 8/10/11
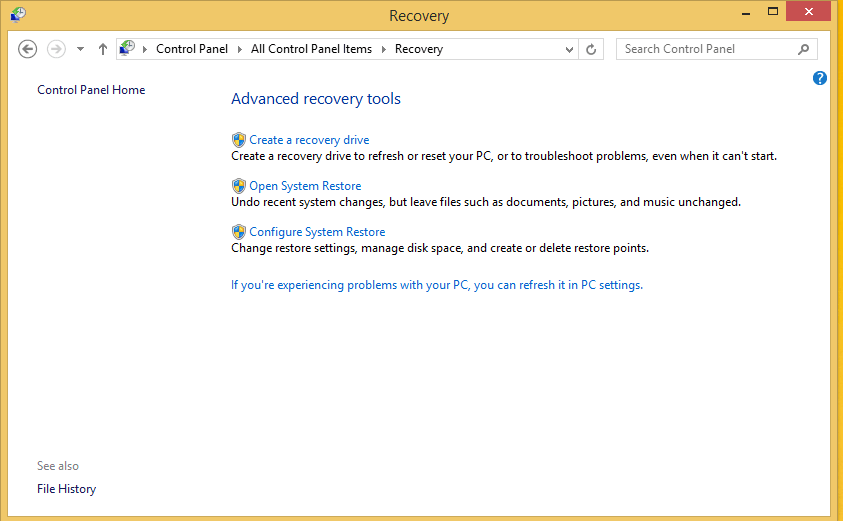
1. Connect a USB drive to your computer.
2. Go through Control Panel -> All Control Panel Items -> Recovery. Then, select Create a recovery drive to start the task.
After you have created system recovery disk for Gateway, you can use it to boot your computer when you need. You can enter the BIOS to change the boot order so that your computer can boot from the recovery disk. However, you may receive an error message: System recovery disk could not be created (0x80070057). Fortunately, you can try some third party software to create Gateway system recovery disk.
Make boot disk for Gateway computer with AOMEI Backupper🔥
AOMEI Backupper Professional is a powerful software that can be used for making system repair disc in simple steps. You can use it to create system recovery disk for Gateway, HP, Dell, Toshiba, Asus, etc, and it can work with all Windows PCs including Windows 11/10/8/7/Vista/XP. Free download Gateway recovery disk creator to have a try!
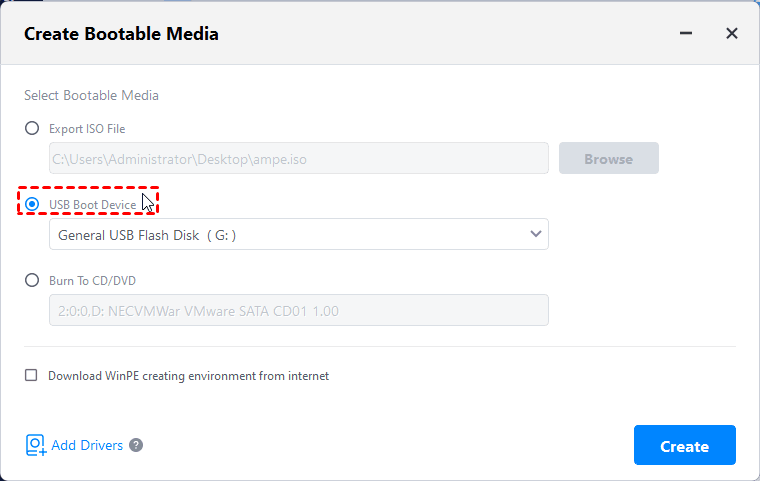
Step 1. Connect your CD/DVD or USB drive to your computer and make sure it can be detected by your Gateway computer. Install and launch AOMEI Backupper. To create system recovery disk for Gateway, here you need to click Tools and then select Create bootable Media.

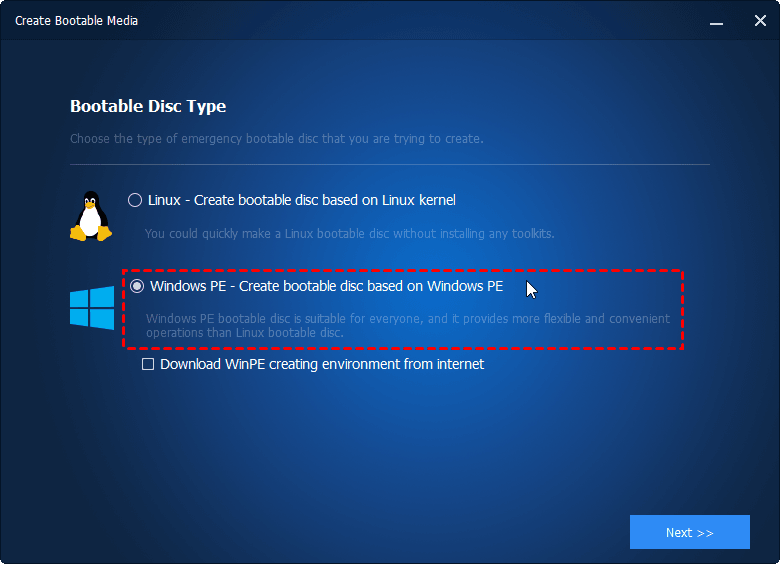
Step 2. Choose a type of bootable disc that you are trying to create and click Next. It is recommended to create bootable disc based on Windows PE so that you can access full functions of AOMEI Backupper.
Step 3. Select a storage device to hold WinPE files or specify a location path to export the ISO file. Click Next to start.
Creating Gateway system recovery disk is such a simple thing with AOMEI Backupper. You can use the recovery disk to boot any Windows computer. Besides, AOMEI Backupper allows you to create a system image backup to the recovery disk or other storage devices so that you can boot your Gateway or other computers from the system repair disc and restore your computer from the system image.
💡 Tips:
- If you are a Windows Server user, the AOMEI Backupper Server edition is suitable for you.
- If you want to create a recovery partition on your internal hard drive, AOMEI OneKey Recovery can give you a hand.

