How to Backup SQL Database to Remote Location without Error
How to backup SQL database to remote location like network share or mapped drive? Here are detailed steps to do it without operating system error 3 or error 5.
By Dylan / Updated on July 2, 2024
How do I backup SQL database to remote location?
Backup database to a network/remote server
I am trying to backup SQL server database to network drive. I have mapped the network, But I am getting the error “Cannot open backup device. Operating system error 3 (The system cannot find the path specified)”.
Backing up beforehand can avoid accidental deletion or corruption of SQL database. But when it’s comes to system failure or computer breakdown, a backup on local drive is pointless. That’s why you need to backup SQL database to remote location like network share, NAS or mapped drive.
The way to do this is nothing different - you can set up backup in SQL Server Management Studio just as usual. But some errors may occur during the process, like Operating system error 3 (The system cannot find the path specified) and Operating system error 5 (Access is denied).
Next, I will introduce how to resolve these errors and back up database to a remote location without problems. You could also try Method 2 to skip these troubleshooting steps and easily backup SQL database to network location.
1. Backup SQL database to network drive in SSMS smoothly
You can use SSMS backup wizard or T-SQL to backup SQL database to network drive, but while specifying a remote location as destination, some operating system errors (like error 3 or error 5) might fail the backup. This is usually due to path issue or permission issue. Simply put, you should be aware that:
☛ When backing up to a mapped drive, enter its UNC name instead of mapped drive letter.
☛ Provide full permissions of the target share to the account you log on SQL Server as.
I will elaborate on these points in the following article.
How to backup SQL Server databases to a mapped drive without error 3?
The Operating system error 3 (The system cannot find the path specified) usually occurs when you use the mapped drive letter like (Z:) or (N:) as path. To solve it, you need to use its UNC name (\\fileserver\share\filename.bak) instead.
☛ Backup with SSMS backup wizard:
1. Connect to your server. Right-click the database you want to backup, and choose Task > Back Up.
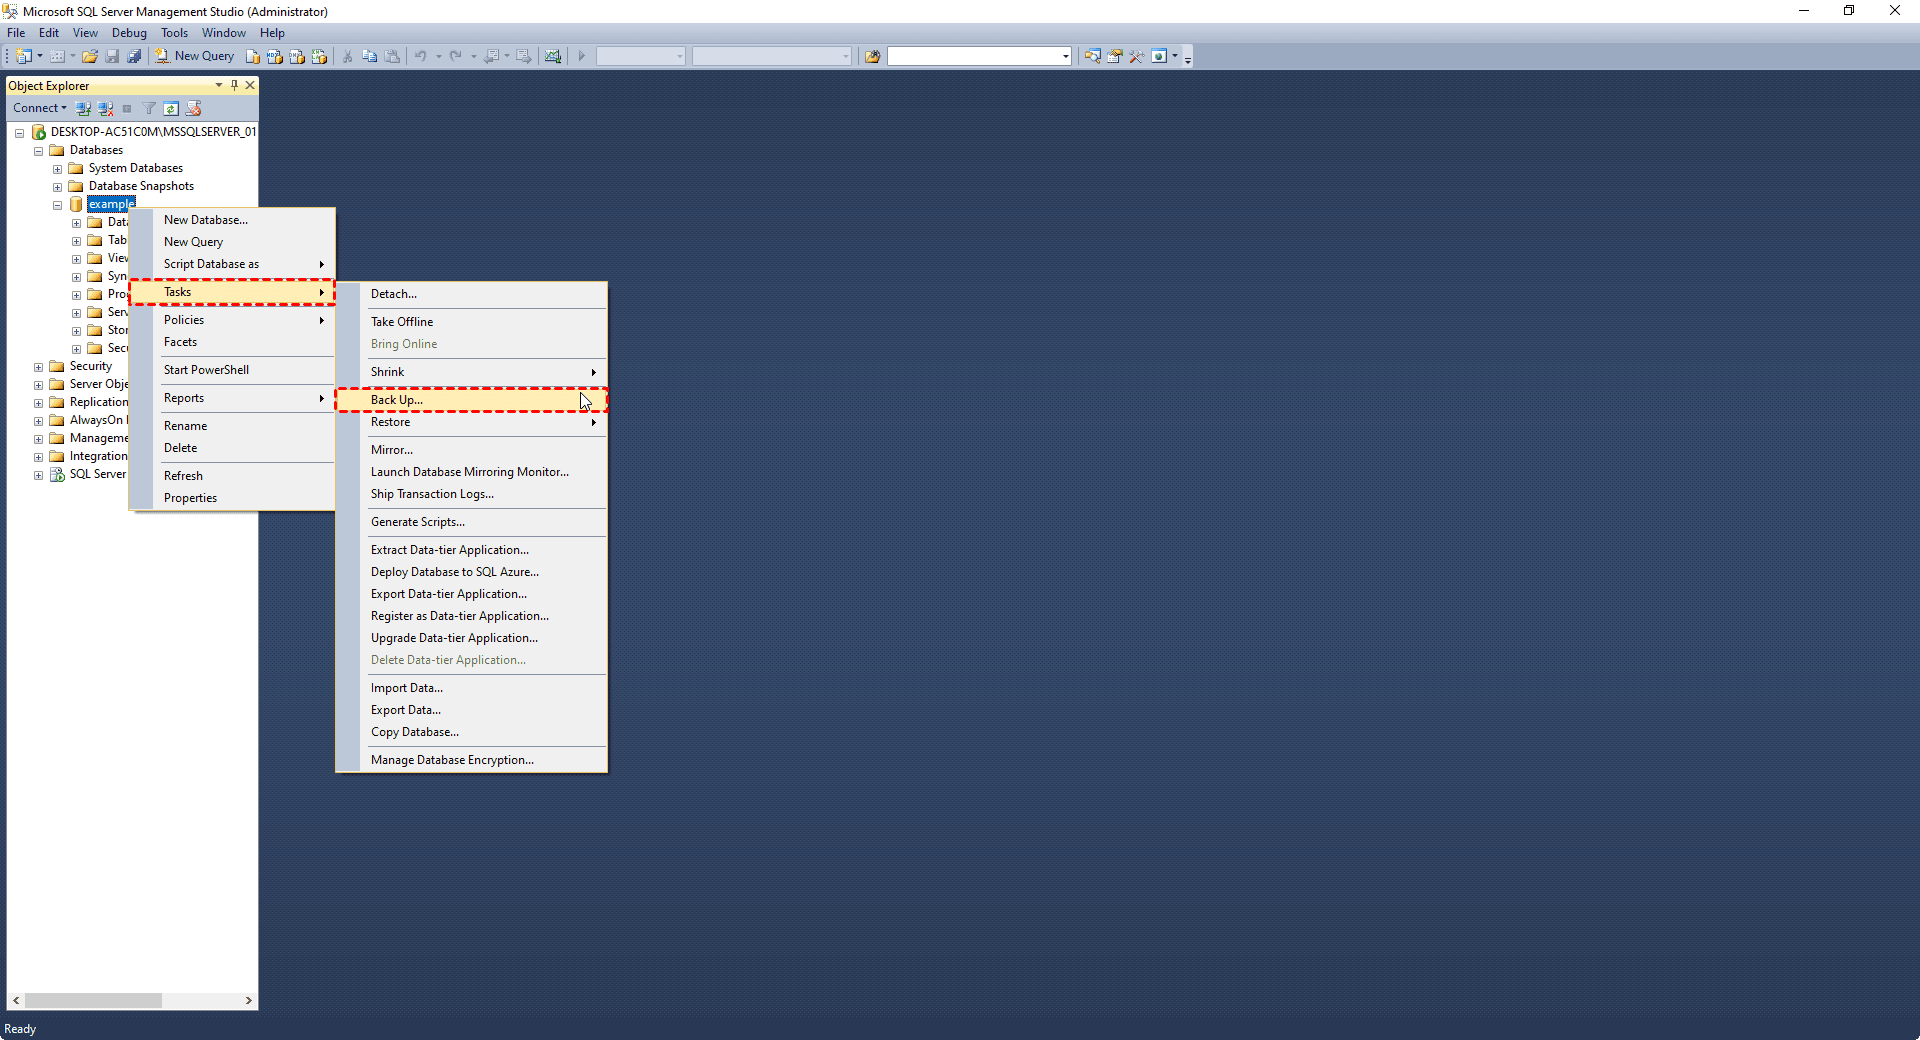
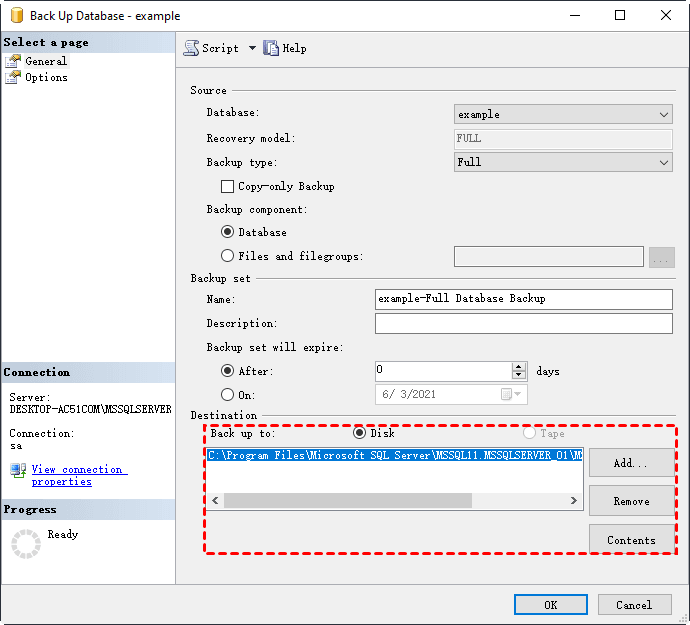
2. In the pop-up wizard, you could configure the database, backup type and destination. In the destination section, Remove the default path and Add a new one.
It’s not allowed to select a share or mapped drive directly, so you need to enter its UNC name of the remote location. For example, I want to backup database to a network share “\DESKTOP-AC51C0M\share” and name the backup file as “1.bak”. Then I need to enter “\DESKTOP-AC51C0M\share\1.bak” .
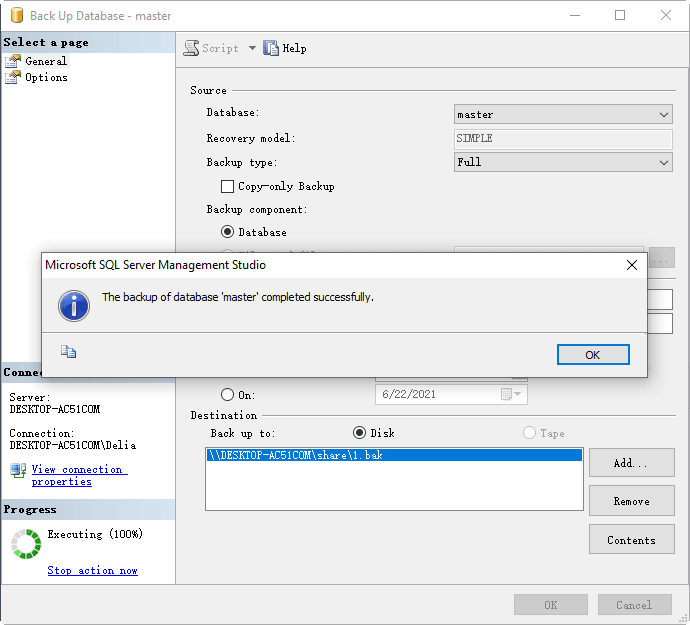
3. Click OK to perform the operation.
☛ Backup with T-SQL:
Alternatively, you could use T-SQL to perform the same operation.
1. Connect to the server, click New Query button above.
2. In the SQLQuery window, enter the backup command as following:
BACKUP DATABASE databasename TO DISK = 'filepath\filename.BAK'
To backup to a network location without error 3, you need to use the UNC name as path, so my example is:
BACKUP DATABASE example TO DISK = '\\DESKTOP-AC51C0M\share\1.bak'
3. Click on Execute to perform the backup.
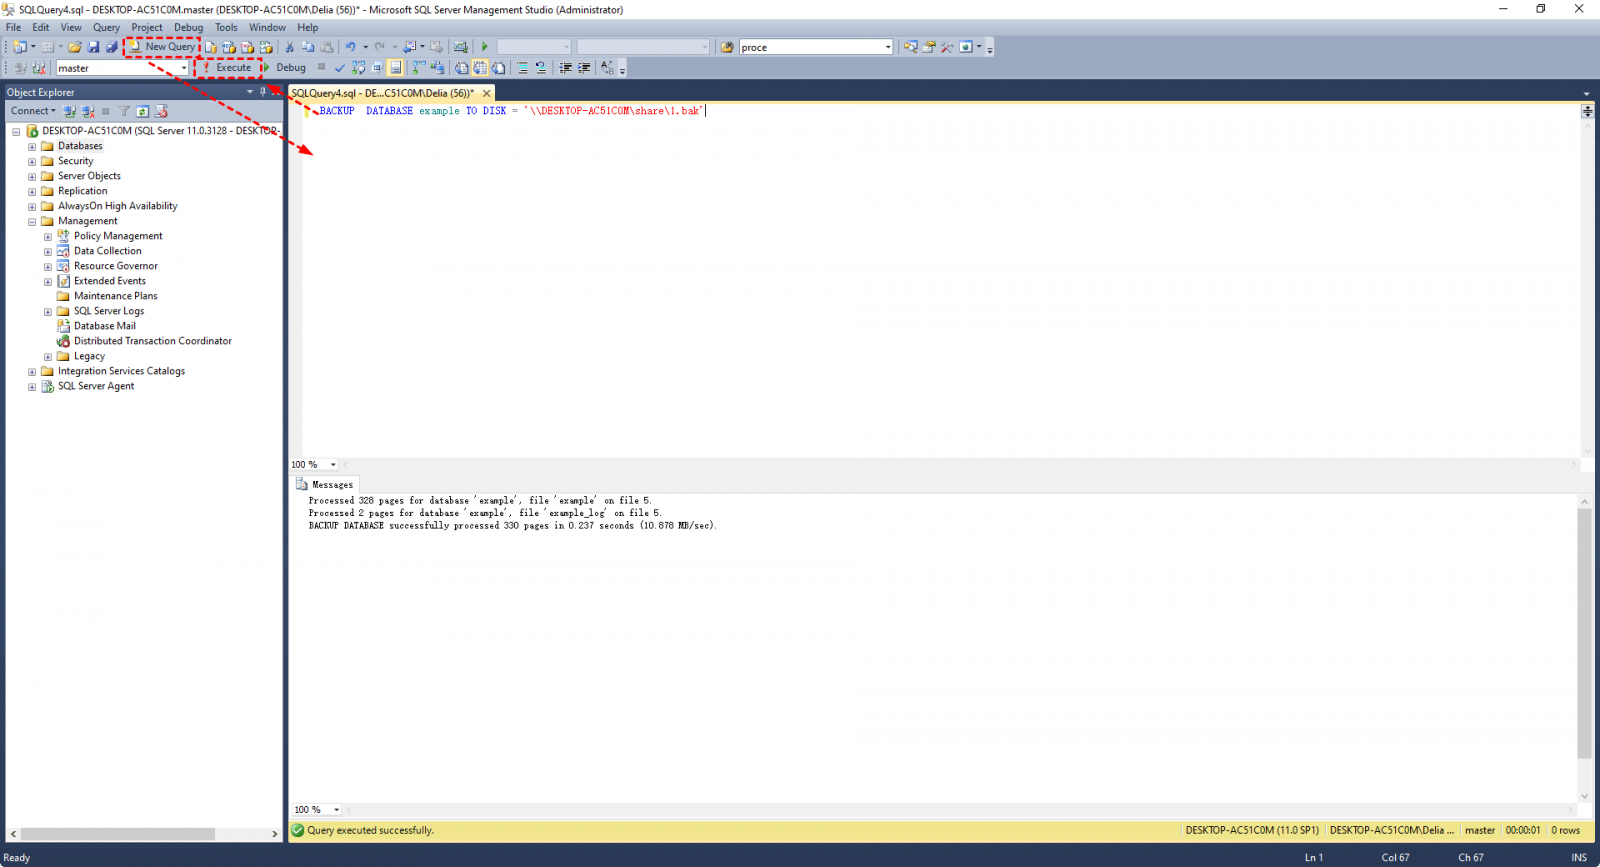
Now that the Operating system error 3 should not bother you anymore.
What if backup failed with Operating system error 5 (Access is denied)?
When you specify a network share in your local drive or a remote machine, the backup may also fail due to error 5:
Msg 3201, Level 16, State 1, Line 1
Cannot open backup device '\\fileserver\share'. Operating system error 5 (Access is denied.).
Msg 3013, Level 16, State 1, Line 1
BACKUP DATABASE is terminating abnormally.
This is usually because the account you log on the SQL Server as doesn’t have the permission to read & write data to the share. To fix it, you need to find the account, then provide full privilege to it. Here’s the approach:
1. Press Win + R to open the Run window. Type “services.msc” and press Enter.
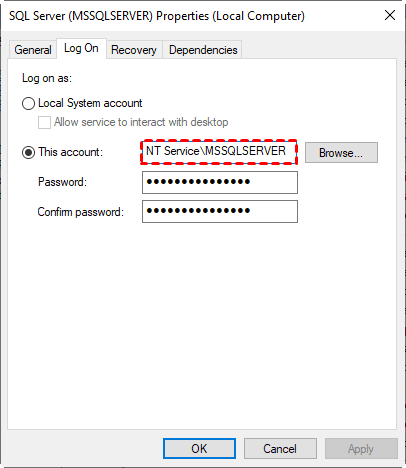
2. Find the service of SQL Server (MSSQLSERVER), right-click it and choose Properties.
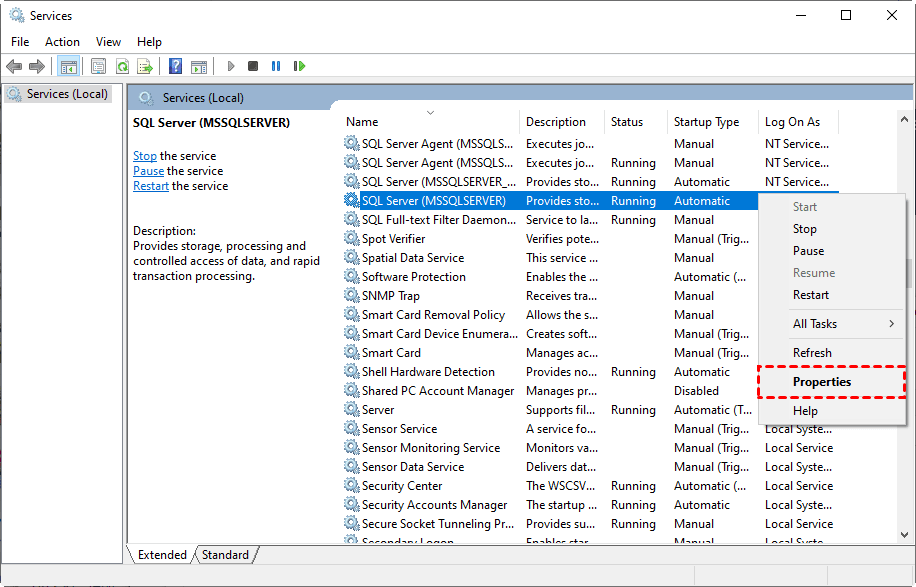
Then you could find the full account name under Log On tab.
3. Now, right-click the network share you want to save the backup, choose Properties, and switch to Security tab.
4. If you can find the account under “Group or user names”, then you just need to select it, and choose to Allow its Full control. Thus all the permissions for this account will be enabled. Click Apply to confirm the settings.

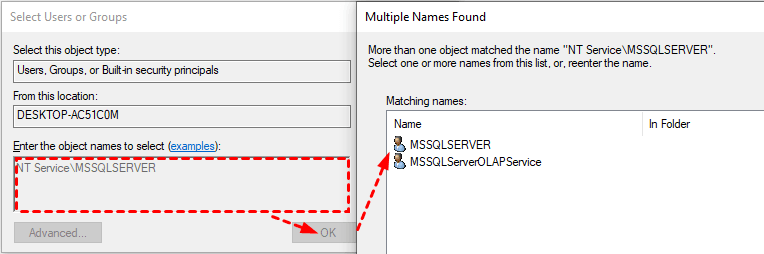
If this account doesn’t show in the list, you will need to add it manually by clicking Edit and then Add.
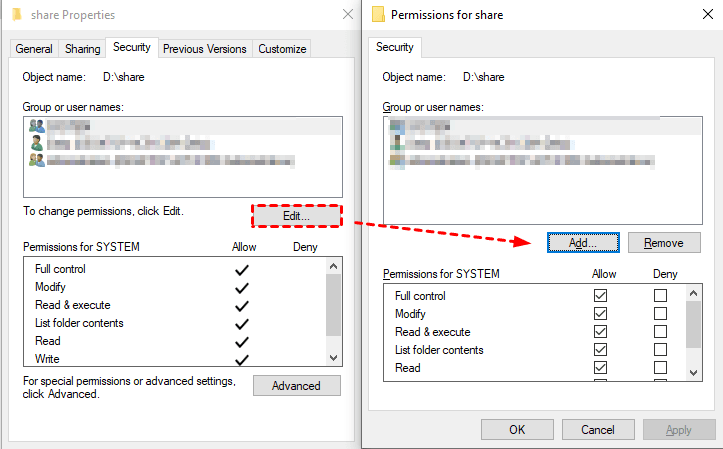
In the popping out window, you could paste the account name in the textbox, and click OK to search for it. Then, select the corresponding account from the results, and continue to modify its permissions as normal.
After that, you should be able to backup SQL database to the share without error 5.
2. Easily backup SQL database to remote location without problems
If you are still unable to backup database to a remote location successfully or feel tired of these troubleshooting steps, you could also try an error-free alternative - AOMEI Cyber Backup. It is a centralized backup and management solution enabling you to backup SQL database to a remote location, including network share and mapped drive.
This robust SQL backup solution integrates various features catering to various scenarios, making it to be the best choice.
►Easy-to-use software: It uses a user-friendly web console that allows users to centrally backup SQL database, even non-tech people can easily create a backup for MS SQL database.
►Auto and scheduled backup: Set up a backup schedule to automatically run the backup task daily, weekly, and monthly.
►Recovery to new server: Apart from restoring MSSQL database backup to the original location, AOMEI Cyber Backup also helps you backup SQL database to another server.
To get started, you need to download and install AOMEI Cyber Backup on the server machine. Have a try on the 30-day free trial:
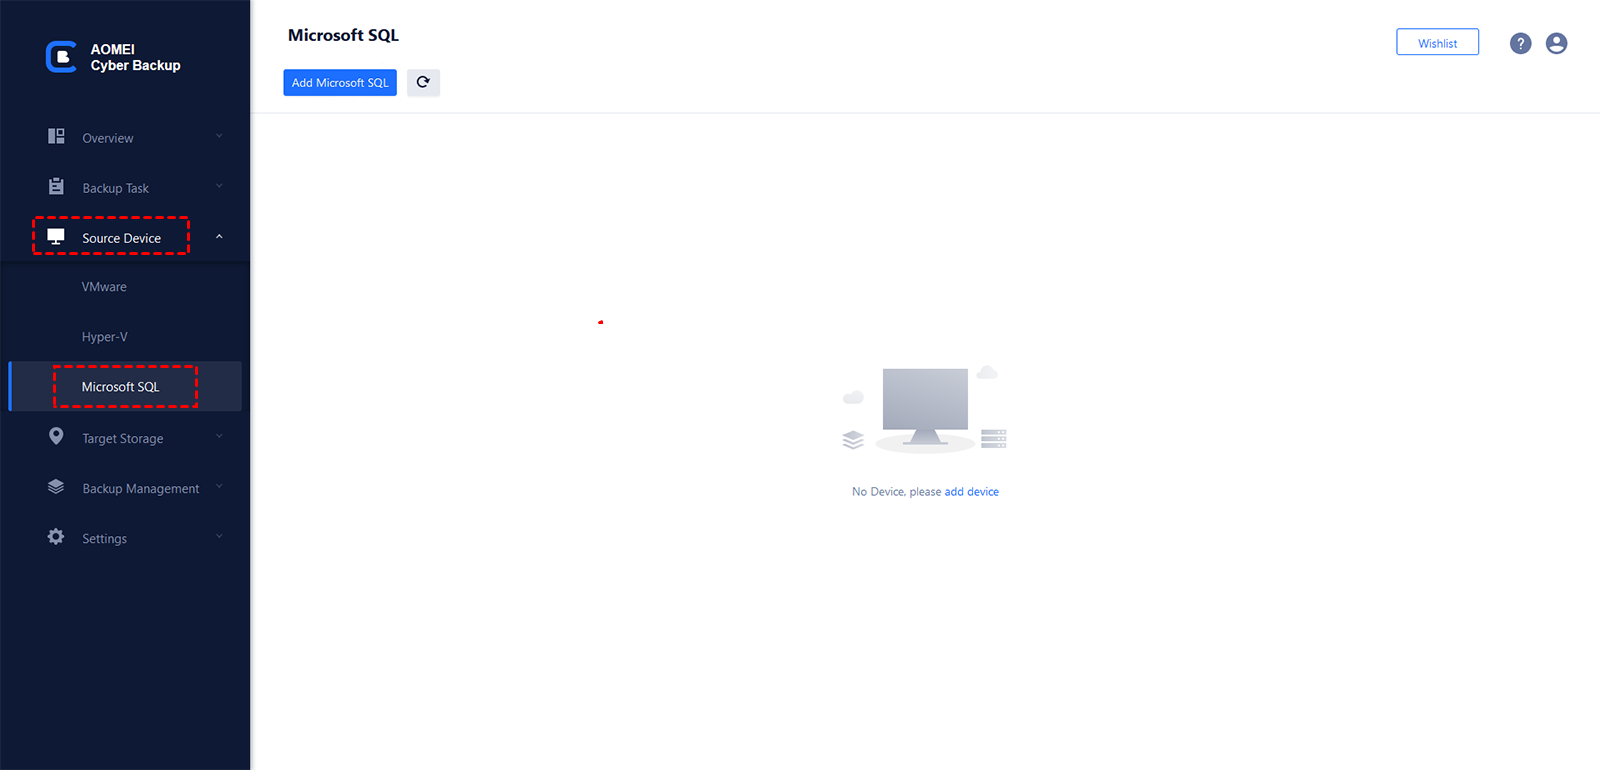
To set up the SQL backup software: run the installed program on the server machine, navigate to Source Device -> Microsoft SQL -> Add Microsoft SQL.
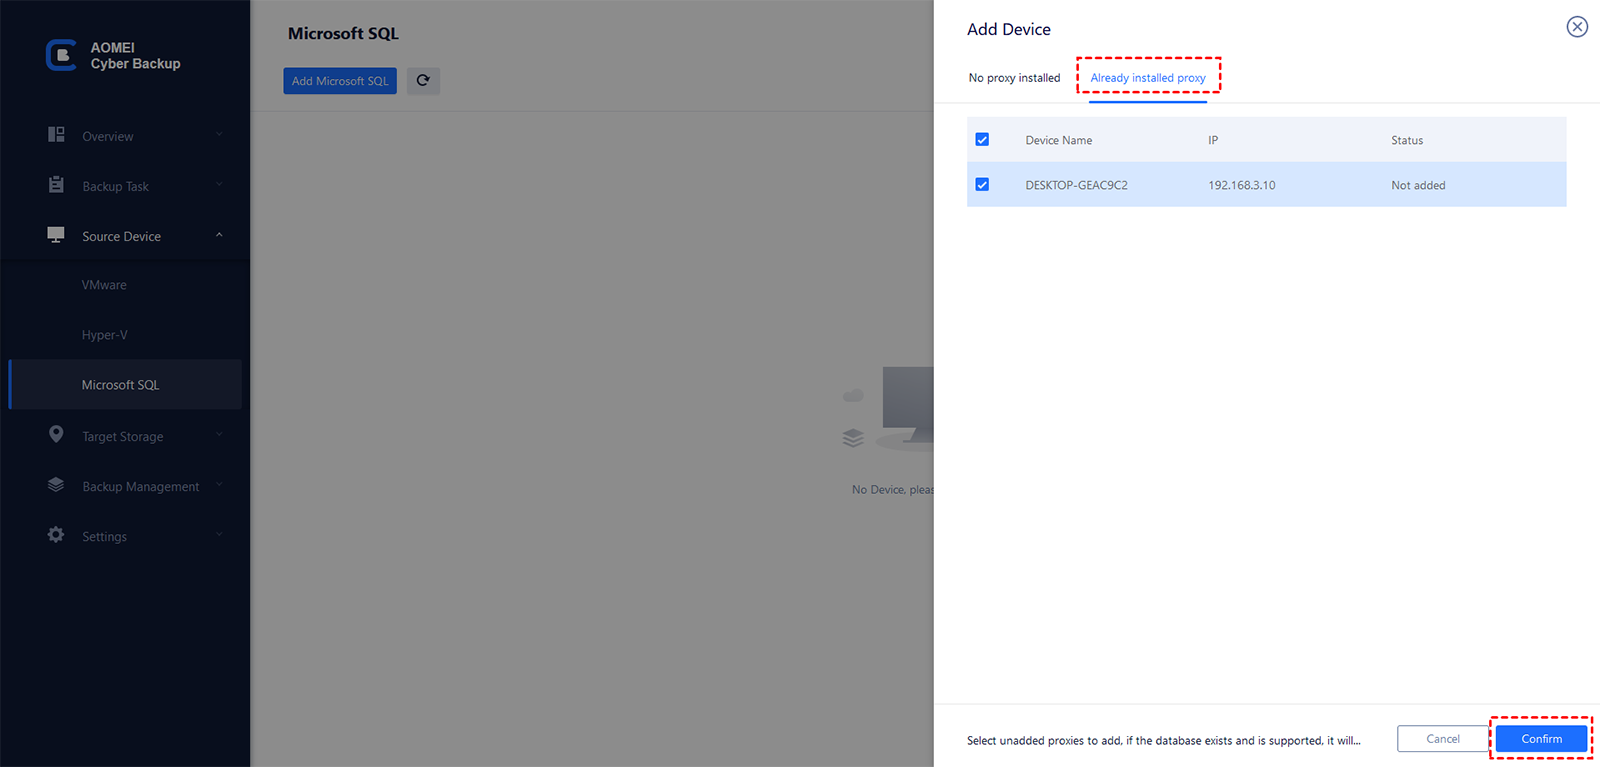
Choose Download proxy program (or Copy link) and install it on to the device with SQL Server installed. Then, click Already installed proxy and select the device to Confirm it.
After that, click ![]() -> Authentication to validate the database instance. And then you can follow the steps below to back up SQL database.
-> Authentication to validate the database instance. And then you can follow the steps below to back up SQL database.
How to backup SQL database to remote location via easier alternative
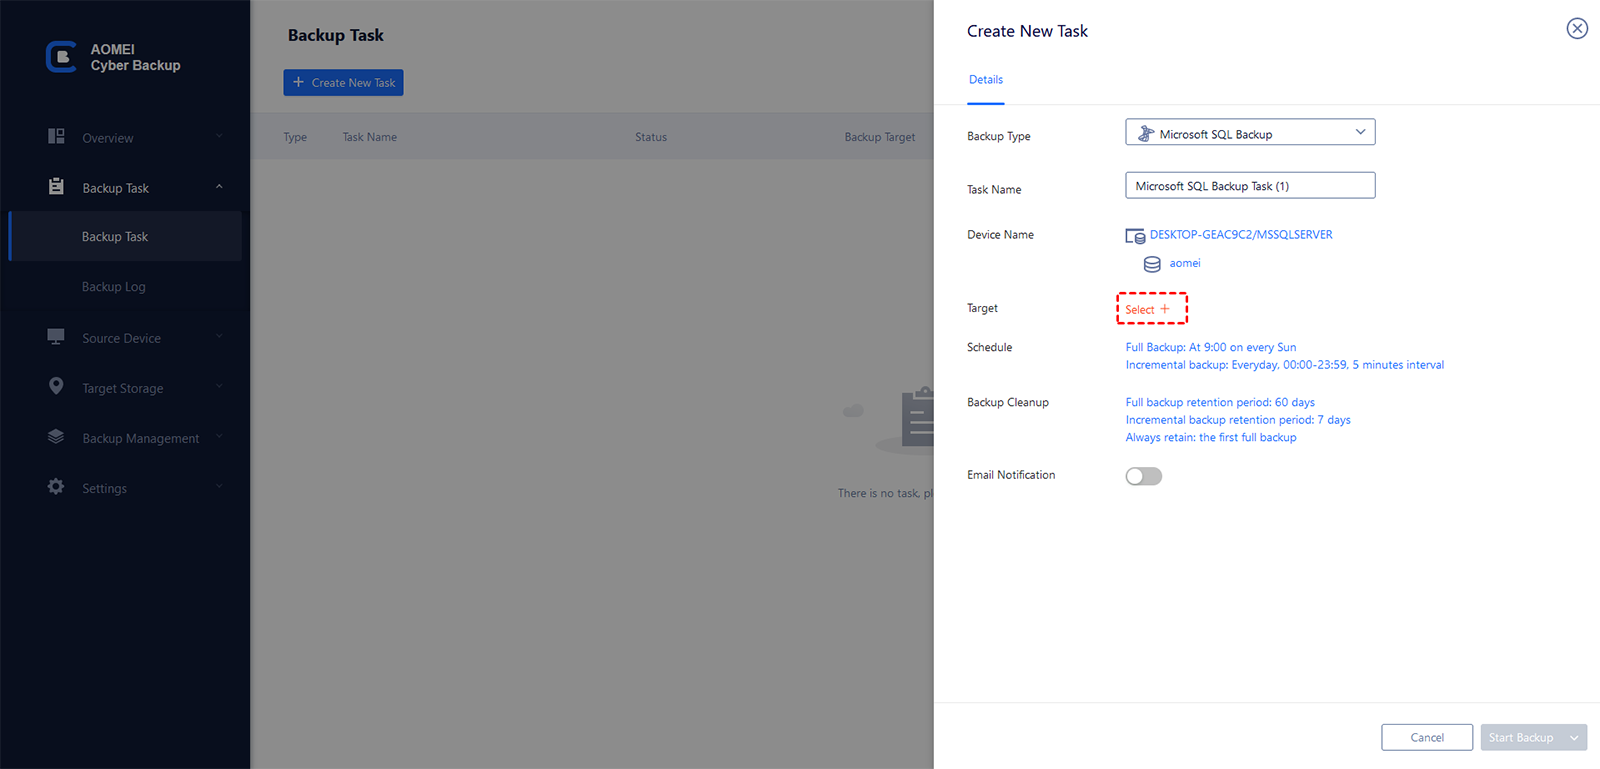
1. Click Backup Task -> Create New Task, and select Backup Type as Microsoft SQL Backup.
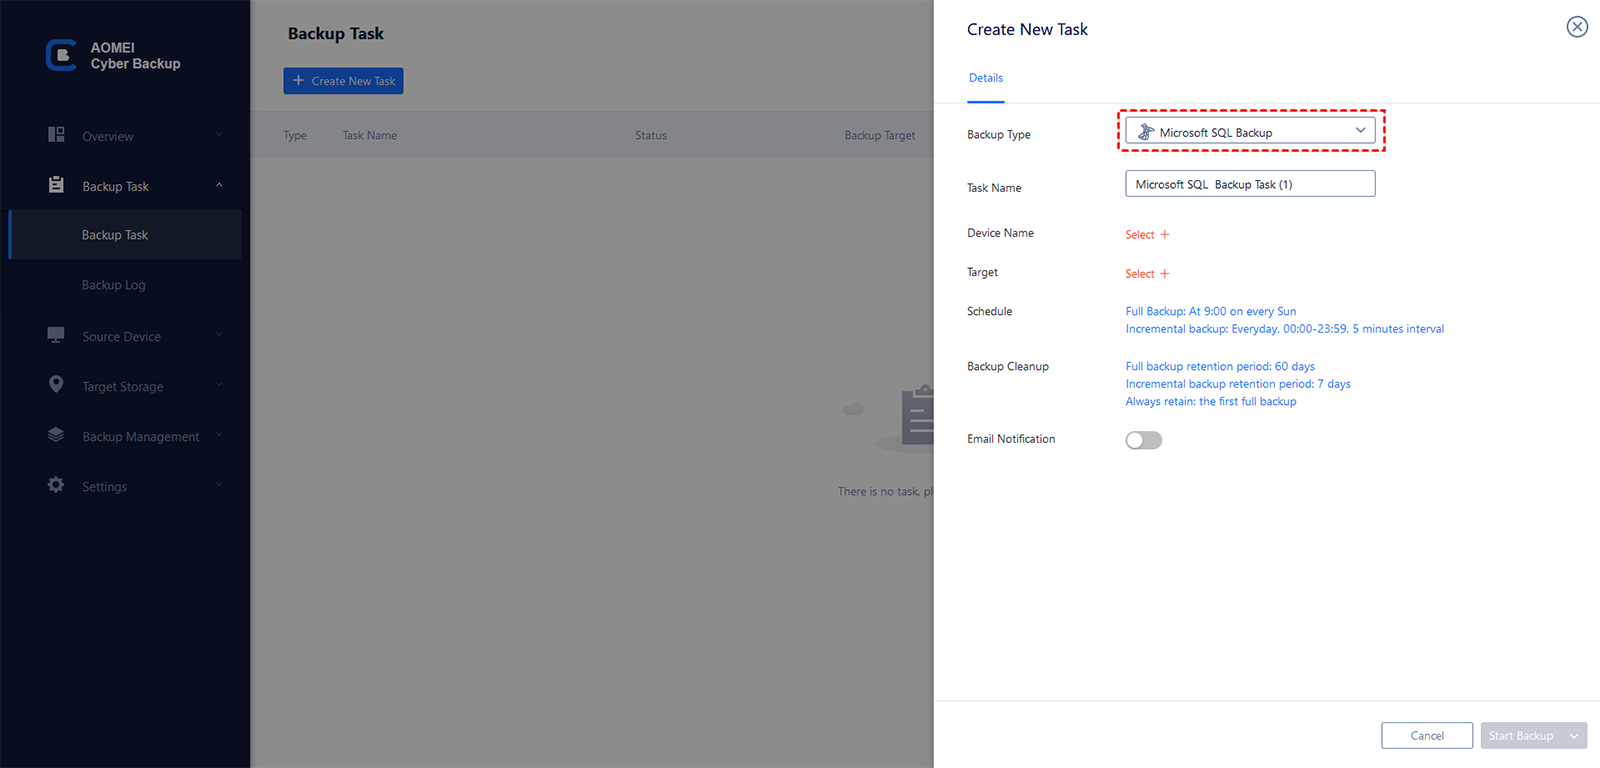
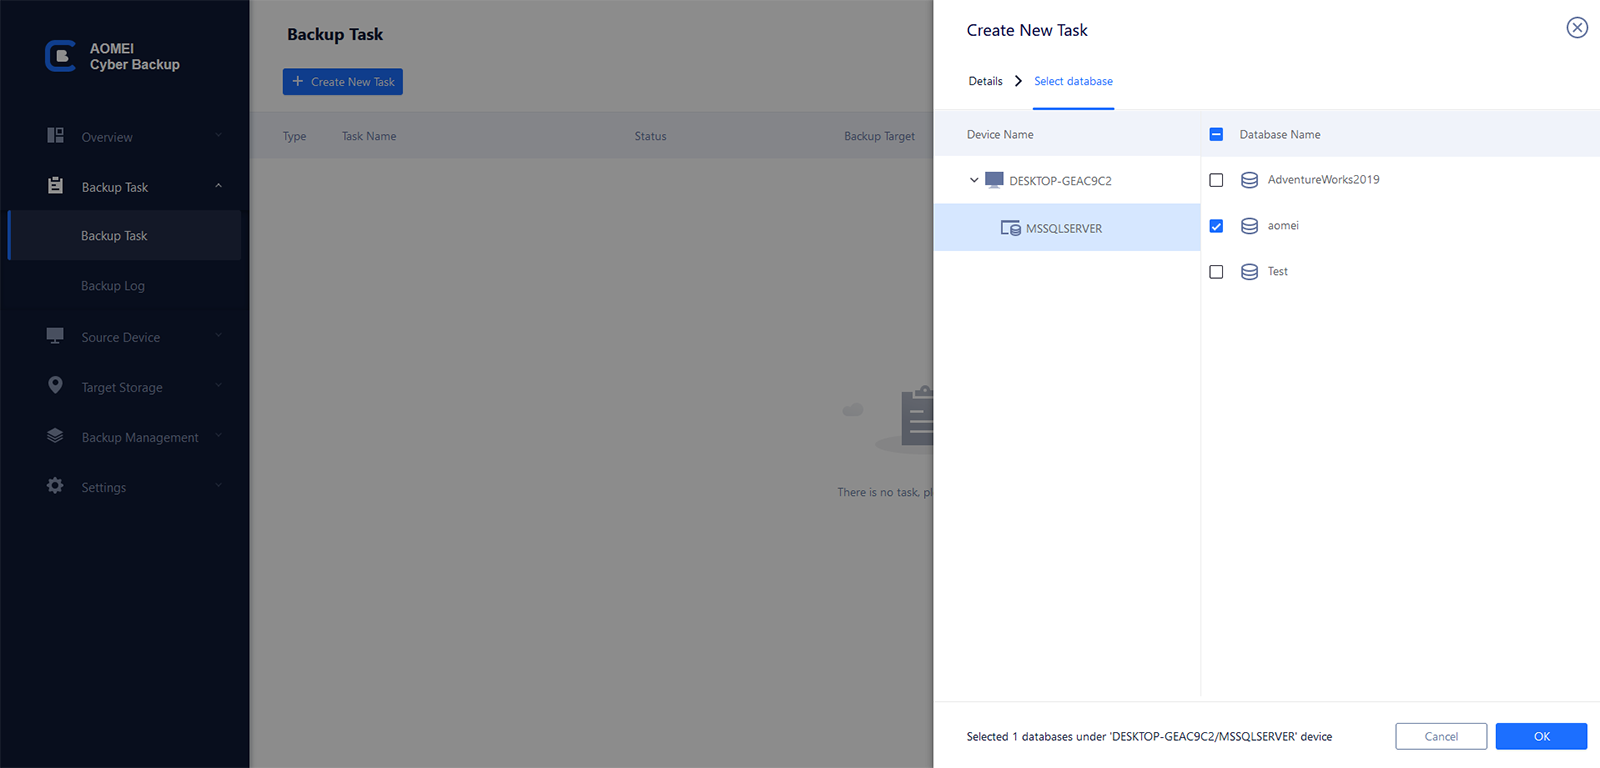
2. Tap Device Name to select the SQL instances and databases for backup. You can select one or multiple databases as you need.
3. Specify a local path or network path as backup Target. To back up SQL database to remote location, you could click Add a new network storage. The added path will be saved in Add storage.
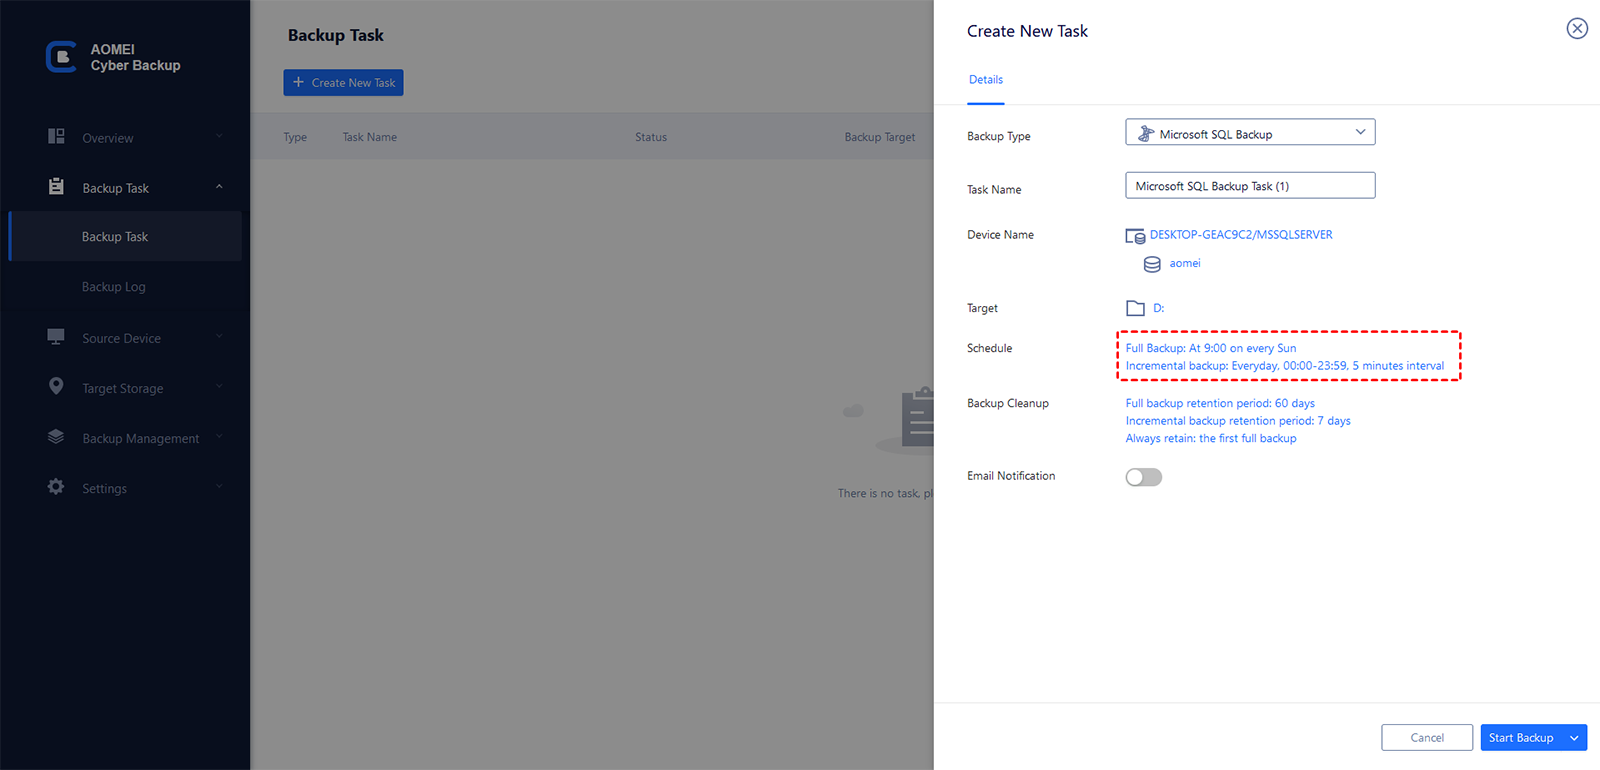
4. Set up a Schedule (optional) to run the SQL database backup daily/weekly/monthly, and set the backup method as Full/Incremental/Differential.
✍More useful features:
- Backup Cleanup helps you to delete older backup version automatically and therefore save storage space.
- Email Notification enables you to receive email notifications when the task is abnormal or successful.
- Archive helps you save the SQL databases backup files to an Amazon S3 storage.
Now you can click Start Backup to create and execute the SQL Server automatic backup.
This way, you won’t receive Operating system error 3 or error 5 during the process. With the centralized backup and restore feature, you can also backup SQL database to another server easily.
Bottom line
It’s a good idea to backup SQL database to remote location, thus even the entire machine breaks down, you can retrieve databases with the backup. However, various operating system errors might appear during the process. To save time from error-proof settings and troubleshooting steps, you could also use third-party software like AOMEI Cyber Backup.
This software allows you to backup SQL databases to network share or NAS within several steps, and you can select multiple databases or even multiple instances at once. In addition, it's also a virtual machine backup solution, so you can easily backup VMware VMs or Hyper-V VMs effortlessly