Backup PC to NetGear ReadyNAS in Simple Steps (FREE)
Get the ReadyNAS backup software below and backup PC to Netgear ReadyNAS to protect your system and data continuously.
By Delia Updated on January 18, 2024
Why use Netgear ReadyNAS for backup solution?
Nowdays, Netgear ReadyNAS is largely used as a network storage device. As you may know, Network Attached Storage (NAS) is a very good solution for saving backups for a couple of reasons. It provides large storage space and excellent data transfer speed, easy access for many users, far away from local disasters.
Meanwhile, the importance of always having a backup can never be addressed more. It's the last resort to NAS disaster recovery in the event of failure. Therefore, you can backup PC to Netgear ReadyNAS in case any unexpected issues, resulting in data loss.

You need a ReadyNAS backup software for Windows PCs
Searching ReadyNAS backup software or backup PC to ReadyNAS, you may find many articles introducing the built-in tool Backup and Restore or File History to help you backup files or system. Besides, you still can use ReadyNAS cloud to perform cloud backup. Then, which one should you use?
>> Backup and Restore works well in creating system image and file backup locally. However, it's a little ticky to backup computer to NAS if you use Windows 7 Home version.
>> File History is good at backing up user files and you can backup specific folder in Windows 10 using its Add folder feature.
>> ReadyNAS cloud is a free service that allows you to access files on your ReadyNAS or on storage connected to your Nighthawk anytime. Thus, you can directly backup file to ReadyNAS.
In view of the functionality of them, it's suggested to use Backup and Restore for PC backup. If you Windows 7 Home version or want more advanced features, try a third-party reliable software, AOMEI Backupper Standard, for example. It is able to backup PC to ReadyNAS with the help of its System Backup and Disk Backup. And either way, you can enjoy the following features:
- Schedule Backup: It allows you to create daily/weekly/monthly backup automatically. Thus, you don't worry about data loss due to forgetting backup.
- Incremental Backup: It is to backup only changed files since last backup, whether it's full backup or incremental backup, thereby saving backup time and disk space.
- Other useful features: It is capable of enabling email notification, create bootable media to boot failure computer, etc.
How to auto backup PC to ReadyNAS
In this part, weI'll continue to discuss how to auto backup PC to ReadyNAS with built-in tool Backup and Restore, and AOMEI Backupper Standard. Before backing up, you need to create destination share on the Ready NAS and set the access restriction for it. Then, select one between them and backup PC with the corresponding steps below.
Notes:
• If you are using Windows 7 Home version, please go to Method 2 directly.
• If you are using Windows 10 or Windows 8, you must lower the SMB protocol version on the ReadyNAS to version 2.0.
Create destination share on Ready NAS and set access restriction
Step 1. Log in to the ReadyNAS admin page. Then, go to Shares and select the New Share button.
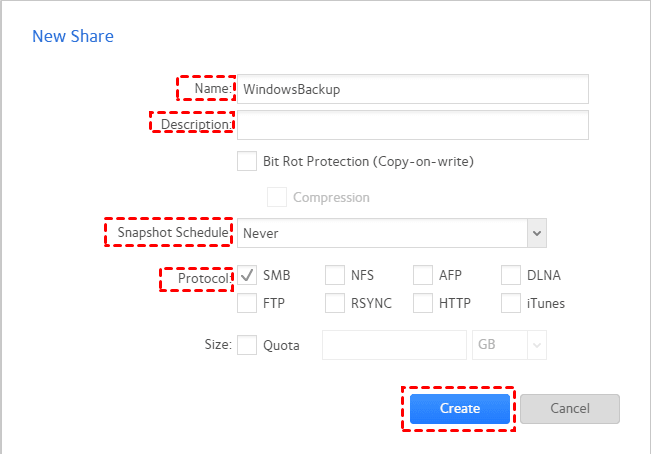
Step 2. In the New Share page, type a name and destination for it. Then, set the destination share settings and click Create.
- Uncheck the Bit Rot Protection if it is checked.
- Select Never as the snapshot schedule.
- Tick SMB as protocol.
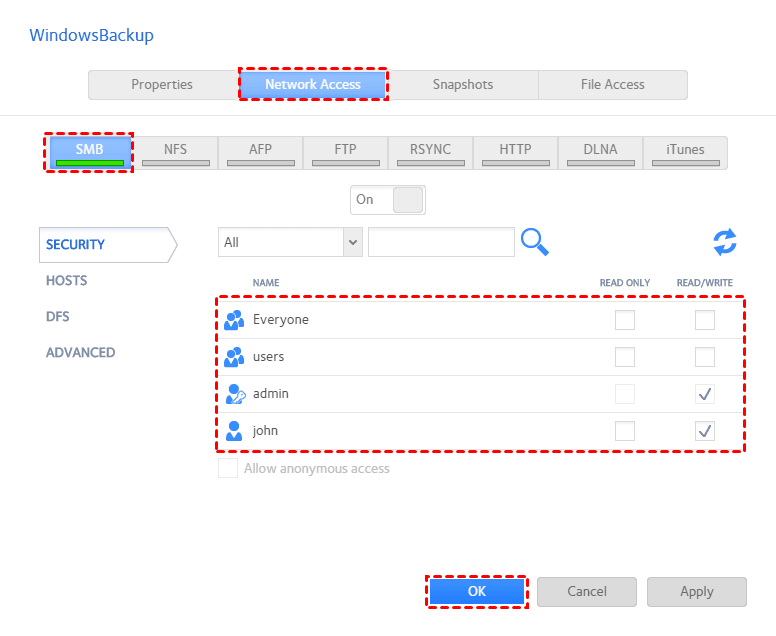
Step 3. Click the newly created share, select Settings > Network Access and SMB.
Step 4. Uncheck the read/write access for Everyone.
Step 5. Tick the read/write access for the user you expect and click OK.
Perform ReadyNAS auto backup with Backup and Restore
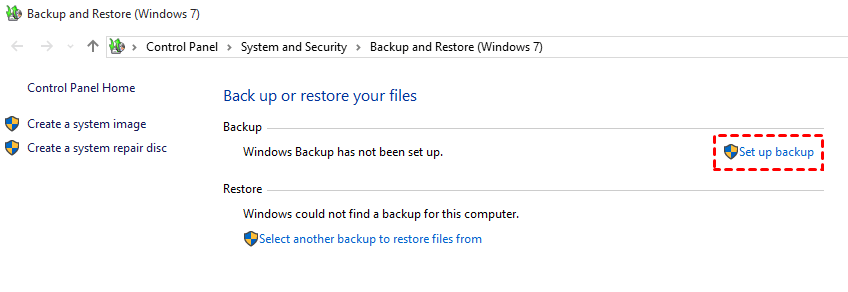
Step 1. Type backup and restore in the search box and select it. Then, click Set up backup on the right side.
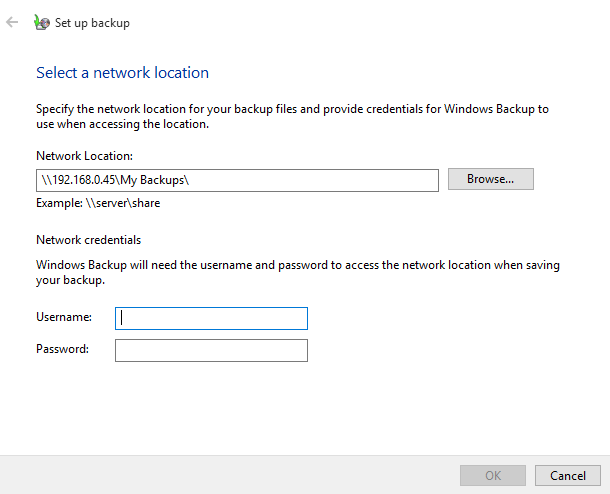
Step 2. Choose Save on network... and add your Netgear ReadyNAS.

Step 3. Type network location and credentials to access Netgear ReadyNAS. After that, click Next.
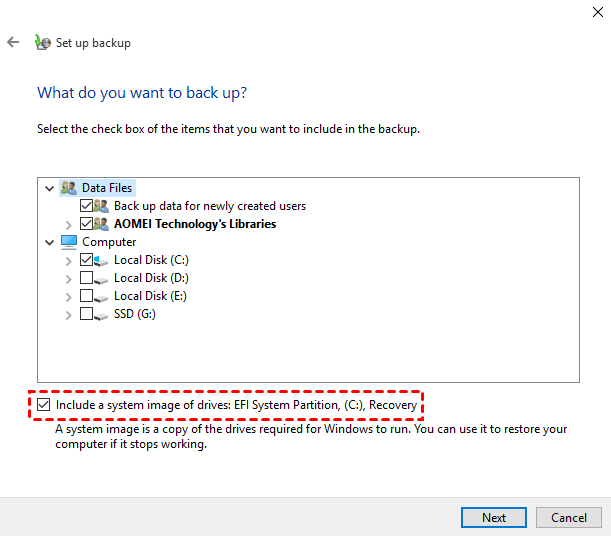
Step 4. Tick Let Windows choose or Let me choose to include the items you want to backup. Anyway, it will include a system image of drives by default, but the latter is more flexible.
Step 5. Review your backup and click Save settings and run backup. By default, the schedule backup is set to 7:00 every Sunday. To change it, click Change schedules.
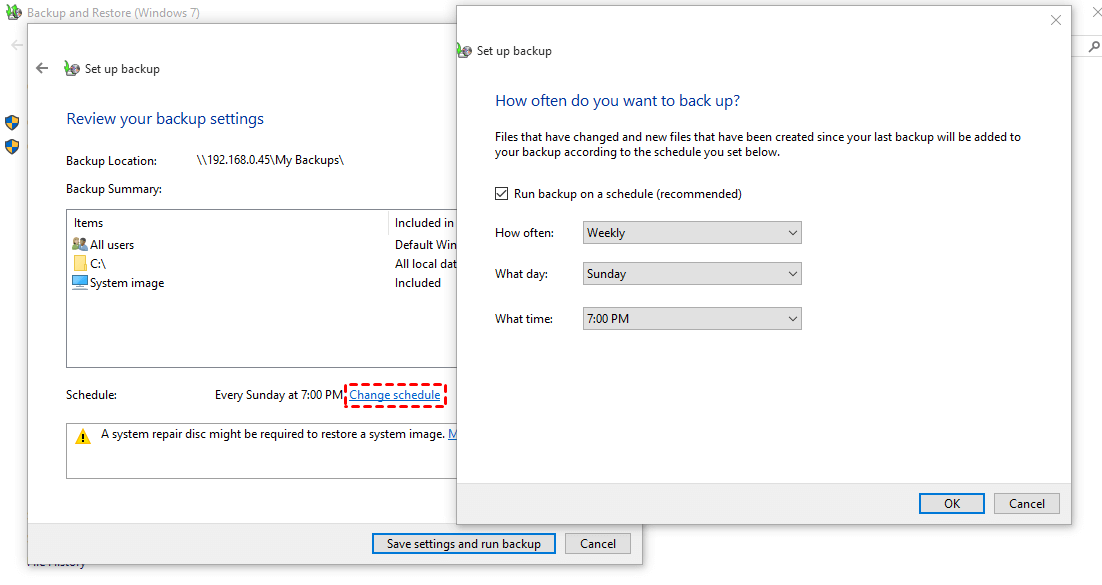
Note: When the process completes, you will be asked if you want to create a system repair disc that can help you boot your computer in trouble. If your computer has an optical drive, please click Yes to make it. If not, you can also create a system repair disk with your USB flash drive.
Perform Netgear ReadyNAS incremental backup via AOMEI Backupper
Step 1. Download free Netgear ReadNAS backup sofwtare and run it. Then, click Backup and System Backup subsequently. To backup important files only, click File Backup.

Step 2. By default, this software will automatically select system partition and boot related partitions for you. Thus, you just need to add the the destination share on the NetGear ReadyNAS.
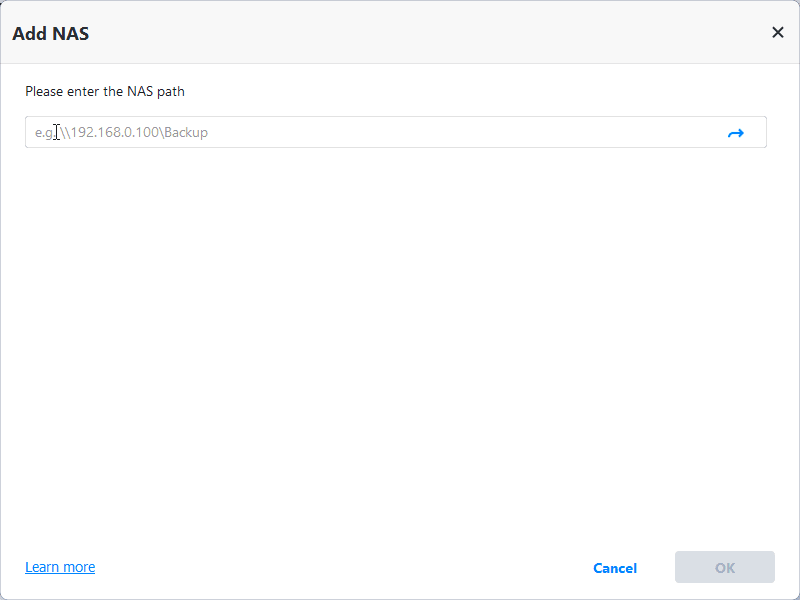
- Click the inverted triangle button and then Add Share or NAS devices.
- In the Add Share or NAS devices page, Type network path or name and click > to continue.
- Then, all the available shared folder will be displayed in the following. Select the one you created before and Click OK to confirm.
Step 3. Set NetGear ReadyNAS incremental backup. By default, this software use incremental backup and backup only changed files. If you don't want to miss any changes, you need to set daily, weekly, monthly schedule backup.

Step 4. Finally, confirm the process and click Start Backup to backup PC to NetGear ReadyNAS.
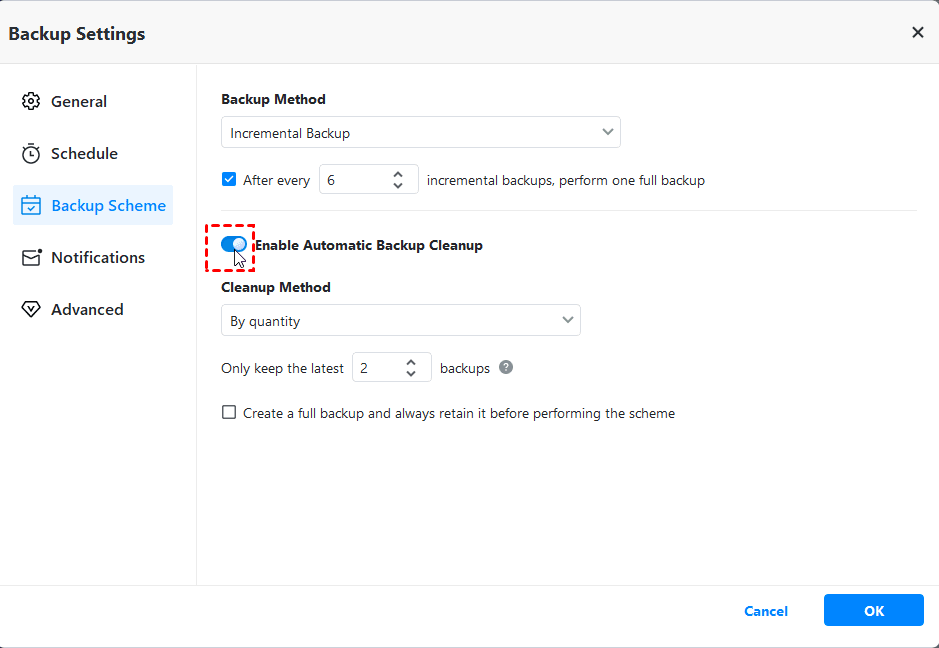
You may feel good at the beginning, everything is backed up with the least backup time and disk space, but you may find the backup disk full due to accumulated backups and limited disk space.
If you don't want to encounter this problem, try automatic backup cleanup in the Backup Scheme. With it, you can delete old backup images regularly to make sure space for new backup with By quantity, By daily/weekly/monthly or By time method. You need to upgrade now (5% discount provided on this page) if you want to use this feature.
Except for this issue, you may encounter system restore failed error. This may be caused by the way incremental backups work. It requires all the backups to be intact while system recovery. If any backup between two full backups is corrupted, the subsequent backups will be invalid.
To avoid backup becomes invalid, you need to pay more attention to backup security or directly use the advanced backup method - differential backup. It only requires one full backup plus any differential backup, preferably the latest backup.
Notes:
• You can use also the above steps to backup Netgear ReadyNAS to USB. In this case, you need to add your files or folders on ReadyNAS and use USB as the destination path. To make it convenient, it's suggested to use "USB plug in" on higher version, which can backup files to USB flash drive automatically when connected.
• This software is still a free disk clone software to help you clone large hard drive to smaller SSD without reinstalling Windows, clone SSD to larger SSD, and more.
Over to you
That's all for free ways to backup PC to NetGear ReadyNAS. Both of them can help you, but I prefer AOMEI Backupper due to its rich functionality. With it, you can set auto backup in NetGear ReadyNAS and backup only changed files on the system partition with incremental backup.
Also, you can use automatic backup cleanup, diferential backup, event trigger, USB plug in etc in the advanced edition. For unlimited PCs, try AOMEI Backupper Technician. It allows you to create portable version of backup software and save it to removable device. Then, take it anywhere and use it on the target computer without installing again and again.

