Windows 11 Disk Check Every Boot: Stop It and Repair Tip
How to stop CHKDSK from running on startup? If disk check runs on every boot automatically, you can try below 2 methods in this post to disable CHKDSK at startup.
By Maggie Updated on November 21, 2023
Why Is Disk Checking Automatically Run on Startup?
“Why does my computer always start disk checking every startup? I scanned it for malware and viruses and there isn't anything and I also shut it down correctly. What could be the problem and how can i fix it?”
When you start your computer, the system automatically initiates a disk check, leading to a prolonged boot time. Why does the Windows 11 disk check every boot? And it can be troublesome for the waiting time. Some factors may trigger this phenomenon.
1. Improper Shutdowns: If the system is improperly shut down, like using the power button or unplugging the cord, it can result in data loss. To ensure the hard disk's integrity, a disk check is performed each time you turn on the system after such incidents.
2. Hard Disk Issues: When there's a problem with the hard disk, such as a bad sector, the system automatically starts Windows check disk every boot and detects issues, searching for any log files. If the disk check becomes a recurring occurrence, it may indicate potential hard drive failure.
3. Virus and Malware Impact: The performance of the system can be affected by viruses and malware. The disk check methodically examines the system to identify any signs of a virus attack, helping maintain the system's security.
Should I Skip Disk Check on Startup?
When you power on your computer, you might notice it engaging in a "scanning and repairing C drive" session, indicating a potential issue with the boot drive. Conversely, if the system checks drive D or E, the problem likely lies with the data drive. If your computer is experiencing slow performance, allowing Windows to perform a thorough disk check is advisable.
If you wish to execute Windows 11 disable disk check on startup it boots up, you can disable it by pressing any key within the first few seconds. However, during the next restart, the same "scanning and repairing" notice may appear, as Windows believes the drive still needs repair. This time, it serves as a reminder until you initiate the disk check. The following two methods can help you stop windows 10/11 keeps checking disk on startup.
How to Skip Disk Check on Windows 11
Just like the above section says, you can press any key when you start the screen. However, the repair notice and process will exceed the next time you start the computer. What should you do when you can’t skip disk check on startup Windows 11? Here are 22 ways:
Method 1. Use CMD to stop checking
To stop Chkdsk.exe from running on every boot, you can use Command Prompt with the following steps:
1. Press Windowa + R to open the Run dialog box, type cmd, and press Enter.
2. In the Command Prompt window, enter the command and hit Enter followed.
fsutil dirty query e:
This command checks if drive E is marked as dirty.)
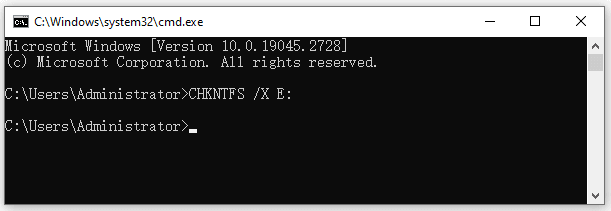
3. To prevent Windows from checking drive E on the next boot, use the command:
CHKNTFS /X E:
✍Note: Replace E with the other drive letter is approved.
4. Restart your PC, and it should skip CHKDSK during boot, directly loading into Windows. Once Windows has fully loaded, open another Command Prompt and run the command:
Chkdsk /f /r e:
This command takes you through five stages of the scan and resets the dirty bit for drive E.
5. Finally, type the command:
fsutil dirty query e:
This confirms that the dirty bit for drive E has been reset.
Method 2. Use Registry Editor
To stop Windows 11 disk check every boot, you can try adjusting certain registry settings using the Registry Editor. Follow these steps:
1. Open the Run box by pressing Win + R, type regedit, and press Enter. Confirm by clicking Yes.
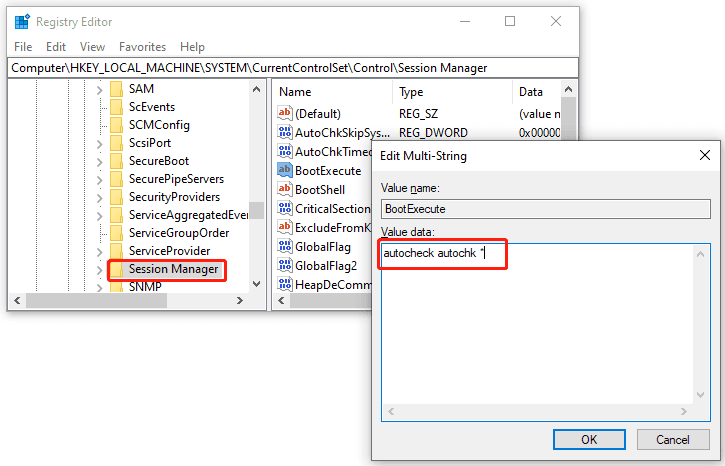
2. In the Registry Editor window, navigate to the following path on the left sidebar:
HKEY_LOCAL_MACHINE\SYSTEM\CurrentControlSet\Control\Session Manager
3. With the Session Manager folder selected, double-click the "BootExecute" string. Change the Value data from autocheck autochk * / to autocheck autochk *, and click OK to save the change.
Bonus tip: how to upgrade your disk with error in Windows 11/10
To solve physical errors like hard bad sectors that may damage your disk, the disk checking tool in Windows 11 can't repair them, it can only mark the sectors as unusable. For a more comprehensive solution, consider cloning your hard drive with bad sectors and upgrading to a new one using AOMEI Backupper Professional, which also supports Windows 10, 8, 7, XP, and Vista.
▶ Intelligent Clone: By default, it clones only used space on a hard drive to another drive, which will save you much space and makes it possible for you to clone larger HDDs to smaller SSDs.
▶ Live clone: It allows the clone task to work in the background, so the cloning process won't interrupt running programs in the Windows and you can work normally while cloning.
▶ Secure boot: After cloning, you can directly boot from the cloned SSD. Or you can create a bootable media to ensure boot successful.
Now download AOMEI Backupper, for server users please consider AOMEI Backupper Server.
Step 1. Open this software and navigate to Clone at the left-side menu and then choose Disk Clone.

Step 2. Select the hard drive with bad sectors as the source disk and then another disk to receive data on this disk.
Note: You will be told the target disk will be deleted, to avoid data loss, please backup files to an external hard drive first.

Step 3. Confirm the operation summary and click Start Clone to upgrade disk with error in Windows 11.
Conclusion
Windows 11 disk check every boot is the protection measure executed by Windows itselt, which also implies that there’s potential data loss dangers. So keep a regular backup for your computer is recommended.
Additionally, the check disk won’t repair the physical damage on your hard drives. At this time, upgrade it with another drive is promising. You can use AOMEI Backupper Profesional to help you. This software cannot only clone disk, but also offers flexibility to clone system, partitions as well.

