3 Ways: Move Programs to Another Drive for Windows 11
This article provides three ways to move programs to another drive on Windows 11. You can choose any of them to suit your needs! Please read carefully.
By Miya Updated on September 21, 2023
Why Moving Programs to Another Drive on Windows 11?
Are you encountering low disk space warnings on a specific internal disk in your Windows 11 system? Rest assured, this issue can be easily resolved by transferring certain programs to another drive. By doing so, you can eliminate performance issues and free up storage space, eliminating those bothersome messages.
It is generally recommended to maintain at least 15% to 20% free space on your primary drive, particularly the C drive. This ensures sufficient room for Windows 11 updates and system settings.
Fortunately, if you have available space on other disk drives, such as the D drive, transferring programs from the C drive to the D drive in Windows 11 is a straightforward process.
This enables you to continue using Windows 11 smoothly without the need to uninstall any programs. Let's explore the efficient methods for moving programs to another drive on Windows 11 computer.
How to Move Programs to Another Drive on Windows 11?
In this section we will provide three effective ways to move programs to another drive for Windows 11, please read carefully!
Method 1. Relocate Program Files to Another Drive Using Registry Editor
The initial method involves modifying the program file location during a clean installation of Windows, enabling you to move them from the C drive to another partition such as D drive. To accomplish this, follow these two steps:
- Create a folder named "Program Files (x86)" on the desired drive, for example, D drive.
- Copy the "Program Files" and "Program Files (x86)" directories to the new location. Open an elevated Command Prompt by running CMD as an administrator and execute the following commands:
- Robocopy "C:\Program Files" "D:\Program Files" /mir
- Robocopy "C:\Program Files (x86)" "D:\Program Files (x86)" /mir
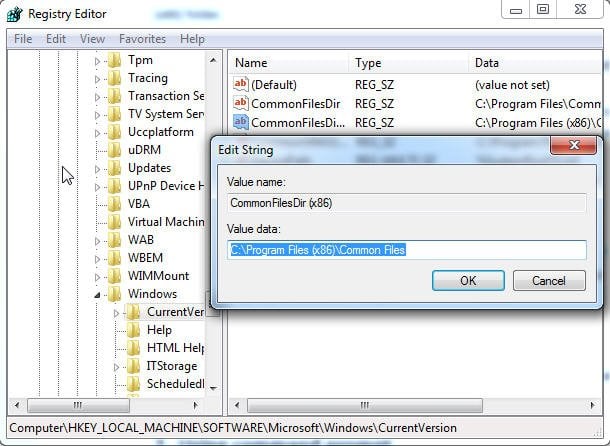
Once the directories are successfully copied, proceed to modify the program location from C drive to the desired drive using the Registry Editor. Follow these steps:
Step 1. Press "Win + R" to open the Run window, then type "Regedit.exe" and hit Enter.
Step 2. In the Registry Editor, navigate to the following path and change the drive letter from C to the desired one, such as D:
For Windows 7/8/8.1:
- HKEY_LOCAL_MACHINE\SOFTWARE\Microsoft\Windows\CurrentVersion
For Windows 10:
- HKEY_LOCAL_MACHINE\SOFTWARE\Wow6432Node\Microsoft\Windows\CurrentVersion
Now, you can move installed programs to another drive on Windows 11. If this method doesn't work, move to the next method.
Method 2. Relocate Program Files to a Different Drive Using MKLINK
The second method involves creating a symbolic link using the Command Prompt. Similar to shortcuts on the desktop, a symbolic link redirects Windows or any program to the new location when accessing the folder.
Follow these steps to securely move program files from C to D or from SSD to HDD:
Step 1. Move the "C:\Program Files" folder to "D:\Program Files".
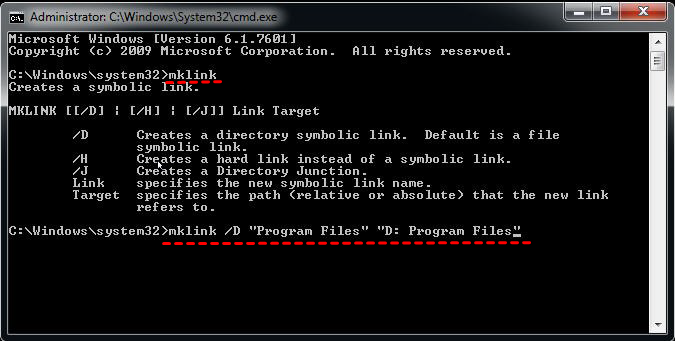
Step 2. Search for "cmd" in the search box, right-click on Command Prompt, and select "Run as administrator".
Step 3. Copy and paste the following command into the Command Prompt window and press Enter. If you are unfamiliar with the "mklink" command, you can learn about the necessary parameters.
- mklink /D "Program Files" "D:\Program Files"
Note: "Program Files" represents the name of your new symbolic link, and "D:\Program Files" is the path to which your new link refers.
After creating the symbolic link, you can set C:\Program Files as the default installation path, while all the installed files will be stored in D:\Program Files.
Additionally, you can utilize the mklink /J command to create a hard link, which makes the files or folders appear as if they actually exist at the location of the symbolic link. In the previous example, you can use the following command: mklink /J "Program Files" "D:\Program Files".
If you wish to delete the old program files, you can use the "mklink /j" command along with the full drive letter and path of both the old and new locations of the program files.
Method 3. Transfer Installed Program to Another Drive Using the "Move" Feature
This feature allows you to not only move programs from the C drive to the D drive but also move program files to another drive on Windows 11. Give it a try yourself. Here's how to do it:
Step 1. Open the Start menu, go to Settings, then select System and click on Apps & features. You will see a list of installed programs.

Step 2. Choose an app from the list and click on the Move option located below the specific app. Then, select a location on another drive where you want to move the program.
Step 3. Click on Move once again to initiate the relocation process.
Step 4. Repeat Step 2 and Step 3 for each program you wish to move until the last program has been successfully transferred to the new drive.
Backup OS before Moving Programs to Another Drive
When moving program files to another drive in Windows 11 or transitioning from an SSD to an HDD, there is a risk that your programs may cease functioning correctly. Therefore, it is crucial to safeguard your system and data by performing a backup. A reliable and widely-used free backup software called AOMEI Backupper Standard is highly recommended for this purpose.
With this software, you can effortlessly create an exact copy of your system using the System Backup feature. In case anything goes wrong during the process, you can easily restore the system image from an external hard drive or other devices. Additionally, the software allows you to create a bootable USB or CD/DVD, enabling you to boot your computer even in the event of a failure.
To ensure the protection of your operating system, please download and install AOMEI Backupper Standard on your computer. This software is compatible with Windows 11, 10, 8, and 7.
Tip: For server users, AOMEI Backupper Server is recommended.
Step 1. Open AOMEI Backupper Standard, and you will be greeted by its sleek deep-blue interface. Navigate to the Backup tab and click on System Backup. This option will automatically select all the boot-related partitions for Windows, including the programs and program files stored on them.

Step 2. In this step, simply choose the destination partition where you want to store the backup image. Once selected, click on Start Backup to initiate the backup process, which will capture everything on the specified partition according to your backup schedule.

✍Tip:
1. After a short wait, you will have successfully created a system image backup of your computer. To address concerns about potential boot failures resulting from moving program files, you can create a bootable USB or CD/DVD as a precautionary measure.
- Click on the "Tools" option within the software.
- Navigate to "Create Bootable Media" and click on it.
- Choose the desired type of bootable disc, such as Windows PE or Linux.
- Select the preferred storage device, whether it is a USB drive, CD/DVD, or an ISO file.
- Proceed by clicking "Next" at each step of the process.

2. Backup Scheme: You can modify the backup method from incremental backup to differential backup, eliminating the need to have all the backup files intact for system recovery. Furthermore, you can implement a regular deletion of old backup images to ensure that your backup disk consistently maintains sufficient space for new backups. To access these features, upgrading to higher editions of the software is recommended.
✈ How to Recover from System Failures Caused by Migrating Program Files
If your computer encounters boot failure after moving program files, you can resolve the issue by following these steps:
Step 1. Restart your computer and access the BIOS settings. Set the bootable USB as the primary boot option, save the changes, and boot from the USB.
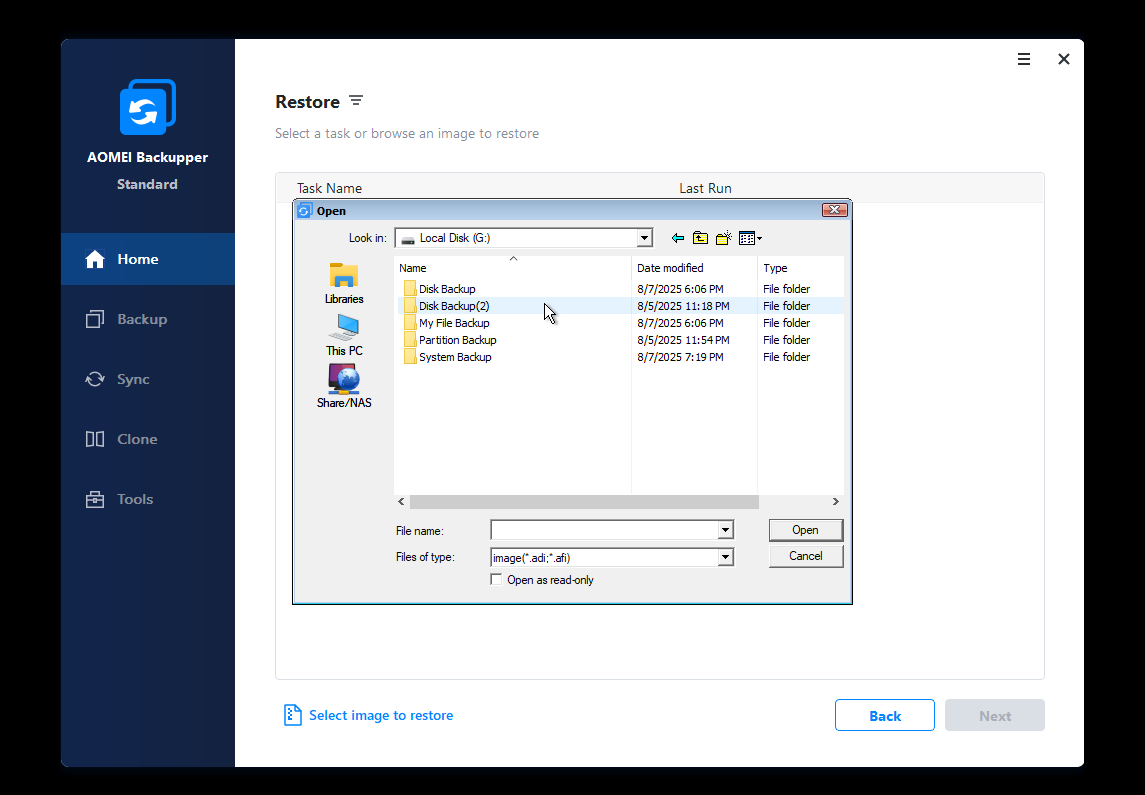
Step 2. Select the Restore option and then locate the backup image file. Choose "Restore this system image" and specify the destination path for the restoration process. Finally, click on "Start Restore" to initiate the restoration process.
Summary
In this article, we present three useful methods to move programs to another drive in Windows 11/10/8/7. You have the option to choose one of these methods or try them all. However, it's essential to prioritize the stability of your system and programs by creating a system image in Windows 11 or any other operating system you are using.
By doing so, you can easily restore your computer to an earlier date without the need for reinstalling Windows and programs. Take this opportunity to give it a try now and ensure the smooth functioning of your system and programs.

