How to Upgrade Motherboard and CPU without Reinstalling Windows | 3 Ways
Don't know how to upgrade the motherboard and CPU without reinstalling Windows 10, 8, 7? Read this guide to get three methods to help you keep current Windows installation, settings and programs after replacing motherboard and CPU.
By Delia Updated on September 2, 2025
I would like to upgrade the motherboard and CPU of my computer, which runs Windows 10. However, I would prefer to avoid reinstalling the operating system. The OS is installed on an M.2 NVMe drive on an AM3+ socket motherboard, and I will be upgrading to an AM4 socket motherboard.
In this post, we compiled some related information you may be concerned, about and three methods to help you know how to upgrade the motherboard and how to successfully replace motherboard and CPU without reinstalling Windows.
Can you upgrade the motherboard and CPU without reinstalling Windows? The answer is yes.
The normal way of upgrading the motherboard and CPU may cause a boot failure. In the following content, you will get to know the step-by-step instructions and preparations on how to upgrade the motherboard and CPU while keeping the Windows OS.

Important: will Windows stay activated after replacement?
Knowing if your Windows version will get auto-activated will save you a lot of trouble reinstalling work.
There are three types of Windows license keys, Retail, OEM, and Volume. A retail license is the one you purchase from a local store or online retailer, an OEM license is preinstalled on a new computer by the manufacturer, and a Volume license is distributed in bulk to large organizations.
Generally, a Retail or Volume license will get automatically activated when connecting to the Internet. However, an OEM key is locked to the original hardware, and cannot be transferred to a new motherboard. In this case, you may need to purchase a new key.
*Please note that even if you are using a Retail key, there are chances that you encounter activation problems and need to contact Microsoft support for further troubleshooting.
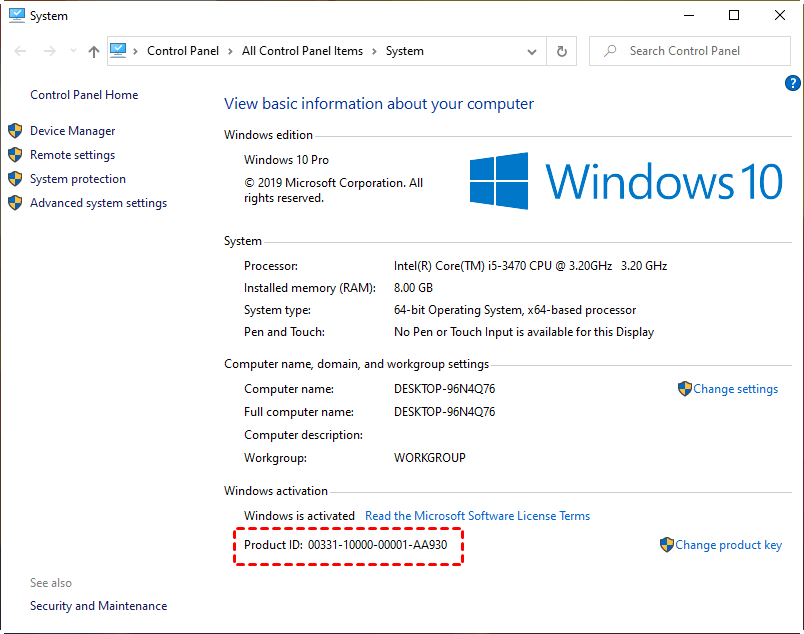
How to check your license type
To check your license key, right-click on My Computer or This PC in Windows 10 and select Properties, then scroll down to the bottom of the screen and view the Product ID. If you see OEM in the second group, then it is an OEM license key. Otherwise, it is retail or volume.
If your computer is pre-installed with Windows 10/8/7, usually it is OEM key. If you bought your license from Microsoft, it is a retail key. Volume keys are purchased by large companies or organizations.
When it comes to upgrading the motherboard without reinstalling Windows 11/10/8/7, you have a few options to consider. One method involves performing a universal restore, which is the simplest approach. The other two methods involve using the Registry Editor, which might require more technical know-how.
Way 1. Replace the motherboard without reinstalling Windows (Easiest)
Universal Restore, a feature found in backup software like AOMEI Backupper, offers a solution for restoring a Windows system to another computer with different hardware configurations.
This feature ensures that your computer can boot up successfully without needing to adjust any settings. To utilize Universal Restore, simply create a backup of the original system and proceed to restore it after replacing the CPU and motherboard. This straightforward process streamlines the transition, allowing you to retain your system's functionality with minimal hassle.
It works like Windows bare metal recovery. The difference is that AOMEI Universal Restore is more convenient without restrictions.
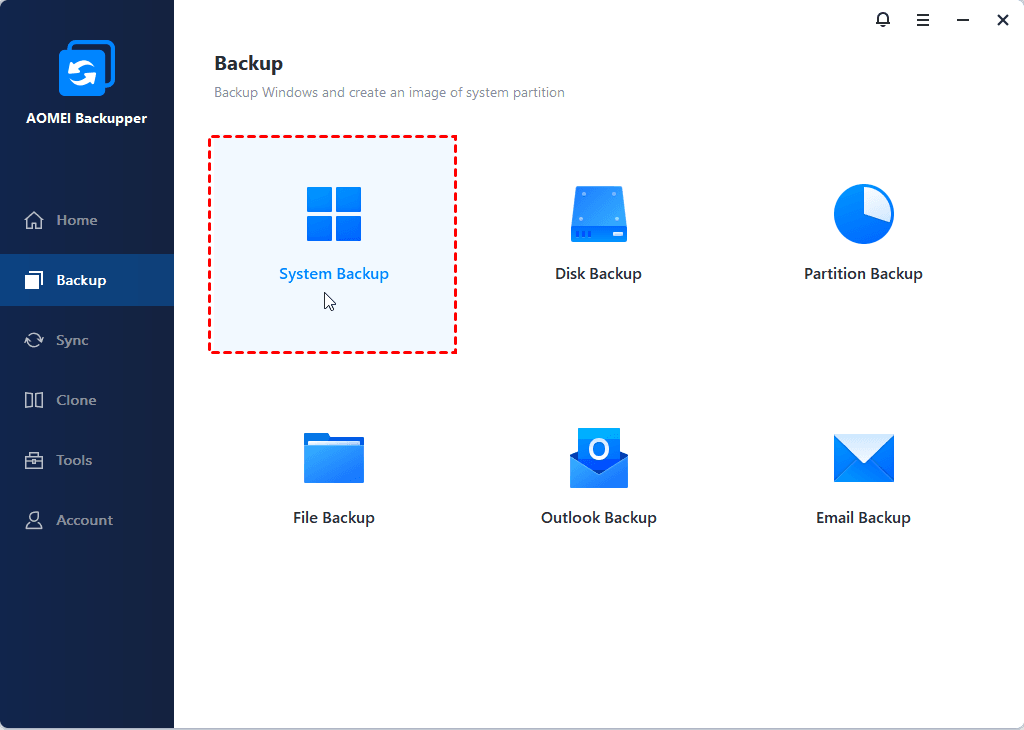
Step Ⅰ: Perform a system backup for universal restore
1. Download and run AOMEI Backupper.
2. Click System Backup under the Backup tab. It will automatically select the needed items as the backup source.
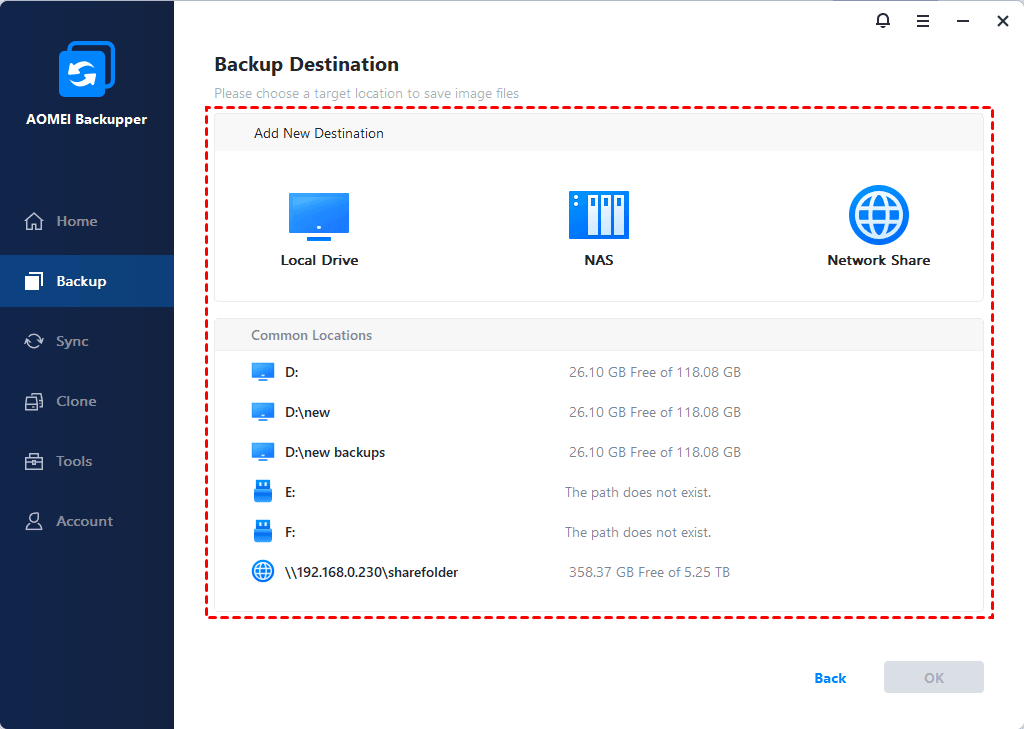
3. Select the destination path for your backup and click Start Backup. You can backup to external hard drive or the original hard drive, or even a network path.
Step Ⅱ: Create bootable media for universal restore
After replacing the motherboard and CPU, your Windows may fail to boot, so you need to create a bootable media in advance.
Go to Tools > Create Bootable Media to make it.

Tips: If you don't want to create a bootable media, you can go to Tools > Recovery Environment to enable the boot option of the AOMEI Backupper recovery environment. It also allows you to boot into Windows PE and perform backup/restore.
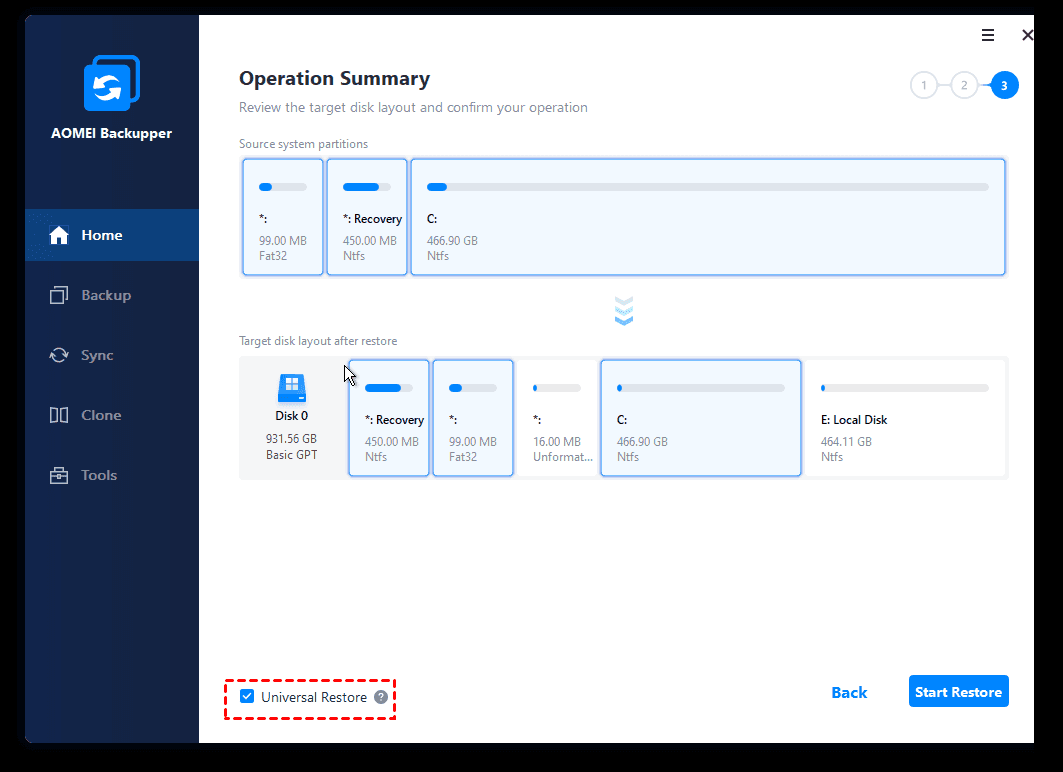
Step Ⅲ: Start a universal restore
1. Press DEL or F2 repeatedly at computer startup to change the boot order and set the bootable disk you created as the first boot option.
2. Then it will load the main interface of AOMEI Backupper. Click Home > Restore and select the backup task or click Select image to restore to select the backup created before.
3. Now, you need to decide how to restore the backup image. Here are two ways: Restore this system backup or Restore a partition in this system backup. You can choose one according to your needs.
4. Before starting the restore, make sure the option Universal Restore is checked.
This method can also be used to transfer OS from old computer to a new one with dissimilar hardware.
Way 2. Upgrade the motherboard without reinstalling Windows by Registry
Before replacing motherboard and CPU in Windows 8/10 or Server 2012, you need to change the msahci key in Registry, because it has been replaced by StorAHCI in these systems. As you may know, modifying the Registry improperly may result in serious issues, so you better create a full system image backup beforehand.
Step Ⅰ: link Windows account to online Microsoft account
Only when you link your Windows 10/8 account to a Microsoft account, you can reactivate your Windows after upgrading your motherboard and CPU. So, please remember to link the account first with the following steps.
1. Click Start > Settings >Update & security, then click Activation in the left panel.
2. Click Add an Account in the right panel and sign-in with your Microsoft account.
Step Ⅱ: modify the Registry and change the motherboard.
1. Press “Windows + R” keys to open the Run dialog box, type “regedit” and then press Enter.

2. Within Registry Editor, navigate to the following key.
HKEY_LOCAL_MACHINE\SYSTEM\CurrentControlSet\services\storahci
3. At the right pane, double-click Start and change its value from whatever to 0.
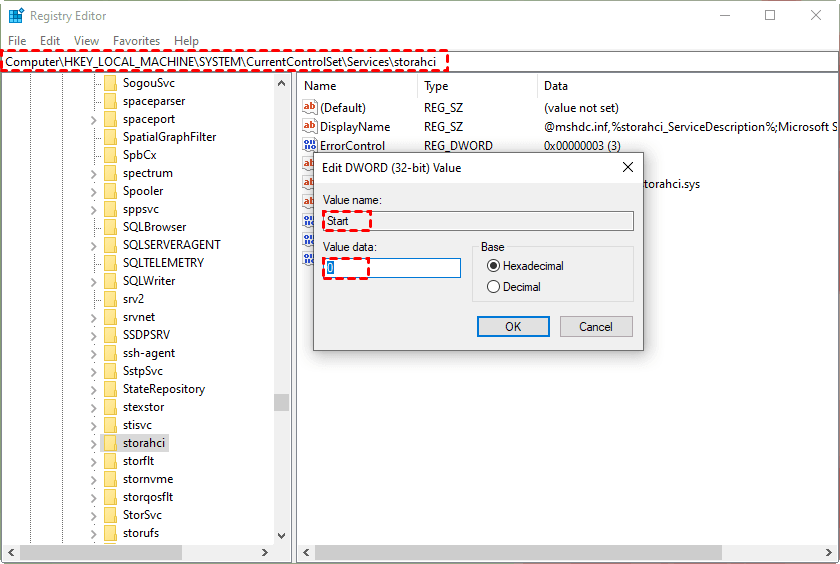
4. Also, change the following Key's Start DWORD value data to 0:
HKEY_LOCAL_MACHINE\SYSTEM\CurrentControlSet\services\pciide
5. Save the changes and exit the Registry editor.
6. Shut down the computer and replace the hardware. Then you should be able to boot Windows successfully.
Step Ⅲ: activate your Windows after replacing the motherboard and CPU
You may need to reactivate Windows 10/8 after upgrading the motherboard, just follow the steps below to make it. (Windows 7 will most likely reactivate by itself, so there is nothing to worry about.)
1. Upgrade the motherboard and tell Windows 10 to reactivate after the boot: Settings > Update & security > Troubleshoot > I changed hardware on this device recently.
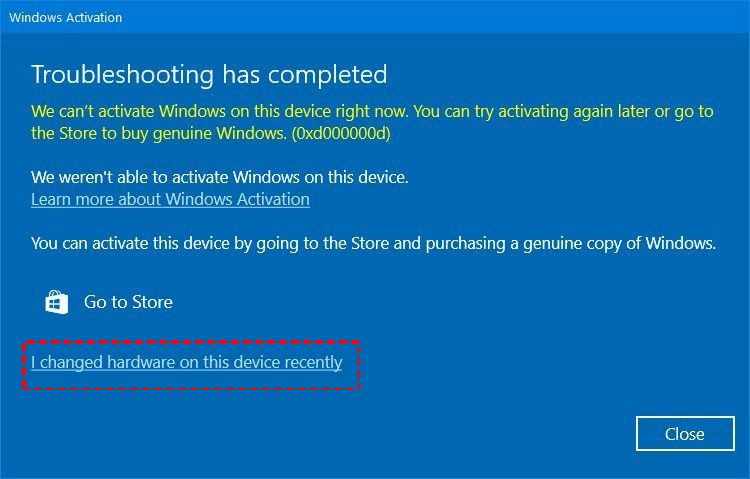
2. Sign in to your Microsoft Account again and click the Active button. Then it will grab the activation key from your online Microsoft account.
3. Change your Windows 10/8 account back to the Local Account if you want.
This method will also work when you want to move a hard drive to a new computer without reinstalling Windows.
Way 3: Upgrade the motherboard and CPU via Offline Registry
If you've encountered a boot failure after upgrading your motherboard and CPU without editing the Registry beforehand, don't worry - this method is for you. Simply prepare an installation disc and boot your computer from it. Once you've accessed the installation environment, you can easily modify the Registry to resolve the boot issue.
This straightforward approach ensures that you can address the problem and get your computer up and running smoothly again. Check the methods below for how to upgrade the motherboard:
1. Start your computer from the installation disc, press F2 or Del repeatedly to enter BIOS, set the disc as the first boot option, then press F10 to save changes and restart.
2. Set language and other settings, then click Repair your computer to move on.
3. Select Troubleshoot > Advanced options > Command Prompt subsequently.
4. Type regedit and press Enter to open Registry Editor.
5. Highlight the HKEY_LOCAL_MACHINE key and choose File and Load Hive.
6. Go to the system drive and open system file. Usually, the path is C:\Windows\system32\config\system.
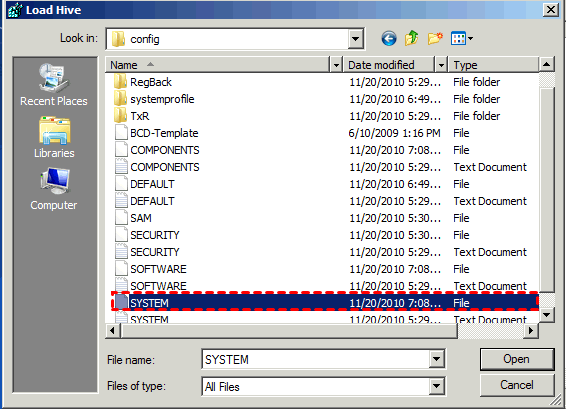
7. Type a key name, here is Offline, and click OK to save it.
8. Go to the following keys in order and set the start value of them to 0.
HKEY_LOCAL_MACHINE\Offline\ControlSet001\services\storahci
HKEY_LOCAL_MACHINE\Offline\ControlSet001\services\pciide
9. Highlight the Offline key, then choose File and Unload Hive to write back the changes you made. Finally, close the Registry Editor.
10. Restart your computer to change the BIOS settings, remove the disc, and run your computer as normal.
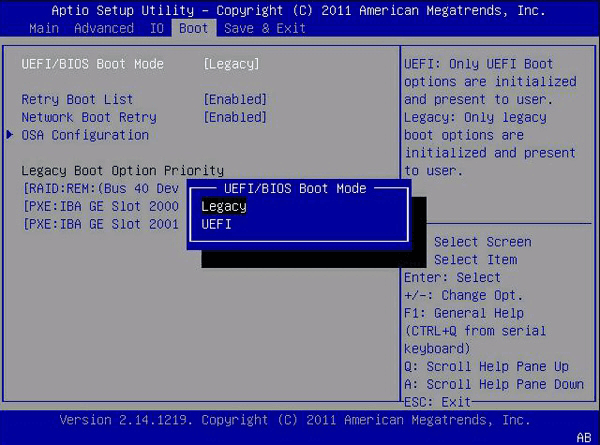
Update: Windows 11/10 won't boot after motherboard upgrade
If your Windows 11/10 won't boot after upgrading the motherboard, it could be due to a mismatch in boot modes. This often happens when the original motherboard uses Legacy BIOS mode, but the new one is set to UEFI. To troubleshoot this issue, restart your computer and access the BIOS settings. Navigate to the Boot menu and adjust the boot mode priority to match the configuration of your new motherboard.
For instance, if your original setup was Legacy BIOS and the new one is UEFI, set UEFI as the alternate boot mode. By making this adjustment, you can resolve the booting problem and ensure smooth operation of your system.
FAQs about how to upgrade the motherboard
1. How can you determine which motherboard you can upgrade to?
When considering a motherboard upgrade, the primary thing to check is the CPU socket type. For instance, if you have an Intel CPU, you'll need a motherboard with the same socket type as your current one. The same applies to AMD CPUs. Additionally, ensure that your RAM is compatible with the new motherboard.
2. Are all motherboards compatible with every GPU?
In general, most GPUs are compatible with most motherboards. If they're from the same manufacturer, they should work seamlessly together. Most brands are also compatible with others, like MSI motherboards with Asus GPUs, for example.
3. What is the best motherboard for gaming?
For Intel gaming setups, the MSI MAG Z790 Tomahawk WiFi is highly recommended. If you're using an Intel Z690 chipset, the Gigabyte Z690 Aorus Pro is a top choice. For those opting for an Intel B760 motherboard, the Asrock B760M PG Sonic WiFi stands out. For AMD X670 gaming rigs, the Gigabyte X670 Aorus Elite AX is a top pick. If you're looking for a budget-friendly option for an AM5 board, consider the Asus TUF Gaming B650 Plus WiFi.
Conclusion
That’s all for how to upgrade the motherboard and CPU without reinstalling Windows 10/8/7. You have three different methods to choose from, making it easier to achieve your desired outcome. Each method offers its advantages and considerations, so be sure to pick the one that best fits your needs. With these options, you can seamlessly improve your computer's performance without the hassle of reinstalling the operating system.
AOMEI Backupper is the easiest way for most users. You just need to make a backup and then restore the backup to the transfer system.
Windows built-in utility Registry Editor can also help you make it. However, the whole process is kind of complicated and also time-consuming. In addition, it’s full of risks. Any improper operation may lead to serious issues. Please remember to make a backup in advance.
If you want to protect unlimited computers within your company, you can pick AOMEI Backupper Technician. With the inbuilt AOMEI Image Deploy tool, you are also allowed to deploy/restore system image file on server-side computer to multiple client-side computers over a network.

